In this post, I will show you how to implement ASP.NET Core Entity Framework Repository Pattern in a WEB API if you are not familiar with ASP.NET Core web API, No need to worry I will show you how to do that using the steps below.
Repository pattern is a way to create better code architecture. This pattern will focus on the interface instead of using the actual class of your methods. This architecture will allow us to easily change the implementation of the method inside an interface if ever you might want to change it later. The interface is consists of static methods, inputs and return type. I will demonstrate it by creating an ASP.NET Core Web API project.
Note: I created this project using Visual Studio Code. Make sure you have it installed in your machine. If not Visual Studio would also be fine.
I. Create ASP.NET Core Web API project
- Create a new folder for your project.
- Open a command prompt and navigate to your folder location using the cd command. (ex. cd folder name)
- Type “code .”, this will open your project directory inside visual studio code.
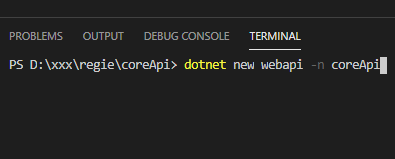
- Open Visual Studio Code Terminal and create a new ASP.NET Core web API project using this command “dotnet new webapi -n coreApi”.
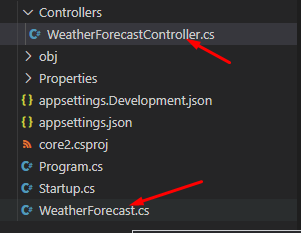
5. You can remove sample controller WeatherForecastController to start a clean project solution. See the image below.
We also need this packages. Install this package using the command below.
dotnet add package Microsoft.AspNetCore.Identity.EntityFrameworkCore
dotnet add package Microsoft.EntityFrameworkCore
dotnet add package Microsoft.EntityFrameworkCore.Design
dotnet add package Microsoft.EntityFrameworkCore.SqlServer
Create ASP.NET Core in Visual Studio using CLI
II. Setup Database Connection for Entity Framework
1. Add your SQL database connection string inside your appsettings.json.
"ConnectionStrings": {
    "default": "Data Source=DESKTOP-4DU98BI\SQLEXPRESS01;User ID=username;Password=password;Connect Timeout=30;Encrypt=False;TrustServerCertificate=False;ApplicationIntent=ReadWrite;MultiSubnetFailover=False"
  },
2. Configure your application to Use SQL Server in your Startup.cs. Put the code below inside ConfigureServices method.
string connectionString = Configuration.GetConnectionString("default");
services.AddDbContext<AppDBContext>(c => c.UseSqlServer(connectionString));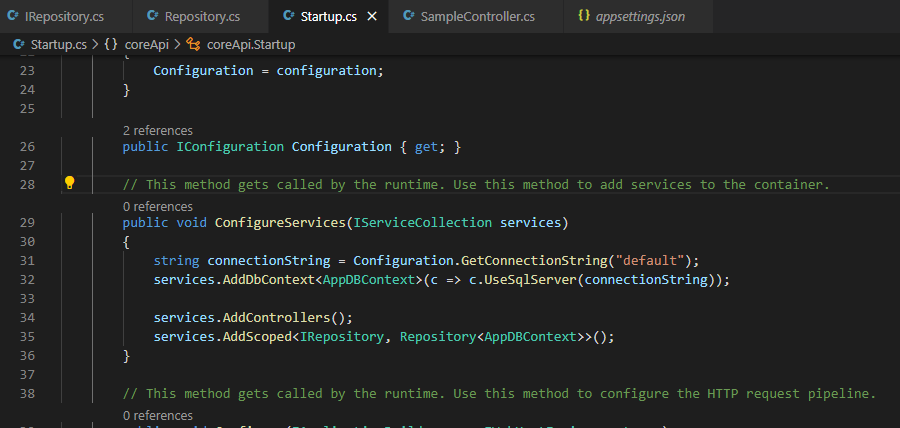
III. ASP.NET Core Entity Framework Repository Pattern Structure
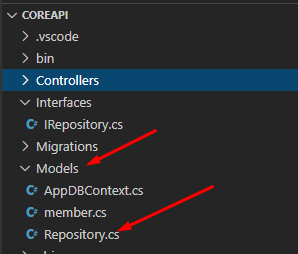
- Create a folder Interfaces, then create repository Interface class this will contains a method for essential CRUD functions.

Below are the methods declare on our IRepository interface:
| Method | Description |
| SelectAll | Select all record |
| SelectById | Select record by id |
| CreateAsync | Insert record |
| UpdateAsync | Update record by id |
| DeleteAsync | Delete record by id |
IRepository.cs
using System.Collections.Generic;
using System.Threading.Tasks;

namespace coreApi.Interfaces
{
    public interface IRepository
    {
        Task<List<T>> SelectAll<T>() where T : class;
        Task<T> SelectById<T>(long id) where T : class;
        Task CreateAsync<T>(T entity) where T : class;
        Task UpdateAsync<T>(T entity) where T : class;
        Task DeleteAsync<T>(T entity) where T : class;
    }
}
2. Configure Interface Implementation class by creating a Models folder then create a class named Repository. This class will serve as the implementation method for the IRepository interface. We will configure this class to accept the DBContext parameter; this way, we can easily change DBContext if we change our database. All method from this class will take a model entity to map to a table from the database.
using System.Collections.Generic;
using System.Threading.Tasks;
using coreApi.Interfaces;
using Microsoft.EntityFrameworkCore;

namespace coreApi.Models
{
    public class Repository<TDbContext> : IRepository where TDbContext : DbContext
    {
        protected TDbContext dbContext;

        public Repository(TDbContext context)
        {
            dbContext = context;
        }

        public async Task CreateAsync<T>(T entity) where T : class
        {
            this.dbContext.Set<T>().Add(entity);

            _ = await this.dbContext.SaveChangesAsync();
        }

        public async Task DeleteAsync<T>(T entity) where T : class
        {
            this.dbContext.Set<T>().Remove(entity);

            _ = await this.dbContext.SaveChangesAsync();
        }

       public async Task<List<T>> SelectAll<T>() where T : class
        {
            return await this.dbContext.Set<T>().ToListAsync();
        }


        public async Task<T> SelectById<T>(long id) where T : class
        {
            return await this.dbContext.Set<T>().FindAsync(id);
        }

        public async Task UpdateAsync<T>(T entity) where T : class
        {
            this.dbContext.Set<T>().Update(entity);

            _ = await this.dbContext.SaveChangesAsync();
        }
    }
}
3. Create a member model, later on we will create a migration and update database using this model to create a table.
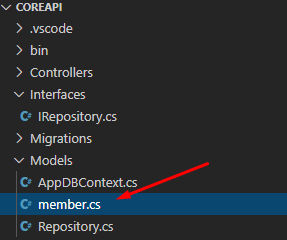
member.cs
using System.ComponentModel.DataAnnotations;
using System.ComponentModel.DataAnnotations.Schema;

namespace coreApi.Models
{
    public class member
    {
        [Key]
        public long Id { get; set; }
        [Column(TypeName = "nvarchar(50)")]
        public string FirstName { get; set; }

        [Column(TypeName = "nvarchar(50)")]
        public string LastName { get; set; }

        [Column(TypeName = "nvarchar(50)")]
        public string MiddleName { get; set; }
    }
}
4. Create a DBContext class inside Models folder name it AppDBContext, this class handles the Database connection.
AppDBContext.cs
using Microsoft.AspNetCore.Identity.EntityFrameworkCore;
using Microsoft.EntityFrameworkCore;
using coreApi.Models;
namespace coreApi.Models
{
    public class AppDBContext: DbContext
    {
        private readonly DbContextOptions _options;
        public AppDBContext(DbContextOptions options) : base(options)
        {
            _options = options;
        }

        public DbSet<member> members { get; set; }

       protected override void OnModelCreating(ModelBuilder modelBuilder)
       {
         base.OnModelCreating(modelBuilder);
       }

    }
}
5. To be able to link IRepository and Repository class, we need to add scope inside ConfigureServices from your Startup.cs. We also need to pass the DBContext parameter to the Repository class. Copy the code below to your Startup.cs.
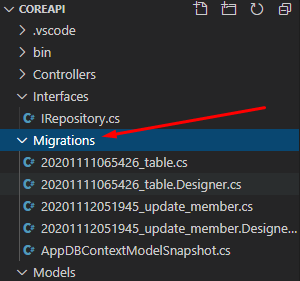
services.AddScoped<IRepository, Repository<AppDBContext>>();6. Create a migration. Open Visual Studio Code terminal and execute the command below.
dotnet ef migrations add create_table_memberThis command will create a Migrations folder and class that contains SQL scripts for Database tables, which in this case is the member table.
7. Execute Database Update. This method create the Database and tables from the migration file that we created in step 6.
dotnet ef database update8. Create a Sample Controller. In my case, I name it SampleController. Open the file and paste the code below. This code calls the DBContext and scoped that we set up from our Startup.cs. Instead of using the actual implementation, we are going to use the interface class, which is the IRepository.

 private readonly IRepository _repository;
 public SampleController(AppDBContext context, IRepository repository)
 {
    _repository = repository;
 }
9. This step, we will create a CRUD function using the implementation of our Repository Class. If you still remember from step 2, we configure our Repository class to accept model entity, so in every method, we pass the member model which represent the table entity were we want to select, Insert, update and delete a data.
SampleController.cs
using System;
using System.Collections.Generic;
using System.Threading.Tasks;
using coreApi.Interfaces;
using coreApi.Models;
using Microsoft.AspNetCore.Mvc;
using Microsoft.Extensions.DependencyInjection;
namespace coreApi.Controllers
{
[ApiController]
[Route("api/[controller]")]
public class SampleController : ControllerBase
{
private readonly IRepository _repository;
public SampleController(AppDBContext context, IRepository repository)
{
_repository = repository;
}
[HttpGet]
public async Task<ActionResult<IEnumerable<member>>> GetMember(int page = 0, int pageSize = 5)
{
var model = await _repository.SelectAll<member>();
return model;
}
[HttpGet("{id}")]
public async Task<ActionResult<member>> GetMember(long id)
{
var model = await _repository.SelectById<member>(id);
if (model == null)
{
return NotFound();
}
return model;
}
[HttpPut("{id}")]
public async Task<IActionResult> UpdateMember(long id, member model)
{
if (id != model.Id)
{
return BadRequest();
}
await _repository.UpdateAsync<member>(model);
return NoContent();
}
[HttpPost]
public async Task<ActionResult<member>> InsertMember(member model)
{
await _repository.CreateAsync<member>(model);
return CreatedAtAction("GetMember", new { id = model.Id }, model);
}
[HttpDelete("{id}")]
public async Task<ActionResult<member>> DeleteMember(long id)
{
var model = await _repository.SelectById<member>(id);
if (model == null)
{
return NotFound();
}
await _repository.DeleteAsync<member>(model);
return model;
}
}
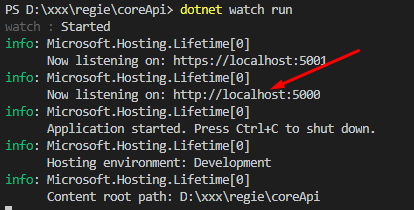
}Now, You have successfully Implemented an ASP NET Core Entity Framework Repository Pattern in a WEB API. To test your application, run your project using the command below.
| Command | Description |
| dotnet build | Build Project Solution |
| dotnet run | Run Solution |
| dotnet watch run | Run solution and watch for any changes in your project |
You can access the method using the url below. Root address might be different from your end you can verify it once you run your project.
| Url | Controller Method | Http Method |
| http://localhost:5000/api/Sample/ | GetMember | HttpGet |
| http://localhost:5000/api/Sample/ | InsertMember | HttpPost |
| http://localhost:5000/api/Sample/ | UpdateMember | HttpPut(“{id}”) |
| http://localhost:5000/api/Sample/{id} | GetMember(long id) | HttpGet(“{id}”) |
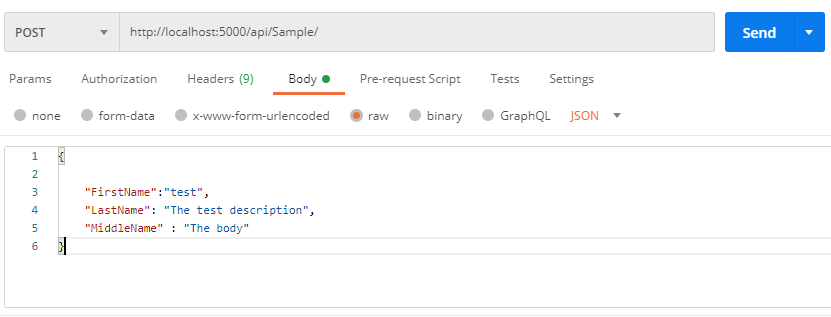
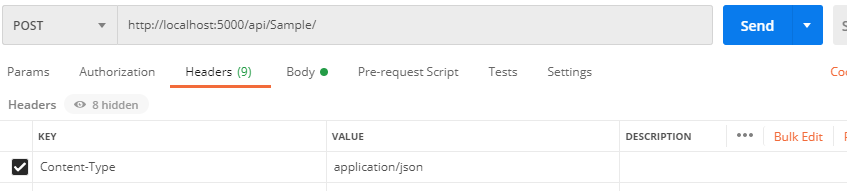
For the post method, you need to put the parameter inside the request body and use application/JSON for the headers Content-Type. Below is a sample postman request.
Request Headers
Source Code: GitHub link
Conclusion
Repository pattern makes your code structure more flexible and reusable. This technique allows you to use an interface instead of using the actual class for your methods. That means by using the interface, you are pre structuring all the inputs and return value of specific methods. And create a class and extend it using this interface to have the actual implementation. This structure will help you to change the implementation of every method with less modification easily.
Hope this helps and share if you think this was helpful. Please also do visit my Blog Page for my other ASP.NET Core tutorials.