In this tutorial, we will implement a CRUD functionality with JWT Authentication in ASP NET Core WEB API and use JWT Bearer Authorization in Swagger for testing. In the past, we’ve created an article that uses JWT Authentication in ASP.NET Core, which can be found here. This tutorial just extends that topic and adds swagger to test our Web API project. We will also include how to configure Swagger to accept a Header Authorization to test the method within our API with Authorize attributes.
- What is Swagger?
- I. Create and Setup a new ASP.NET Core Web API
- II. Setup Appsettings.Json
- III. Register JWT base authentication
- IV. Create Model properties
- V. Create Table and Stored Procedures
- VI. Create Repository Class
- VII. Create AccountController
- VIII. Configure Swagger to accept Header Authorization
- Summary
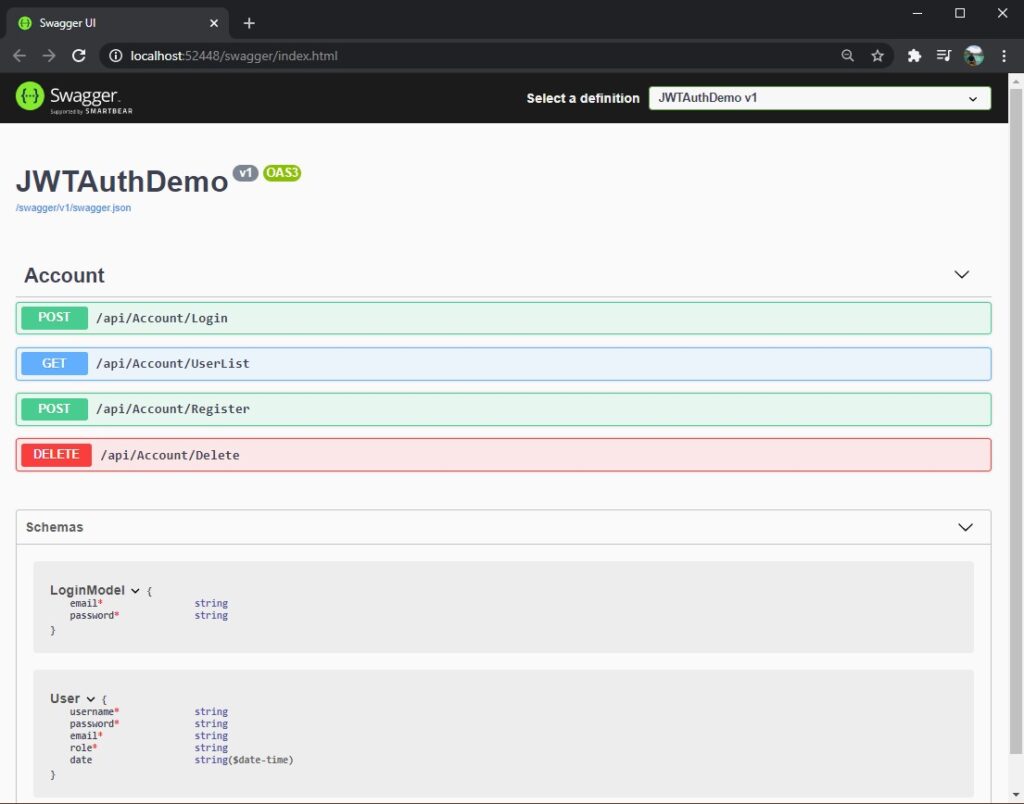
What is Swagger?
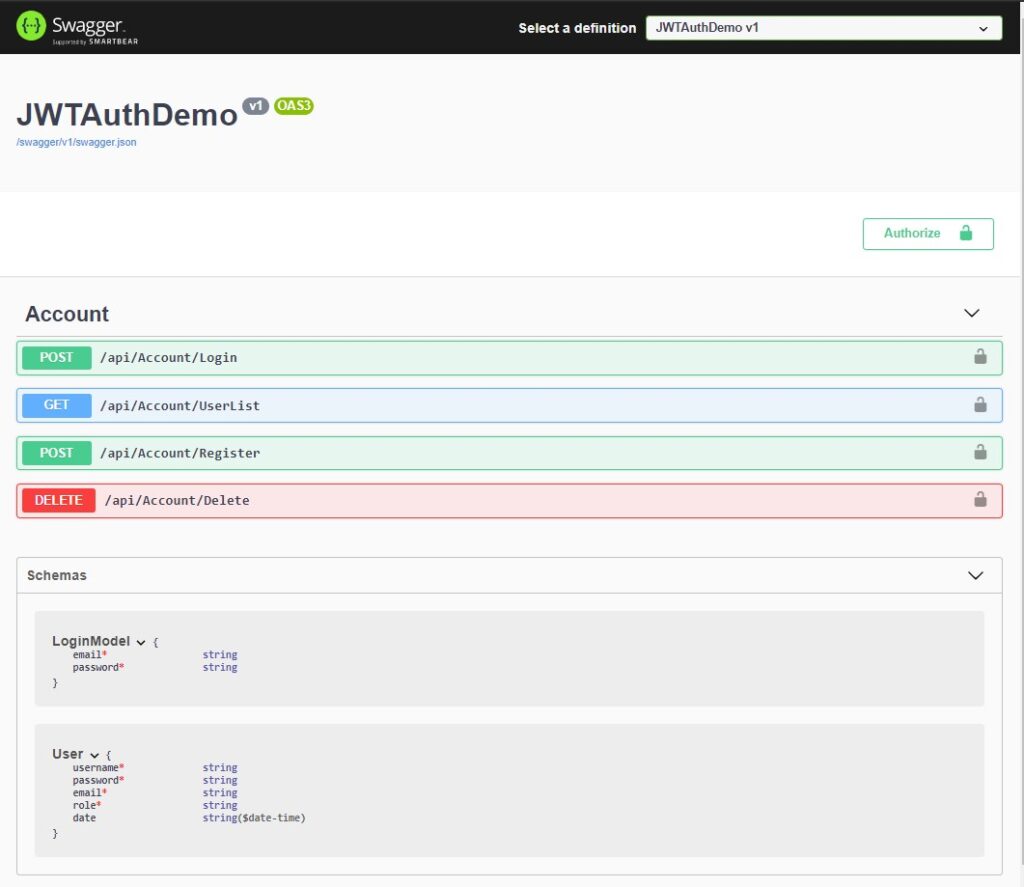
Swagger is an open-source set of rules, specifications, and tools for developing and describing RESTful APIs. The Swagger framework allows developers to create interactive, machine, and human-readable API documentation. Below is the swagger UI with our default methods and properties or this tutorial.
Before we start please make sure you have the following installed on your machine.
- The latest version of Visual Studio
- Alternatively, you can also use the Visual Studio Code.
- SQL Server
In this tutorial, I am going to use Visual Studio 2019. Below is the video from my previous article on how to implement JWT Auth in ASP.NET Core.
I. Create and Setup a new ASP.NET Core Web API
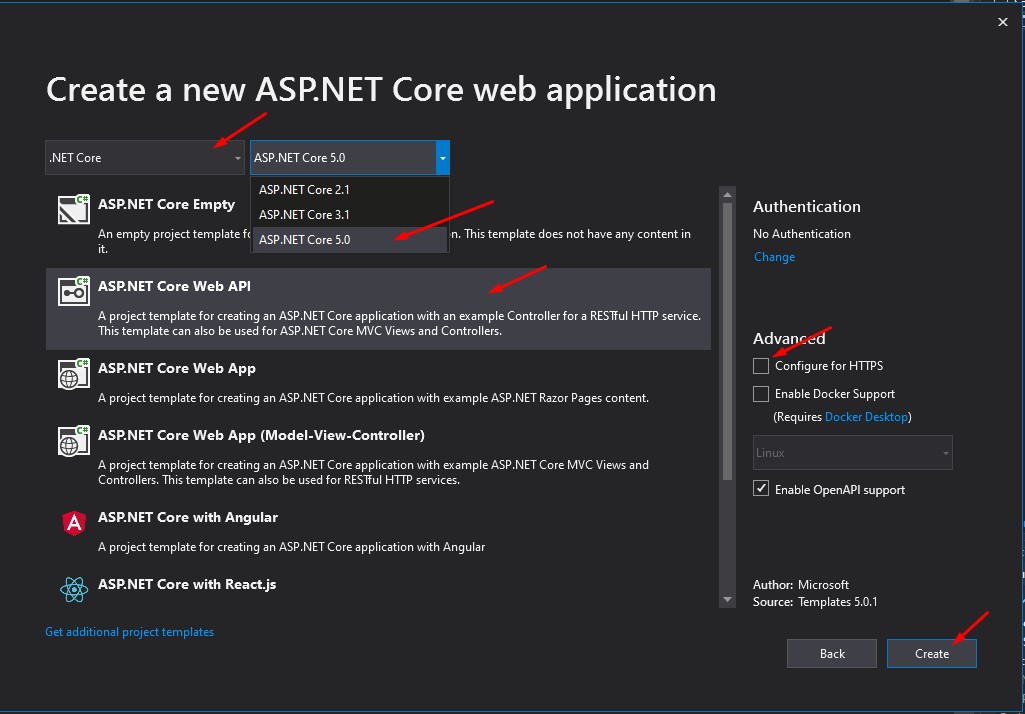
- First, create your ASP.NET Core Web API. To do that just follow the steps below.
- Select File > New > Project.
- Select ASP.NET Core Web Application. Name the project JWTAuthDemo to have the same namespace as my project. Click OK.
- Select API and then uncheck Configure for HTTPS.
- Lastly, Click on Create.
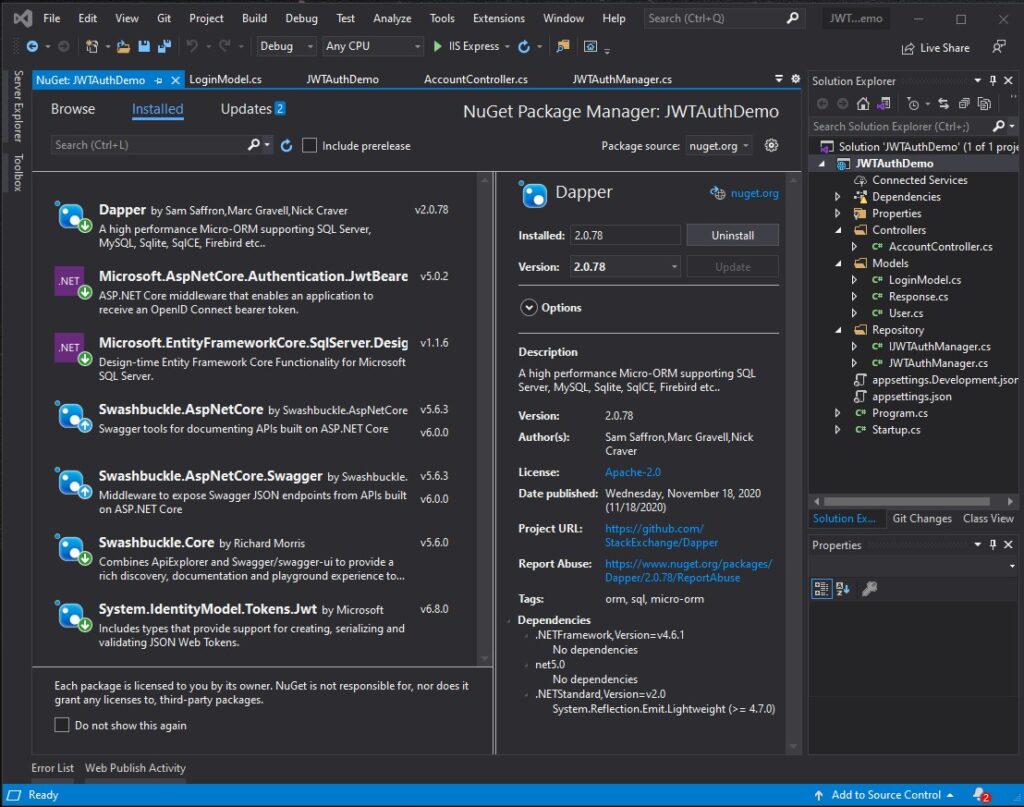
2. Now we need to install required packages for this project. I have listed it all below.
- Dapper
- Microsoft.EntityFrameworkCore.SqlServer.Design
- Microsoft.AspNetCore.Authentication.JwtBearer
- Swashbuckle.AspNetCore
- Swashbuckle.AspNetCore.Swagger
- Swashbuckle.Core
- System.IdentityModel.Tokens.Jwt
Use NuGet Package Manager to install this package. If this is your first time using this, you can visit this article.
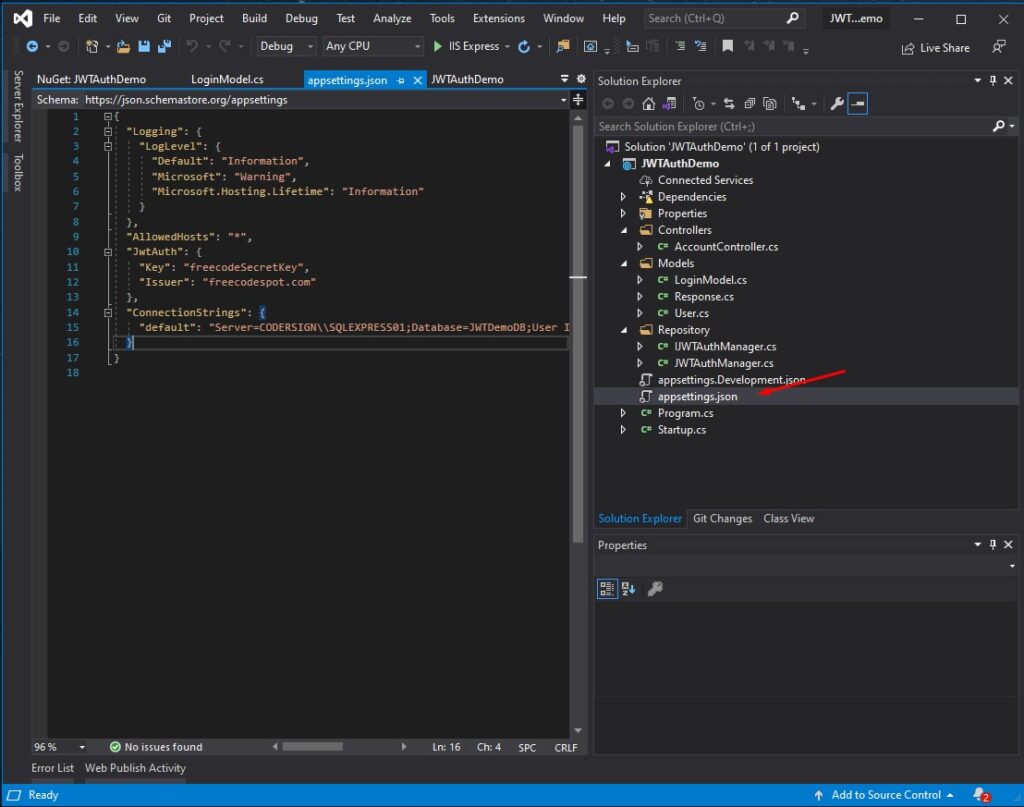
II. Setup Appsettings.Json
After installing all the necessary packages that we need, add your SQL connection string and JWT Auth key inside appsettings.json.
"JwtAuth": {
     "Key": "freecodeSecretKey",
     "Issuer": "freecodespot.com"
   },
   "ConnectionStrings": {
     "default": "Server=CODERSIGN\SQLEXPRESS01;Database=JWTDemoDB;User Id=freecode;Password=freecodespot;"
   }
We will use this later on the code part of this tutorial. See the screenshot below.
III. Register JWT base authentication
First, we need to configure JWT based authentication in our project. To do that, register JWT authentication on your startup.cs. Put the code snippet below under ConfigureServices.
services.AddAuthentication(JwtBearerDefaults.AuthenticationScheme)
            .AddJwtBearer(options =>
            {
                options.TokenValidationParameters = new TokenValidationParameters
                {
                    ValidateIssuer = true,
                    ValidateAudience = true,
                    ValidateLifetime = true,
                    ValidateIssuerSigningKey = true,
                    ValidIssuer = Configuration["JwtAuth:Issuer"],
                    ValidAudience = Configuration["JwtAuth:Issuer"],
                    IssuerSigningKey = new SymmetricSecurityKey(Encoding.UTF8.GetBytes(Configuration["JwtAuth:Key"]))
                };
});- ValidateIssuer = true » Validate the server that generates the token.
- ValidateAudience = true » Validate the recipient of the token is authorized to receive.
- ValidateLifetime = true » Check if the token is not expired and the signing key of the issuer is valid
- ValidateIssuerSigningKey = true » Validate signature of the token
- ValidIssuer » stored in appsettings.json
- ValidAudience » stored in appsettings.json
- IssuerSigningKey » stored in appsettings.json
IV. Create Model properties
Let’s create model properties for this project. We will use this model later to handle request parameters and response in our web API. See the code snippet below.
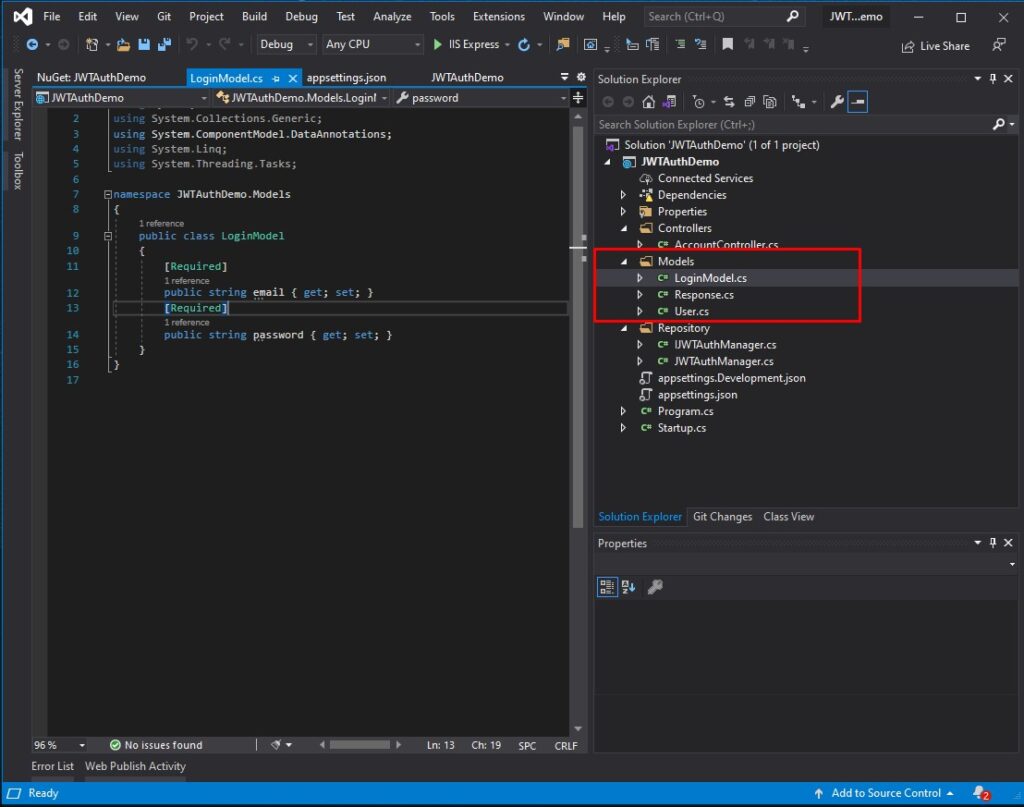
LoginModel
This model will handle the parameter request for our API login method.
using System;
 using System.Collections.Generic;
 using System.ComponentModel.DataAnnotations;
 using System.Linq;
 using System.Threading.Tasks;
 namespace JWTAuthDemo.Models
 {
     public class LoginModel
     {
         [Required]
         public string email { get; set; }
         [Required]
         public string password { get; set; }
     }
 }
User
This Model will handle the response from our tbl_users table
using System;
 using System.Collections.Generic;
 using System.ComponentModel.DataAnnotations;
 using System.Linq;
 using System.Threading.Tasks;
 namespace JWTAuthDemo.Models
 {
     public class User
     {
         [Required]
         public string Username { get; set; }
         [Required]
         public string Password { get; set; }
         [Required]
         public string Email { get; set; }
         [Required]
         public string Role { get; set; }
         public DateTime Date { get; set; } = DateTime.Now;
     }
 }
Response
This will act as the property container for our Repository class response
using System;
 using System.Collections.Generic;
 using System.Linq;
 using System.Threading.Tasks;
 namespace JWTAuthDemo.Models
 {
     public class Response<T>
     {
         public T Data { get; set; }
         public string message { get; set; }
         public int  code { get; set; }
     }
 }
What is <T>?
T is called a type parameter, which can be used as a type of fields, properties, method parameters, return types, and delegates in the DataStore class. For example, Data is generic property because we have used a type parameter T as its type instead of the specific data type.
V. Create Table and Stored Procedures
Let’s create a database, table, and stored procedure that we need for this tutorial. Below are the table and procedures that we need.
- Create a database using the query below.
CREATE DATABASE JWTDemoDB;2. Create tbl_users table inside JWTDemoDB Database.
USE [JWTDemoDB]
 GO
 SET ANSI_NULLS ON
 GO
 SET QUOTED_IDENTIFIER ON
 GO
 CREATE TABLE [dbo].[tbl_users](
     [userid] [int] IDENTITY(1,1) NOT NULL,
     [username] nvarchar NULL,
     [password] nvarchar NULL,
     [email] nvarchar NULL,
     [role] nvarchar NULL,
     [reg_date] [datetime] NULL
 ) ON [PRIMARY]
 GO
3. Create a stored procedure for login action. Name it sp_loginUser.
USE [JWTDemoDB]
 GO
 SET ANSI_NULLS ON
 GO
 SET QUOTED_IDENTIFIER ON
 GO
  -- =============================================
  -- Author:    FreeCode Spot
  -- Create date:
  -- Description:
  -- =============================================
  CREATE PROCEDURE [dbo].[sp_loginUser]
      @email Nvarchar(50),
      @password nvarchar(200),
      @retVal int OUTPUT
      AS
  BEGIN
      SET NOCOUNT ON;
         Select
                userid,
                username,
                email,
                [role],
                reg_date
                FROM tbl_users
                where Email = @email and
               [Password] = CONVERT(VARCHAR(32), HashBytes('MD5', @password), 2)
         IF(@@ROWCOUNT > 0)
         BEGIN
          SET @retVal = 200
         END
         ELSE
         BEGIN
           SET @retVal = 500
         END
  END
4. Create a stored procedure for the registration of the user. Name it sp_registerUser. See the code snippet below.
USE [JWTDemoDB]
 GO
 SET ANSI_NULLS ON
 GO
 SET QUOTED_IDENTIFIER ON
 GO
  -- =============================================
  -- Author:        FeeCode Spot
  -- Create date:
  -- Description:
  -- =============================================
  CREATE PROCEDURE [dbo].[sp_registerUser]
      @username Nvarchar(50),
      @email Nvarchar(50),
      @password nvarchar(200),
      @role nvarchar(50),
      @retval int OUTPUT
  AS
  BEGIN
      SET NOCOUNT ON;
        INSERT INTO tbl_users(
                              username,
                              Email,
                              [Password],
                              [role],
                              reg_date)
                              VALUES(
                              @username,
                              @email,
                              CONVERT(VARCHAR(32), HashBytes('MD5', @password), 2),
                              @role,
                              GETDATE())
        if(@@ROWCOUNT > 0)
        BEGIN
          SET @retval = 200 --return value when changes is detected on table
        END
        ELSE
        BEGIN
        SET @retval = 500  --return value if something went wronng
        END
  END
5. Create a stored procedure for deletion of user. Name it sp_deleteUser. See the code snippet below.
 USE [JWTDemoDB]
 GO
 SET ANSI_NULLS ON
 GO
 SET QUOTED_IDENTIFIER ON
 GO
  -- =============================================
  -- Author:        FeeCode Spot
  -- Create date:
  -- Description:
  -- =============================================
  ALTER PROCEDURE [dbo].[sp_deleteUser]
      @userid int,
      @retval int OUTPUT
  AS
  BEGIN
      SET NOCOUNT ON;
           Delete tbl_users where userid = @userid

           if(@@ROWCOUNT > 0)
        BEGIN
          SET @retval = 200 --return value when changes is detected on table
        END
        ELSE
        BEGIN
        SET @retval = 500  --return value if something went wronng
        END
  END
VI. Create Repository Class
The repository class will handle the authentication and CRUD functionality of our WEB API. This repository class will inherit from an interface class. To create this class, follow the steps below.
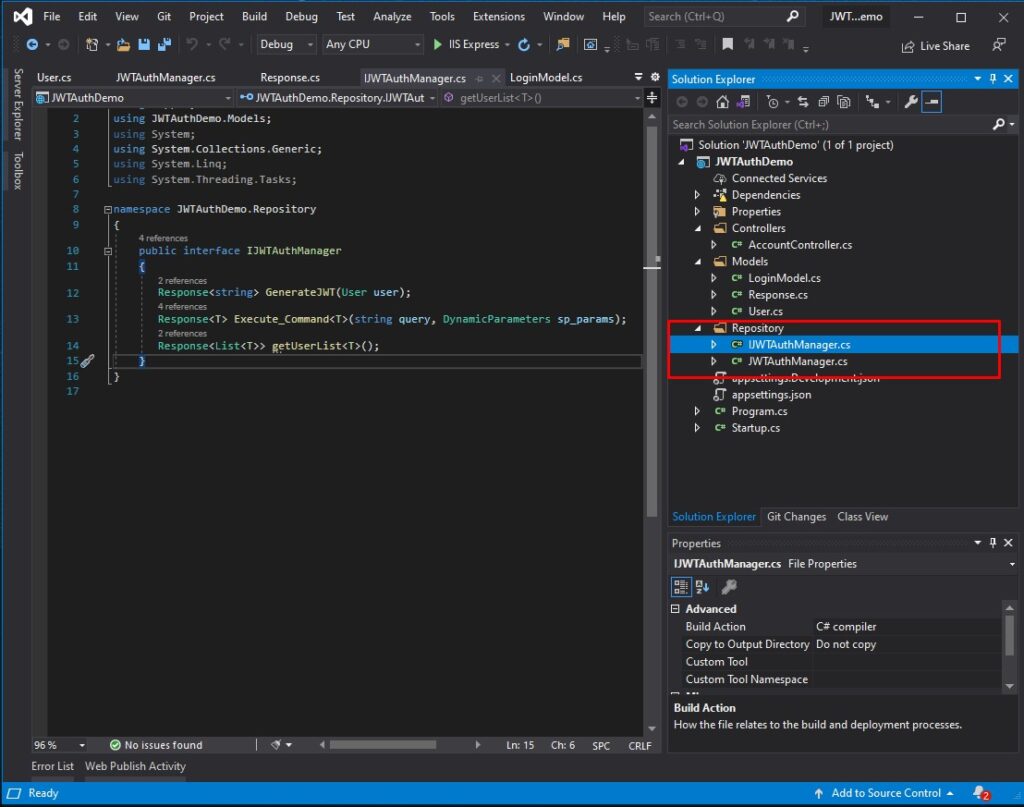
- Create a Repository Folder from your project’s root directory.
- Create New Interface and name it IJWTAuthManager. See the code snippet below.
 using Dapper;
 using JWTAuthDemo.Models;
 using System;
 using System.Collections.Generic;
 using System.Linq;
 using System.Threading.Tasks;

 namespace JWTAuthDemo.Repository
 {
     public interface IJWTAuthManager
     {
        Response<string> GenerateJWT(User user);
        Response<T> Execute_Command<T>(string query, DynamicParameters sp_params);
        Response<List<T>> getUserList<T>();
     }
 }
3. After that, create another file name JWTAuthManager. This class will be the implementation of the IJWTAuthManager interface. Below is the method we added inside JWTAuthManager class.
| Method | Functions |
| GenerateJWT(User user) | Generate JSON Web Token for the authenticated user |
| Execute_Command(string query, DynamicParameters sp_params) | Execute stored procedures using dapper |
| getUserList() | Retrieve a list of the user using dapper |
using Dapper;
using JWTAuthDemo.Models;
using Microsoft.Extensions.Configuration;
using Microsoft.IdentityModel.Tokens;
using System;
using System.Collections.Generic;
using System.Data;
using System.Data.SqlClient;
using System.IdentityModel.Tokens.Jwt;
using System.Linq;
using System.Security.Claims;
using System.Text;
using System.Threading.Tasks;

 namespace JWTAuthDemo.Repository
 {
     public class JWTAuthManager : IJWTAuthManager
     {
         private readonly IConfiguration _configuration;

         public JWTAuthManager(IConfiguration configuration)
         {
             _configuration = configuration;
         }
         public Response<string> GenerateJWT(User user)
         {
             Response<string> response = new Response<string>();

             var securityKey = new SymmetricSecurityKey(Encoding.UTF8.GetBytes(_configuration["JwtAuth:Key"]));
             var credentials = new SigningCredentials(securityKey, SecurityAlgorithms.HmacSha256);

             //claim is used to add identity to JWT token
             var claims = new[] {
                 new Claim(JwtRegisteredClaimNames.Sub, user.Username),
                 new Claim(JwtRegisteredClaimNames.Email, user.Email),
                 new Claim("roles", user.Role),
                 new Claim("Date", DateTime.Now.ToString()),
                 new Claim(JwtRegisteredClaimNames.Jti, Guid.NewGuid().ToString())
             };

             var token = new JwtSecurityToken(_configuration["JwtAuth:Issuer"],
               _configuration["JwtAuth:Issuer"],
               claims,    //null original value
               expires: DateTime.Now.AddMinutes(120),
               signingCredentials: credentials);

             response.Data = new JwtSecurityTokenHandler().WriteToken(token); //return access token
             response.code = 200;
             response.message = "Token generated";
             return response;
         }

         public Response<T> Execute_Command<T>(string query, DynamicParameters sp_params)
         {
             Response<T> response = new Response<T>();
             using (IDbConnection dbConnection = new SqlConnection(_configuration.GetConnectionString("default")))
             {
                 if (dbConnection.State == ConnectionState.Closed)
                     dbConnection.Open();
                using var transaction = dbConnection.BeginTransaction();
                 try
                 {
                     response.Data = dbConnection.Query<T>(query, sp_params, commandType: CommandType.StoredProcedure, transaction: transaction).FirstOrDefault();
                     response.code = sp_params.Get<int>("retVal"); //get output parameter value
                     response.message = "Success";
                     transaction.Commit();
                 }
                 catch (Exception ex)
                 {
                     transaction.Rollback();
                     response.code = 500;
                     response.message = ex.Message;
                 }
             }
             return response;
         }

         public Response<List<T>> getUserList<T>()
         {
             Response<List<T>> response = new Response<List<T>>();
             using IDbConnection db = new SqlConnection(_configuration.GetConnectionString("default"));
             string query = "Select userid,username,email,[role],reg_date FROM tbl_users";
             response.Data = db.Query<T>(query, null, commandType: CommandType.Text).ToList();
             return response;
         }
     }
 }
VII. Create AccountController
AccountController will handle incoming HTTP requests and send responses back to the caller. Create a new API controller inside the controller’s folder. Below is the CRUD action result method that I have inside my AccountController.
Note that we also apply role-based authorization in this tutorial. The user can only access the method that is specified in Authorize Roles per method.
login
Login method will handle the authentication and the generation the JWT.
 [HttpPost("Login")]
 [AllowAnonymous]
 public IActionResult login([FromBody]LoginModel user)
    {
     if (!ModelState.IsValid)
        {
           return BadRequest("Parameter is missing");
        }

    DynamicParameters dp_param = new DynamicParameters();
    dp_param.Add("email",user.email,DbType.String);
    dp_param.Add("password",user.password,DbType.String);
    dp_param.Add("retVal", DbType.String, direction: ParameterDirection.Output);
    var result = _authentication.Execute_Command<User>("sp_loginUser",dp_param);
    if (result.code == 200)
    {
        var token = _authentication.GenerateJWT(result.Data);
        return Ok(token);
    }
      return NotFound(result.Data);
  }
UserList – Role » Only User is allowed to access this method
Retrieve User list from the database.
 [HttpGet("UserList")]
 [Authorize(Roles = "User")]
 public IActionResult getAllUsers()
 {
     var result = _authentication.getUserList<User>();
     return Ok(result);
 }
Register – Role » Only Admin can access this method
This will register user to the database
 [HttpPost("Register")]
 [Authorize(Roles = "Admin")]
 public IActionResult Register([FromBody]User user)
 {
     if (!ModelState.IsValid)
     {
         return BadRequest("Parameter is missing");
     }
     DynamicParameters dp_param = new DynamicParameters();
     dp_param.Add("email", user.Email, DbType.String);
     dp_param.Add("username", user.Username, DbType.String);
     dp_param.Add("password", user.Password, DbType.String);
     dp_param.Add("role", user.Role, DbType.String);
     dp_param.Add("retVal", DbType.String, direction: ParameterDirection.Output);
     var result = _authentication.Execute_Command<User>("sp_registerUser", dp_param);
     if (result.code == 200)
     {
         return Ok(result);
     }
     return BadRequest(result);
 }
Delete – Role » Only Admin can access this method
This will remove user from the database
 [HttpDelete("Delete")]
 [Authorize(Roles = "Admin")]
 public IActionResult Delete(string id)
 {
     if (id == string.Empty)
     {
         return BadRequest("Parameter is missing");
     }

     DynamicParameters dp_param = new DynamicParameters();
     dp_param.Add("userid", id, DbType.String);

     dp_param.Add("retVal", DbType.String, direction: ParameterDirection.Output);
     var result = _authentication.Execute_Command<User>("sp_deleteUser", dp_param);
     if (result.code == 200)
     {
         return Ok(result);
     }
     return NotFound(result);
 }
Below are the full source code from my AccountController.
  using Dapper;
 using JWTAuthDemo.Models;
 using JWTAuthDemo.Repository;
 using Microsoft.AspNetCore.Authorization;
 using Microsoft.AspNetCore.Mvc;
 using System;
 using System.Collections.Generic;
 using System.Data;
 using System.Linq;
 using System.Threading.Tasks;

 namespace JWTAuthDemo.Controllers
 {
     [Route("api/[controller]")]
     [ApiController]

     public class AccountController : ControllerBase
     {
         private readonly IJWTAuthManager _authentication;

         public AccountController(IJWTAuthManager authentication)
         {
             _authentication = authentication;
         }

         [HttpPost("Login")]
         [AllowAnonymous]
         public IActionResult login([FromBody]LoginModel user)
         {
             if (!ModelState.IsValid)
             {
                 return BadRequest("Parameter is missing");
             }

             DynamicParameters dp_param = new DynamicParameters();
             dp_param.Add("email",user.email,DbType.String);
             dp_param.Add("password",user.password,DbType.String);
             dp_param.Add("retVal", DbType.String, direction: ParameterDirection.Output);
             var result = _authentication.Execute_Command<User>("sp_loginUser",dp_param);
             if (result.code == 200)
             {
                 var token = _authentication.GenerateJWT(result.Data);
                 return Ok(token);
             }
             return NotFound(result.Data);
         }

         [HttpGet("UserList")]
         [Authorize(Roles = "User")]
         public IActionResult getAllUsers()
         {
             var result = _authentication.getUserList<User>();
             return Ok(result);
         }

         [HttpPost("Register")]
         [Authorize(Roles = "Admin")]
         public IActionResult Register([FromBody]User user)
         {
             if (!ModelState.IsValid)
             {
                 return BadRequest("Parameter is missing");
             }

             DynamicParameters dp_param = new DynamicParameters();
             dp_param.Add("email", user.Email, DbType.String);
             dp_param.Add("username", user.Username, DbType.String);
             dp_param.Add("password", user.Password, DbType.String);
             dp_param.Add("role", user.Role, DbType.String);
             dp_param.Add("retVal", DbType.String, direction: ParameterDirection.Output);
             var result = _authentication.Execute_Command<User>("sp_registerUser", dp_param);
             if (result.code == 200)
             {
                 return Ok(result);
             }
             return BadRequest(result);
         }

         [HttpDelete("Delete")]
         [Authorize(Roles = "Admin")]
         public IActionResult Delete(string id)
         {
             if (id == string.Empty)
             {
                 return BadRequest("Parameter is missing");
             }

             DynamicParameters dp_param = new DynamicParameters();
             dp_param.Add("userid", id, DbType.String);

             dp_param.Add("retVal", DbType.String, direction: ParameterDirection.Output);
             var result = _authentication.Execute_Command<User>("sp_deleteUser", dp_param);
             if (result.code == 200)
             {
                 return Ok(result);
             }
             return NotFound(result);
         }
     }
 }
VIII. Configure Swagger to accept Header Authorization
If you created your project using ASP.NET Core 3.1 or 5.0, swagger is already included during creation, so when you run your project, you will see that swagger is the default homepage of your ASP.NET Core Web API. If not, you may also install swagger using NuGet Package Manager in Visual Studio.
Since we are using JWT Authentication, All the authorize request should contain an authorization header. Which in this case, it is the token that is generated from the login method. Let’s add some minor configuration in our startup.cs. Just follow the steps below. This step will add the Authorize function to the swagger framework.
- Open startup.cs and under ConfigureServices method find service.AddSwaggerGen.
- Once you locate the swagger configuration, add the following code inside the service.AddSwaggerGen.
 option.AddSecurityDefinition("Bearer", new OpenApiSecurityScheme()
 {
     Name = "Authorization",
     Type = SecuritySchemeType.ApiKey,
     Scheme = "Bearer",
     BearerFormat = "JWT",
     In = ParameterLocation.Header,
     Description = "JWT Authorization header using the Bearer scheme. \r\n\r\n Enter 'Bearer' [space] and then your token in the text input below.\r\n\r\nExample: \"Bearer 1safsfsdfdfd\"",
 });
 option.AddSecurityRequirement(new OpenApiSecurityRequirement
 {
     {
           new OpenApiSecurityScheme
             {
                 Reference = new OpenApiReference
                 {
                     Type = ReferenceType.SecurityScheme,
                     Id = "Bearer"
                 }
             },
             new string[] {}
     }
 });
3. Now, make sure that inside Configure method you will have this code declaration for swagger.
app.UseSwagger();
app.UseSwaggerUI(c => c.SwaggerEndpoint("/swagger/v1/swagger.json", "JWTAuthDemo v1"));
4. Try running your Web API Application. You should now see an Authorize button. See the code snippet below.
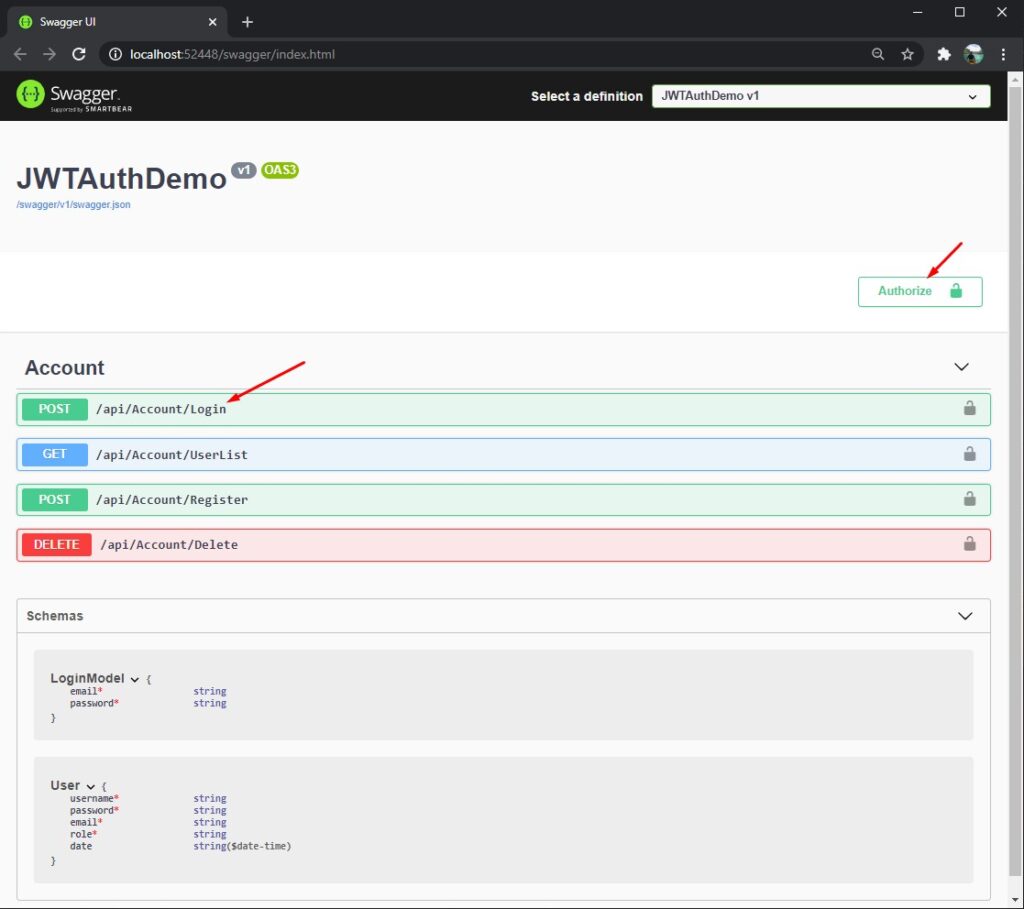
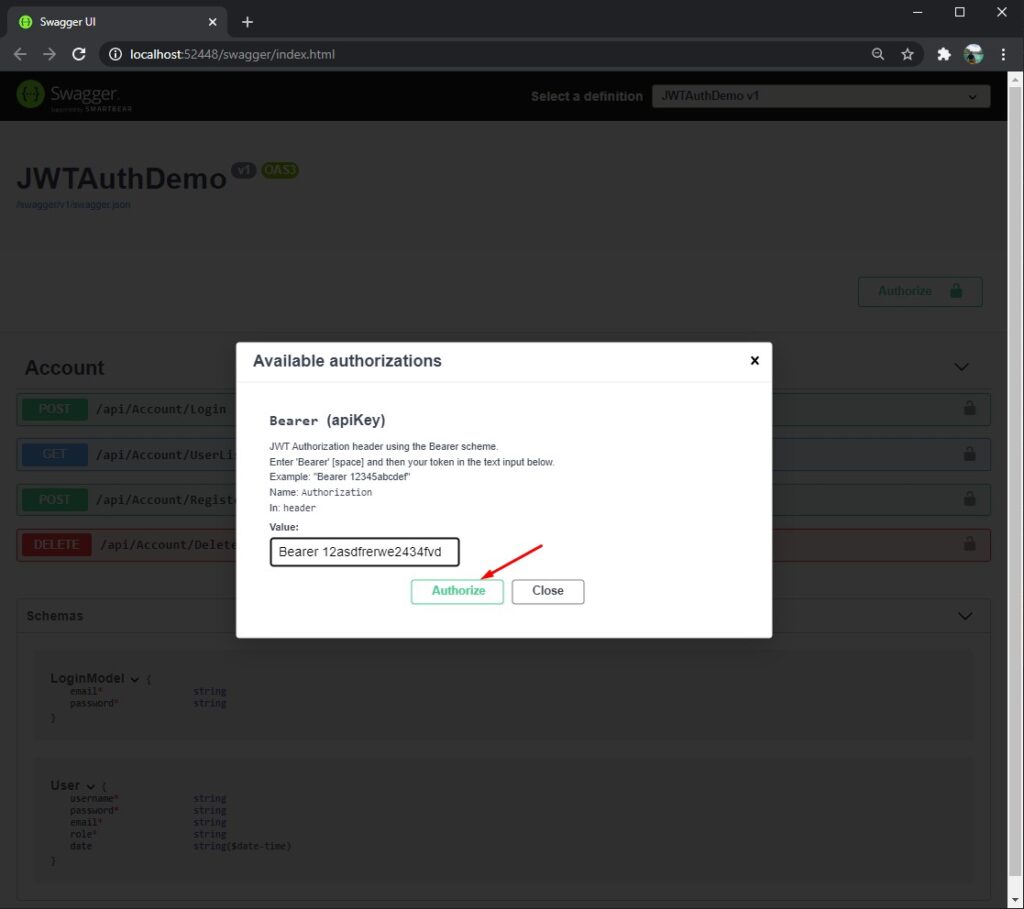
5. Now, let’s Use JWT Bearer Authorization in Swagger. To Authorize your request, run the Login method. Use the generated token from the response. The format should be “Bearer 123xyzx2sff”. Press the Authorize button to set your Authorization header on all the requests from methods displayed in a swagger dashboard. See the screenshot below.
That’s how you can configure JWT Authentication in ASP.NET Core WEB API and use JWT Bearer Authorization in Swagger. If somehow it doesn’t work on your end. You can download the source code from my GitHub Repository. @coderbugzz.
Summary
We have learned from this tutorial how to use JWT Authentication in ASP NET Core WEB API and use JWT Bearer Authorization in Swagger. We also use role-based authorization in this project tutorial. You can use this to restrict API users to limit them on what method is accessible for them. We also see how Swagger can help us automatically document our API configuration, like the list of methods available and schema property that is required and not. Hopefully, you have learned something from this article.
KEEP CODING!