
JWT’s are one of the best ways to transmit information between the client and server securely. In this article, we are going to learn how to implement JWT Authentication In ASP NET Core. Using JWT’s, we can make sure that the request comes from a user that is authenticated.
What is JWT?
JWT stands for JSON Web Token. This token is used to create an access token for an application. JWT is an open standard (RFC 7519) for securely transmitting information between parties as a JSON object. The purpose of using JWT is not to hide data but to ensure the user’s authenticity that is requesting the data. JWT is signed and encoded, not encrypted.
JWT Structure
A JSON Web Token(JWT) is composed of three part. That is a header, payload and a signature . This 3 parts is separated by a columns.
header.payload.signatureHeader
Algorithms » HMAC, SHA256, RSA, HS256 or RS256
{
  "typ": "JWT",
  "alg": "HS256"
}
Header of a JWT is used for signing and encoding.
Payload
This part of JWT contains the claims. Claims include supportable security statements, such as the user’s identity and the permissions they are allowed. Below are some of the claims that we can use.
- Issuer(iss)
- Subject (sub)
- Audience (aud)
- Expiration time (exp)
- Issued at (iat)
{
"sub": "freecode001",
"iat": freecodespot.com
}
Signature
Signature is the most important part of a JSON Web Token(JWT). Signature is calculated by encoding the header and payload using Base64url Encoding and concatenating them with a period separator
Implementation of JWT Authentication In ASP NET Core
We have cover the JWT definition and it’s part. Now, how are we going to implement this on ASP.NET Core? Below are the basic flow of a JWT authorization.
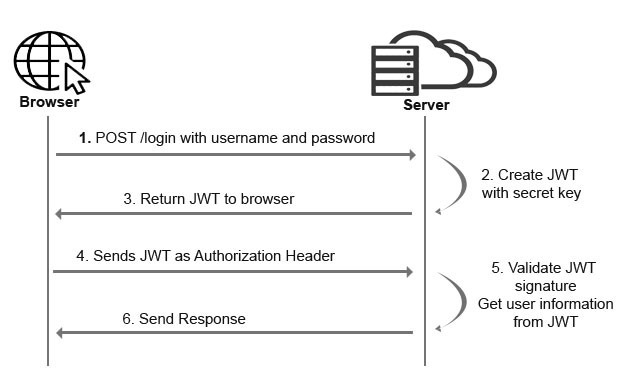
We will base this article on the diagram flow above. The good things is we can easily do this in ASP.NET core using a middleware. Middleware exists in the Microsoft.AspNetCore.Authentication.JwtBearer package that does most of the work for us!
Before we start please make sure you have the following installed on your machine.
- The latest version of Visual Studio
- Alternatively, you can also use the Visual Studio Code.
On this tutorial I am going to use Visual Studio Code.
I. Create ASP.NET Core Web API project
- Create a new folder for your project.
- Open a command prompt and navigate to your folder location using the cd command. (ex. cd folder name)
- Type “code .”, this will open your project directory inside the visual studio code.
- Open Visual Studio Code Terminal and create a new ASP.NET Core web API project using this command “dotnet new webapi -n JwtAuth”.
dotnet new webapi -n JwtAuthII. Install JWT Packages
Once you have configure your web api project proceed on adding the following package.
dotnet add package Microsoft.AspNetCore.Authentication.JwtBearer
dotnet add package System.IdentityModel.Tokens.Jwt
III. Register JWT
First, we need to configure JWT based authentication in our project. To do that, register JWT authentication on your startup.cs. Put the code snippet below under ConfigureServices.
services.AddAuthentication(JwtBearerDefaults.AuthenticationScheme)
            .AddJwtBearer(options =>
            {
                options.TokenValidationParameters = new TokenValidationParameters
                {
                    ValidateIssuer = true,
                    ValidateAudience = true,
                    ValidateLifetime = true,
                    ValidateIssuerSigningKey = true,
                    ValidIssuer = Configuration["JwtAuth:Issuer"],
                    ValidAudience = Configuration["JwtAuth:Issuer"],
                    IssuerSigningKey = new SymmetricSecurityKey(Encoding.UTF8.GetBytes(Configuration["JwtAuth:Key"]))
                };
});- ValidateIssuer = true » Validate the server that generates the token.
- ValidateAudience = true » Validate the recipient of the token is authorized to receive.
- ValidateLifetime = true » Check if the token is not expired and the signing key of the issuer is valid
- ValidateIssuerSigningKey = true » Validate signature of the token
- ValidIssuer » stored in appsettings.json
- ValidAudience » stored in appsettings.json
- IssuerSigningKey » stored in appsettings.json
IV. Setup Appsettingss.Json
Now, let’s add our JWT credentials in appsettings.json. This way we can easily change our JWT key if we want to change key later.
 "JwtAuth": {
      "Key": "freecodeSecretKey",
      "Issuer": "freecodespot.com"
    }
V. Create LoginModel
This model will handle user login credentials properties.
 public class LoginModel
    {
        public string Username { get; set; }
        public string Password { get; set; }
        public string EmailAddress { get; set; }
        public DateTime Date { get; set; } = DateTime.Now;
    }
VI. SETUP JWT AUTHORIZATION – JWTAuthController
Create an API controller. In this tutorial, I name my controller as JWTAuthController. If you have already created a controller proceed with the steps below.
- Inside JWTAuthController, create an Authenticator method. Just for the sake of this tutorial, I used hardcoded credentials in this authenticator. Below is the code snippet of my authenticator.
- Username » freecode
 private LoginModel AuthenticateUser(LoginModel login)
        {
            LoginModel user = null;

            if (login.Username == "freecode")
            {
                user = new LoginModel { Username = "freecode", EmailAddress = "freecode@gmail.com" };
            }
            return user;
        }
2. From your JWTAuthController create a constructor and add IConfiguration to access variable from appsettings.json. See the code snippet below.
 private readonly IConfiguration _config;
        public JWTAuthController(IConfiguration config)
        {
            _config = config;

        }
3. Create a JSON Web Token generator. This method will generate a token with secret keys. And also add claims for our JWT.
 private string GenerateJWT(LoginModel userInfo)
        {
            var securityKey = new SymmetricSecurityKey(Encoding.UTF8.GetBytes(_config["JwtAuth:Key"]));
            var credentials = new SigningCredentials(securityKey, SecurityAlgorithms.HmacSha256);


        //claim is used to add identity to JWT token
        var claims = new[] {
                new Claim(JwtRegisteredClaimNames.Sub, userInfo.Username),
                new Claim(JwtRegisteredClaimNames.Email, userInfo.EmailAddress),
                new Claim("Date", DateTime.Now.ToString()),
                new Claim(JwtRegisteredClaimNames.Jti, Guid.NewGuid().ToString())
            };


            var token = new JwtSecurityToken(_config["JwtAuth:Issuer"],
              _config["JwtAuth:Issuer"],
              claims,
              expires: DateTime.Now.AddMinutes(120),
              signingCredentials: credentials);

            return new JwtSecurityTokenHandler().WriteToken(token);
        }
4. Now, that we have set up our JWT generator we need to create a method access point. In my case it is the Login method.
Once the user calls the Login method, it will authenticate if the user has passed the correct username. In a real-case scenario, the user should input the username and password. Once the credential is validated, we will generate JSON Web Token for the user using the GenerateJWT method that we created a while ago.
        [AllowAnonymous]
        [HttpPost("Login")]
        public IActionResult Login([FromBody]LoginModel login)
        {

            var user = AuthenticateUser(login);

            if (user != null)
            {
                var tokenString = GenerateJWT(user);
               return Ok(new { token = tokenString });
            }    else
            {
                return Unauthorized();
            }


        }
5. This is how we validate the token. We will create a sample method that has an authorized attribute. This method will expect an authorization header. This method will return the custom Date claim that we added to the GenerateJWT process. See code snippet below.
[HttpGet]
[Authorize]
public ActionResult<IEnumerable<string>> Get()
    {

      var currentUser = HttpContext.User;
      DateTime TokenDate = new DateTime();

         if (currentUser.HasClaim(c => c.Type == "Date"))
           {
             TokenDate = DateTime.Parse(currentUser.Claims.FirstOrDefault(c => c.Type == "Date").Value);

           }

        return Ok("Custom Claims(date): " + TokenDate);

      }
6. To enable the Authentication on your project you need to add the code snippet below in your startup.cs under configure method.
app.UseAuthentication();Below are the code under Configure Method from your startup.cs.
       public void Configure(IApplicationBuilder app, IWebHostEnvironment env)
        {
            if (env.IsDevelopment())
            {
                app.UseDeveloperExceptionPage();
                app.UseSwagger();
                app.UseSwaggerUI(c => c.SwaggerEndpoint("/swagger/v1/swagger.json", "JWTAuth v1"));
            }

            app.UseHttpsRedirection();

            app.UseRouting();
            app.UseAuthentication();
            app.UseAuthorization();

            app.UseEndpoints(endpoints =>
            {
                endpoints.MapControllers();
            });
        }
VII. Test API
To test your application, run your project using the command below.
| Command | Description |
| dotnet build | Build Project Solution |
| dotnet run | Run Solution |
| dotnet watch run | Run solution and watch for any changes in your project |
Run Command
You can access the method using the URL below. The root address might be different from your end. You can verify it once you run your project.
| Url | Method | Description |
| http://localhost:5000/api/JWTAuth/Login | POST | Return a JSON Web Token |
| http://localhost:5000/api/JWTAuth/ | GET | Get() » return the date claim from GenerateJWT |
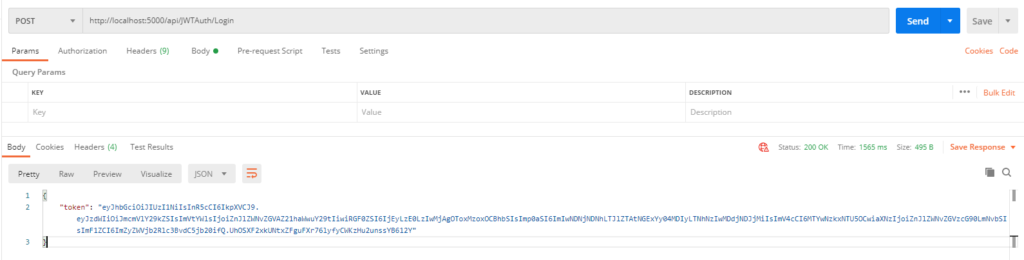
See the image below for the test request using POSTMAN. You can download postman here.
Login Request Via POSTMAN
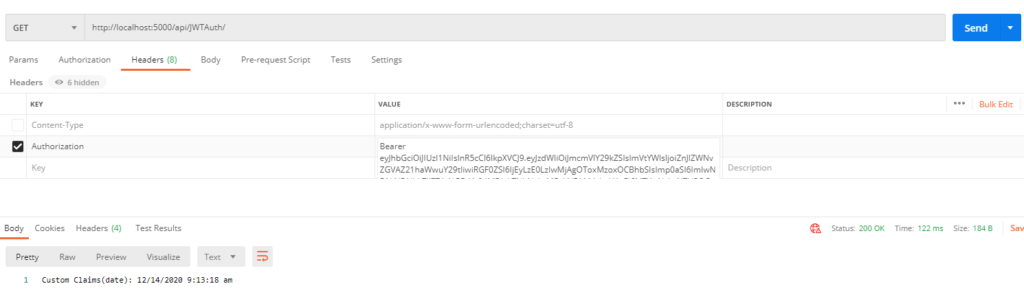
GET Request
GitHub Source Code : coderbugzz
Summary
In this tutorial, we learn what is a JWT authorization is. How to generate JSON Web Token using middleware Microsoft.AspNetCore.Authentication.JwtBearer. We also cover how we can validate the generated token. This is how you can Implement JWT Authentication In ASP NET Core. Hopefully, this article we’ll help you with your future projects. Happy coding.