
In this tutorial, we are going to Build an angular 11 application with ASP.NET Core Web API. Many new applications right now are using a separate front-end and back-end. One of the many choices is to use a single-page application framework like angular to handle your front-end application.
- I. Create and set up a new Angular using Visual Studio
- II. Upgrade Angular Version
- III. Setup ASP.NET Core Web API – CRUD
- IV. Create an Angular Component
- V. Create Angular Service and Model Class
- VI. Angular Project(ClientApp) Structure
- VII. Modify Angular default index.html
- VIII. Create a member form(member-form.component.html)
- IX. Display Child Component member-form
- X. Run Angular 11 Application with ASP.NET Core Web API
- XI. Summary
We will understand more about angular in the below steps as we will create a complete CRUD operation using the Angular 11 application with ASP.NET Core. Before we proceed to the next step, Please make sure to have installed the following
- The latest version of Visual Studio
- Visual Studio Code(Alternative)
- SQL Server
- nodeJS
I. Create and set up a new Angular using Visual Studio
- First, create your ASP.NET Core Web API. To do that just follow the steps below.
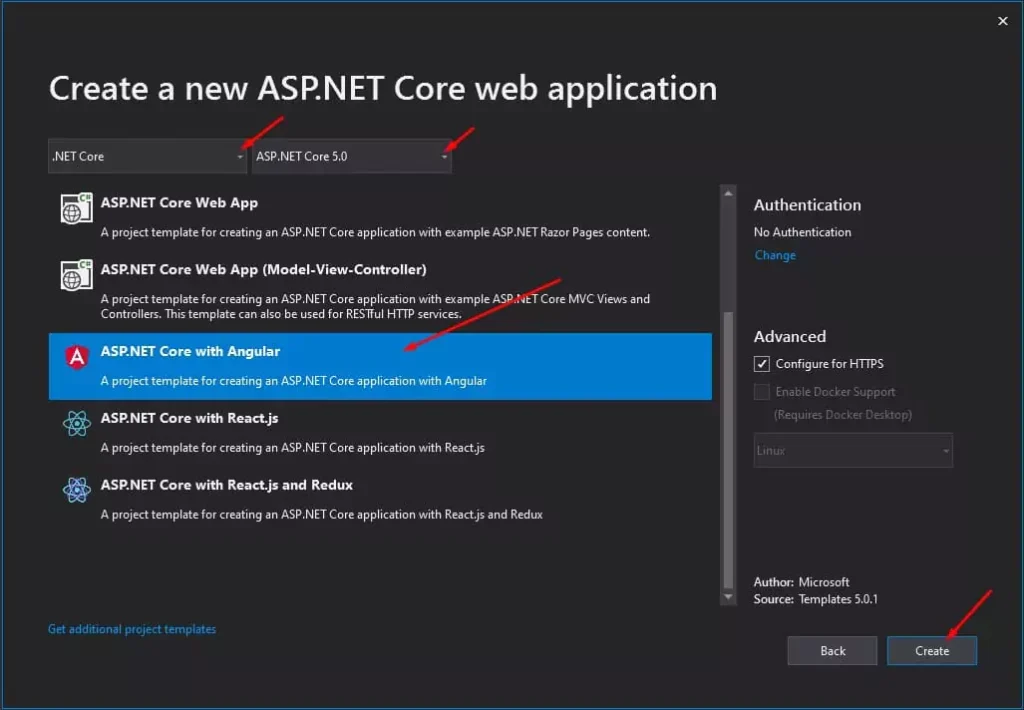
- Select File > New > Project.
- Select ASP.NET Core Web Application. Name the project AngularDemo to have the same namespace as my project. Click OK.
- Select ASP.NET Core with Angular and then uncheck Configure for HTTPS.
- Lastly, Click on Create.
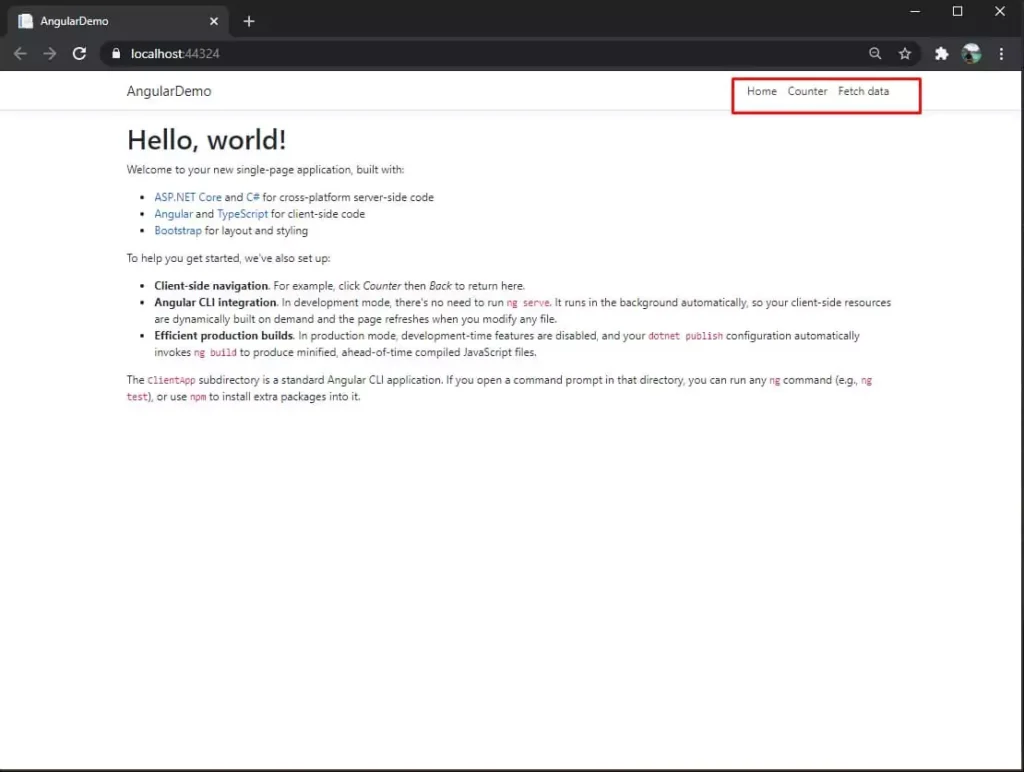
Once the creation of your project is done. This will generate a default angular application template.
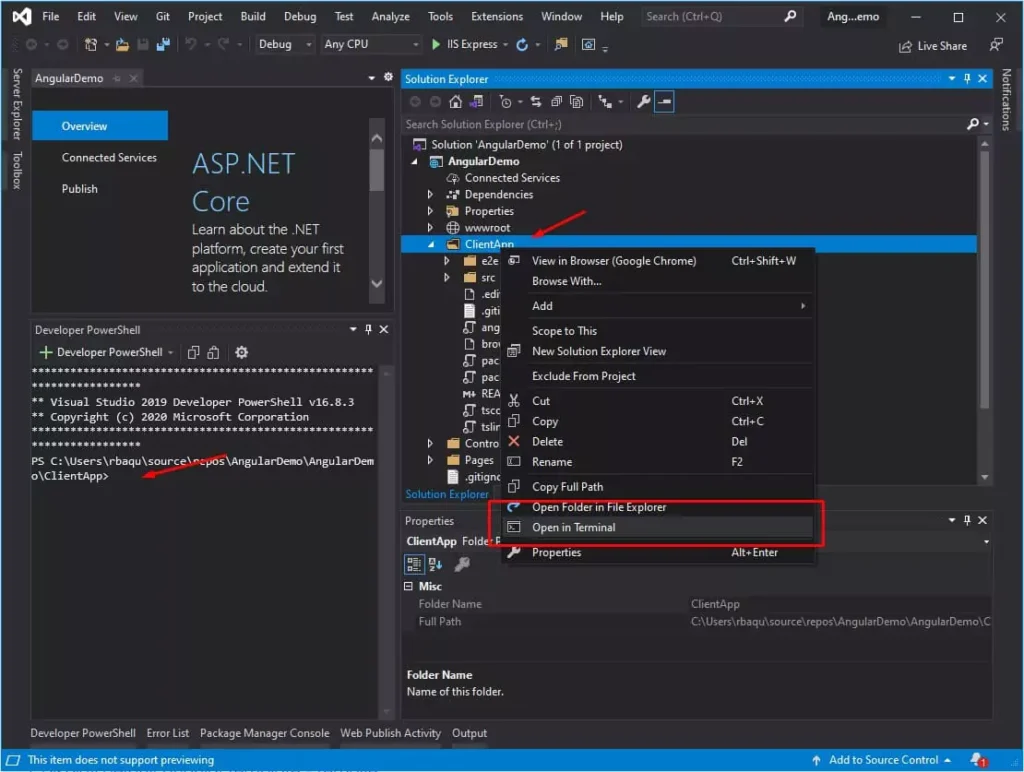
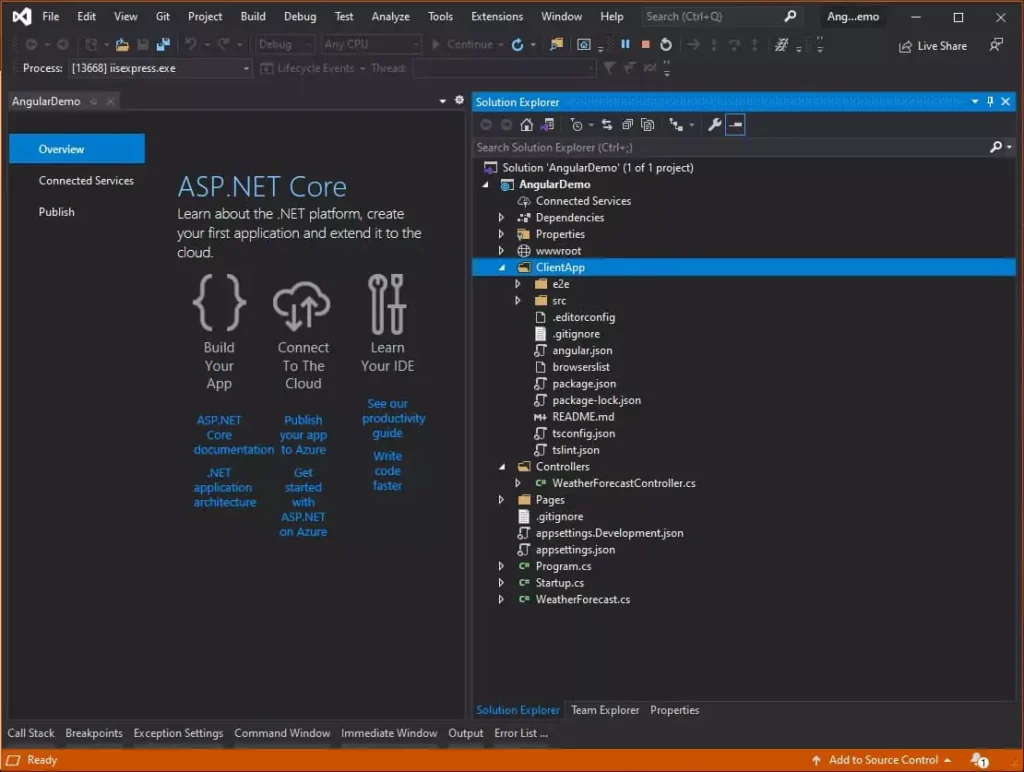
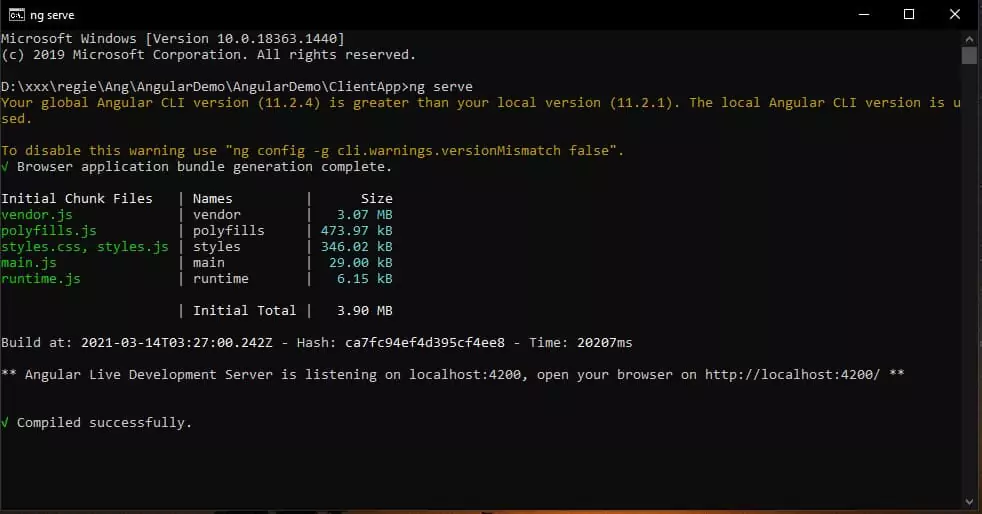
2. Run your angular application. Right-click on the angular folder from the solution, then choose open in the terminal. This action will open a developer shell with the location of your ClientApp. See the image below.
3. To run your Angular application you can use the following command and execute it on the terminal. This command will serve your Angular project.
npm run ng serveWhen running the command I end up with this error. If you encounter an error like the error in the image shown below you can install the missing module.
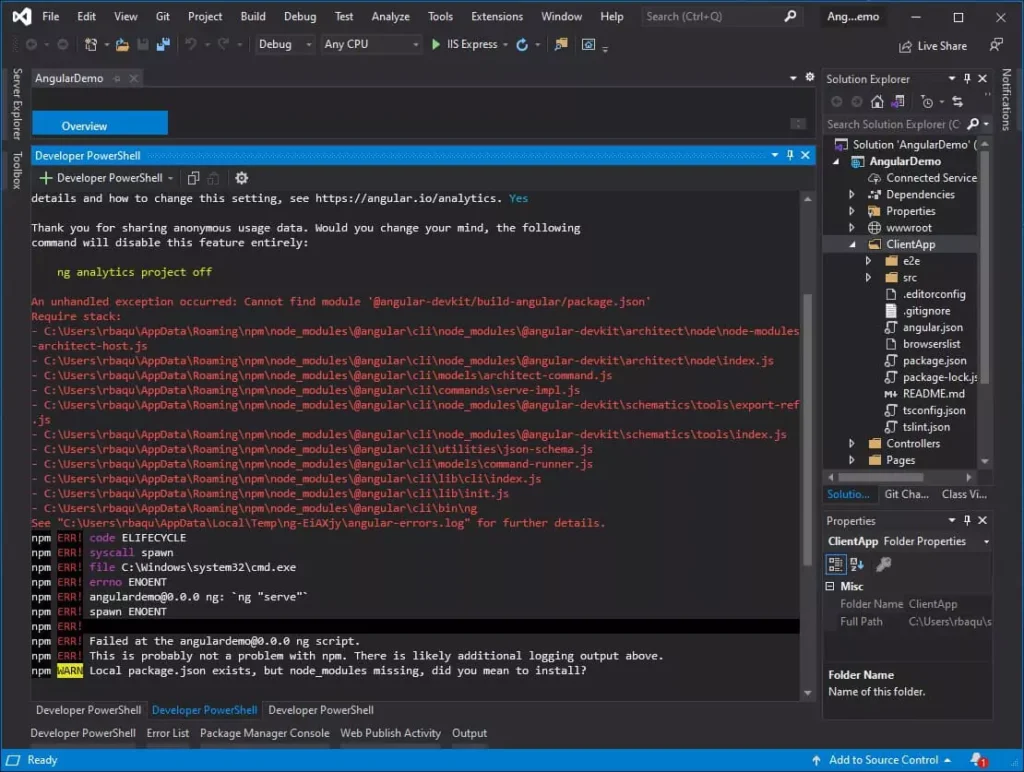
To fix this issue you can Install the missing package using the npm command provided below then rerun the Angular project using npm run ng serve.
npm install --save-dev @angular-devkit/build-angular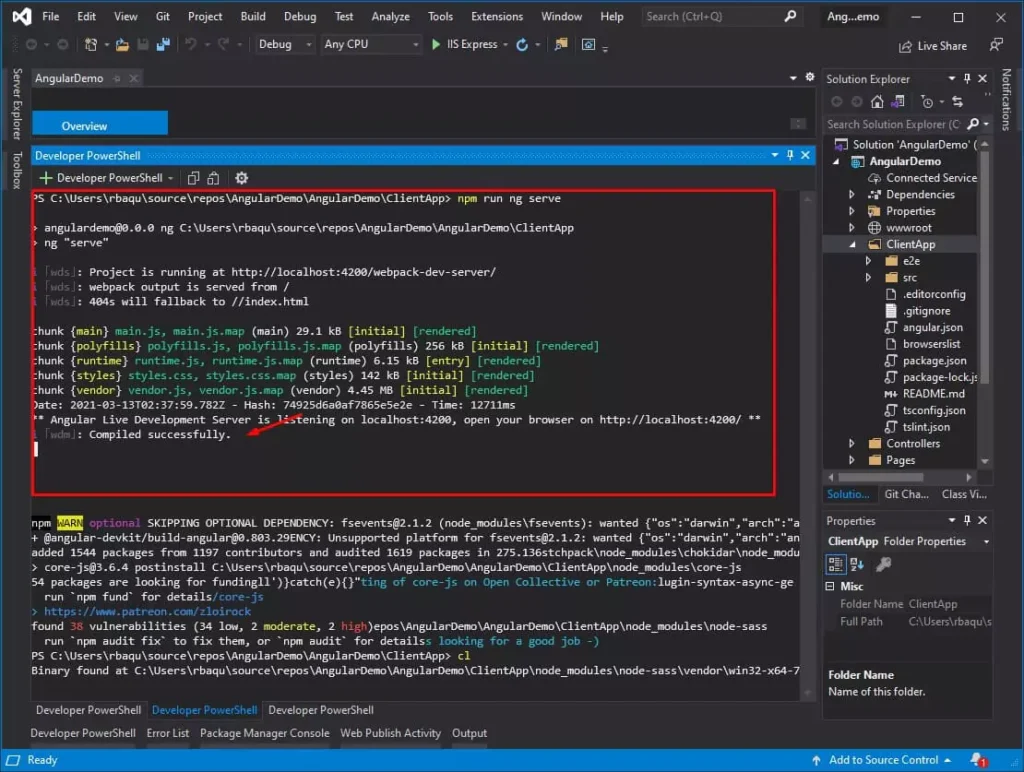
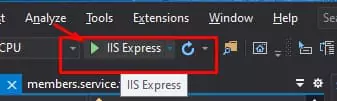
4. Once your ClientApp is compiled successfully and running. Press F5 or manually click on the play button on your visual studio to run your project.
ASP.NET Core with Angular default folder structure.
II. Upgrade Angular Version
Angular created using the template from Visual Studio is an outdated version. One of the options is to update it using their Update guide from this link or you can also create a new angular project using CLI to get the latest version. In this tutorial, I will delete the ClientApp folder and then create a new Angular project with the same name. To do that, follow the steps below.
- Remove the Existing Angular App, which is inside the ClientApp folder, or simply delete the folder ClientApp.
- Open a command prompt and navigate to the location of your project. Which in my case is “C:\Users\rbaqu\source\repos\AngularDemo\AngularDemo”
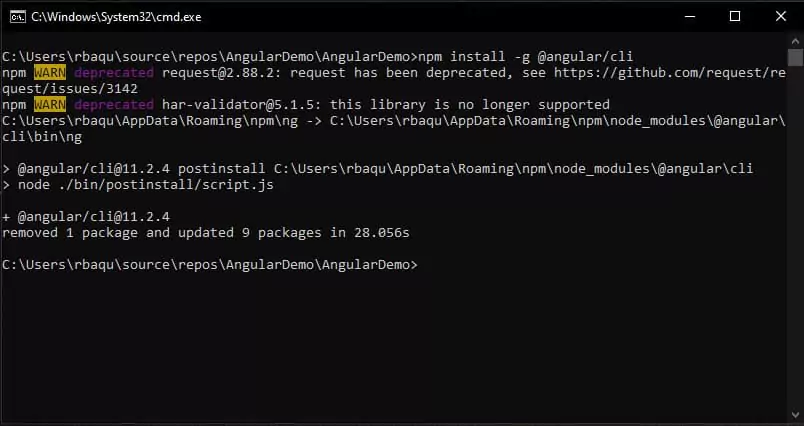
3. Now, install Angular CLI. Make sure you have NodeJs installed on your machine. You can visit this link and choose the installer that is compatible with your machine. Once done, you can open a command prompt change the location to your AngularDemo project’s root directory, and run the following command.
To verify the nodeJS version you can run this command.
node -v
npm -v
Install Angular CLI:
npm install -g @angular/cliThe -g flag will make sure to install it globally.
Create a New Angular Project
4. Now, to recreate the ClientApp project that we deleted a while ago just run the ng command below to create an Angular project and name it ClientApp since it is the name provided from the default angular template of Visual Studio.
ng new ClientApp 5. You will be asked several questions before the creation of the project. Just press y for yes and n for No. Lastly, it will ask you to choose a stylesheet format. Use the up and down arrow from your keyboard to select from the options and then press enter to finalize your choice. Then wait for the process to finish. See the image below.

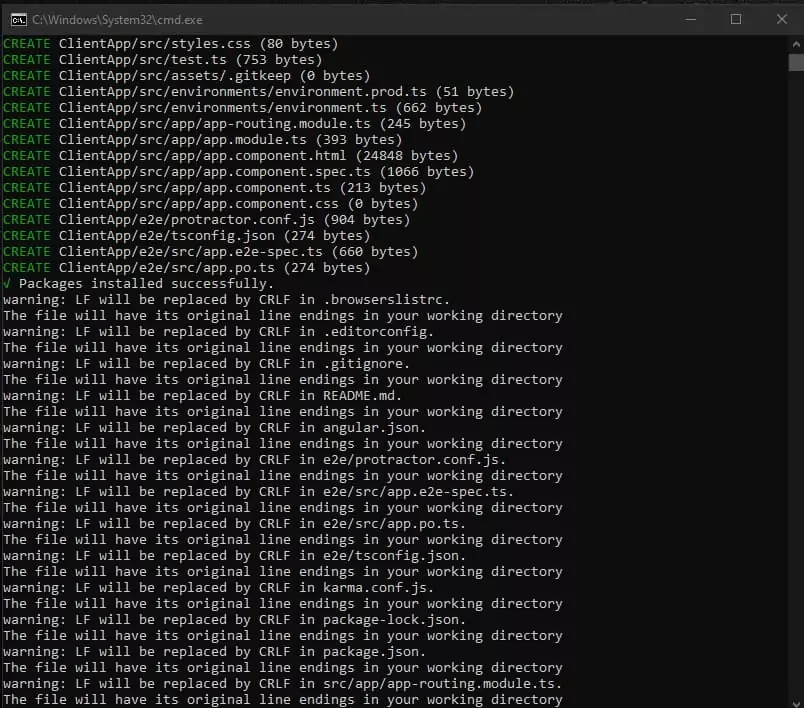
6. Once done, it will generate all the needed files for your angular application. Below is an image of my cmd window installing the Angular Project.
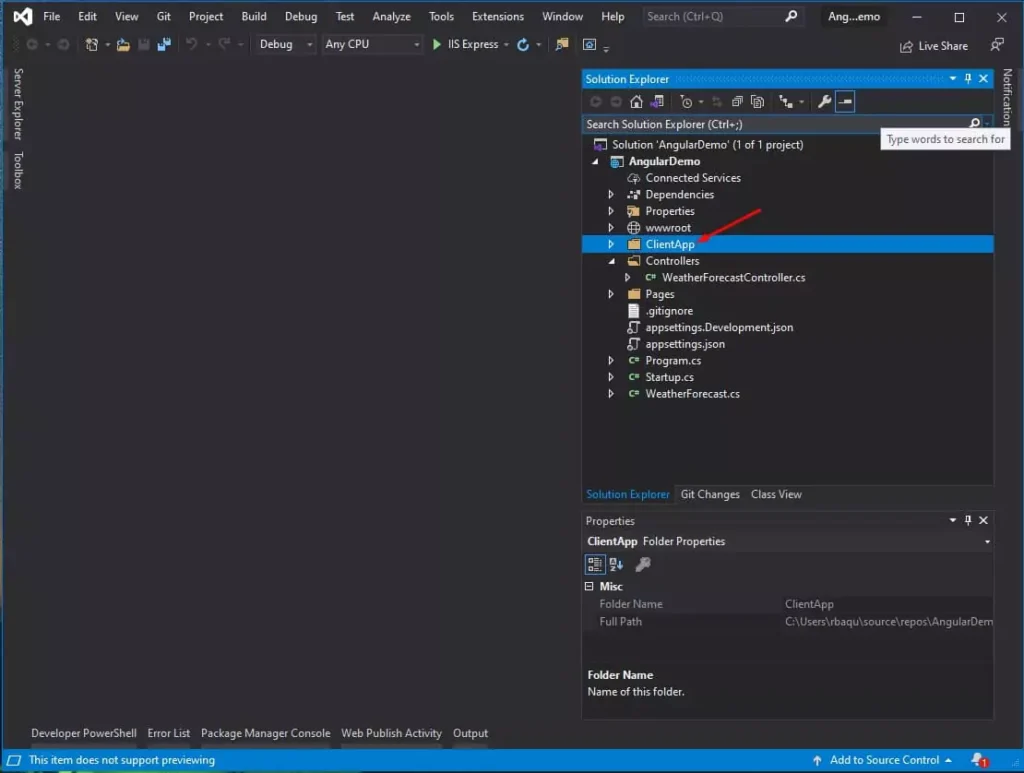
7. Now, Open your application in your Visual Studio Editor and you will find a new folder ClientApp which if you remember we deleted in the previous steps. As a result, we created a new and updated Angular Application ClientApp.
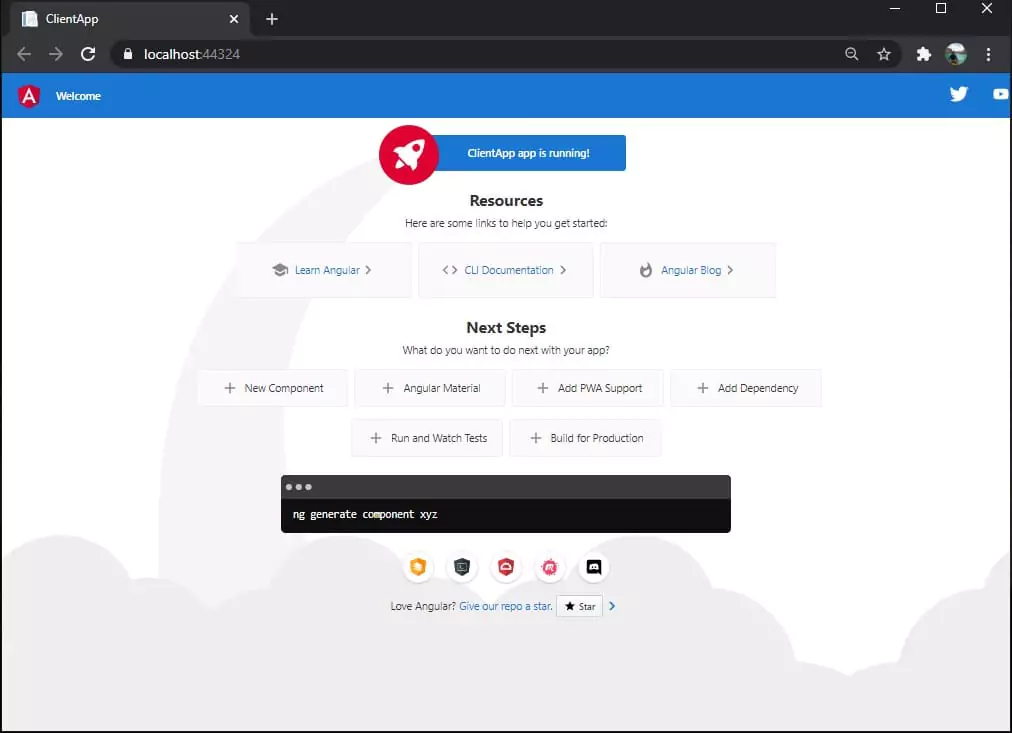
8. Run your angular project by running “npm run ng serve” on your Visual Studio terminal and then press F5 to run your application in a browser. I also provided an image below for your reference on the new Angular default Homepage view. See the image below.
III. Setup ASP.NET Core Web API – CRUD
Now, let’s prepare our back-end application since we are using Angular 11 application with ASP.NET Core, we will setup ASP.NET Core WEB API on this tutorial. We will also create a CRUD functionality. The process would be to register new members, update their records, remove members, and select a list of members available. We are going to use Entity Framework on this project To do that, follow the steps below.
Install packages
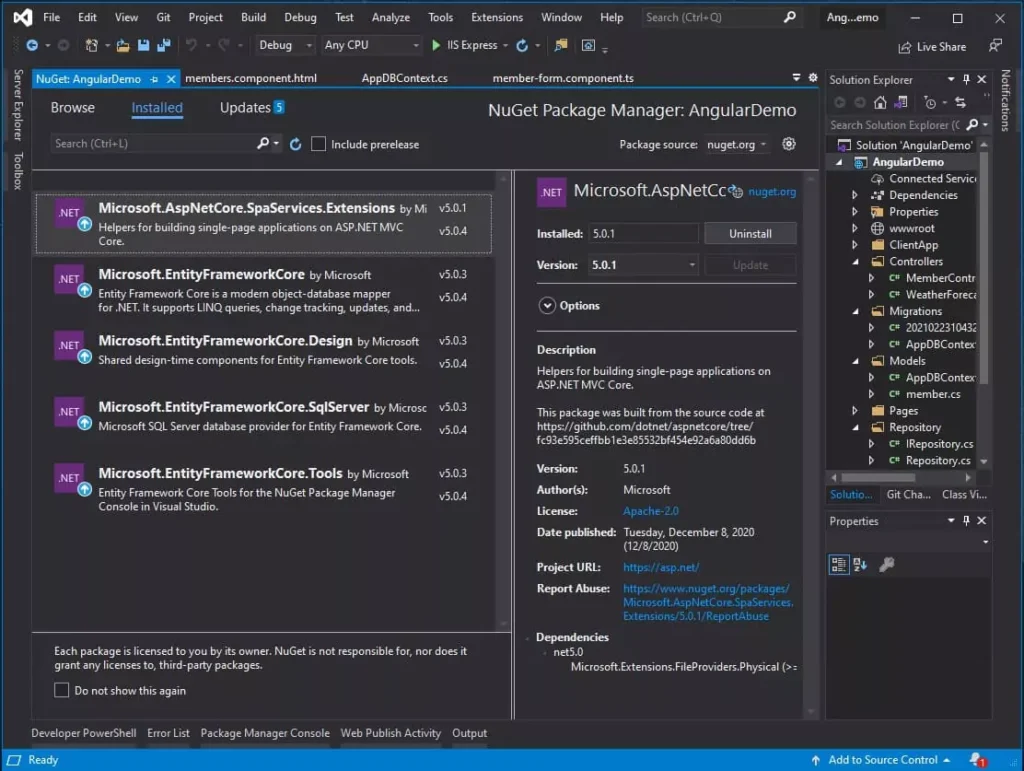
- Since we are going to use Entity framework we need to install required packages. Using Nuget Package Manager we can manually search and install the packages provided below. See the list below.
- Microsoft.AspNetCore.Identity.EntityFrameworkCore
- Microsoft.EntityFrameworkCore
- Microsoft.EntityFrameworkCore.Design
- Microsoft.EntityFrameworkCore.SqlServer
Setup Database connection
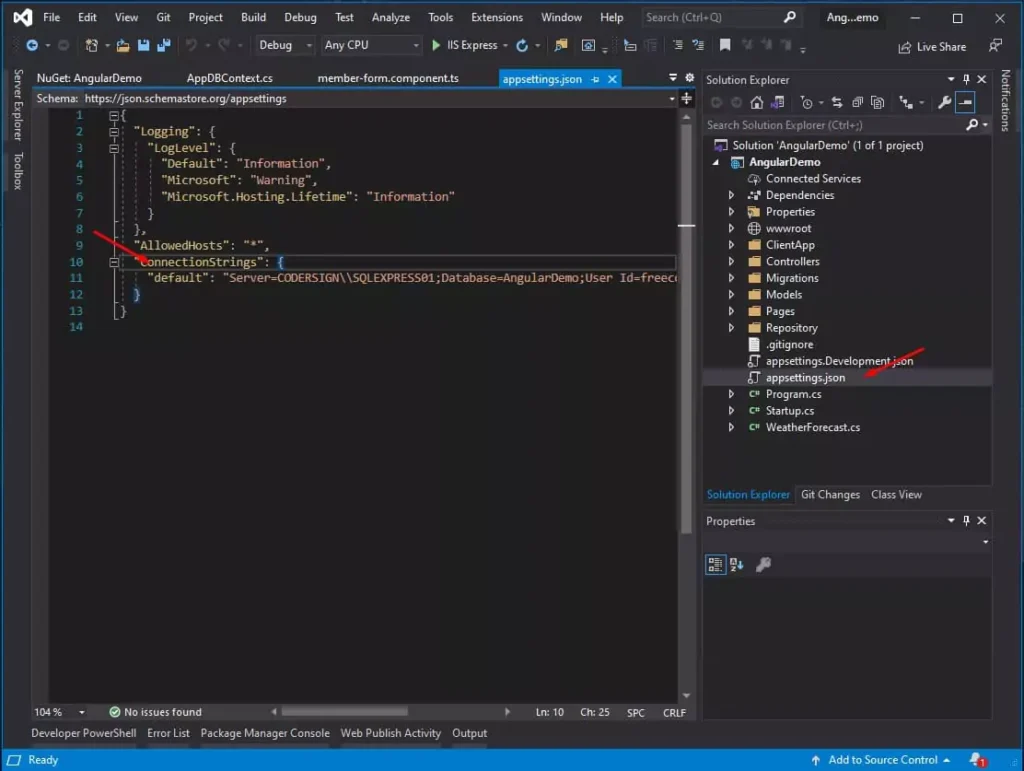
2. Now, add your database connection string inside the appsettings.json file. Using appsettings.json will help us to easily change the value later in case our database location is changed.
"ConnectionStrings": {
     "default": "Server=CODERSIGN\SQLEXPRESS01;Database=AngularDemo;User Id=freecode;Password=freecodespot.com;"
   }
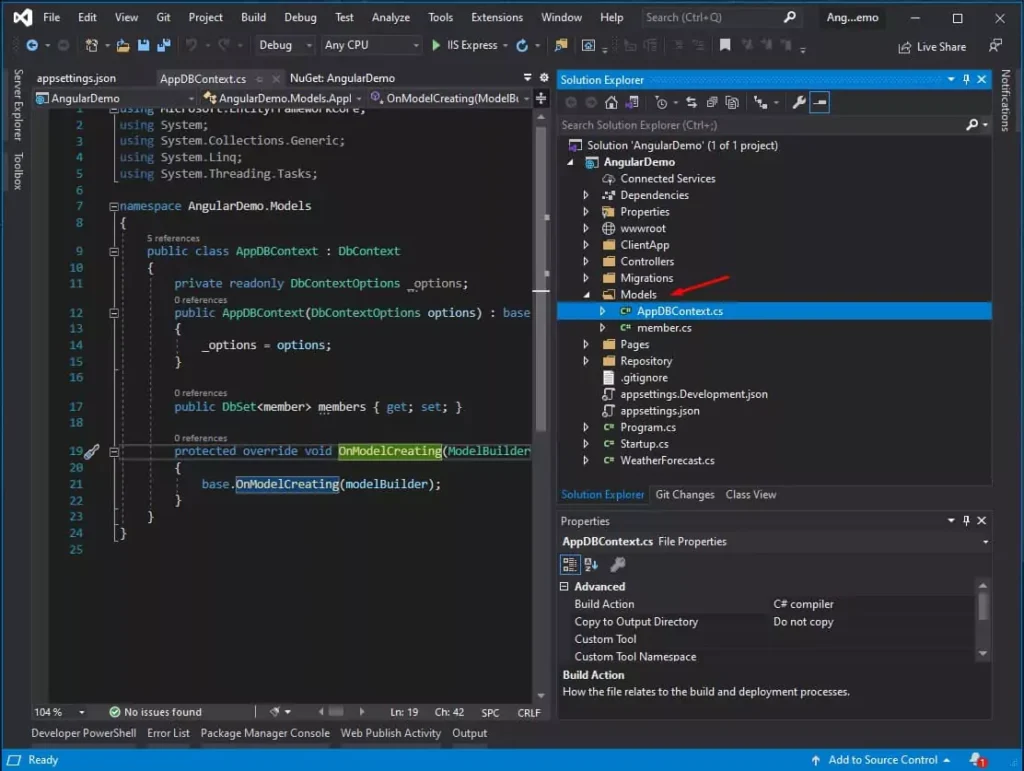
3. Once done, create a member model and AppDBContext. This member model will represent table properties, and AppDBContext will handle the connection to the database. To do that, Create these classes inside the Models folder. And then copy-paste the code snippet provided below.
Source Code:
member model
This property represent the table columns
 public class member
 {
    [Key]
    public long Id { get; set; }
    [Column(TypeName = "nvarchar(50)")]
    public string FirstName { get; set; }

    [Column(TypeName = "nvarchar(50)")]
    public string LastName { get; set; }

    [Column(TypeName = "nvarchar(50)")]
    public string MiddleName { get; set; }
 }
AppDBContext.cs
This class will handle the connectivity between our application and the database.
The DBContext class is where you declare your database’s table properties, which are converted into SQL queries when you run a migration and update database command. In this case, we added a member’s DBSet, which is the member model. This DBSet declaration means that when you run a migration, this will create a table name members with columns based on the member properties.
 public class AppDBContext : DbContext
     {
         private readonly DbContextOptions _options;
         public AppDBContext(DbContextOptions options) : base(options)
         {
             _options = options;
         }

         public DbSet<member> members { get; set; }

         protected override void OnModelCreating(ModelBuilder modelBuilder)
         {
             base.OnModelCreating(modelBuilder);
         }
     }
Configure Startup.cs
4. Now, let’s configure and initialize services on our ASP.NET Core API. Open startup.cs and then add the following code under ConfigureServices() method. This code retrieved the connection string from the appsettings.json file and then set a DBContext for our application.
string connectionString = Configuration.GetConnectionString("default");
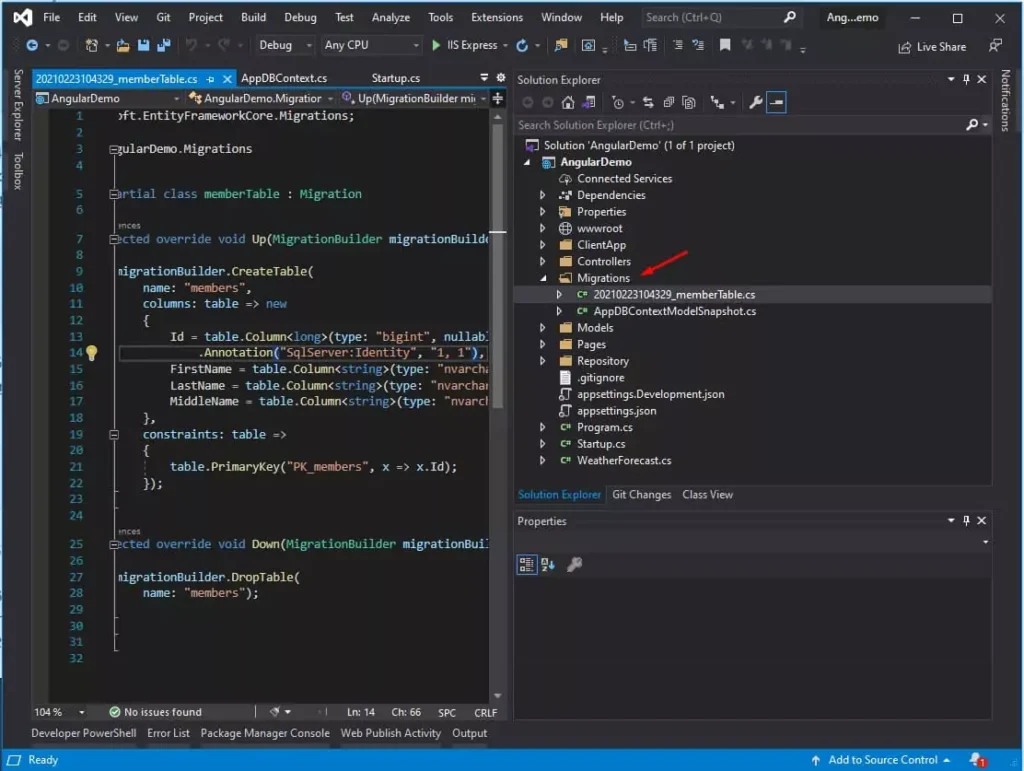
services.AddDbContext<AppDBContext>(c => c.UseSqlServer(connectionString)); 5. Once done, Let’s create a migration file. This migration will generate an SQL script to create the table that we need based on the member.cs model that we created a while ago. Using the Package Manager console you can execute the code snippet provided below. As a result, this will generate a Migration folder inside your project solution containing a migration file.
Add-Migration memberTableTo see the result of this command I have attached a screenshot of my migration folder after I executed this dotnet core command. And also This file contains an SQL command to create a table with the member property. See the code snippet below.
6. Once the migration file is created you can execute the migration using the command below. This command will create the actual database table that you need based on the member model property and to the database that you provided in your connection string. So please make sure that your connection string is pointed to the correct SQL Database you are using.
Update-Database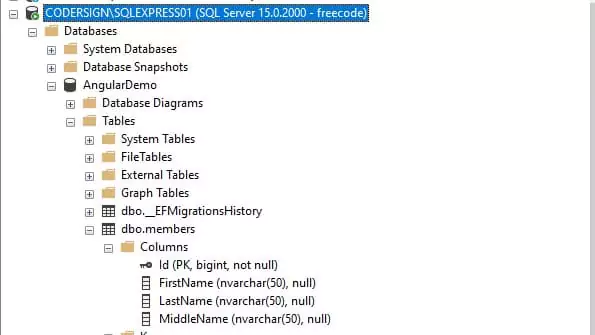
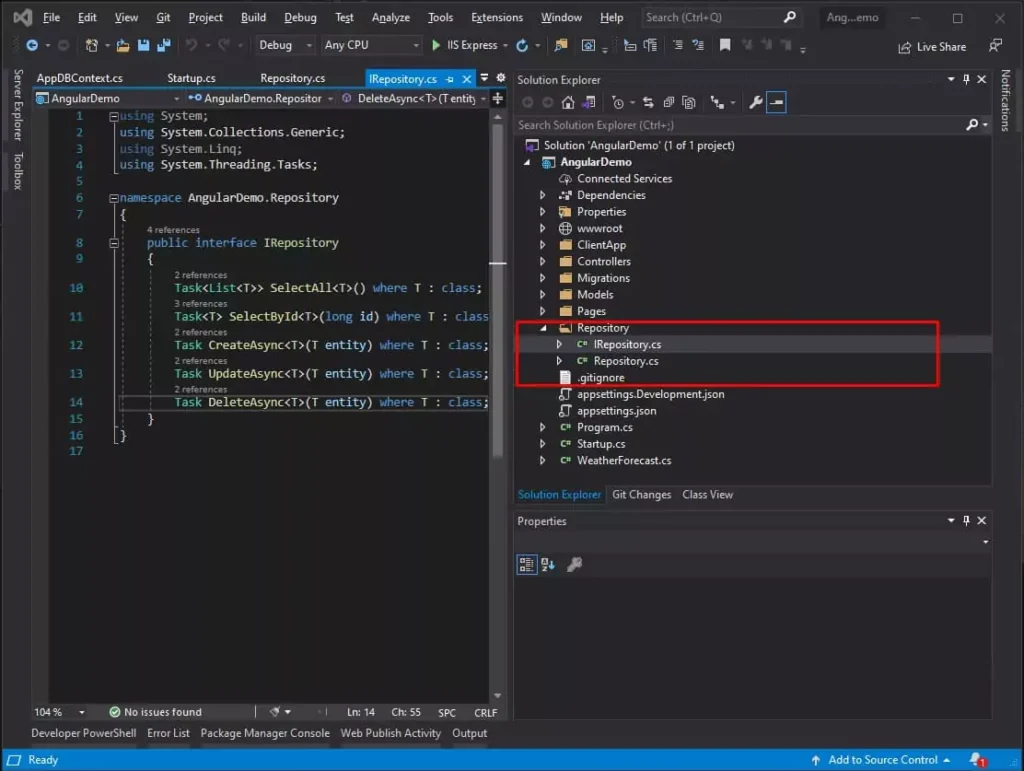
7. Now, that our database connection is set up, let’s create a Repository folder and also create two classes inside the folder a repository class implementation and an interface. This repository is where we will create our CRUD operation for the API. To do so, create two classes inside the Repository folder an IRepository.cs and Repository.cs. Please see the code attached below and paste it into your file.
Source Code:
IRepository.cs
This class is the Interface class. This contains all the method we want to implement inside Repository.cs
 using System;
 using System.Collections.Generic;
 using System.Linq;
 using System.Threading.Tasks;

 namespace AngularDemo.Repository
 {
     public interface IRepository
     {
         Task<List<T>> SelectAll<T>() where T : class;
         Task<T> SelectById<T>(long id) where T : class;
         Task CreateAsync<T>(T entity) where T : class;
         Task UpdateAsync<T>(T entity) where T : class;
         Task DeleteAsync<T>(T entity) where T : class;
     }
 }
Repository.cs
This class contains the CRUD Operation which is the actual implementation of the interface class
 using AngularDemo.Models;
 using AngularDemo.Repository;
 using Microsoft.EntityFrameworkCore;
 using System;
 using System.Collections.Generic;
 using System.Linq;
 using System.Threading.Tasks;

 namespace AngularDemo.Repository
 {
     public class Repository<TDbContext> : IRepository where TDbContext : DbContext
     {
         protected TDbContext dbContext;

         public Repository(TDbContext context)
         {
             dbContext = context;
         }
         public async Task CreateAsync<T>(T entity) where T : class
         {
             this.dbContext.Set<T>().Add(entity);

             _ = await this.dbContext.SaveChangesAsync();
         }

         public async Task DeleteAsync<T>(T entity) where T : class
         {
             this.dbContext.Set<T>().Remove(entity);

             _ = await this.dbContext.SaveChangesAsync();
         }
         public async Task<List<T>> SelectAll<T>() where T : class
         {
             return await this.dbContext.Set<T>().ToListAsync();
         }

         public async Task<T> SelectById<T>(long id) where T : class
         {
             return await this.dbContext.Set<T>().FindAsync(id);
         }

         public async Task UpdateAsync<T>(T entity) where T : class
         {
             this.dbContext.Set<T>().Update(entity);

             _ = await this.dbContext.SaveChangesAsync();
         }
     }
 }
MemberController:
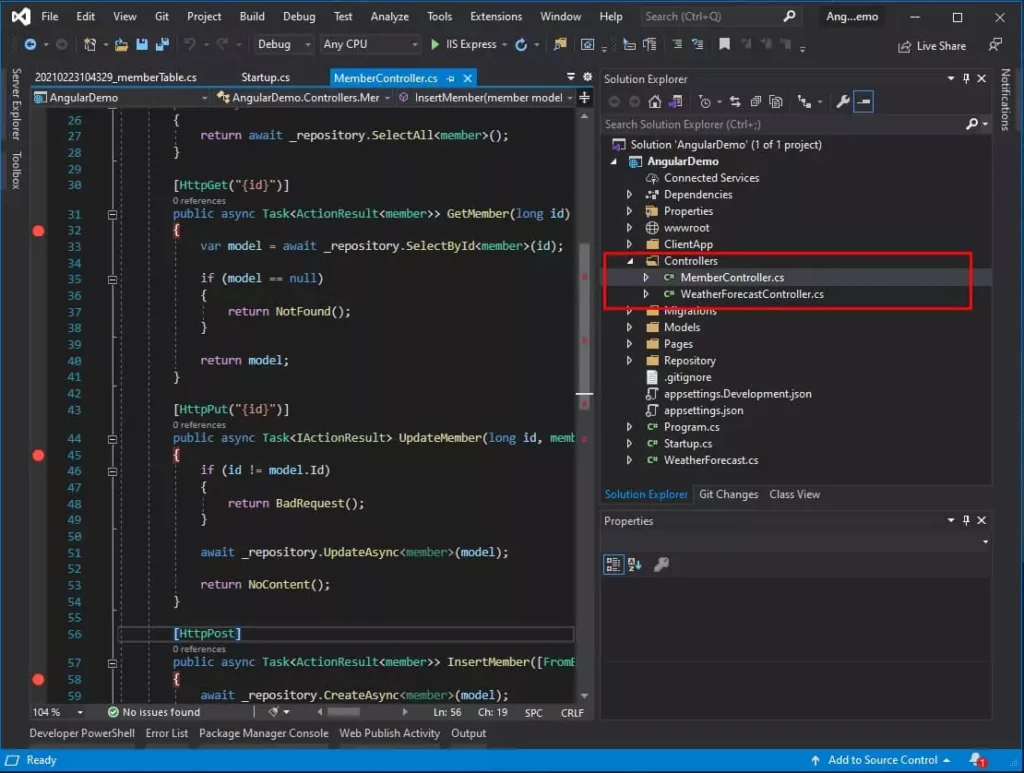
8. Lastly, create a MemberController. The function of this controller is to handle the HTTP request and response from a client application which in this tutorial is the Angular Project ClientApp. Please see the source code below for your reference.
Source Code:
MemberController.cs
using AngularDemo.Models;
 using AngularDemo.Repository;
 using Microsoft.AspNetCore.Mvc;
 using System;
 using System.Collections.Generic;
 using System.Linq;
 using System.Threading.Tasks;

 // For more information on enabling Web API for empty projects, visit https://go.microsoft.com/fwlink/?LinkID=397860

 namespace AngularDemo.Controllers
 {
     [Route("api/[controller]")]
     [ApiController]
     public class MemberController : ControllerBase
     {
         private readonly IRepository _repository;

         public MemberController(IRepository repository)
         {
             _repository = repository;
         }
         // GET: api/<DataController>
         [HttpGet]
         public async Task<ActionResult<IEnumerable<member>>> MemberList()
         {
             return await _repository.SelectAll<member>();
         }

         [HttpGet("{id}")]
         public async Task<ActionResult<member>> GetMember(long id)
         {
             var model = await _repository.SelectById<member>(id);

             if (model == null)
             {
                 return NotFound();
             }

             return model;
         }

         [HttpPut("{id}")]
         public async Task<IActionResult> UpdateMember(long id, member model)
         {
             if (id != model.Id)
             {
                 return BadRequest();
             }

             await _repository.UpdateAsync<member>(model);

             return NoContent();
         }

         [HttpPost]
         public async Task<ActionResult<member>> InsertMember([FromBody]member model)
         {
             await _repository.CreateAsync<member>(model);
             return CreatedAtAction("GetMember", new { id = model.Id }, model);
         }

         [HttpDelete("{id}")]
         public async Task<ActionResult<member>> DeleteMember(long id)
         {
             var model = await _repository.SelectById<member>(id);

             if (model == null)
             {
                 return NotFound();
             }

             await _repository.DeleteAsync<member>(model);

             return model;
         }
     }
 }
These are the methods and URLs available in MemberController.
| HTTP METHOD | Action Result | URL |
| HTTPGET | MemberList() | https://localhost:44336/api/Member/ |
| HTTPPUT | UpdateMember(long id, member model) | https://localhost:44336/api/Member/{id} |
| HTTPPOST | InsertMember([FromBody]member model) | https://localhost:44336/api/Member/ |
| HTTPGET | DeleteMember(long id) | https://localhost:44336/api/Member/{id} |
IV. Create an Angular Component
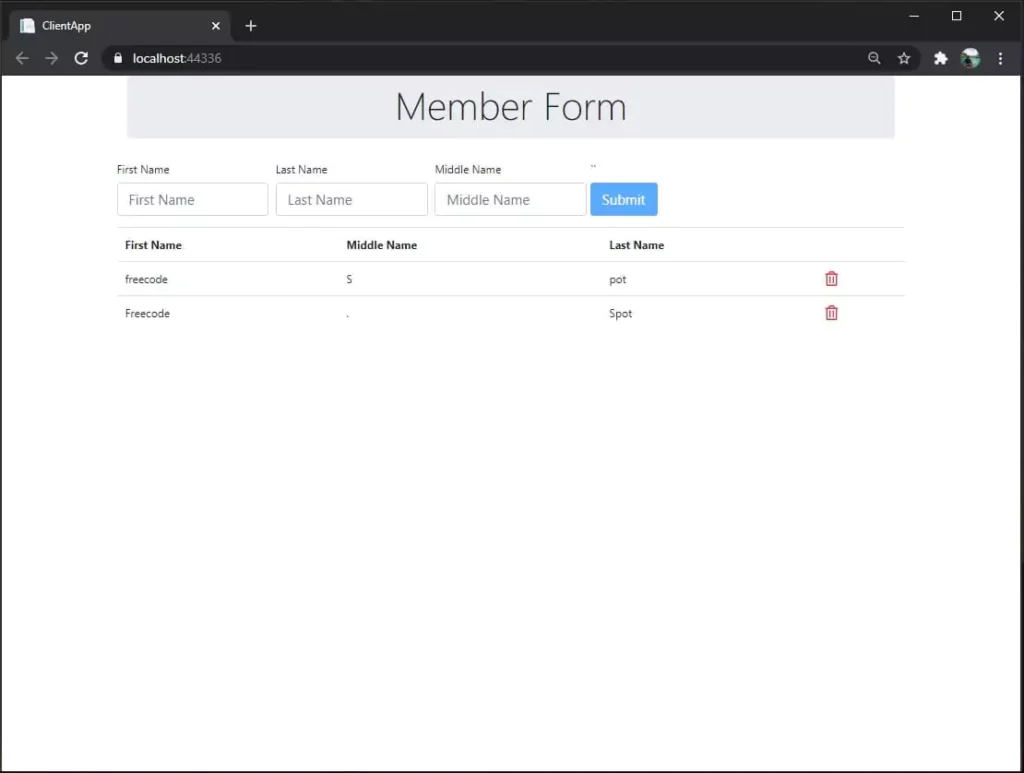
Now, we are done with the Web API configuration. It is time to start modifying our angular project to connect to our ASP.NET Core Web API. Moreover, to give you an idea of what we are to accomplish here, I have attached an image below.
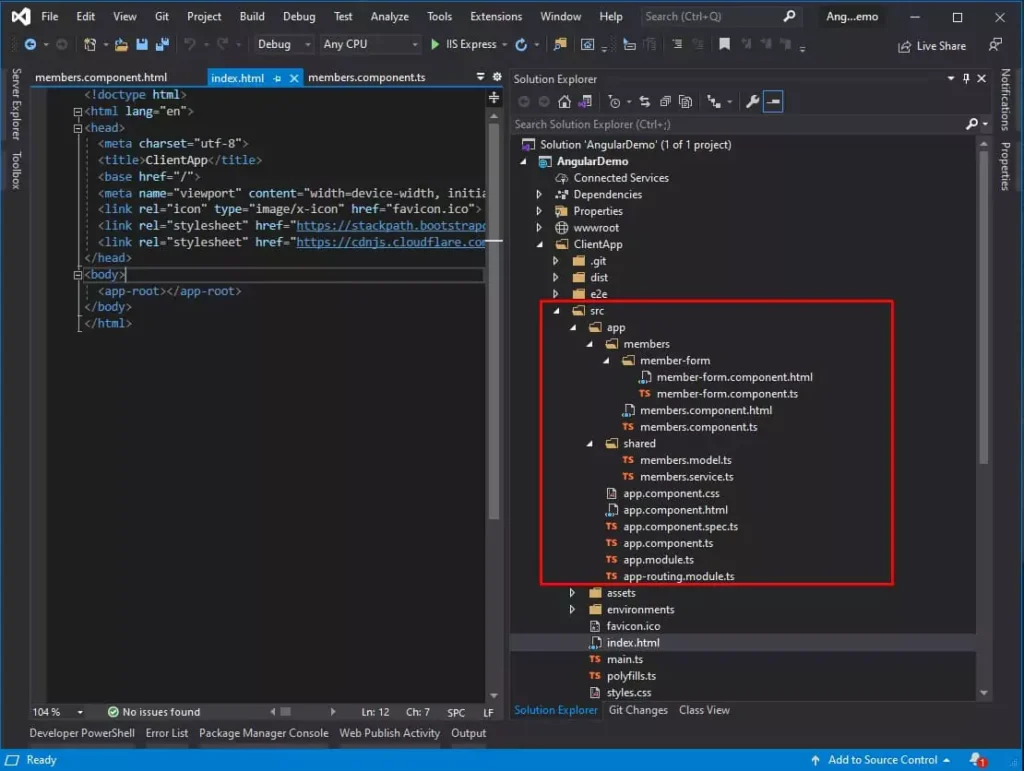
For your guidelines, I have also attached an image of the folder structure for this project. Below is the actual folder structure of my application. To create this, follow the steps below the picture.
- Create the member component using the CLI command below. This command will generate two files, HTML and typescript files.
ng g c member -s --skip-tests 2. Create a sub-component named member-form. This component will handle the action and form for the registration of new members.
ng g c member/member-form -s --skip-tests3. Create a service class file. This service will handle the HTTP request to our ASP.NET Core Web API. The command below will create the service class inside a folder named shared since that is what we specify in the line of code below.
ng g s shared/member --skip-tests4. We will also generate a model class property to bind the member record and inputs from the member form.
ng g class shared/member --type=model --skip-testsUsing the CLI command, all the component generated is automatically registered to the app.module.ts. You can verify it by opening the file. You can see that the member and member form component from the declarations.
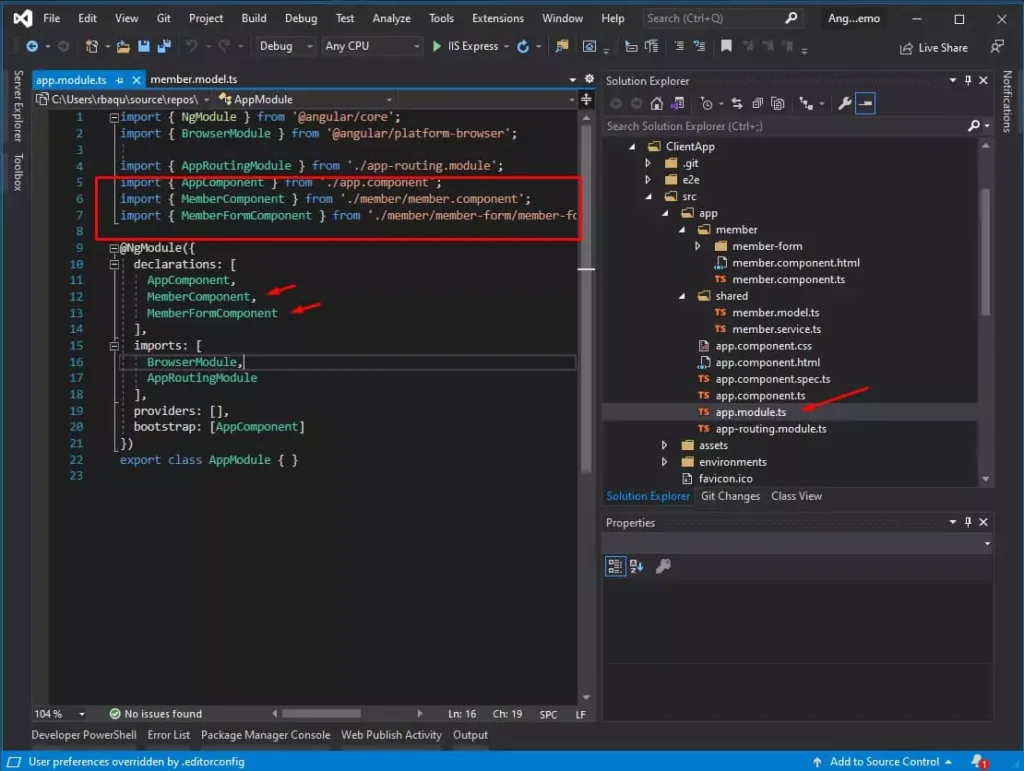
V. Create Angular Service and Model Class
This service will handle the connection to our WEB API. If you remember, we created a service class under the Shared folder(member.service.ts). We also made a member.model.ts which is the model property of the member model.
First, create the property of member.model.ts. Open member.model.ts, then add the properties from the code below. This property declared on the code is also based on the member model on our Web API.
export class Members {
   id: number;
   firstName: string;
   lastName: string;
   middleName: string;
 constructor() {
     this.id = 0;
     this.firstName = "";
     this.lastName = "";
     this.middleName = "";
   }
 }
Second, call an HTTP Request. To do that we also need to add the HTTPClient module inside app.module.ts. We will also declare FormsModule, and we will use this later on building our member form to capture user inputs. To do that, open app.module.ts and add the following module.
import { FormsModule } from '@angular/forms';
import { HttpClientModule } from '@angular/common/http';
imports: [
FormsModule,
HttpClientModule
],
Third, open the member.service.ts file and inside the file, we will declare a service that will connect to the WEB API. For your reference, I also attached a list of service functions with corresponding URLs from our WEB API. Below is the list of the methods and URLs from the ASP.NET CORE WEB API.
| member.service | METHOD | MemberController Action Result | URL |
| refreshList() | HTTPGET | MemberList() | https://localhost:44336/api/Member/ |
| putMember() | HTTPPUT | UpdateMember(long id, member model) | https://localhost:44336/api/Member/{id} |
| postMember() | HTTPPOST | InsertMember([FromBody]member model) | https://localhost:44336/api/Member/ |
| deleteMember(id:number) | HTTPGET | DeleteMember(long id) | https://localhost:44336/api/Member/{id} |
Source Code:
member.service.ts
Service class » connect to the ASP.NET Core WEB API
import { Injectable } from '@angular/core';
 import { Members } from './members.model';
 import { HttpClient } from "@angular/common/http";
 @Injectable({
   providedIn: 'root'
 })
 export class MembersService {
 constructor(private http: HttpClient) {
 }
   readonly _baseUrl = "https://localhost:44336/api/Member";
 formData: Members = new Members();
   list: Members[];
 postMember() {
     return this.http.post(this._baseUrl ,this.formData);
   }
 putMember() {
     return this.http.put(${this._baseUrl}/${this.formData.id} ,this.formData);
   }
 deleteMember(id:number)
   {
      return this.http.delete(${this._baseUrl}/${id});
   }
 refreshList() {
     this.http.get(this._baseUrl)
       .toPromise()
       .then(res => this.list = res as Members[]);
   }
 }
VI. Angular Project(ClientApp) Structure
To understand the structure of an angular project, I have drawn an image representing how the view is being rendered and the main component involved in this project. Please see the image provided below.
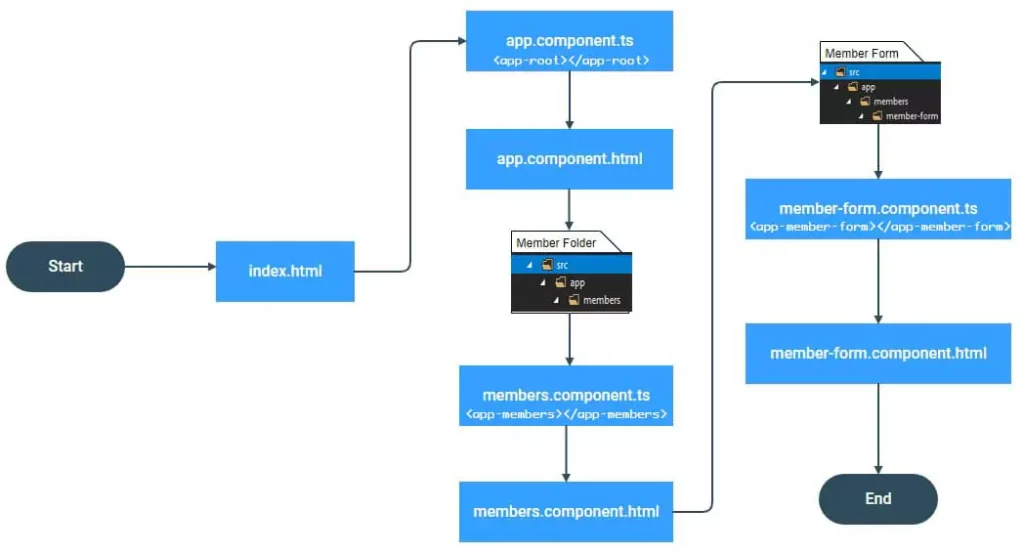
A component from an angular application contains a typescript and an HTML file. A component is called using the selector name of each .ts file and can also be called in an HTML form using this syntax <selector name></selector name>.
For example:
Below is the app.component.ts file and the selector name is app-root.
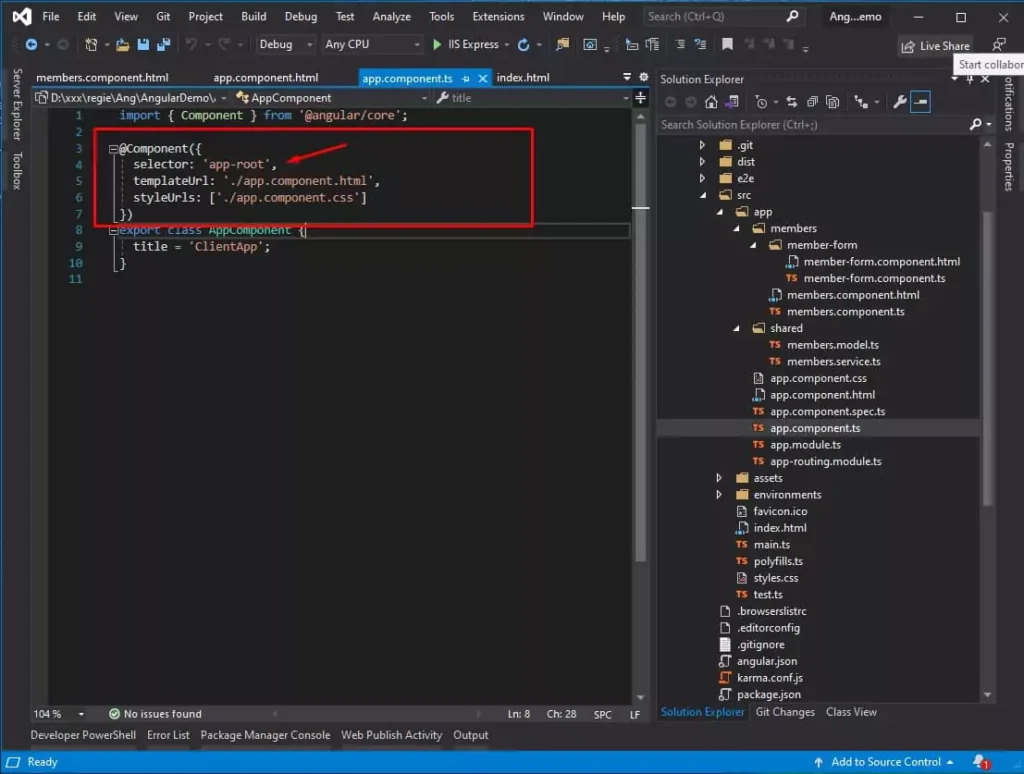
From the index.html we can call this component using this tag.
<app-root></app-root>I think that would be the basic behavior that would guide you throughout this project. So now, we can start modifying the view of our Angular project on the next step.
We are now ready to configure our Angular 11 application with ASP.NET Core Web API Application.
VII. Modify Angular default index.html
To remove the default view on angular and display the form that we created from the component. We can remove all the the script inside the body tag or you can also replace your code with the code snippet below. We want to remove all the unnecessary script and add the app root component inside the body tag, which points to the app.component.ts file.
- <app-root></app-root> » This call the app-root component which is app.component.ts.
<!doctype html>
 <html lang="en">
 <head>
   <meta charset="utf-8">
   <title>ClientApp</title>
   <base href="/">
   <meta name="viewport" content="width=device-width, initial-scale=1">
   <link rel="icon" type="image/x-icon" href="favicon.ico">
   <link rel="stylesheet" href="https://stackpath.bootstrapcdn.com/bootstrap/4.3.1/css/bootstrap.min.css" integrity="sha384-ggOyR0iXCbMQv3Xipma34MD+dH/1fQ784/j6cY/iJTQUOhcWr7x9JvoRxT2MZw1T" crossorigin="anonymous">
   <link rel="stylesheet" href="https://cdnjs.cloudflare.com/ajax/libs/font-awesome/5.15.2/css/all.min.css" integrity="sha512-HK5fgLBL+xu6dm/Ii3z4xhlSUyZgTT9tuc/hSrtw6uzJOvgRr2a9jyxxT1ely+B+xFAmJKVSTbpM/CuL7qxO8w==" crossorigin="anonymous" />
 </head>
 <body>
   <app-root></app-root>
 </body>
</html> 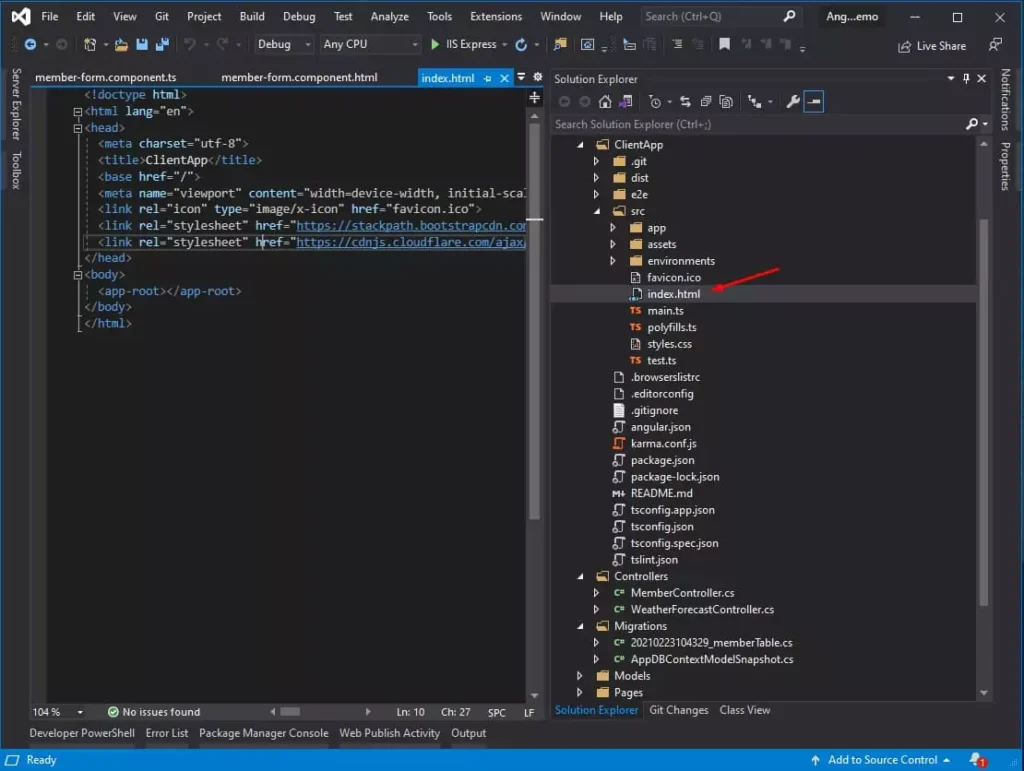
I also use Bootstrap on this design. To add Bootstrap to your project, you can google the CDN link for Bootstrap and declare it inside the header tag.
<link rel="stylesheet" href="https://stackpath.bootstrapcdn.com/bootstrap/4.3.1/css/bootstrap.min.css" integrity="sha384-ggOyR0iXCbMQv3Xipma34MD+dH/1fQ784/j6cY/iJTQUOhcWr7x9JvoRxT2MZw1T" crossorigin="anonymous">
   <link rel="stylesheet" href="https://cdnjs.cloudflare.com/ajax/libs/font-awesome/5.15.2/css/all.min.css" integrity="sha512-HK5fgLBL+xu6dm/Ii3z4xhlSUyZgTT9tuc/hSrtw6uzJOvgRr2a9jyxxT1ely+B+xFAmJKVSTbpM/CuL7qxO8w==" crossorigin="anonymous" />
VIII. Create a member form(member-form.component.html)
Now, that our service is ready, we can start creating our member form registration.
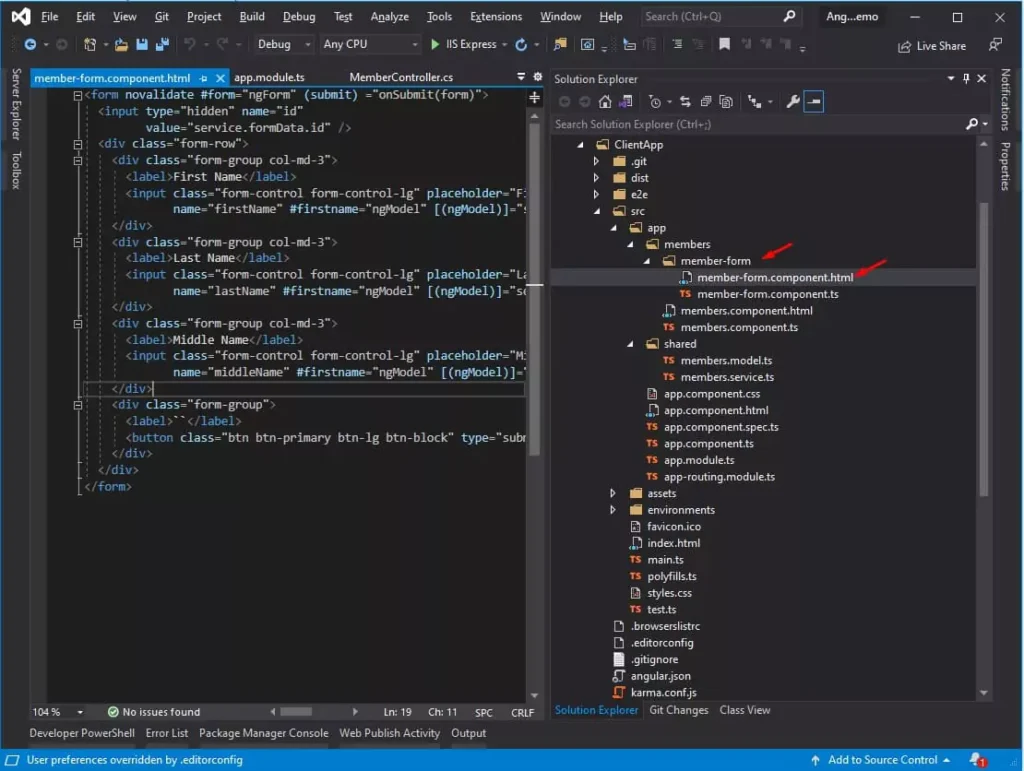
- This member-form is a child component of the member component, so to display this form, we need to call this from the parent component, which is member.component.html. We can call the member component using the following code.
<app-member-form></app-member-form>2. Navigate to your member-form folder and then open member-form.component.ts. We will add an HTML form with simple input validation. See the code snippet below.
- ngModel » This binds the input to the Member property.
- (submit) » Specify the method that will be called on submission of the form.
- ngForm » directive exported from FormsModule
<form novalidate #form="ngForm" (submit) ="onSubmit(form)">
<input type="hidden" name="id"
value="service.formData.id" />
<div class="form-row">
<div class="form-group col-md-3">
<label>First Name</label>
<input class="form-control form-control-lg" placeholder="First Name"
name="firstName" #firstname="ngModel" [(ngModel)]="service.formData.firstName" required/>
</div>
<div class="form-group col-md-3">
<label>Last Name</label>
<input class="form-control form-control-lg" placeholder="Last Name"
name="lastName" #firstname="ngModel" [(ngModel)]="service.formData.lastName" required/>
</div>
<div class="form-group col-md-3">
<label>Middle Name</label>
<input class="form-control form-control-lg" placeholder="Middle Name"
name="middleName" #firstname="ngModel" [(ngModel)]="service.formData.middleName" required/>
</div>
<div class="form-group">
<label>``</label>
<button class="btn btn-primary btn-lg btn-block" type="submit" [disabled]="form.invalid">Submit</button>
</div>
</div>
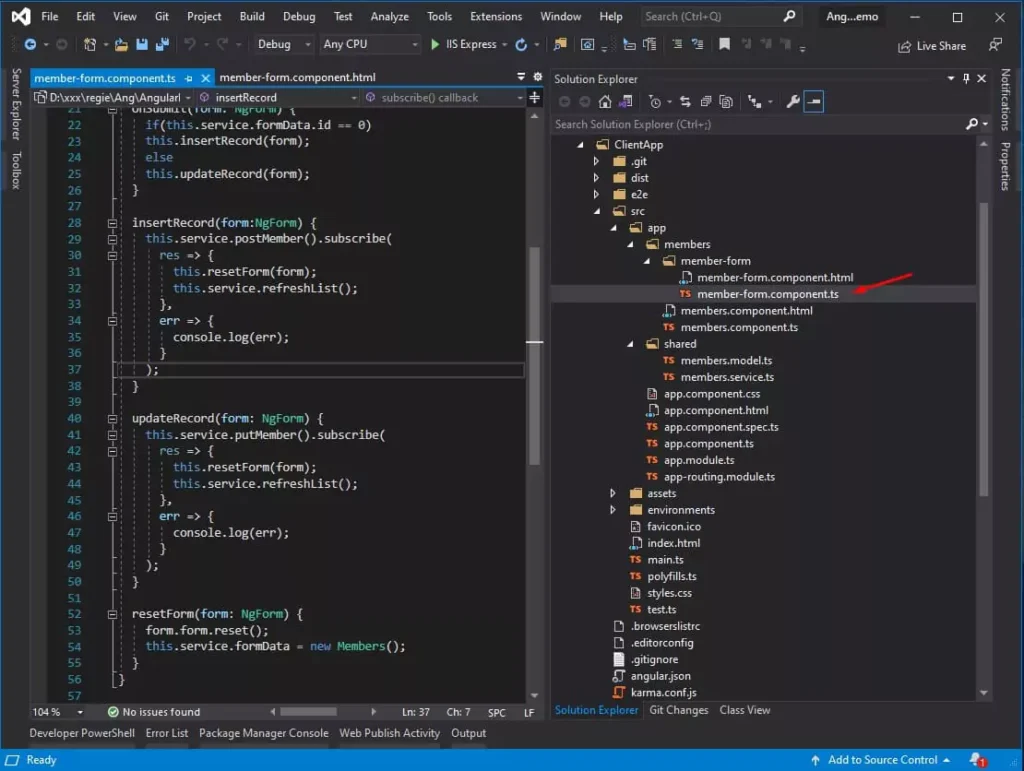
</form>3. Now, we need to create the onSubmit function inside member-form.component.ts. Aside from the onSubmit method we also need to create three additional functions inside memeber-form typescript. To summarize we will add onSubmit(), insertRecord(), updateRecord(), and resetForm().
- this.service.postMember() » This is the service method we created from member.service.ts.
- constructor(public service: MembersService) » declaration to use the Member service
Source Code:
import { Component, OnInit } from '@angular/core';
 import { MembersService } from '../../shared/members.service';
 import { NgForm } from '@angular/forms';
 import { Members } from '../../shared/members.model';
 @Component({
   selector: 'app-member-form',
   templateUrl: './member-form.component.html',
   styles: [
   ]
 })
 export class MemberFormComponent implements OnInit {
 constructor(public service: MembersService) {
 }
 ngOnInit(): void {
   }
 onSubmit(form: NgForm) {
     if(this.service.formData.id == 0) //we will use the id as identifier for updating or insertion
     this.insertRecord(form);
     else
     this.updateRecord(form);
   }
 insertRecord(form:NgForm) {
     this.service.postMember().subscribe(
       res => {
         this.resetForm(form);
         this.service.refreshList();
       },
       err => {
         console.log(err);
       }
     );
   }
 updateRecord(form: NgForm) {
     this.service.putMember().subscribe(
       res => {
         this.resetForm(form);
         this.service.refreshList();
       },
       err => {
         console.log(err);
       }
     );
   }
 resetForm(form: NgForm) {
     form.form.reset();
     this.service.formData = new Members();
   }
 }
For reference, I also attached a screenshot of my member-form.component.ts and the source code.
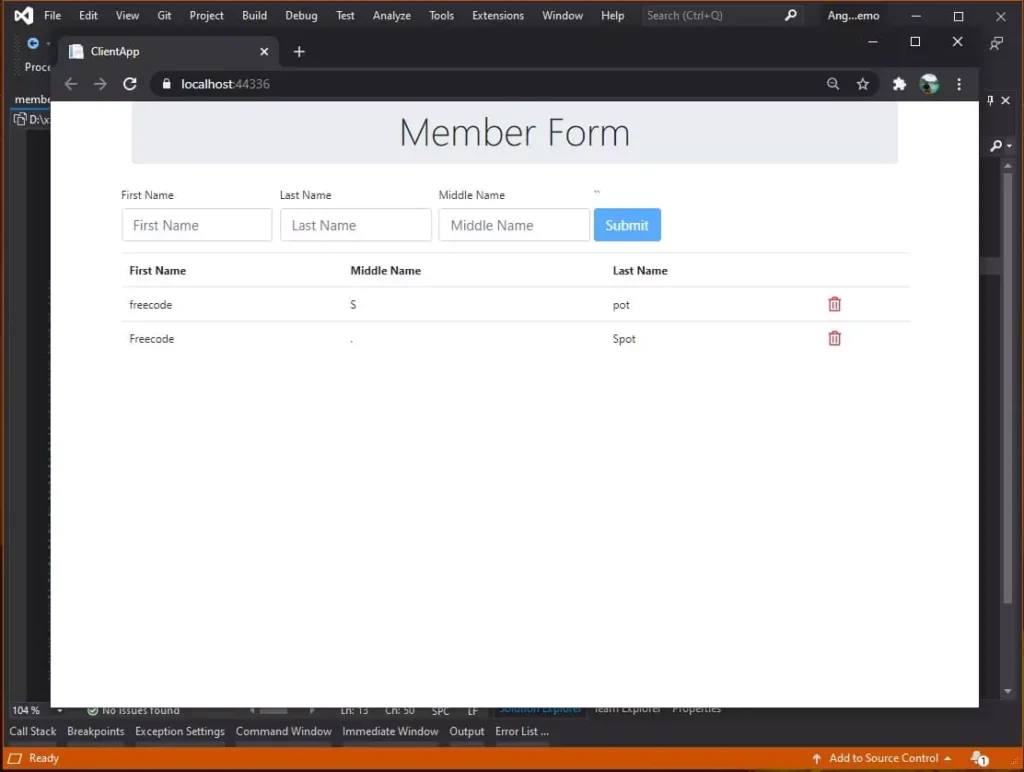
IX. Display Child Component member-form
To display the form that we created from the child component member-form, we also need to add the member-form selector on member.component.html. We can call it using the selector member-form. We will also generate an HTML table that will display a list of members, select a specific record for update, and delete members from the database.
1. Open the member.component.html and then add the member-form component using the code snippet below.
 <div class="jumbotron py-2">
   <h1 class="display-4 text-center">Member Form</h1>
 </div>
 <div class="row">
     <app-member-form></app-member-form>
 </div>
2. Now let’s create a table to display the list of members and also add a click event on each row from the table. See the code below.
- (click)=”populateForm(row)” » function when a click event is triggered.
 <div class="jumbotron py-2">
   <h1 class="display-4 text-center">Member Form</h1>
 </div>
 <div class="row">
 <app-member-form></app-member-form>
   <table class="table">
     <thead>
       <tr>
         <th>First Name</th>
         <th>Middle Name</th>
         <th>Last Name</th>
         <th></th>
       </tr>
     </thead>
     <tbody>
       <tr *ngFor="let row of service.list">
         <td (click)="populateForm(row)">{{row.firstName}}</td>
         <td (click)="populateForm(row)">{{row.middleName}}</td>
         <td (click)="populateForm(row)">{{row.lastName}}</td>
         <td></td>
       </tr>
     </tbody>
   </table>
 </div>
3. Let’s also add a delete button with an onclick action.
 <div class="jumbotron py-2">
   <h1 class="display-4 text-center">Member Form</h1>
 </div>
 <div class="row">
 <app-member-form></app-member-form>
   <table class="table">
     <thead>
       <tr>
         <th>First Name</th>
         <th>Middle Name</th>
         <th>Last Name</th>
         <th></th>
       </tr>
     </thead>
     <tbody>
       <tr *ngFor="let row of service.list">
         <td (click)="populateForm(row)">{{row.firstName}}</td>
         <td (click)="populateForm(row)">{{row.middleName}}</td>
         <td (click)="populateForm(row)">{{row.lastName}}</td>
         <td>
           <i class="far fa-trash-alt fa-lg text-danger" (click)="onDelete(row.id)"></i>
         </td>
       </tr>
     </tbody>
   </table>
 </div>
4. On the member.component.ts, we also need to add the function that we specify on the click event on our HTML table. What we need is a function for onDelete() and populateForm(). You can also copy the code snippet below.
- this.service.refreshList(); » get the member record from the Web API and fill the service.list.
 import { Component, OnInit } from '@angular/core';
 import { Members } from '../shared/members.model';
 import { MembersService } from '../shared/members.service';

 @Component({
   selector: 'app-members',
   templateUrl: './members.component.html',
   styles: [
   ]
 })
 export class MembersComponent implements OnInit {

   constructor(public service: MembersService) { }

   ngOnInit(): void {
     this.service.refreshList();
   }

   populateForm(selectedRecord: Members) {
     this.service.formData = Object.assign({},selectedRecord);
   }

   onDelete(id:number)
   {
     this.service.deleteMember(id)
     .subscribe(
       res=>{
          this.service.refreshList();
       },
       err=>{console.log(err)}
     )
   }
 }
X. Run Angular 11 Application with ASP.NET Core Web API
Now, it’s time to run your application, and let’s see what this looks like in a browser. To do that, run your Angular Application using the terminal or a command prompt, then execute “ng serve” or “npm run ng serve.” Once your angular app is running, press F5 on your keyboard.
- Run ng serve on a command prompt:
2. Run Visual Studio by pressing F5 or manually pressing the play button.
3. A web browser will prompt and display your Application.
That’s it this is how you build a basic Angular 11 application with ASP.NET Core.
Download Source Code
If your application is not running for some reason, you may also download the source code for this tutorial on my GitHub account @coderbugzz.
Error Running the downloaded source code:
1. The first thing you need to make sure of is to install the .NET Core 5.0 SDK
2. Then rename the ClientApp - Copy to ClientApp
3. If you encounter a typescript syntax error. You can run the following command to install the typescript.
npm install tslib --save-dev4. When you finally run the angular app with npm run ng serve, and you encounter this error.
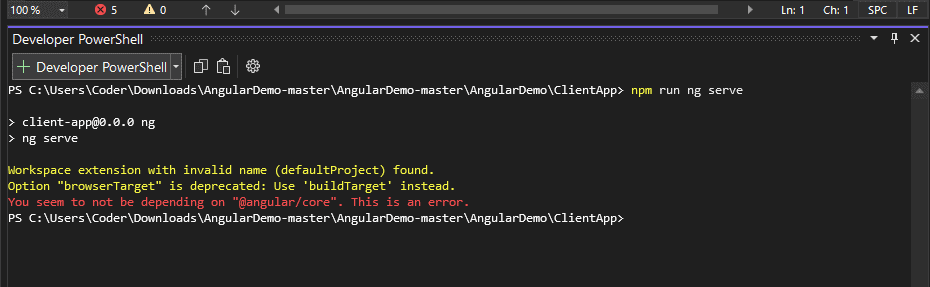
Run npm install command, and try running ng serve again.
5. If you are running the latest version of Nodejs you probably encounter this error.
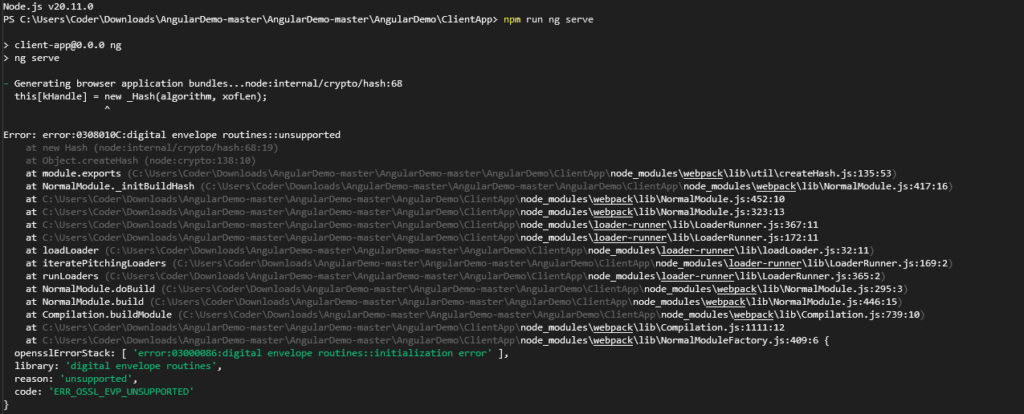
The easiest solution is to downgrade your Nodejs version or else you can follow this tutorial to create a new project using the latest version of Nodejs.
To easily change Nodejs version you can follow the steps below.
1. Download NVM for windows.
2. Install the Nodejs version v16 or any other version you prefer
nvm install v16 3. You can switch the version you use by running this command.
nvm use v164. Verify the node version using node -v command.
5. Now, try running npm run ng serve again.
XI. Summary
In this tutorial, we build an Angular 11 application with ASP.NET Core WEB API. We have also learned to create an Angular project using Visual Studio and also recreate the Angular app using CLI to get the latest Angular app. Using the Angular framework made it easy to connect to a WEB API and also to apply some client-side validation using the form module. Hopefully, this gives you an idea of how you can start your Angular project. If this helps you, don’t forget to share this with your friends.
KEEP CODING!!