Logging is essential for tracking errors, keeping track of performance, and diagnosing problems with our web application. Effective logging enables developers to quickly locate and fix issues, enhancing application performance and user experiences. Popular logging framework NLog offers logging in ASP.NET Core with a wealth of capabilities and flexibility.
- I. Create a new ASP.NET Core Web Application
- II. Configure Logging provider in Program.cs
- III. Create Nlog configuration
- IV. Setup logging example from HomeController
- V. Console logging
- VI. Logging To File
- VII. Logging to a JSON File
- VIII. Logging to a Database
- IX. Logging to the Database using SQL Stored Procedure
- X. Custom Layout Parameter
- Summary
In this article, we will guide you through the process of implementing NLog for logging in ASP.NET Core applications. We’ll explore how to configure NLog with ASP.NET Core and demonstrate best practices for effective logging, ensuring your application remains robust and maintainable.
Before we start please make sure to have this following application installed on your machine.
- Latest version of Visual Studio
- Alternatively you can also use Visual Studio Code
- SQL SERVER
- .Net Core SDK 3.1
I. Create a new ASP.NET Core Web Application
- First, create your ASP.NET Core Web Application. To do that just follow the steps below.
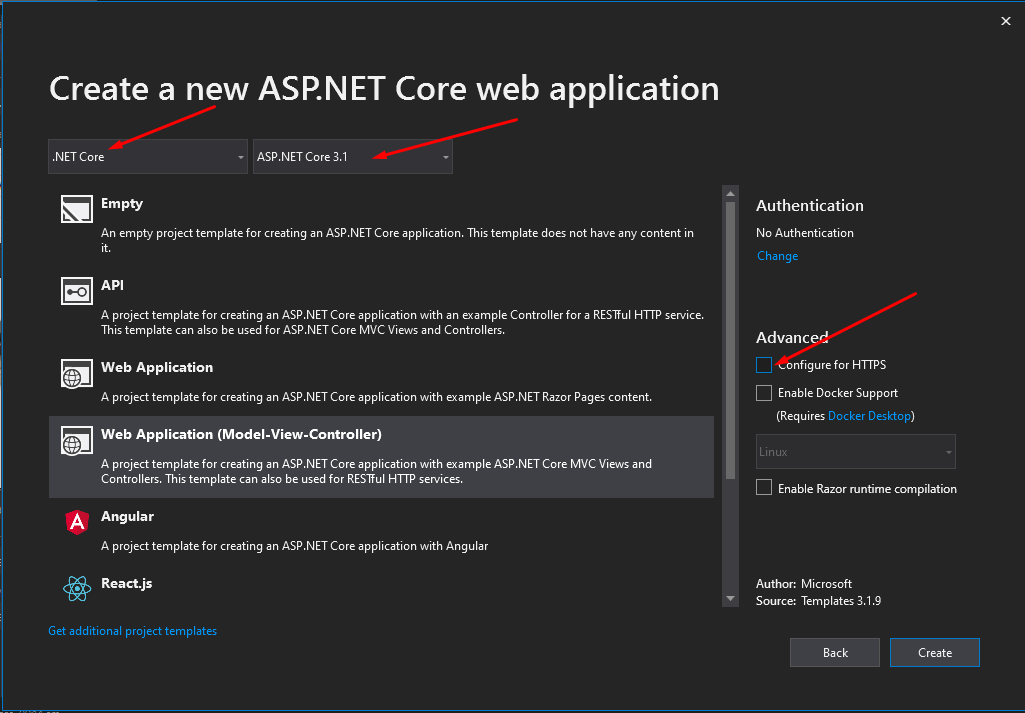
- Select File > New > Project.
- Select ASP.NET Core Web Application. Name the project NLogDemo to have the same namespace as my project. Click OK.
- Select an ASP.NET Core Web Application. and then uncheck Configure for HTTPS.
- Lastly, Click on Create.
2. Now we need to install required packages for this project. I have listed it all below.
- NLog.Web.AspNetCore
- Newtonsoft.Json
- Microsoft.Data.SqlClient
- NLog.Appsettings.Standard
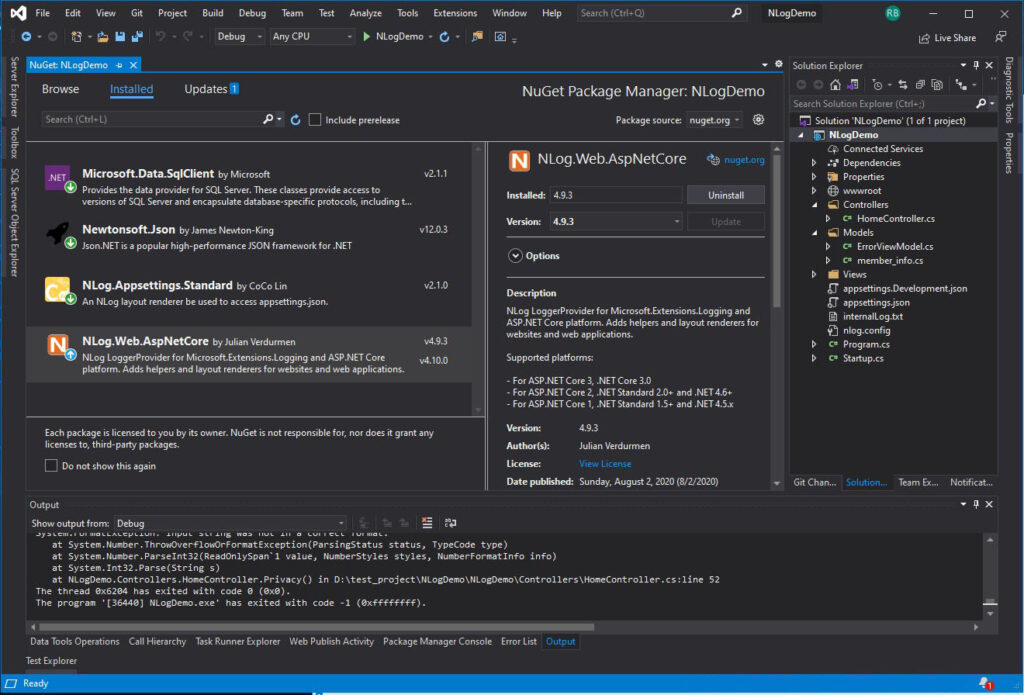
Use NuGet Package Manager to install this package. If this is your first time using this, you can visit this article.
3. After we gather all the necessary package, we will set up our connection string in appsettings.json, we will use this later on our NLog configuration.
"ConnectionStrings": {
     "default": "Data Source=DESKTOP-4DU98BI\SQLEXPRESS01;Initial Catalog=NlogDemo;User ID=freecode;Password=freecodespot;
   }
II. Configure Logging provider in Program.cs
Creating a new ASP.NET Core Web Application has already included a logging extension injected in the default controller. We need to configure logging in ASP Net Core by adding additional logging provider inside your ASP.NET Core Program.cs
To do that, open your program.cs, as shown above. Then copy the code snippet below under CreateHostBuilder method.
.ConfigureLogging((hostingContext, logging) =>
                   {
                       logging.AddConfiguration(hostingContext.Configuration.GetSection("Logging")); //appsettings.json
                       logging.AddConsole(); //Adds a console logger named 'Console' to the factory.
                       logging.AddDebug(); //Adds a debug logger named 'Debug' to the factory.
                       logging.AddEventSourceLogger(); //Adds an event logger named 'EventSource' to the factory.
                   // Enable NLog as one of the Logging Provider                   logging.AddNLog();               })
Below is the full code inside my program.cs after I added the code snippet.
using Microsoft.AspNetCore.Hosting;
 using Microsoft.Extensions.Configuration;
 using Microsoft.Extensions.Hosting;
 using Microsoft.Extensions.Logging;
 using NLog;
 using NLog.Extensions.Logging;
 using NLog.Web;
 using System;
 using System.Collections.Generic;
 using System.Linq;
 using System.Threading.Tasks;
 namespace NLogDemo
 {
     public class Program
     {
         public static void Main(string[] args)
         {
             CreateHostBuilder(args).Build().Run();
         }
     public static IHostBuilder CreateHostBuilder(string[] args) =>         Host.CreateDefaultBuilder(args)
               .ConfigureLogging((hostingContext, logging) =>
               {                   logging.AddConfiguration(hostingContext.Configuration.GetSection("Logging")); //logging settings under appsettings.json
                   logging.AddConsole(); //Adds a console logger named 'Console' to the factory.
                   logging.AddDebug(); //Adds a debug logger named 'Debug' to the factory.
                   logging.AddEventSourceLogger(); //Adds an event logger named 'EventSource' to the factory.
                   // Enable NLog as one of the Logging Provider                   logging.AddNLog();
              })
             .ConfigureWebHostDefaults(webBuilder =>
             {
                 webBuilder.UseStartup<Startup>();
             });
 }
 }
III. Create Nlog configuration
As you have observed above, we added Nlog as one of the logging providers. We will use Nlog to write logs to a file and the database. For Nlogs to work, we need to create a separate configuration file that is nlog.config. This steps can also be used on other third-party extensions if you will use logging in ASP NET Core. Let’s go ahead and follow the steps below.
- Add new item, by right-clicking on your project. See the image below.
2. In a new window, search for a text file, then name it as nlog.config, once you did, click on the Add button. See the image below.
3. After adding the config file. Add the snippet below. This code snippet is the default Nlog config found on their GitHub documentation.
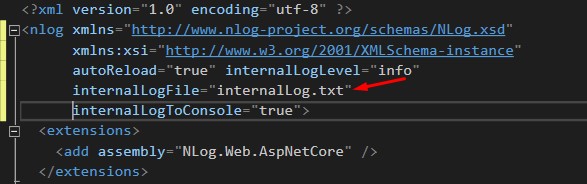
<?xml version="1.0" encoding="utf-8" ?>
<nlog xmlns="http://www.nlog-project.org/schemas/NLog.xsd" xmlns:xsi="http://www.w3.org/2001/XMLSchema-instance" autoReload="true" internalLogLevel="info" internalLogFile="internalLog.txt" internalLogToConsole="true">
  <extensions>
    <add assembly="NLog.Web.AspNetCore" />
  </extensions>
  <!-- the targets to write to -->
  <targets>
        <!--place target here-->
  </targets>
  <!-- rules to map from logger name to target -->
  <rules>
      <!--place rule here-->
  </rules>
</nlog>
Tags and Property Definition
| Tags/properties | Description |
| internalLogFile | Create a text file for logs provider internal error |
| internalLogToConsole | Enable logging nlog error to a console |
| <targets> | all the logging target found |
| <rules> | Map from logger name to target(Trigers which target to execute) |
IV. Setup logging example from HomeController
Now, we have covered most of the necessary configuration for our logging provider. We have to create targets and rules for our logging provider to perform, but before that, let’s add logs to our controller using dependency injection.
- Open your controller, which in my case since it’s HomeController.
- If you are using the default controller for ASP.NET Core from a newly created project, ILogger is already added. See the code snippet below.
private readonly ILogger _logger;
public HomeController(ILogger<HomeController> logger)
{
_logger = logger;
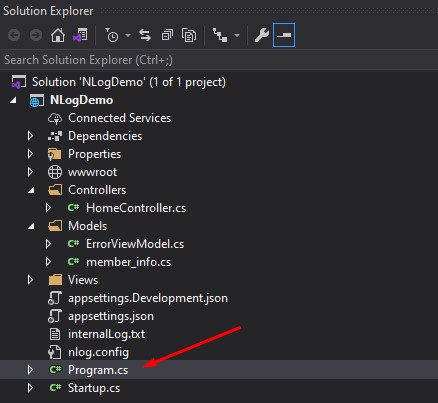
}3. Now, this part is just additional data that I want to add in my logs. I created a model class name member_info. Then I added two properties. I will use this to generate a JSON value.
public class member_info
     {
         public string FullName { get; set; }
         public string Website { get; set; }
     }
4. Now, Navigate back to your HomeController. Inside your index method copy and paste the code below. This snippet will log the JSON value from the model properties that we created awhile ago.
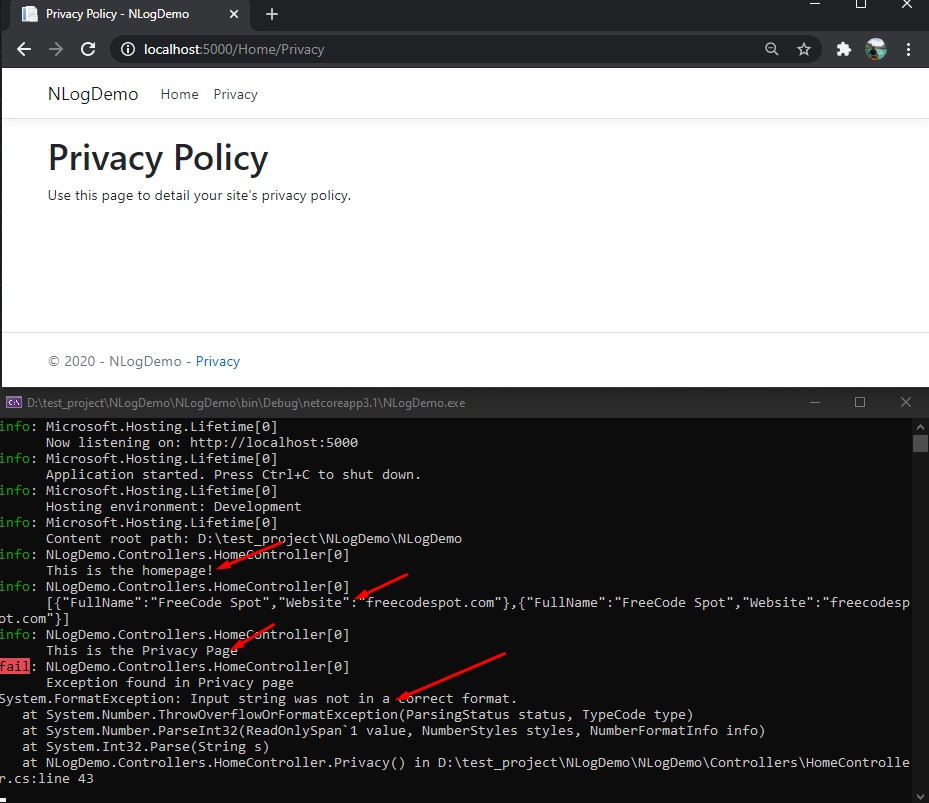
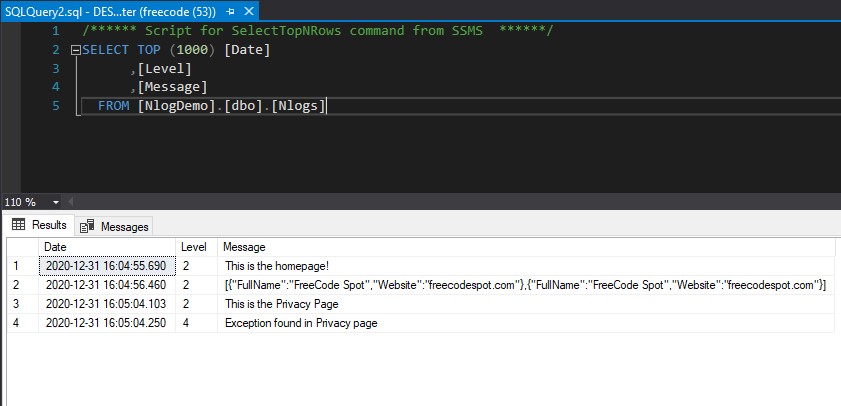
_logger.LogInformation("This is the homepage!");
 List info = new List();
info.Add(new member_info { FullName = "FreeCode Spot", Website = "freecodespot.com" });
info.Add(new member_info { FullName = "FreeCode Spot", Website = "freecodespot.com" });

string json_value = JsonConvert.SerializeObject(info);

_logger.LogInformation(json_value);
5. I also added logs information and logs error from the privacy page. See the code snippet below.
public IActionResult Privacy()
         {
             _logger.LogInformation("This is the Privacy Page");
         try
         {
             int s = int.Parse("error"); //Test excemption
         }
         catch (Exception ex)
         {
             _logger.LogError(ex, "Exception found in Privacy page");
         }
         return View();
     }
V. Console logging
This time, let’s try to run our application using a console to logging. And see if we can output the logs that we set on our HomeController.
- Instead of using IIS Express in running your application, please select the option with your project name on it. See the image below.
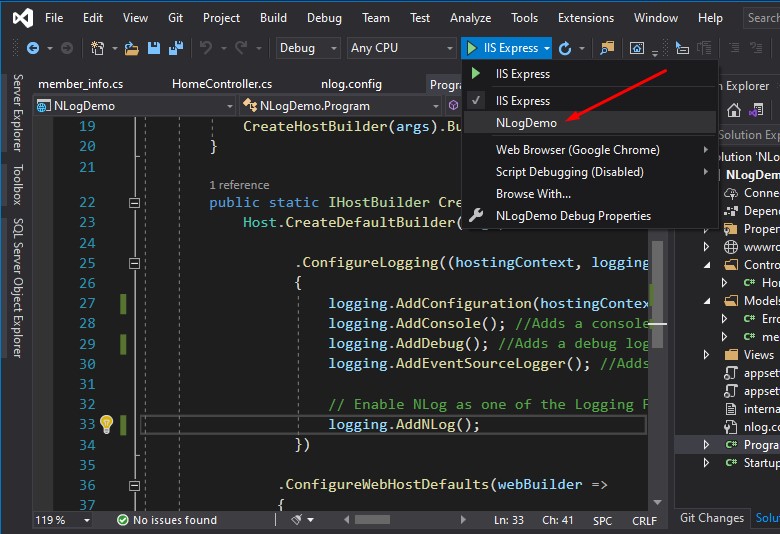
2. Running your application using this option will open up a new console window and a browser. A console window will log the error and information from our web application. The expected result should be as shown below.
- _logger.LogInformation(“This is the homepage!”);
- _logger.LogInformation(json_value);
- _logger.LogInformation(“This is the Privacy Page”);
- _logger.LogError(ex, “Exception found in Privacy page”);
VI. Logging To File
Console logging is not an option when you are about to deploy your web application. This is where we need to use a third-party extension to write our logs on a file. It could be a JSON or an actual text file. ?In this tutorial, we are going to use Nlog.
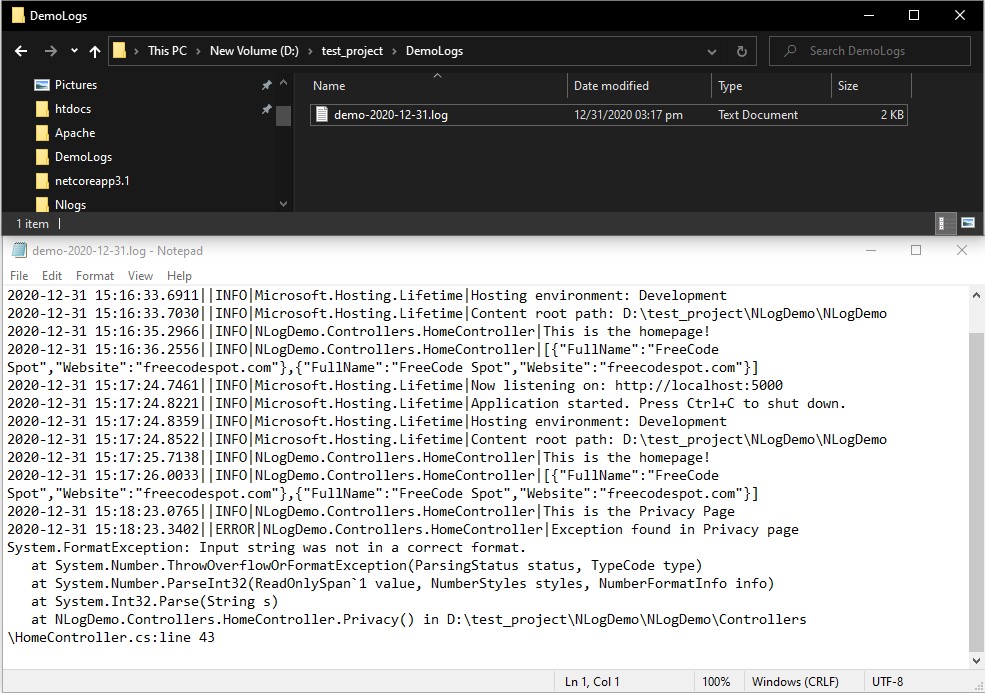
- If you remember, we created nlog.config. This is where we will create a target and a rule to write our log in a file. Place the code below inside <targets> tag. See the code snippet below for the target on writing logs to file.
 <target xsi:type="File" name="alldata"
             fileName="D:\test_project\DemoLogs\demo-${shortdate}.log"
             layout="${longdate}|${event-properties:item=EventId_Id}|${uppercase:${level}}|${logger}|${message} ${exception:format=tostring}" />
2. Now, add rule to your nlog.config. This rule will execute the target with name alldata.
<logger name="*" minlevel="Trace" writeTo="alldata" /> 3. Run your Web Application again. You should be able to see a log file under the directory that you set which in my case it’s in D: » test_project » Demologs. See the image below.
Nlog configuration should now look like this.
<?xml version="1.0" encoding="utf-8" ?>
<nlog xmlns="http://www.nlog-project.org/schemas/NLog.xsd" xmlns:xsi="http://www.w3.org/2001/XMLSchema-instance" autoReload="true" internalLogLevel="info" internalLogFile="internalLog.txt" internalLogToConsole="true">
  <extensions>
    <add assembly="NLog.Web.AspNetCore" />
  </extensions>
  <!-- the targets to write to -->
  <targets>
        <target xsi:type="File" name="alldata"
             fileName="D:\test_project\DemoLogs\demo-${shortdate}.log"
             layout="${longdate}|${event-properties:item=EventId_Id}|${uppercase:${level}}|${logger}|${message} ${exception:format=tostring}" />
  </targets>
  <!-- rules to map from logger name to target -->
  <rules>
     <logger name="Microsoft.*" minlevel="Info" final="true" />
       <logger name="*" minlevel="Trace" writeTo="alldata" />
  </rules>
</nlog>
VII. Logging to a JSON File
Now, let’s try to write the logs using a JSON Layout.
- Use the target format from the code snippet below.
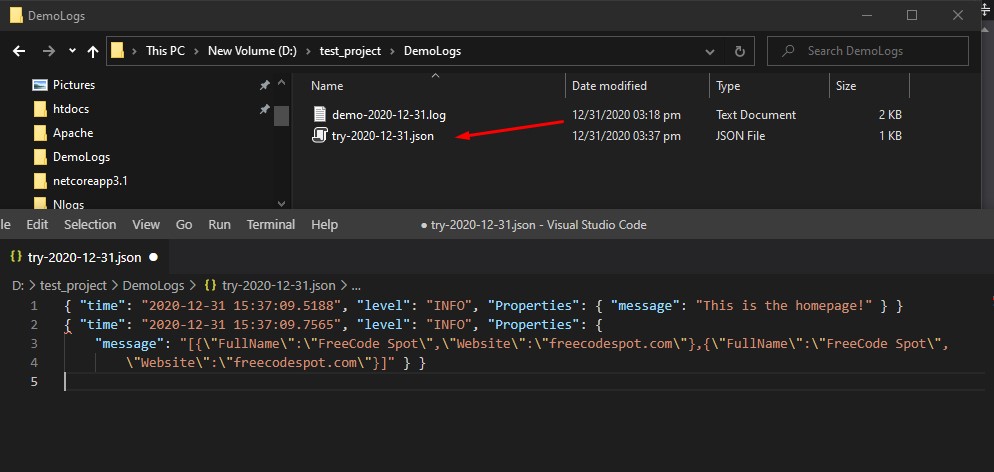
 <target name='jsonFile' type='File' fileName='D:\test_project\DemoLogs\try-${shortdate}.json'>
       <layout type='JsonLayout'>
         <attribute name='time' layout='${longdate}' />
         <attribute name='level' layout='${level:upperCase=true}'/>
         <attribute name='Properties' encode='false'  >
           <layout type='JsonLayout'>
             <attribute name='message' layout='${message}' />
             <attribute name='exception' layout='${exception}' />
           </layout>
         </attribute>
       </layout>
     </target>
2. Add the code snippet rule below.
<logger name="*" minlevel="Info" writeTo="jsonFile" /> 3. Run your application again. It should create another file, just like the image I added below.
Nlog Configuration full code snippet.
<?xml version="1.0" encoding="utf-8" ?>
 <nlog xmlns="http://www.nlog-project.org/schemas/NLog.xsd" xmlns:xsi="http://www.w3.org/2001/XMLSchema-instance" autoReload="true" internalLogLevel="info" internalLogFile="internalLog.txt" internalLogToConsole="true">
   <extensions>
     <add assembly="NLog.Web.AspNetCore" />
   </extensions>
   <!-- the targets to write to -->
   <targets>

     <target name='jsonFile' type='File' fileName='D:\test_project\DemoLogs\try-${shortdate}.json'>
       <layout type='JsonLayout'>
         <attribute name='time' layout='${longdate}' />
         <attribute name='level' layout='${level:upperCase=true}'/>
         <attribute name='Properties' encode='false'  >
           <layout type='JsonLayout'>
             <attribute name='message' layout='${message}' />
             <attribute name='exception' layout='${exception}' />
           </layout>
         </attribute>
       </layout>
     </target>
   </targets>

   <!-- rules to map from logger name to target -->
   <rules>
     <logger name="Microsoft.*" maxLevel="Info" final="true" />
     <logger name="*" minlevel="Info" writeTo="jsonFile" />

   </rules>
 </nlog>
VIII. Logging to a Database
This time, we will add our logs to the database, instead of writing to a file. Below is the table that I created for this tutorial. You can add additional columns if you want, but I only added three columns for the sake of this tutorial.
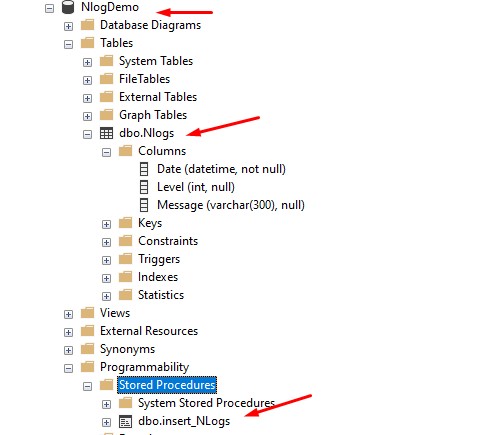
You can use the SQL Query below to create the SQL table shown above.
USE [NlogDemo]
 GO

 SET ANSI_NULLS ON
 GO
 SET QUOTED_IDENTIFIER ON
 GO
 CREATE TABLE [dbo].[Nlogs](
     [Date] [datetime] NOT NULL,
     [Level] [int] NULL,
     [Message] varchar NULL
 ) ON [PRIMARY]
GO- If you remember, we set our connection string inside appsettings.json. We are going to use this in our Nlog config.
"ConnectionStrings": {
     "default": "Data Source=DESKTOP-4DU98BI\SQLEXPRESS01;Initial Catalog=NlogDemo;User ID=freecode;Password=freecodespot;
   }
2. Since we added NLog.Appsettings.Standard package. We can call the connection string from appsettings.json using the code snippet below.
${appsettings:name=ConnectionStrings.default}3. Add code snippet below inside your nlog config <targets> tag.
<target name="dbase" xsi:type="Database"
       dbProvider="Microsoft.Data.SqlClient.SqlConnection, Microsoft.Data.SqlClient"
       connectionString="${appsettings:name=ConnectionStrings.default}">
       <commandtext>INSERT INTO Nlogs VALUES(@date, @lvl, @msg)</commandtext>
       <parameter name="@date" layout="${date}" dbType="SqlDbType.DateTime" />
       <parameter name="@lvl" layout="${level}" dbType="DbType.Int32" />
       <parameter name="@msg" layout="${message}" dbType="SqlDbType.VarChar" size="300" />
   </target>
4. Add this rule to execute the dbase target.
<logger name="*" minlevel="Trace" writeTo="dbase" /> 5. If you could not write to the database, check the error summary inside internalLogFile of your Nlog configuration. Also, check your database connection string if it is pointing to the right database.
6. Now, if you run your web application you should now be able to see the logs inside your table.
Nlog Configuration full code snippet:
 <?xml version="1.0" encoding="utf-8" ?>
 <nlog xmlns="http://www.nlog-project.org/schemas/NLog.xsd"
       xmlns:xsi="http://www.w3.org/2001/XMLSchema-instance"
       autoReload="true" internalLogLevel="info"
       internalLogFile="internalLog.txt"
       internalLogToConsole="true">
   <extensions>
     <add assembly="NLog.Web.AspNetCore" />
   </extensions>
   <!-- the targets to write to -->
   <targets>
     <target name="dbase" xsi:type="Database"
       dbProvider="Microsoft.Data.SqlClient.SqlConnection, Microsoft.Data.SqlClient"
       connectionString="${appsettings:name=ConnectionStrings.default}">
       <commandtext>INSERT INTO Nlogs VALUES(@date, @lvl, @msg)</commandtext>
       <parameter name="@date" layout="${date}" dbType="SqlDbType.DateTime" />
       <parameter name="@lvl" layout="${level}" dbType="DbType.Int32" />
       <parameter name="@msg" layout="${message}" dbType="SqlDbType.VarChar" size="300" />
     </target>
   </targets>

   <!-- rules to map from logger name to target -->
   <rules>
     <logger name="Microsoft.*" maxLevel="Info" final="true" />
     <logger name="*" minlevel="Trace" writeTo="dbase" />

   </rules>
 </nlog>
IX. Logging to the Database using SQL Stored Procedure
Another option in writing to the database is using a stored procedure. But before we can proceed, we need to create an actual SQL stored procedure.
Below is the insert SQL Stored Procedure that I created.
USE [NlogDemo]
 GO
 SET ANSI_NULLS ON
 GO
 SET QUOTED_IDENTIFIER ON
 GO
 -- =============================================
 ALTER PROCEDURE [dbo].[insert_NLogs]
     -- Add the parameters for the stored procedure here
     @date datetime,
     @lvl int,
     @msg varchAR(50)
 AS
 BEGIN
     -- SET NOCOUNT ON added to prevent extra result sets from
     -- interfering with SELECT statements.
     SET NOCOUNT ON;
 -- Insert statements for procedure here INSERT INTO Nlogs VALUES(@date,@lvl,@msg)
 END
This step is similar to the previous step, all you have to do to configure the targets that Instead of using this:
<target name="dbase" xsi:type="Database"
       dbProvider="Microsoft.Data.SqlClient.SqlConnection, Microsoft.Data.SqlClient"
       connectionString="${appsettings:name=ConnectionStrings.default}">
       <commandtext>INSERT INTO Nlogs VALUES(@date, @lvl, @msg)</commandtext>
       <parameter name="@date" layout="${date}" dbType="SqlDbType.DateTime" />
       <parameter name="@lvl" layout="${level}" dbType="DbType.Int32" />
       <parameter name="@msg" layout="${message}" dbType="SqlDbType.VarChar" size="300" />
     </target>
We will use this:
 <target name="dbase" xsi:type="Database"
       dbProvider="Microsoft.Data.SqlClient.SqlConnection, Microsoft.Data.SqlClient"
       connectionString="${appsettings:name=ConnectionStrings.default}"
       commandType="StoredProcedure"
       commandText="insert_NLogs">

       <parameter name="@date" layout="${date}" dbType="SqlDbType.DateTime" />
       <parameter name="@lvl" layout="${level}" dbType="DbType.Int32" />
       <parameter name="@msg" layout="${message}" dbType="SqlDbType.VarChar" size="300" />
     </target>
Now, Nlog Configuration will look like this
<?xml version="1.0" encoding="utf-8" ?>
 <nlog xmlns="http://www.nlog-project.org/schemas/NLog.xsd"
       xmlns:xsi="http://www.w3.org/2001/XMLSchema-instance"
       autoReload="true" internalLogLevel="info"
       internalLogFile="internalLog.txt"
       internalLogToConsole="true">
   <extensions>
     <add assembly="NLog.Web.AspNetCore" />
   </extensions>
   <!-- the targets to write to -->
   <targets>
     <target name="dbase" xsi:type="Database"
       dbProvider="Microsoft.Data.SqlClient.SqlConnection, Microsoft.Data.SqlClient"
       connectionString="${appsettings:name=ConnectionStrings.default}"
       commandType="StoredProcedure"
       commandText="insert_NLogs">

       <parameter name="@date" layout="${date}" dbType="SqlDbType.DateTime" />
       <parameter name="@lvl" layout="${level}" dbType="DbType.Int32" />
       <parameter name="@msg" layout="${message}" dbType="SqlDbType.VarChar" size="300" />
     </target>
   </targets>

   <!-- rules to map from logger name to target -->
   <rules>
     <logger name="Microsoft.*" maxLevel="Info" final="true" />
     <logger name="*" minlevel="Trace" writeTo="dbase" />

   </rules>
 </nlog>
You may also check the source code for this tutorial at my GitHub account coderbugzz.
X. Custom Layout Parameter
Now, here’s how you can add a custom layout parameter. You can use the below code snippet to add logs information from your Controller using the logger BeginScope.
- KeyValuePair(property_Name, Value)
Single custom parameter:
 using (_logger.BeginScope(new[] { new KeyValuePair("referenceNo", refNo) }))
             {
                 _logger.LogInformation("Logon from {0}", refNo);
             }
Multiple Custom Parameter:
KeyValuePair[] logparam = new KeyValuePair[]
{
new KeyValuePair("referenceNo", refNo), //${mdlc:item=referenceNo}
new KeyValuePair("jsonparam", json_value) //${mdlc:item=jsonparam}
};
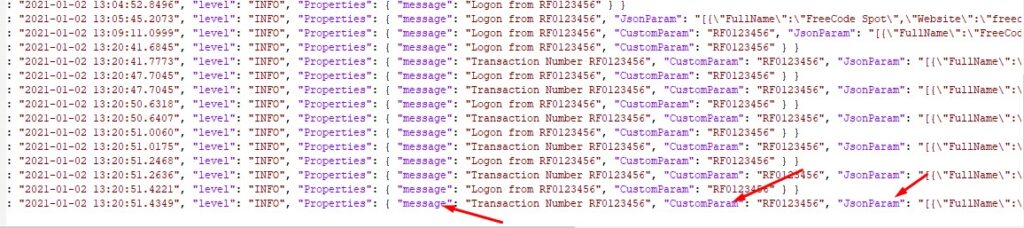
using (_logger.BeginScope(logparam)) { _logger.LogInformation("Transaction Number {0}", refNo); //${message}
};Now, to access this logs from your nlog.config, you can use this.
- ${mdlc:item=property_Name}
 <attribute name='CustomParam' layout='${mdlc:item=referenceNo}' />
 <attribute name='JsonParam' layout='${mdlc:item=jsonparam}' />
Your target layout should now look like this.
 <target name='jsonFile' type='File' fileName='D:\test_project\DemoLogs\try-${shortdate}.json'>
       <layout type='JsonLayout'>
         <attribute name='time' layout='${longdate}' />
         <attribute name='level' layout='${level:upperCase=true}'/>
         <attribute name='Properties' encode='false'  >
           <layout type='JsonLayout'>
             <attribute name='message' layout='${message}' />
             <attribute name='exception' layout='${exception}' />
             <attribute name='CustomParam' layout='${mdlc:item=referenceNo}' />
             <attribute name='JsonParam' layout='${mdlc:item=jsonparam}' />
           </layout>
         </attribute>
       </layout>
     </target>
This is how the output JSON will look like.
Summary
An effective strategy for application monitoring is to include logging to the console, a database, and a file. Developers can acquire real-time visibility, save data for analysis, and maintain an extensive record of system activity by logging events and failures to various areas.
The effective troubleshooting, performance optimization, and improvement of the general reliability and maintainability of applications are all facilitated by this multidimensional logging method. Logging will make software developer such my self to identify and remediate errors that may occur in our application. I hope this simple how-to tutorial will help you and will be used on your future projects. Share this article if it did help you, Thank you.
KEEP CODING!!