
In this article, we will explore how to manage the lifetimes of services in ASP.NET Core, an essential aspect of building scalable and efficient applications. Service lifetimes dictate how and when instances of services are created and disposed of within the application’s dependency injection container.
I. Service Lifetimes in ASP.NET Core
1. Transient
Services registered as transient are created anew each time they are requested. This makes them suitable for lightweight, stateless services where a fresh instance for every injection is appropriate. Transient services are ideal for scenarios where instances should not be reused and are expected to be short-lived.
    // Transient registration
    builder.Services.AddTransient<ITransientService, TransientService>();
2. Scoped
Scoped services are created once per client request (HTTP request in a web application). The same instance is used throughout the entire scope of a request, making them suitable for scenarios where state needs to be maintained for the duration of a specific operation or request. Scoped services strike a balance between transient and singleton lifetimes.
   // Scoped registration
    builder.Services.AddScoped<IScopedService, ScopedService>();
3. Singleton
Singleton services are created only once and the same instance is used for all requests throughout the application’s lifetime. They are suitable for stateful or expensive services that can be shared among multiple clients. Singleton services are often used for caching, configuration, and other long-lived components.
   // Singleton registration
    builder.Services.AddSingleton<ISingletonService, SingletonService>();
II. Creating a Demo Application
Now, let’s create an app to demonstrate the behavior of each service. Before you start make sure you have the following tools installed on your local machine.
- Visual Studio Code(optional)
- The latest version of Visual Studio
- .NET Core SDK
In this demo, we will use Visual Studio Code. So if you have all the necessary tools listed above. We can proceed with creating our demo app.
Step 1: Project Setup
Begin by creating a new ASP.NET Core web application. Open Visual Studio Code and select a folder directory where you want to place your ASP.NET core project. Use the command below to create a new ASP.NET core MVC app.
dotnet new mvc -n LifetimeDemo
Use the following command to change to the project directory once the project is created.
cd LifetimeDemoStep 2: Service Interface and Implementation
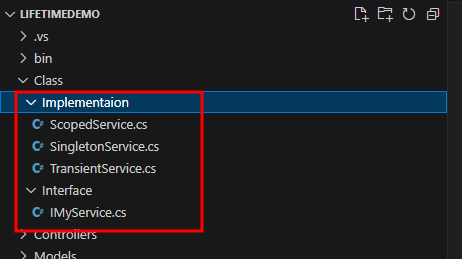
1. Create a service interface and implementation. In my case, I created a folder Class, and inside I created two subfolders which are Interface and Implementation.
2. Then, create the Interface class IMyService with the following scripts.
namespace LifetimeDemo.Class.Interface
{
    public interface IMyService
    {
            string GetMessage();
    }
}
3. Now, create an implementation class for Scoped, SIngleton, and Transient.
Use the Script below for the SingletonService.cs class:
using LifetimeDemo.Class.Interface;
namespace LifetimeDemo.Class.Implementaion
{
    public interface ISingletonService : IMyService { }
    public class SingletonService : ISingletonService
    {
        private static int instanceCount = 0;

        public SingletonService()
        {
            instanceCount++;
        }

        public string GetMessage()
        {
            return $" Singleton Service! Instance count: {instanceCount}";
        }
    }
}
For ScopedService.cs you can use the script below:
using LifetimeDemo.Class.Interface;

namespace LifetimeDemo.Class.Implementaion
{
    public interface IScopedService : IMyService { }
    public class ScopedService : IScopedService
    {
        private static int instanceCount = 0;

        public ScopedService()
        {
            instanceCount++;
        }

        public string GetMessage()
        {
            return $" Scoped Service! Instance count: {instanceCount}";
        }
    }
}
Lastly, the TransientService class:
using LifetimeDemo.Class.Interface;
namespace LifetimeDemo.Class.Implementaion
{
    public interface ITransientService : IMyService { }
    public class TransientService : ITransientService
    {
        private static int instanceCount = 0;

        public TransientService()
        {
            instanceCount++;
        }

        public string GetMessage()
        {
            return $" Transient Service! Instance count: {instanceCount}";
        }
    }
}
Step 3: Configure Services
In the Program.cs class, register the service using each of the lifetimes. Copy the code snippet below after the builder initialization(var builder = WebApplication.CreateBuilder(args);).
    // Transient registration
    builder.Services.AddTransient<ITransientService, TransientService>();

    // Scoped registration
    builder.Services.AddScoped<IScopedService, ScopedService>();

    // Singleton registration
    builder.Services.AddSingleton<ISingletonService, SingletonService>();
Step 4: Use the Service
Inject the service into the HomeController.cs file and use it in an action.
using System.Diagnostics;
using Microsoft.AspNetCore.Mvc;
using LifetimeDemo.Models;
using LifetimeDemo.Class.Implementaion;

namespace LifetimeDemo.Controllers;

public class HomeController : Controller
{
     private readonly ITransientService _transientService;
    private readonly IScopedService _scopedService;
    private readonly ISingletonService _singletonService;

    public HomeController(ITransientService transientService, IScopedService scopedService, ISingletonService singletonService)
    {
        _transientService = transientService;
        _scopedService = scopedService;
        _singletonService = singletonService;
    }
    public IActionResult Index()
    {
         ViewBag.TransientMessage = _transientService.GetMessage();
        ViewBag.ScopedMessage = _scopedService.GetMessage();
        ViewBag.SingletonMessage = _singletonService.GetMessage();
        return View();
    }
}
Step 5: Display the Message
Modify the Views/Home/Index.cshtml file to display the message returned by the service. I also injected the Interface directly in the View to see the difference between Scoped and Transient.
@using LifetimeDemo.Class.Implementaion;
@inject IScopedService scoped
@inject ITransientService transient
@inject ISingletonService singleton
@{
ViewData["Title"] = "Home Page";
}
<div class="text-center">
<h1 class="display-4">Service Lifetime Demo</h1>
<table class="table">
<thead>
<tr>
<th>LifeTime</th>
<th>HomeController instance</th>
<th>View instance</th>
</tr>
</thead>
<tbody>
<tr>
<td>Singleton</td>
<td>@ViewBag.SingletonMessage</td>
<td>@singleton.GetMessage()</td>
</tr>
<tr>
<td>Scoped</td>
<td>@ViewBag.ScopedMessage</td>
<td>@scoped.GetMessage()</td>
</tr>
<tr>
<td>Transient</td>
<td>@ViewBag.TransientMessage</td>
<td>@transient.GetMessage()</td>
</tr>
</tbody>
</table>
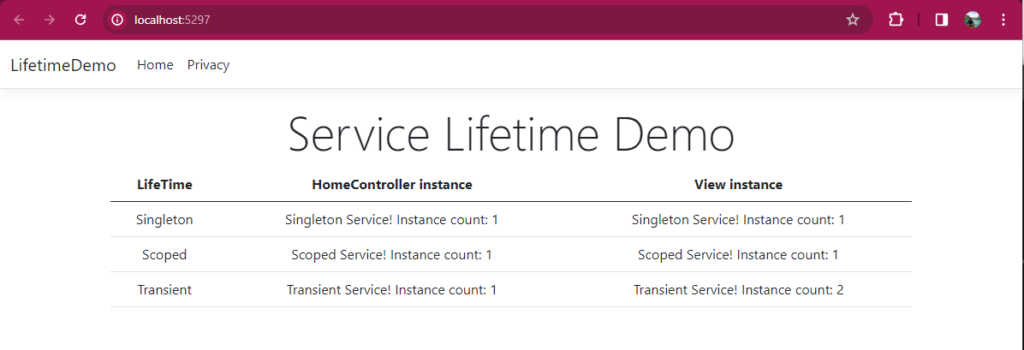
</div>The HTML above will display a table where you can see the number of instances in each lifetime and see it’s behavior. See the image below.
Step 6: Run the Application
Execute dotnet run in the terminal and navigate to https://localhost:5297 to observe the behavior based on the chosen service lifetime.
What you can observe from the video above.
- A transient instance when you first run the app is 2 that is because we call the TransientService GetMessage from the HomeController and View.
- A single instance of the scope is created per HTTP request since it is limited to that specific context.
- And Singleton has 1 since it will be created one time and the same instance will be used throughout the lifetime of the application.
Reloading the page leads to the transient incrementing by two since we invoke GetMessage twice, while the scope increments by 1, being created solely with each HTTP request.
III. Additional Considerations
Now that we’ve covered the basics of service lifetimes in ASP.NET Core, let’s take a moment to explore some additional factors that can play a role in optimizing your application development experience:
1. Memory Footprint
Think of service lifetimes as a way your application manages memory. Transient services, like short-term memories, are quick to dispose of, reducing memory use. On the flip side, singleton services stick around, potentially taking up more memory throughout your application’s life.
2. Thread Safety
Consider your application’s threading model. Transient services are naturally thread-safe, each thread getting its own instance. Scoped services play nice within a single request, great for web apps. However, with singleton services shared across threads, you might need to be a bit more cautious to ensure thread safety.
3. Performance Considerations
Performance matters, and your choice of service lifetime can impact it. Transient services are quick and light. Scoped services balance things out, providing one instance per request. While singleton services are efficient to instantiate, they might introduce some contention in busy scenarios.
4. Dependency Graph Complexity
As your application grows, so does the complexity of its dependency graph. Choose service lifetimes wisely to keep things manageable. Sometimes, a mix of lifetimes can be just what you need, catering to different requirements across your application.
5. Dispose and Cleanup
For services that need a bit of tidying up or resource disposal, be mindful of their lifetimes. Each go disposes of transient services, treating them like one-time use items. At the end of a request, one can set up scoped services to perform cleanup. And singleton services might need explicit cleanup methods if they’re holding onto resources that need releasing.
Considering these factors lets you make smart decisions about service lifetimes in ASP.NET Core. This way, your application not only runs efficiently but is also resilient and easy to take care of.
IV. Download Source Code
You can download the source code from GitHub. Don’t forget to follow us for more content like this.
V. Conclusion
Understanding service lifetimes in ASP.NET Core is crucial for building robust and efficient applications. By selecting the appropriate lifetime for each service, developers can optimize resource usage and ensure the proper functioning of their applications. In this article, we’ve explored the concepts of transient, scoped, and singleton lifetimes and demonstrated their behavior through a simple ASP.NET Core web application.
KEEP Coding!