
In this guide, we will explore how to create a WEB API using NestJS and implement CRUD operation. We will also cover Dependency Injection, Data Models, and Database Integration. NestJS has emerged as a powerful tool when it comes to backend architecture, providing a scalable framework built on the principles of modularity, maintainability, and scalability.
I. Introduction
Dependency Injection (DI) is not just a fancy term; it’s a paradigm that can transform the way we structure and scale our code. Understanding how NestJS harnesses the power of dependency injection becomes very important as we take on the task of creating applications that are not only scalable but also maintainable in the long run.
Data, the backbone of any application, deserves meticulous attention in its structuring. Thus, we’ll establish best practices for crafting data models that not only encapsulate the essence of our data but also ensure scalability and readability. Additionally, we’ll introduce the concept of Data Transfer Objects (DTOs) and how they become integral in achieving structured communication within our application.
Theory without practical application often leaves a void. In the latter part of our journey, we’ll bring theory to life by building a sample application. This real-life concept will seamlessly incorporate the principles of dependency injection, effective data modeling, and robust database integration. Guided by practical examples and code snippets, you’ll witness the cohesive synergy of these principles in action.
II. Creating and Using Data Models
Defining the Essence of Data Models
In the architectural blueprint of a NestJS application, data models serve as the cornerstone, shaping the structure and representation of information within the system. A well-crafted data model not only encapsulates the essence of your application’s data but also forms a robust foundation for seamless communication between different parts of your codebase.
The Role of Data Models in NestJS
Data models act as the guardians of your application’s integrity, defining the types of data it will handle and how that data should be structured. In NestJS, they play a pivotal role in shaping the entities and relationships that mirror your business logic. Whether representing a user, a product, or any other domain entity, data models act as the blueprint for the information your application manages.
// Example of a User data model
export class User {
  id: number;
  username: string;
  email: string;
  password: string;
  createdAt: Date;
  updatedAt: Date;
}
Best Practices for Effective Data Models
Crafting effective data models requires a thoughtful approach. Here are some best practices to guide you:
1. Clarity and Readability:
- Keep model names clear and reflective of the entity they represent.
- Use descriptive field names to enhance code readability.
2. Consistency in Naming Conventions:
- Establish consistent naming conventions for models and their fields.
- Align with industry-standard practices for clarity.
3. Scalability Considerations:
- Anticipate future growth and scalability requirements when designing models.
- Plan for flexibility to accommodate changes without major overhauls.
4. Validation and Constraints:
- Implement validation rules within your models to ensure data integrity.
- Enforce constraints such as required fields or unique identifiers.
5. Separation of Concerns:
- Consider separating database-specific details from the core model.
- Embrace the idea of Data Transfer Objects (DTOs) for tailored communication between different parts of your application.
Embracing Data Transfer Objects (DTOs)
In the realm of NestJS, Data Transfer Objects (DTOs) play a crucial role in structuring the communication of data between different parts of your application. DTOs act as intermediaries, facilitating the seamless flow of information while promoting a clear and standardized approach.
- Benefits of Using DTOs: Structured Communication: DTOs define a clear structure for data exchange, reducing ambiguity.
- Validation Centralization: DTOs centralize validation logic, ensuring data consistency across your application.
- Enhanced Readability: By specifying data expectations, DTOs enhance the readability of your codebase.
Keep in mind that the choices made at this stage significantly influence the maintainability and scalability of your NestJS application.
III. Install MongoDB
In this demo project, we will use MongoDB as a database, to do that make sure that you have MongoDB compass installed on your machine. Or you can follow the steps below to install MongoDB.
1. Download MongoDB compass from here » MongoDB Compass Installer
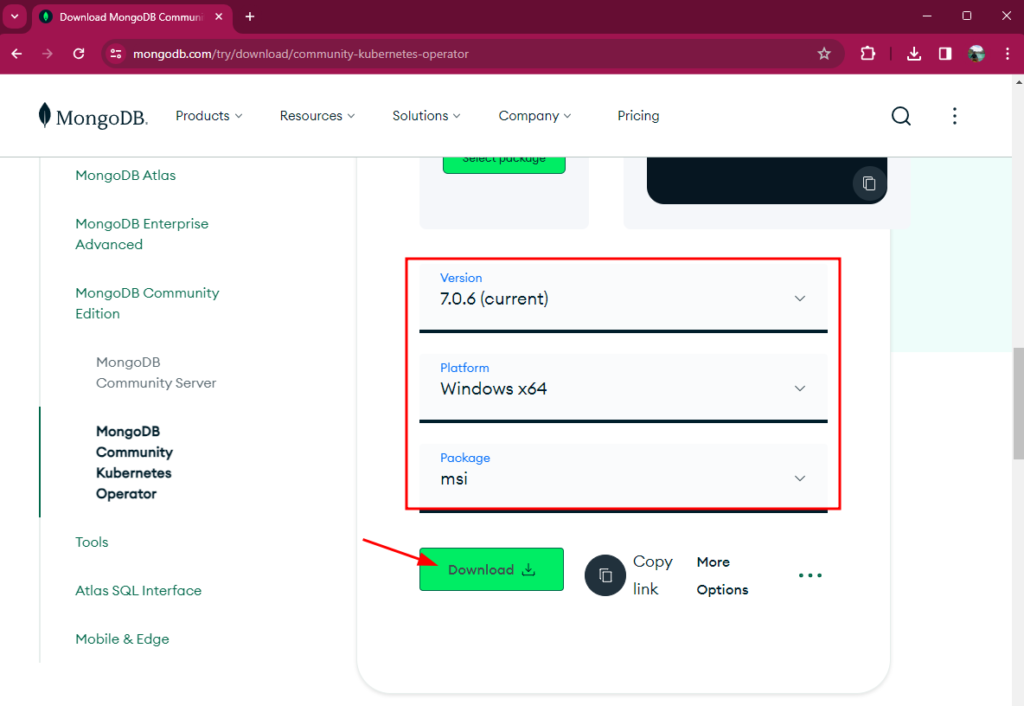
2. Once the MSI installer is downloaded run the MSI application and follow the prompts to install Compass. You can select the destination of the Compass installation.
3. Once installed, Compass launches and prompts you to connect. See the image below.
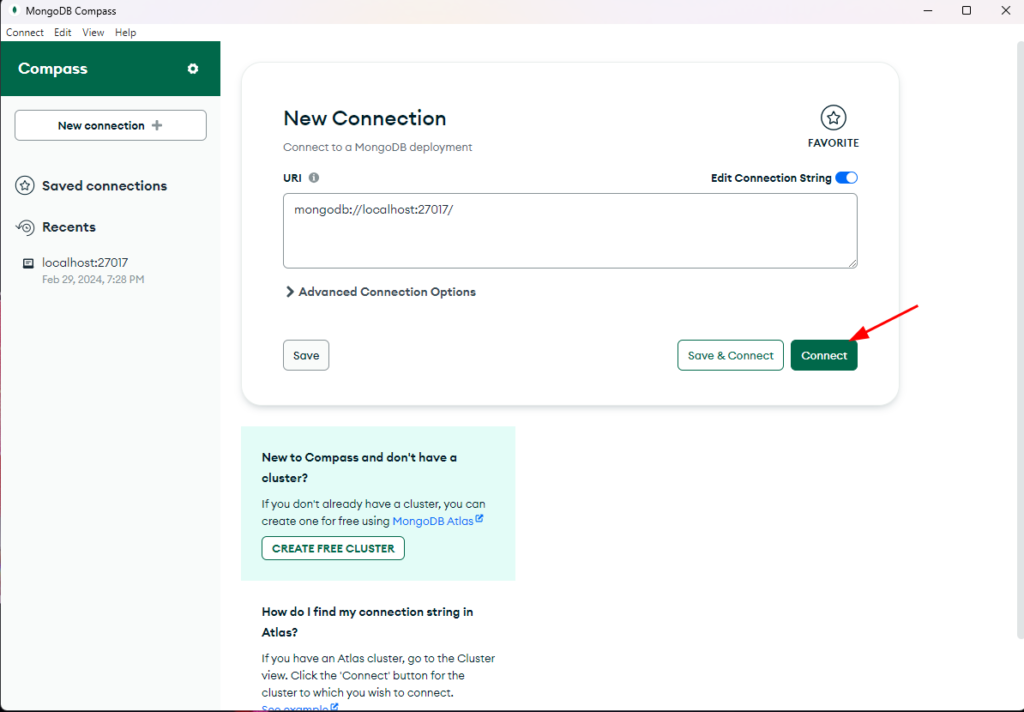
4. Click the Connect button and it will show you the default and new databases if you created one.
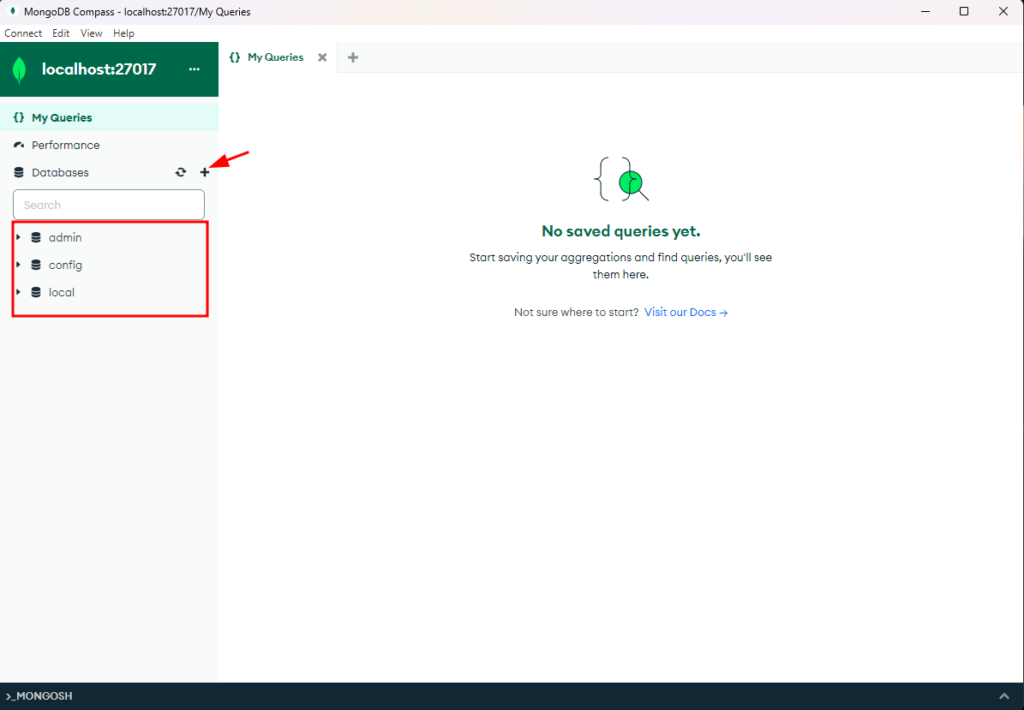
5. Compass makes it easier to manipulate data within MongoDB databases. We can create, edit, update, and delete within the compass dashboard. For example, if we create a database and its collection, we can simply click on the + button and input the name of the database and the collection.
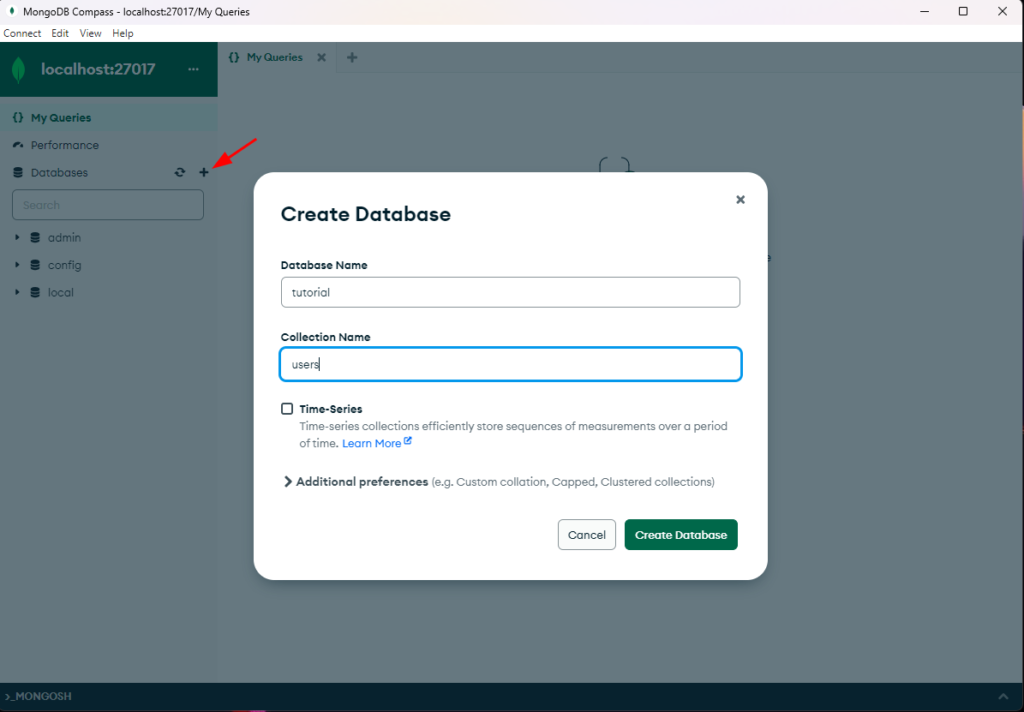
For this demo, we don’t really need to create the database and collection manually. The Nestjs API will do it for us. Now, proceed to the next step to know how we can integrate MongoDB into our NestJS app.
IV. Database Integration in NestJS
The true power of a NestJS application unfolds when it seamlessly integrates with databases, facilitating persistent data storage and retrieval. In this section, we’ll explore the intricacies of connecting NestJS applications to popular databases, such as MongoDB and PostgreSQL, and implementing essential CRUD(Create, Read, Update, and Delete) operations in creating WEB API using NestJS.
Connect to Databases
MongoDB Integration
NestJS provides a straightforward way to integrate with MongoDB using the @nestjs/mongoose package. Begin by installing the package:
npm install --save @nestjs/mongoose mongooseNow, let’s set up a simple MongoDB module and service:
Create a mogodb.module.ts file
// mongodb.module.ts
import { Module } from '@nestjs/common';
import { MongooseModule } from '@nestjs/mongoose';


@Module({
  imports: [
    MongooseModule.forRoot('mongodb://localhost/nestjs-demo'),
  ],
})
export class MongodbModule {}
Then create a user.model.ts file
// user.model.ts
import { Prop, Schema, SchemaFactory } from '@nestjs/mongoose';
import { Document } from 'mongoose';


@Schema()
export class User extends Document {
  @Prop({ required: true })
  username: string;


  @Prop({ required: true })
  email: string;


  @Prop({ required: true })
  password: string;
}


export const UserModel = SchemaFactory.createForClass(User);
Create a user.service.ts file
// user.service.ts
import { Injectable } from '@nestjs/common';
import { InjectModel } from '@nestjs/mongoose';
import { Model } from 'mongoose';
import { User } from './user.model';


@Injectable()
export class UserService {
  constructor(@InjectModel(User.name) private readonly userModel: Model<User>) {}


  async findAll(): Promise<User[]> {
    return this.userModel.find().exec();
  }


  async findById(id: string): Promise<User | null> {
    return this.userModel.findById(id).exec();
  }


  async create(user: User): Promise<User> {
    const newUser = new this.userModel(user);
    return newUser.save();
  }


  async update(id: string, user: User): Promise<User | null> {
    return this.userModel.findByIdAndUpdate(id, user, { new: true }).exec();
  }


  async delete(id: string): Promise<User | null> {
    return this.userModel.findByIdAndDelete(id).exec();
  }
}
Create WEB API using NestJS and Implement CRUD Operation
With the database connections established, let’s implement CRUD operations for our User entity. The examples showcase MongoDB, but similar principles apply to the databases.
// user.controller.ts
import { Controller, Get, Param, Post, Body, Put, Delete } from '@nestjs/common';
import { UserService } from './user.service';
import { User } from './user.model';


@Controller('users')
export class UserController {
  constructor(private readonly userService: UserService) {}


  @Get()
  async findAll(): Promise<User[]> {
    return this.userService.findAll();
  }


  @Get(':id')
  async findById(@Param('id') id: string): Promise<User | null> {
    return this.userService.findById(id);
  }


  @Post()
  async create(@Body() user: User): Promise<User> {
    return this.userService.create(user);
  }


  @Put(':id')
  async update(@Param('id') id: string, @Body() user: User): Promise<User | null> {
    return this.userService.update(id, user);
  }


  @Delete(':id')
  async delete(@Param('id') id: string): Promise<User | null> {
    return this.userService.delete(id);
  }
}
After we define our model and controller, we need to use it in our app module. You should have a structure like this:
import { Module } from '@nestjs/common';
import { MongooseModule } from '@nestjs/mongoose';
import { AppController } from './app.controller';
import { AppService } from './app.service';
import { TestControllerController } from './test-controller/test-controller.controller';
import { TestServiceService } from './test-service/test-service.service';
import { UserController } from './user.controller';
import { UserService } from './user.service';
import { User, UserModel } from './user.model';


@Module({
  imports: [
    // Add MongooseModule.forRoot with your MongoDB connection URI
    MongooseModule.forRoot('mongodb://localhost/tutorial'),


    // Add MongooseModule.forFeature to register the User model
    MongooseModule.forFeature([{ name: User.name, schema: UserModel }]),
  ],
  controllers: [AppController, TestControllerController, UserController], // Include UserController in the controllers array
  providers: [AppService, TestServiceService, UserService], // Include UserService in the providers array
})
export class AppModule {}
V. Test WEB API using Postman.
Run the nest.js app using the npm run start command. Then you can test the NestJS CRUD operation using Postman. See the video below.
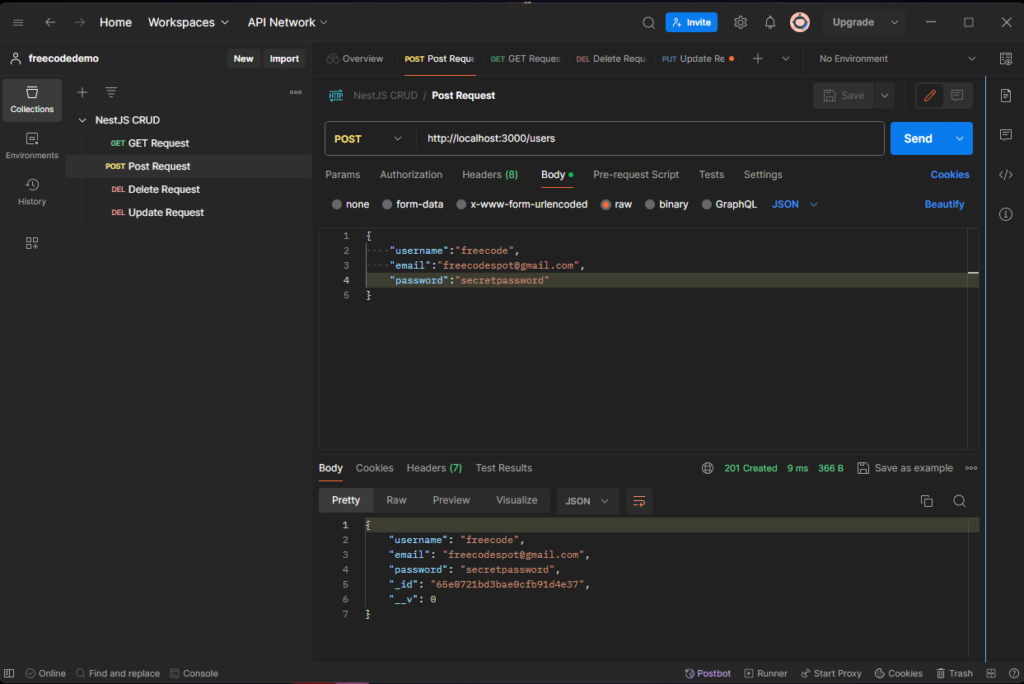
1. Test the POST endpoint
This method creates a record in the MongoDB database.
- Open the Postman application.
- Select the request type as “POST.” ,
- In the request body section, choose the raw option and select the content type (e.g., JSON).
- Enter the JSON payload representing the data you want to send in the POST request.
URL Endpoint:
http://localhost:3000/usersSample JSON payload:
{
    "username":"freecode",
    "email":"freecodespot@gmail.com",
    "password":"secretpassword"
}
2. Test the GET endpoint
This method is used to retrieve records from the database
- Open the Postman application.
- Select the request type as “GET.” ,
URL Endpoint:
http://localhost:3000/users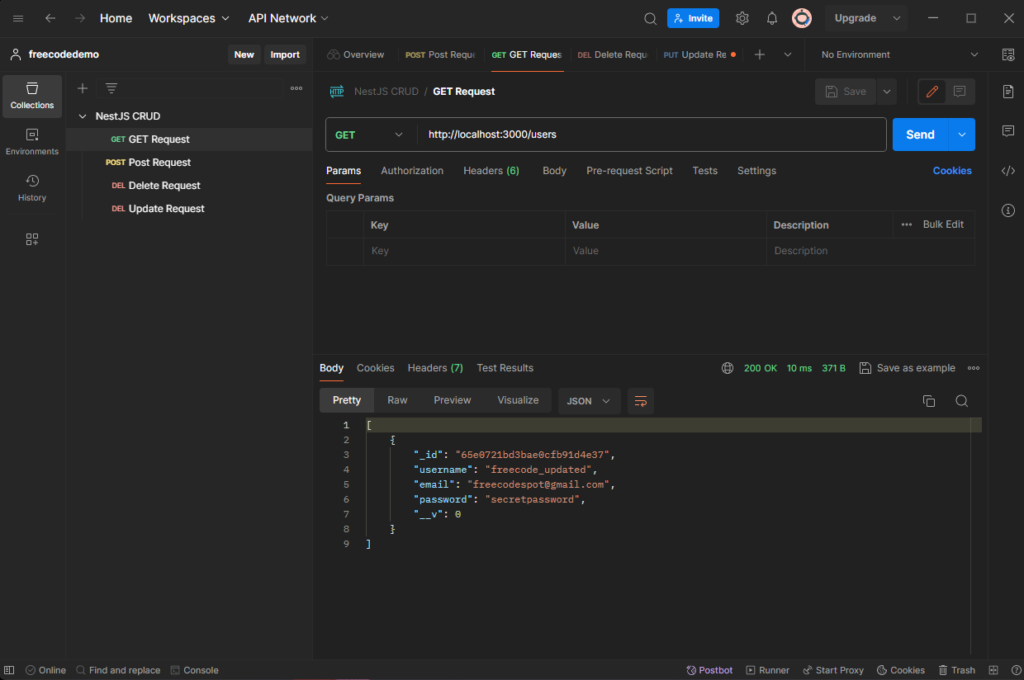
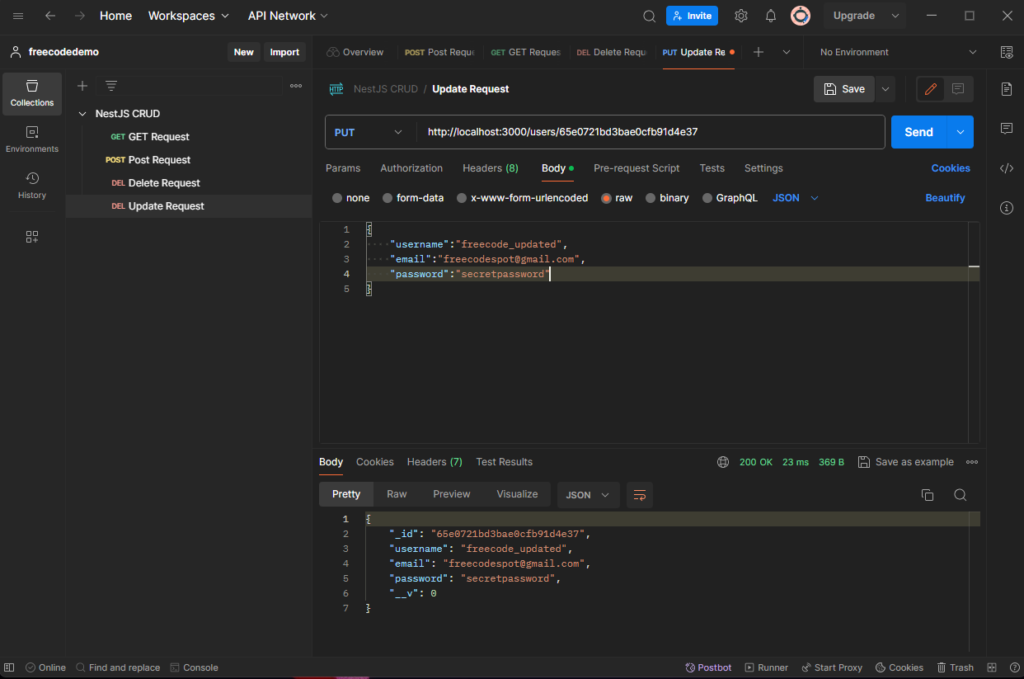
3. Test the PUT endpoint
- Open the Postman application.
- Select the request type as “PUT.” ,
- In the request body section, choose the raw option and select the content type (e.g., JSON).
- Enter the URL of your NestJS application’s PUT endpoint, and replace the {id} with the actual ID of the user you want to update.
URL Endpoint:
http://localhost:3000/users/{id}JSON Payload:
{
    "username":"freecode_updated",
    "email":"freecodespot@gmail.com"
}
4. Test the DELETE endpoint
- Open the Postman application.
- Select the request type as “DELETE.” ,
- In the request body section, choose the raw option and select the content type (e.g., JSON).
- Enter the URL of your NestJS application’s DELETE endpoint and replace the {id} with the actual ID of the user you want to delete.
URL Endpoint:
http://localhost:3000/users/{id}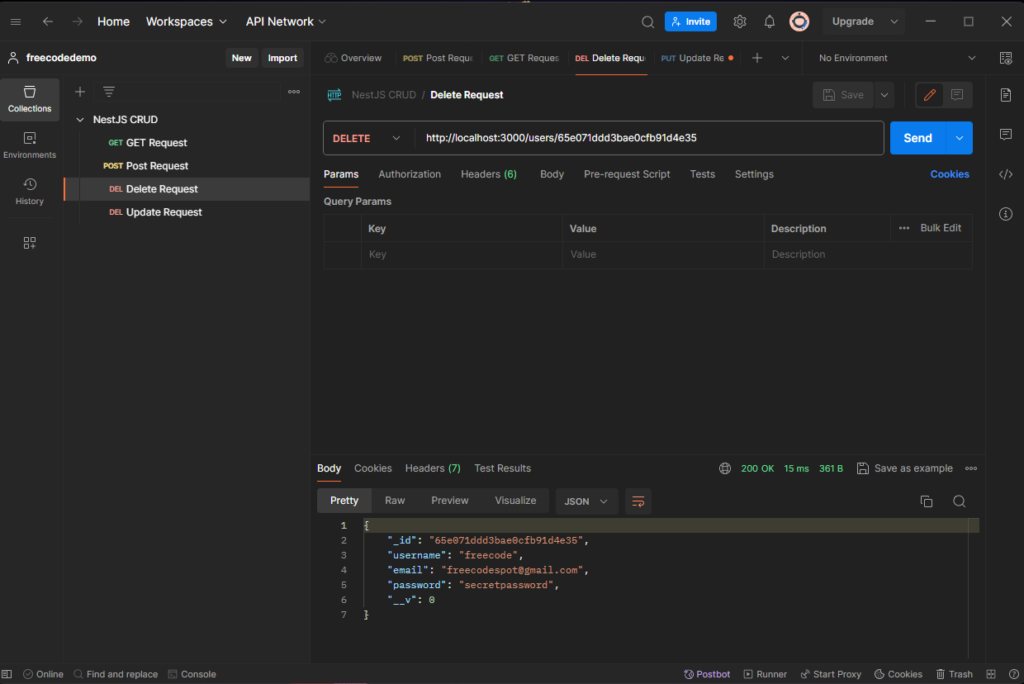
Hurray! We just created and practiced how to create data models and test WEB API using NestJS
Optimizing data models is another crucial aspect of advanced NestJS development. Beyond the basics, consider implementing strategic indexing strategies for faster query performance. Evaluate the benefits of denormalization in specific use cases, understanding its impact on both storage and retrieval. Integrate caching mechanisms judiciously to alleviate database load, particularly for frequently accessed data. These optimizations contribute to a more responsive and scalable application architecture.
When it comes to database interactions, advanced techniques involve implementing transactions to ensure the ACID properties—atomicity, consistency, isolation, and durability. NestJS supports transactional operations within its services, offering a reliable approach to maintaining data integrity. Robust error-handling strategies are equally vital. Leverage NestJS middleware and interceptors to centralize error handling, providing a cohesive mechanism for managing database errors. Consider implementing retry mechanisms for transient errors, enhancing the application’s resilience in the face of unexpected challenges.
VI. Download Source Code
If something goes wrong while you follow this step-by-step guide, you can download the current source code on GitHub. Don’t forget to follow us, for more articles like this.

Free Code ASP.NET Core Entity Framework Compilation
Conclusion
In conclusion, exploring advanced techniques in creating WEB API using NestJS, encompassing advanced dependency injection, data model optimizations, and sophisticated database interactions, empowers developers to create high-performance and resilient applications. These techniques not only address the intricacies of real-world scenarios but also contribute to the scalability and reliability of WEB API using NestJS applications in complex environments.