In this article, we will set up Python and your development environment, the first part of a four-part series on Web development with Python and Django. We will learn how we can easily begin your web development journey with Django, even if you’re a complete beginner.
- I. Introduction To Python and Django
- II. Why Python and Django are Suitable for Beginners
- III. Install Python on Window
- IV. How to set up your development environment
- V. Install Django
- VI. Introduction to the basics of Python
- 1. Syntax: The Building Blocks of Code
- 2. Variables: Storing Information
- 3. Data Types: Different Flavors of Data
- 4. Built-in Functions
- 5. Reserved Words
- 6. Indentation and Spacing
- VI. Flow control with conditions and loops in Python
- VIII. Conditions: Taking the Right Path
- IX. Loops
- X. While Loop
- XI. Creating your first Django web app
- XII. Create a Django Admin User
- Download Source Code
- Summary:
I. Introduction To Python and Django
Python is a powerful language for any kind of development, and professionals in various fields are using it for different purposes ranging from Web development to more advanced things like Machine Learning and Artificial Intelligence.
Django is a tool/framework/library (sometimes used interchangeably) written in Python that allows programmers to develop web applications and APIs (Application Programming Interfaces).
Django comes heavily packed out of the box with tools and libraries that speed up the development of your web app and take care of things like Security, Cookies, Sessions, Authentication, etc. It also comes with an admin panel to manage your resources.
II. Why Python and Django are Suitable for Beginners
Python is a relatively easy-to-learn programming language; with its English-like form and simple syntax, anyone can start programming in hours. Its simplicity and versatility make it one of the most popular and loved languages.
The creators of Django did well to follow in the steps of Python, as the Zen of Python states: “Simple is better than complex.” as such, much of the complexities of developing a large-scale web application has been abstracted and simplified by Django, making it the most used python web framework out there, and it’s being used by industry giants the likes of Instagram (by Meta) among others.
III. Install Python on Window
Firstly, to start your web development journey with Python, you need to install the Python interpreter on your computer. This allows you to run various commands and Python programs. Please keep in mind that these instructions are tailored for users with a Windows Operating System.
To install Python, follow these straightforward steps:
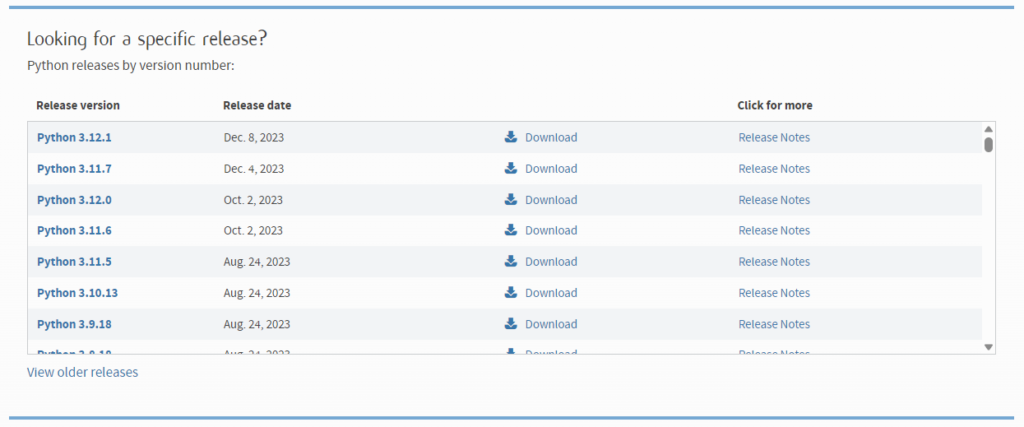
Step 1: In your web browser, go to Download Python | Python.org, scroll down to the releases page, and select a version of your choice (I recommend 3.8.0 for this tutorial).
Step 2: After downloading the file, click on the file to install Python on your computer. Follow the prompt using the default settings to install the Python Interpreter.
Step 3: Open the terminal app on your computer and type in the command below to confirm that Python is installed; you should see the version of Python installed on your computer.
py --version
IV. How to set up your development environment
Before diving into Django installation, let’s take a moment to understand what a Virtual Environment is and why it matters. A virtual environment is like a dedicated space on your computer, encompassing everything an application requires to run, primarily external libraries.
The significance of a virtual environment lies in the practice of keeping the dependencies of each project isolated. This prevents unintentional interference with libraries needed by other applications on your computer. By maintaining separation, a virtual environment ensures that each application has its own space, distinct from both other applications and the system-wide installed libraries on your computer.
Now that you grasp the concept of a virtual environment, let’s proceed to create one. Once again, open your terminal and enter the following command:
py -m venv my-app-venvthis will create a virtual environment named “my-app-venv”. It might take a little while for it to be created, and you won’t see any feedback from your terminal when it’s created, but if your cursor is blinking on a new line after you send the command, then your virtual environment should be created.
Although you’ve created a virtual environment, it isn’t activated by default – meaning if you install a library from PyPI, it’ll go straight to your computer’s default environment.
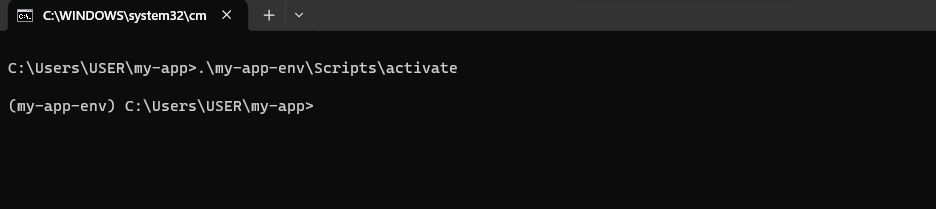
To activate your virtualenv (short for virtual environment), type in the command below and hit enter.
source \my-app-venv\Scripts\activateOr if it did not work you can try running this command instead.
.\\my-app-venv\Scripts\activateNow, your virtualenv should be activated, and you should see the name of your virtualenv enclosed in parenthesis before your active directory (on the left-hand side of your terminal).
Now, we have fully set up Python and Development Environment. We can proceed to the next step to install Django.
V. Install Django
You can now install Django to your app’s virtual environment at this stage. Run the command below.
py -m pip install django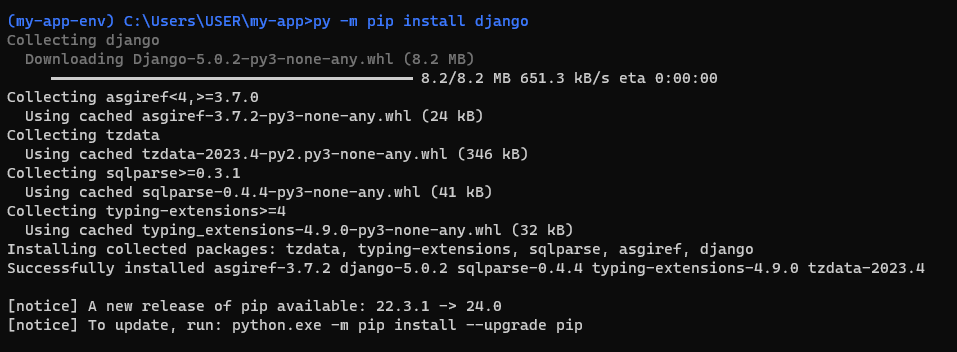
VI. Introduction to the basics of Python
Python is a powerful and versatile programming language known for its readability, beginner-friendliness, and extensive applications. Whether you’re a seasoned programmer or just starting your coding journey, Python is an excellent choice. This article will serve as a stepping stone to your Python exploration, covering the fundamental concepts with clear explanations and illustrative code examples.
1. Syntax: The Building Blocks of Code
Imagine Python syntax as the grammar of your program. It defines how you structure your code to communicate instructions to the computer. Python’s syntax is known for its simplicity and resemblance to plain English, making it easier to read and understand than other languages.
Here’s a basic example:
print("Hello, world!")This code simply prints the message “Hello, world!” to the screen. The print function is a built-in function in Python that displays output, and the parentheses contain the value you want to print out.
2. Variables: Storing Information
- Consider variables as containers that hold data you can use throughout your program. You can assign values to variables using the assignment operator (=).
name = "Alice"  # String variable
age = 30  # Integer variable
is_adult = True  # Boolean variable
3. Data Types: Different Flavors of Data
Python recognizes different data types, each with its own set of operations. Understanding these types is crucial for working effectively with your data. Here are some common data types:
- Integers: Represent whole numbers (e.g., -10, 0, 23).
- Floats: Represent decimal numbers (e.g., 3.14, -9.67).
- Strings: Represent sequences of text characters (e.g., “Hello”, “This is a string”).
- Booleans: Represent logical values, True or False.
- Lists: Ordered collections of items that can hold different data types (e.g., [1, “apple”, True]).
- Dictionaries: Unordered collections of key-value pairs (e.g., {“name”: “Bob”, “age”: 25}).
4. Built-in Functions
Python provides a rich set of built-in functions that perform various tasks without you having to write complex code from scratch. Some commonly used functions include:
- print() -:- Displays output on the screen.
- input() -:- Prompts the user to enter input and stores it as a string.
- len() -:- Returns the length of an object (e.g., the length of a string, the size of a list).
- type() -:- Returns the data type of an object.
5. Reserved Words
Certain words in Python have special meanings and cannot be used as variable or function names. These are called reserved words. Make sure to avoid using them when naming your code elements. Here are some examples:
- if, else, for, while: Used for control flow.
- def: Used to define functions.
- class: Used to define classes (classes are like a blueprint for a python object).
- True, False: Boolean values.
6. Indentation and Spacing
Unlike many other programming languages, Python uses indentation (whitespace) to define code blocks. This means proper indentation is crucial for your code to run correctly. Pay attention to the spaces you use. Python’s default indentation is four spaces long!
if age >= 18:
   print("You are an adult.")
else:
   print("You are a minor.")
To keep this article brief, we can’t cover the whole of Python, so I’ll provide links to some free resources to get you more comfortable with Python.
VI. Flow control with conditions and loops in Python
Python, like many other languages, lets you control the flow of your program using conditions and loops. This means your code can make decisions based on information and repeat tasks as needed. Let’s explore these concepts in beginner-friendly terms with some code examples!
VIII. Conditions: Taking the Right Path
Conditions are like road signs, telling your program which way to go based on certain rules. Python uses the “if”, “else”, and “elif” statements to handle these choices.
age = 16
if age >= 18:
 print("You can vote!")
else:
 print("Wait until you turn 18 to vote.")
Here, the program checks if age is greater than or equal to 18. The “You can vote!” message is printed if it is. Otherwise, the “Wait until you turn 18 to vote.” message appears.
IX. Loops
Loops are code blocks that perform repetitive action as long as a certain condition remains true. There are two types of loops in Python: for and while.
For loop:
This loop is great when you know exactly how often you want to repeat something.
for i in range(5):
  print(f"round: {i}") # Prints "round: 0", "round: 2=1”, … “round: 4”
The range(5) function creates a sequence of numbers from 0 to 4. The loop iterates five times, assigning each number to i in each turn.
X. While Loop
This loop keeps going as long as a condition is true.
number = 10
while number > 0:
 print(number)
number -= 2 # Decrease number by 2 in each iteration
Here, the loop starts with number as 10. It prints the current value and then subtracts 2 from number each time the cycle repeats. The loop continues as long as number is greater than 0.
Remember
- Indentation matters! Python uses spaces to define code blocks, so pay attention to how you format your code.
- Use clear variable names to make your code more readable.
- Test your code with different inputs to see how it behaves.
XI. Creating your first Django web app
Now that you know a bit of Python, we can continue creating our first Django web app.
Step 1. Activate your virtualenv
if you’ve closed it, you’ll need to open it up again and activate your virtualenv to proceed
source \my-app-venv\Scripts\activateStep 2. Create Project
The first step is returning to your terminal and running the command below. This will create a new Django project.
django-admin startproject mysiteIt should take a few seconds to create your project. To view the files created, you can open your working directory/folder in File Explorer to view them.
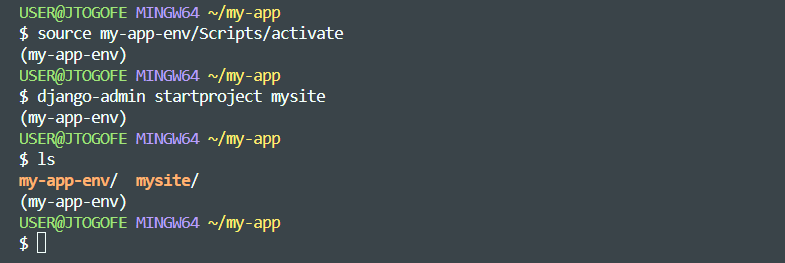
Step 3. Change working directory
Now, change your working directory into your newly created app and start your development server. To do that, run the command below.
cd mysite py manage.py runserverWhen you’ve done that, you should see a response like this,
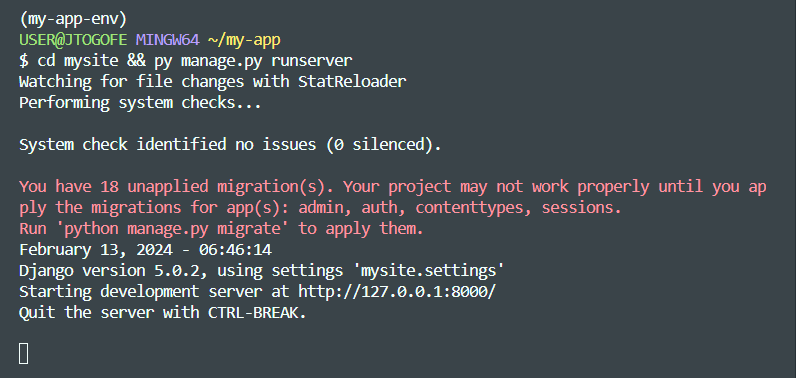
Don’t worry about the warning message. That’s pretty normal for the first time you run a Django server without making any changes.
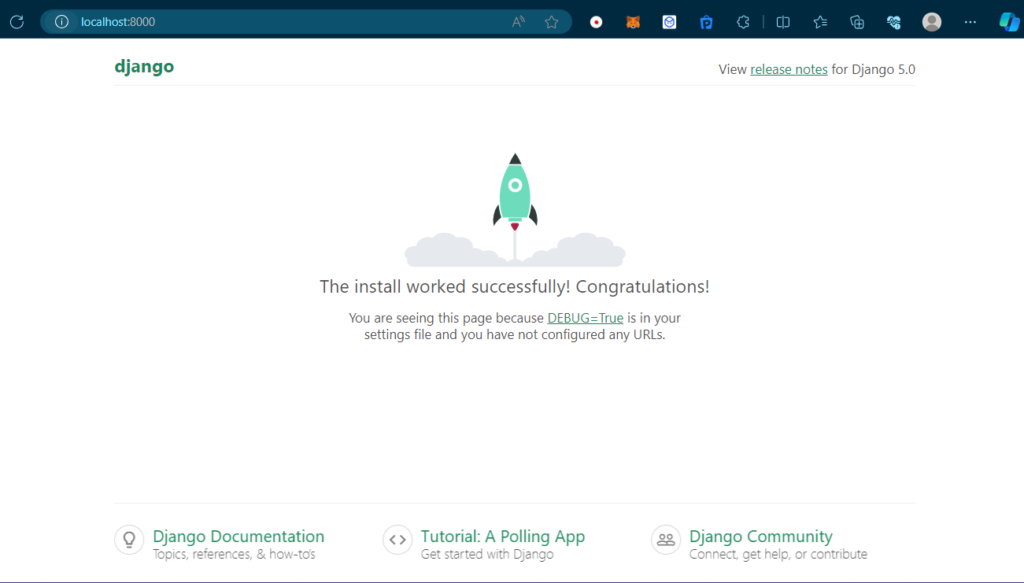
Now open your web browser and go to the URL shown in your terminal: http://127.0.0.1:8000. Alternatively, you can type in http://localhost:8000 to view your site.
To stop the server, you only need to hit Ctrl + C in your terminal, and your server will stop running.
Now, let’s create some basic database models that Django needs. This action will also get rid of that warning message when you run your server. Run the command below.
py manage.py migrateYou should see an output like so:
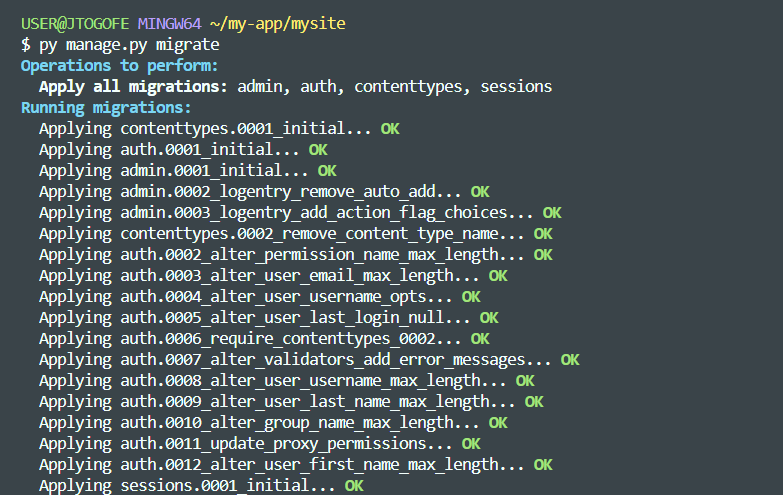
Now that migrations have been made – Migrations are how Django writes data to your database based on your models. Don’t worry if you don’t fully grasp this concept. It’ll be explained in detail in the next part of this series; for now, just keep in mind that you’ll need migrations when you want to add a table to your database.
When you make migrations for the first time, Django creates a lightweight database file, “db.sqlite3,” using SQLite – this is where all your database tables and data will be stored when you’re developing your application locally.
XII. Create a Django Admin User
Now, let’s create our admin user. Thanks to Django’s robust system, when we made our first migrations, we already created a managed user authentication system that is built into Django, and we can log in to the default Django admin dashboard.
To create your admin user, run the following command in your terminal and follow the prompt to create your user.
The email field is optional
py manage.py createsuperuser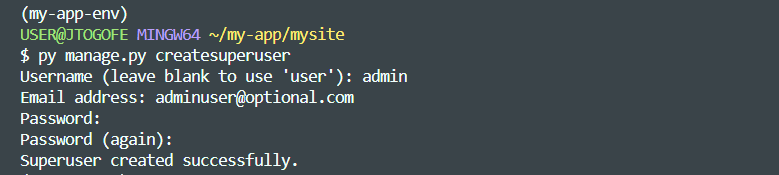
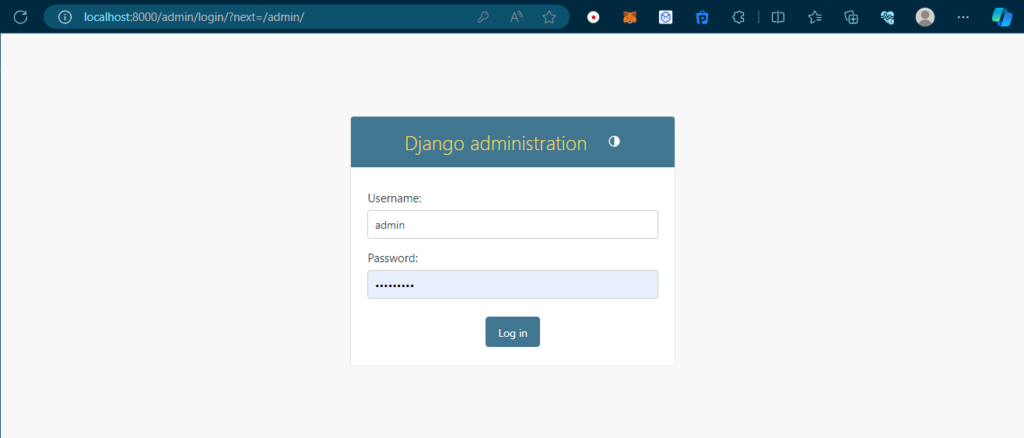
Now, start up your server again using the command below.
py manage.py runserverNavigate to http://127.0.0.1:8000/admin or http://localhost:8000/admin, and you should see a login page like this one:
You can log in with the username and password you just created, and you should be redirected to the Django admin interface, which looks like this:
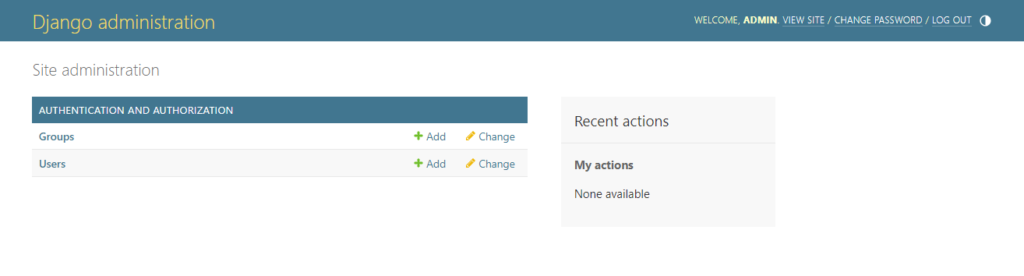
**Don’t forget to kill/stop your server when you’re done playing around with the admin**
Download Source Code
You can download the source code from GitHub.
Summary:
In this guide, we have successfully set up Python and the Development Environment. We also create a new Django project and its dependencies. As you can see, Django comes fully loaded with packages that’ll speed up your development time and a fully functional admin dashboard to manage your data and resources.
In the next part of this series, we’ll be delving deeper into Django, looking at Views, Models, Routing, and the Django Admin.