
In this tutorial, we will learn how to implement ASP NET Core CRUD Operation with Firebase Database. We will create a basic ASP.NET Core 6 web application that will use the firebase Real-Time Database.
- I. Sign up and set up a firebase Account
- II. Create Firebase Real-time Database
- III. Firebase AUTH and Base path
- IV. Create ASP.NET Core Web Application
- V. Add Dependencies
- VI. Create Student Model
- VII. Create StudentController and Add Firebase Configuration
- VIII. CREATE OPERATION
- IX. Read Operation
- X. Update Operation
- XI. Delete Operation
- XII. Set the Default Controller to StudentController
- XIII. Testing
- Summary
What is a CRUD?
CRUD is a computer programming acronym that stands for create, read, update, and delete, and it refers to the four functions that are required to develop a persistent storage application: create, read, update, and delete.
What is Firebase and Realtime database?
Firebase is a Backend-as-a-Service (Baas) that is built on Google’s infrastructure. It offers a number of tools and services to assist developers to create high-quality apps and expanding their user base. Firebase is categorized as a NoSQL database program, that stores data in JSON-like documents.
A firebase Realtime database is a cloud-hosted NoSQL database that allows storing data and syncing between users in Realtime.
Before we start, Please make sure to have installed the following
- Visual Studio 2022
- Alternatively, you can also use the Visual Studio Code and download .net Core SDK(.net 6.0)
If you already have installed all of that, proceed to the next step.
I. Sign up and set up a firebase Account
Before you can use firebase in your application, you need to have a firebase account and create a firebase project to be used on your web application. To do that, follow the steps below.
- Navigate to https://console.firebase.google.com/ and signup using your Gmail account.
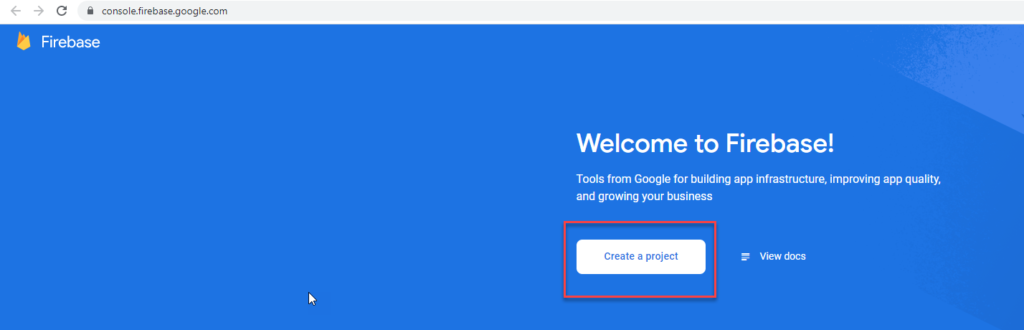
- After successfully sign-in you will be redirected to the firebase console https://console.firebase.google.com/. Click on create a project
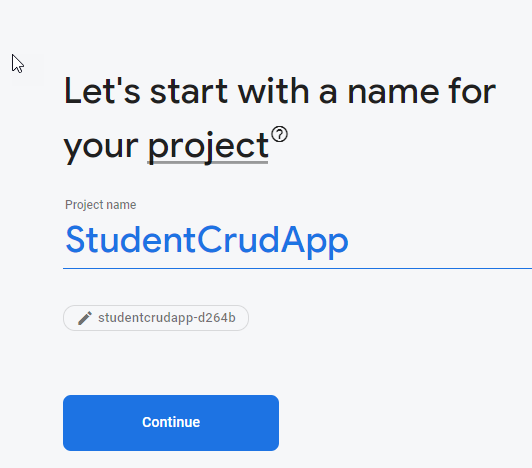
3. Give your project the name “StudentCrudApp” then click on next and continue until the project is set up.
II. Create Firebase Real-time Database
Once the project is ready, let’s create a Real-time database that we will use to store our data from our ASP.NET Core Web application.
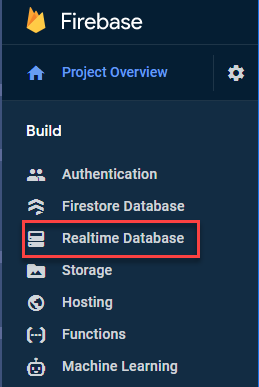
- Go to the project dashboard and click on Realtime Database.
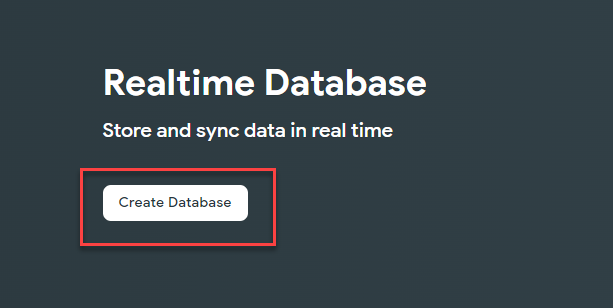
2. Click on “Create Database”
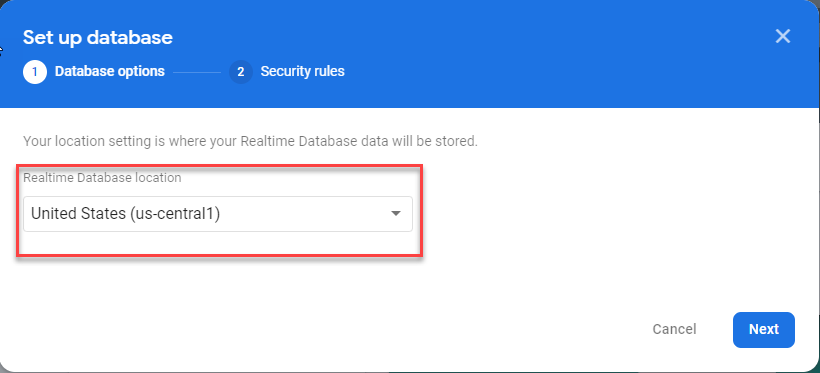
3. Select your location and hit the “next” button.
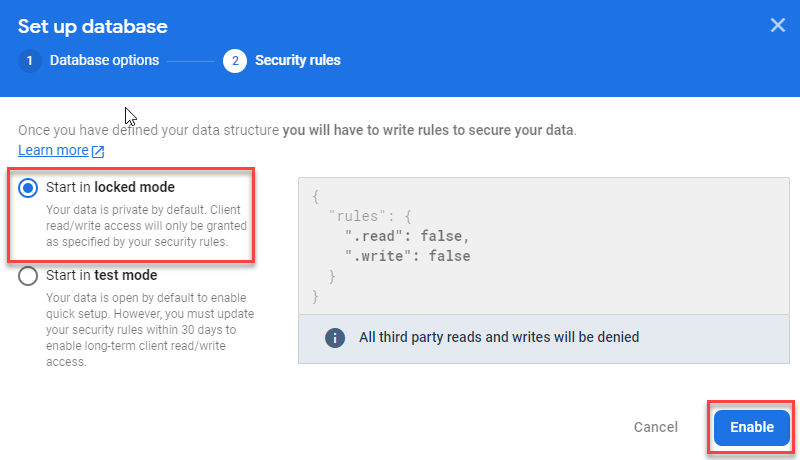
4. For the security rules choose “Start in locked mode” then click “Enable” to finish creating the database.
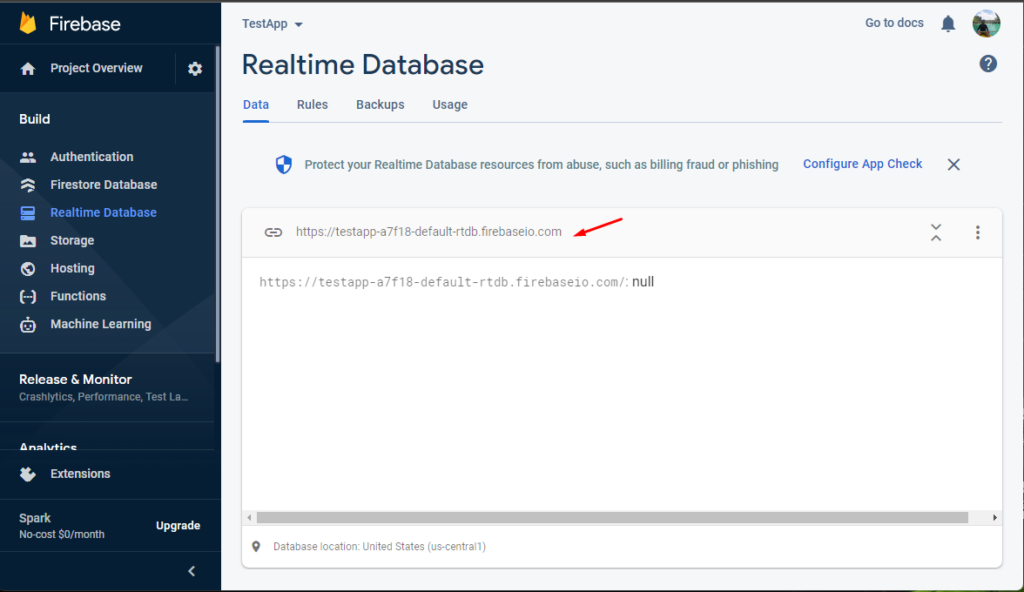
Once enabled, you will be prompted with your database URL path. See the image below. The image below might be different on your end since this will vary on the project name you created.
III. Firebase AUTH and Base path
Now, in order for us to use this database we need to get Authsecret and BasePath URL. AuthSecret contains the database secret key used for authentication to the server while Basepath is the URL link to the database. These variable names will be used later on our firebase configuration. To get that follow the steps below.
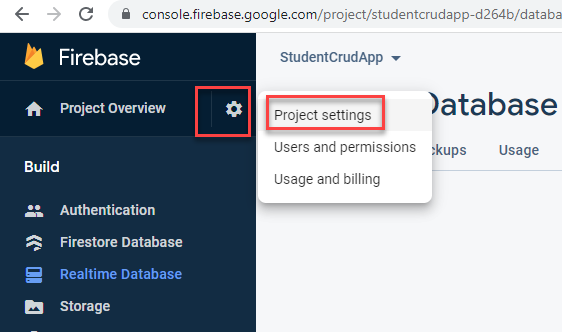
- Go to Project Overview » Project settings
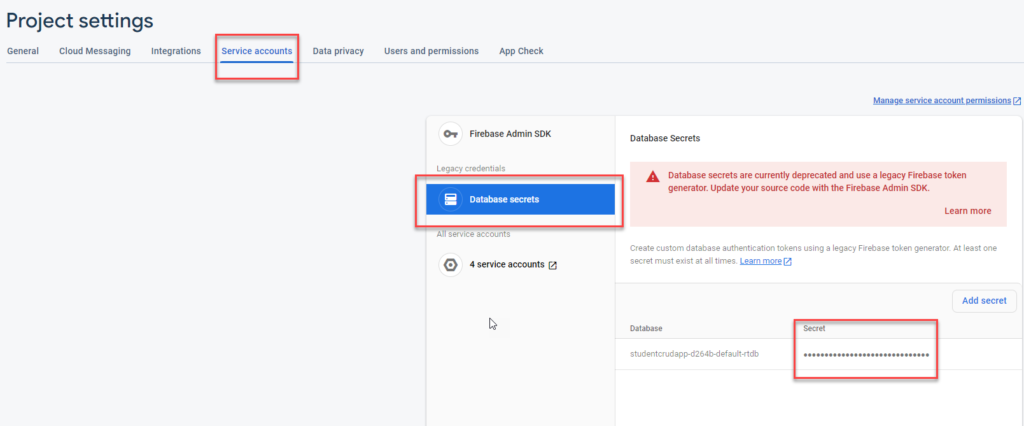
2. Go to Project settings select “Service accounts” under “Database secrets”
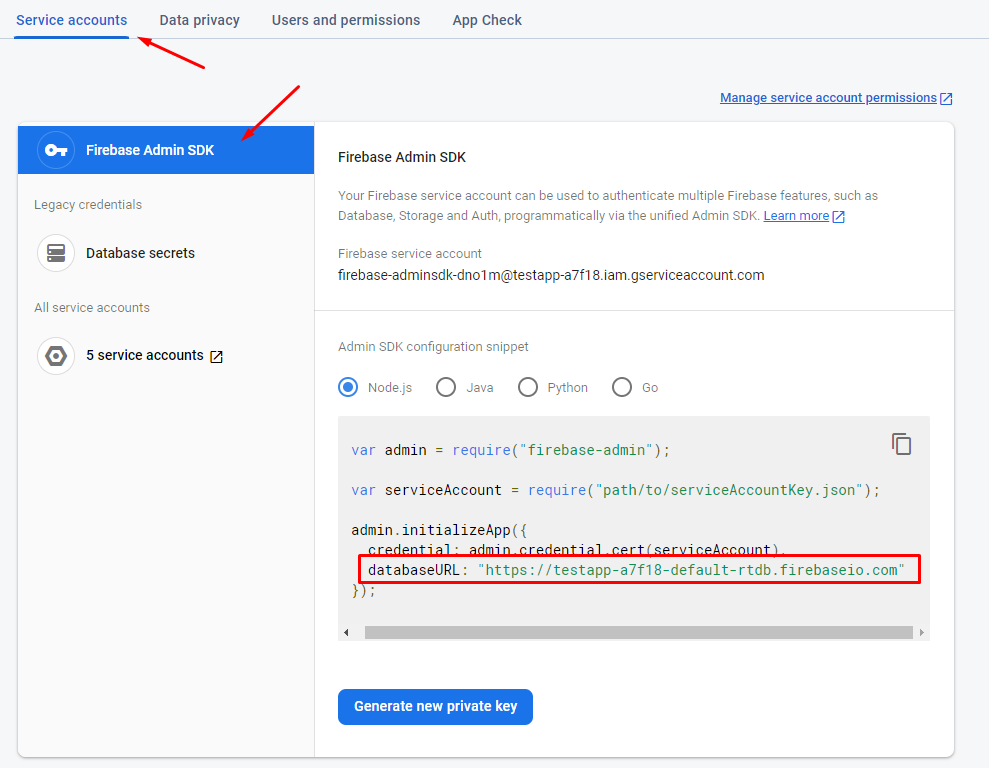
3. To view the BasePath or the Database URL, click on the Firebase Admin SDK and you will see the database URL from the code snippet provided. See the image below.
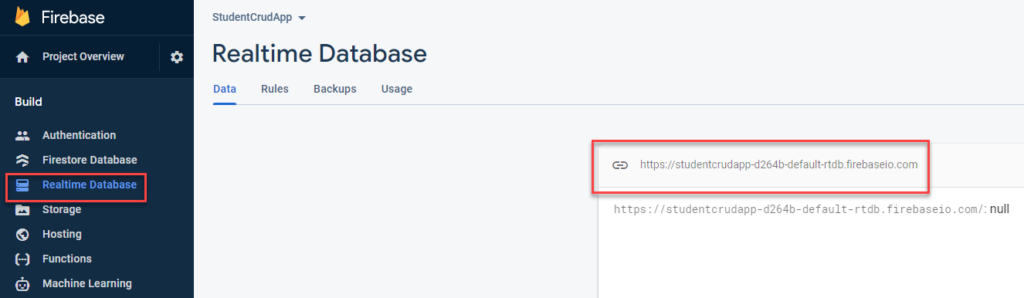
4. The other way to view the database URL is to navigate to the Realtime Database tab then you can copy the URL as shown below and paste the link to BasePath in our code.
IV. Create ASP.NET Core Web Application
Now, we have completed our Firebase set up and collected the necessary credential we need to configure our application, which is the basepath and the AuthSecret. It’s time to create an ASP NET Core CRUD Operation with Firebase Database. To do that, follow the steps below.
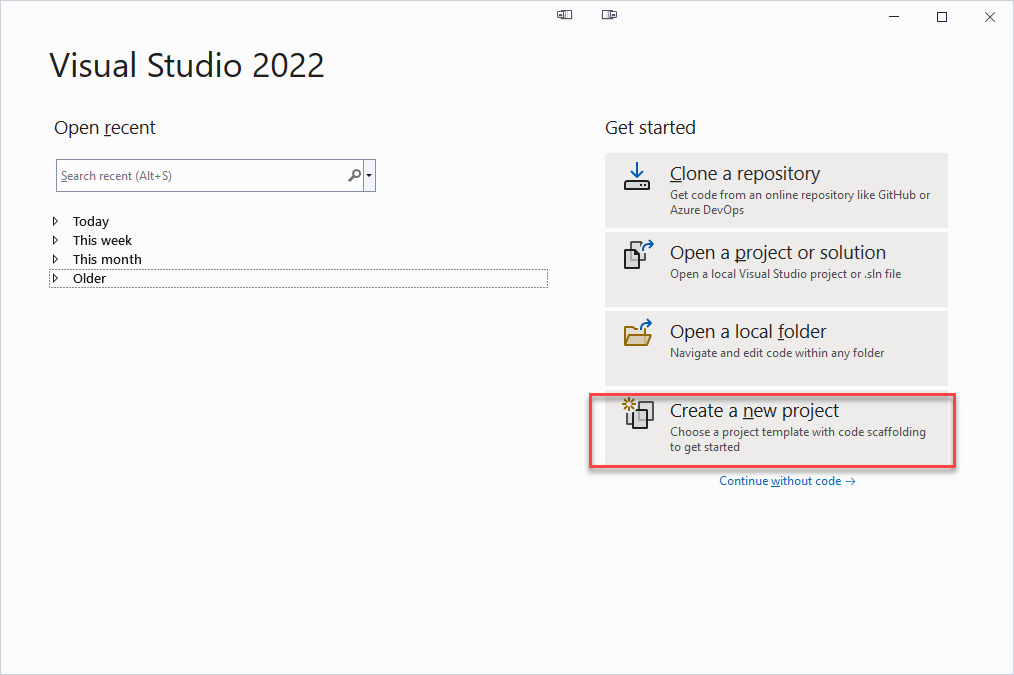
- Launch Visual Studio 2022
- Create a new project
3. Select ASP.NET Core Web App(Model-View-Controller)
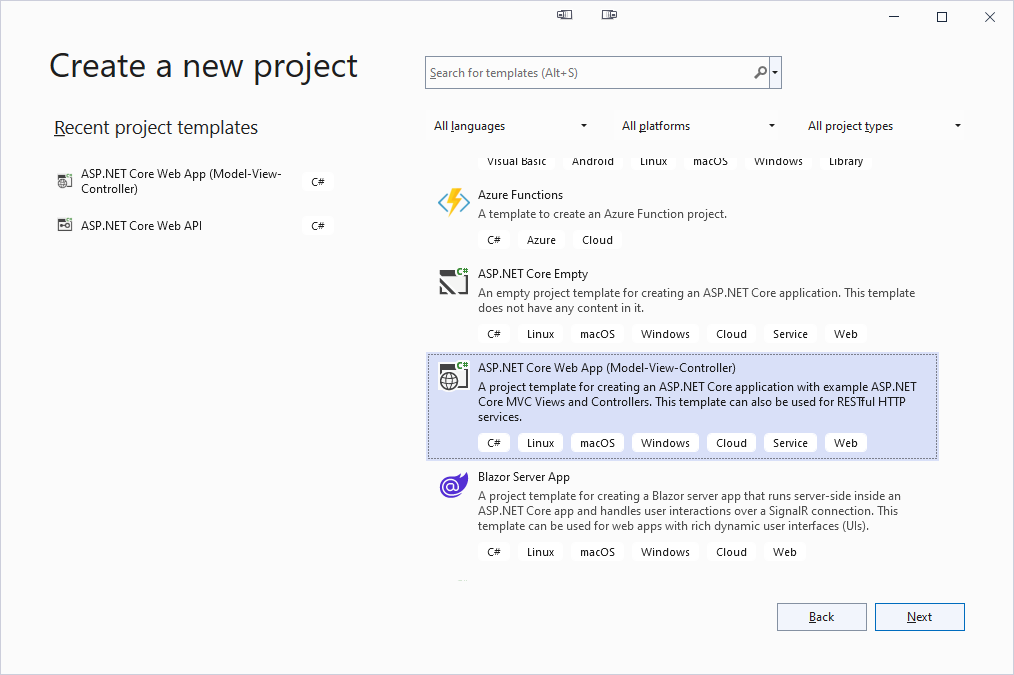
4. Give your project the name “Student Information”, or you may choose a different name.
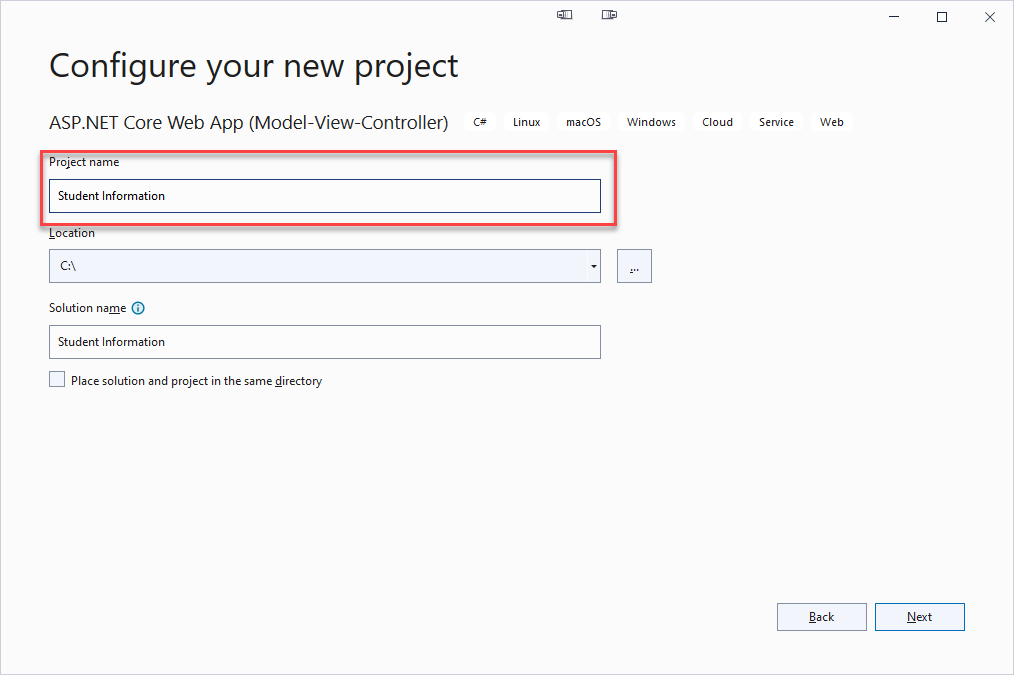
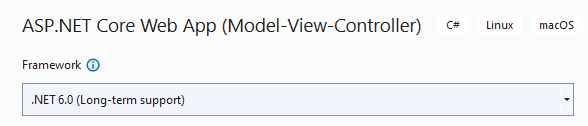
5. Select .NET 6.0 framework then click “Create” to finish setting up the project.
V. Add Dependencies
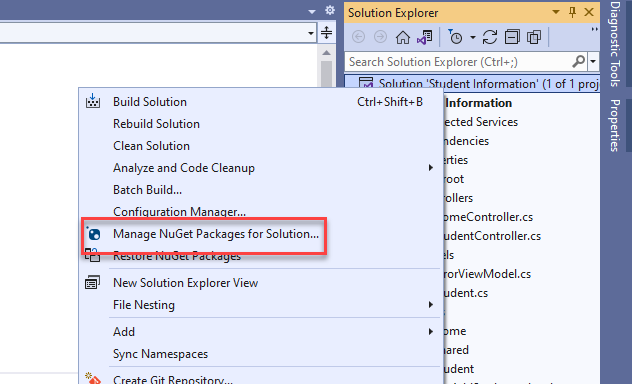
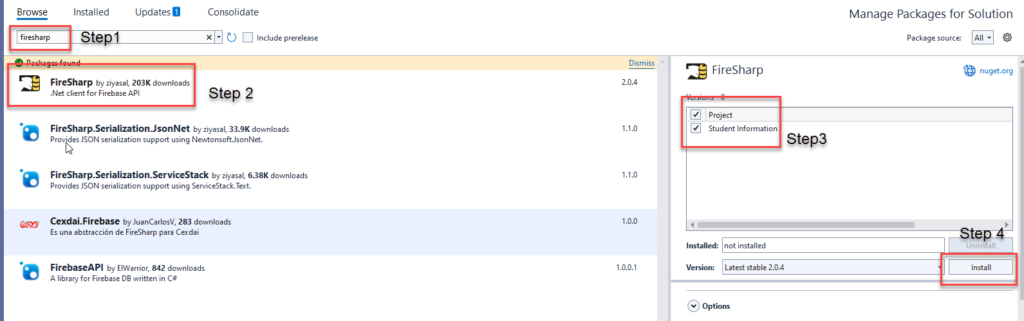
After successfully creating our project, We need to install this package to be able to integrate firebase on our ASP.NET Core project. To install this package right-click on project solution then select “Manage NuGet Packages for solution”
On the Browse, tab search for “Firesharp” and click on it then install. This will prompt you to accept the terms and conditions and click agree to finish installing the package.
VI. Create Student Model
Now, let’s create the properties that we will use for this tutorial. To do that follow the steps below.
1.. Right-click on the Models folder and select Add a new class “Student”. In the Student Model class, we are going to declare all the properties that we require for the student. Some of the properties we require to capture are the student Id, Full name, degree title, address, and phone No.
2. You can choose what properties you will add, but in my case, I used the properties shown below.
 public class Student
    {
        public string? Id { get; set; } // firebase unique id
        public string? Student_id { get; set; }
        public string? fullname { get; set; }
        public string? degree_title { get; set; }
        public string? address { get; set; }
        public string? phone { get; set; }
    }
VII. Create StudentController and Add Firebase Configuration
Now, that we are done declaring the properties, the next would be to create a new controller. To do that, follow the steps below.
1.. Right-click on the controller folder and add a new controller “StudentController”.
2. After that add the Firebase configuration using the code snippet below.
        IFirebaseConfig config = new FirebaseConfig
        {
            AuthSecret= "Firebase Database Secret",
            BasePath = "Firebase Database URL"
        };
        IFirebaseClient client;
This is now what my Student Controller looks like.
using Microsoft.AspNetCore.Mvc;
using FireSharp.Config;
using FireSharp.Interfaces;
using Student_Information.Models;
using FireSharp.Response;
using Newtonsoft.Json;
using Newtonsoft.Json.Linq;

namespace Student_Information.Controllers
{
    public class StudentController : Controller
    {
        IFirebaseConfig config = new FirebaseConfig
        {
           AuthSecret= "Firebase Database Secret",
            BasePath = "Firebase Database URL"
        };
        IFirebaseClient client;


        public ActionResult Index()
        {
            return View();
        }

     }
}
The above code contains two firebase configuration files that are the AuthSecret and the Basepath. To view your Auth secret and Basepath of your database you can revisit these steps III_Firebase_AUTH_and_Base_path
VIII. CREATE OPERATION
Now, let’s add the create functionality. This will add a new student record to the Firebase Database. To do that follow the steps below.
1.. Inside the Student controller, create an action method called Create. See the code snippet below.
        [HttpGet]
        public IActionResult Create()
        {
            return View();
        }
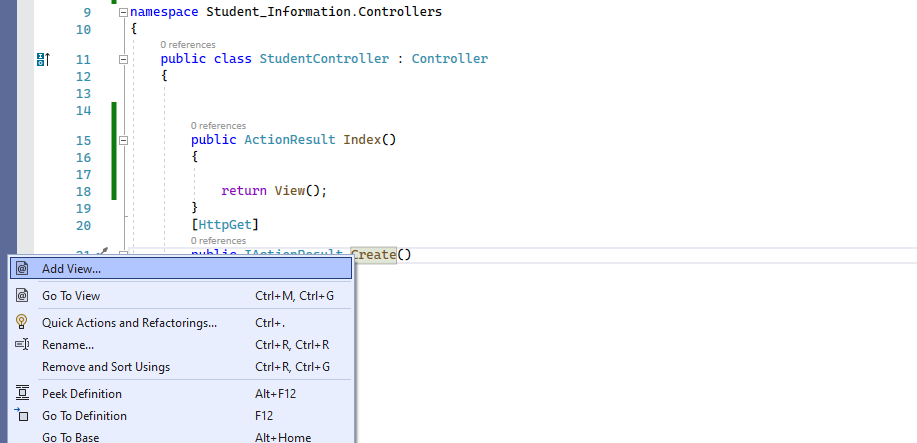
2. Right-click on the create action method then select add View to generate an HTML form for adding a new student record.
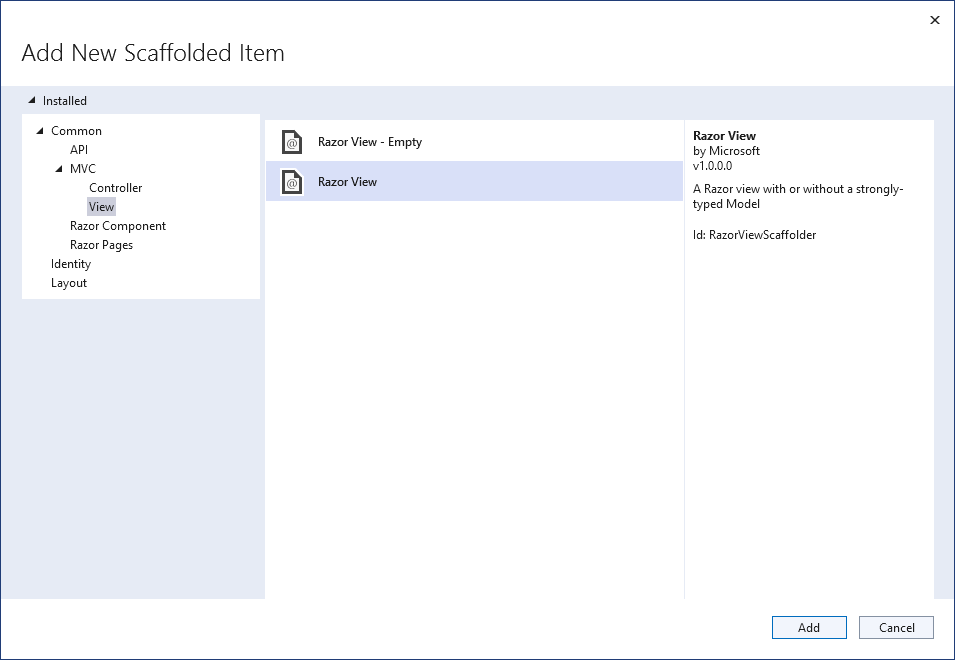
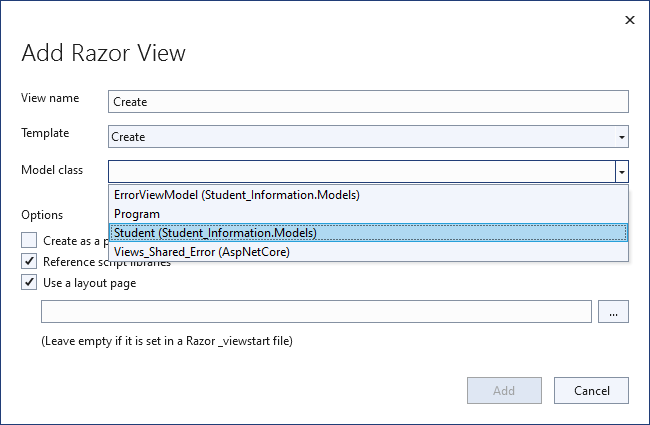
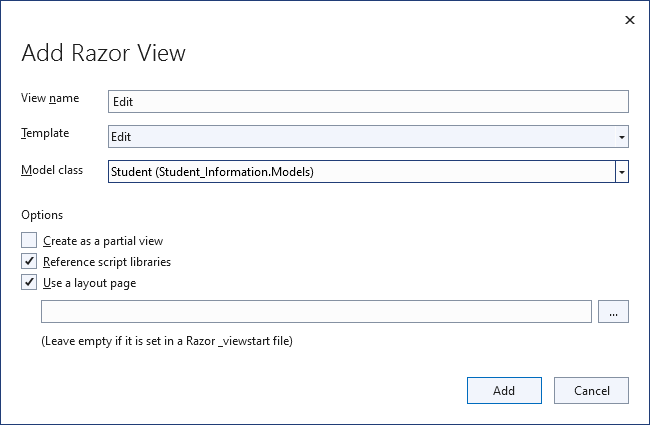
3. Select Razor View, then click the Add button.
4. Give the view a name “Create” then on the Template section select create.
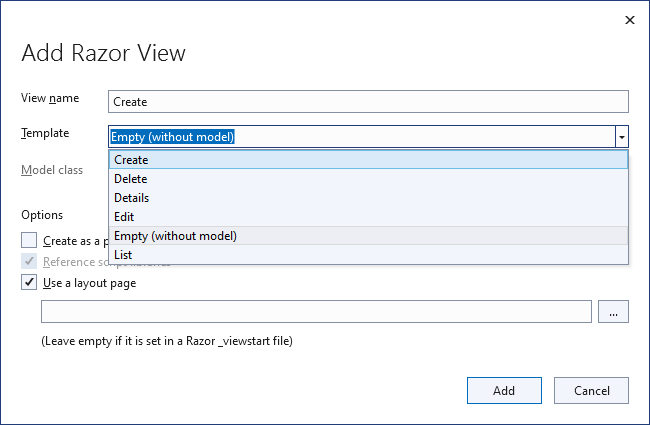
5. On the Model class section, we will select the model class we created a while ago which is the Student model then click the “Add “button to finish generating the Html form.
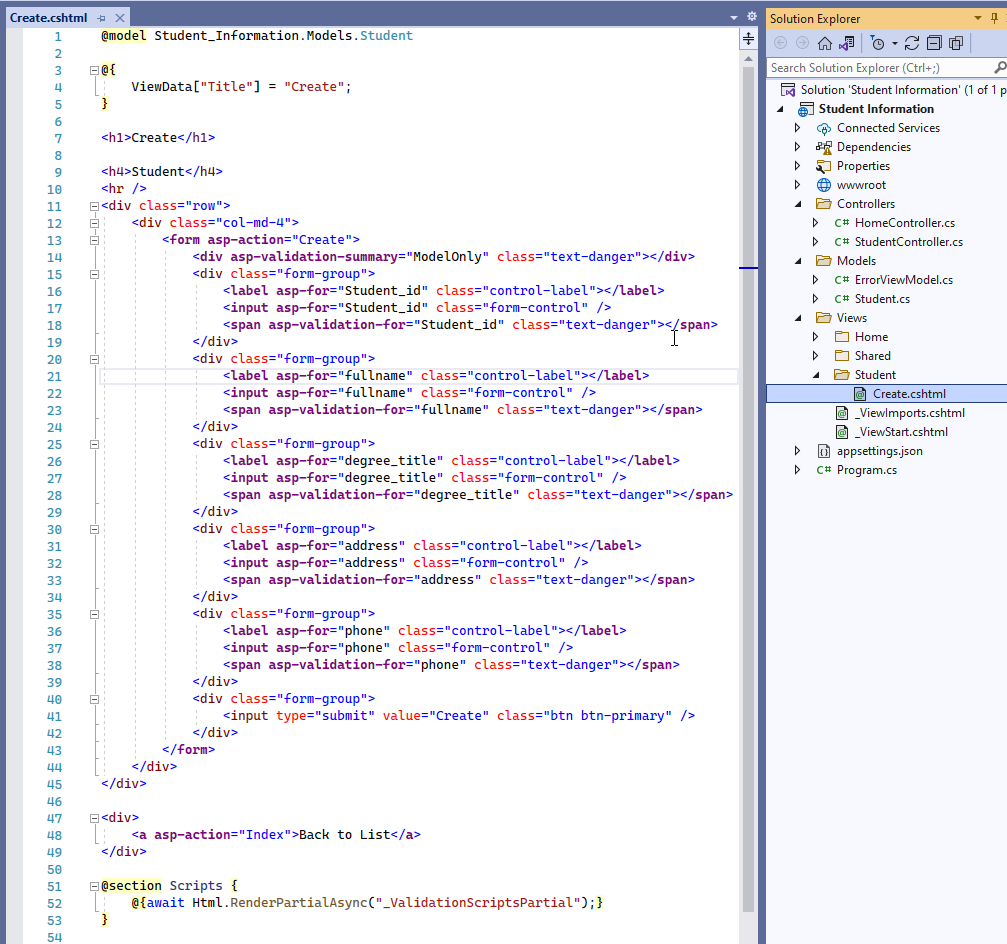
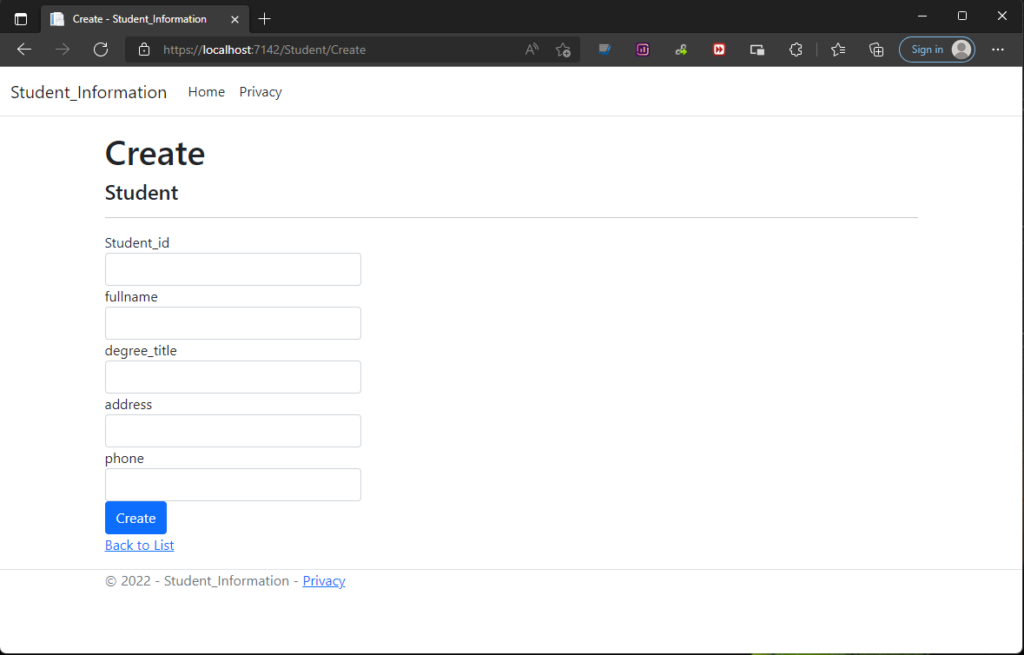
Once Visual studio finishes auto-generating, a “create.cshtml” form is created inside the folder named Views » Student as shown below.
5. Now, let’s add Create POST action method. This will submit the record to the Firebase database from the Views.
[HttpPost]
public IActionResult Create(Student student)
{
try
{
client = new FireSharp.FirebaseClient(config);
var data = student;
PushResponse response = client.Push("Students/", data);
data.Id = response.Result.name;
SetResponse setResponse = client.Set("Students/" + data.Id, data);
if(setResponse.StatusCode == System.Net.HttpStatusCode.OK)
{
ModelState.AddModelError(string.Empty, "Added Succesfully");
}else
{
ModelState.AddModelError(string.Empty, "Something went wrong!!");
}
}
catch (Exception ex)
{
ModelState.AddModelError(string.Empty, ex.Message);
}
return View();
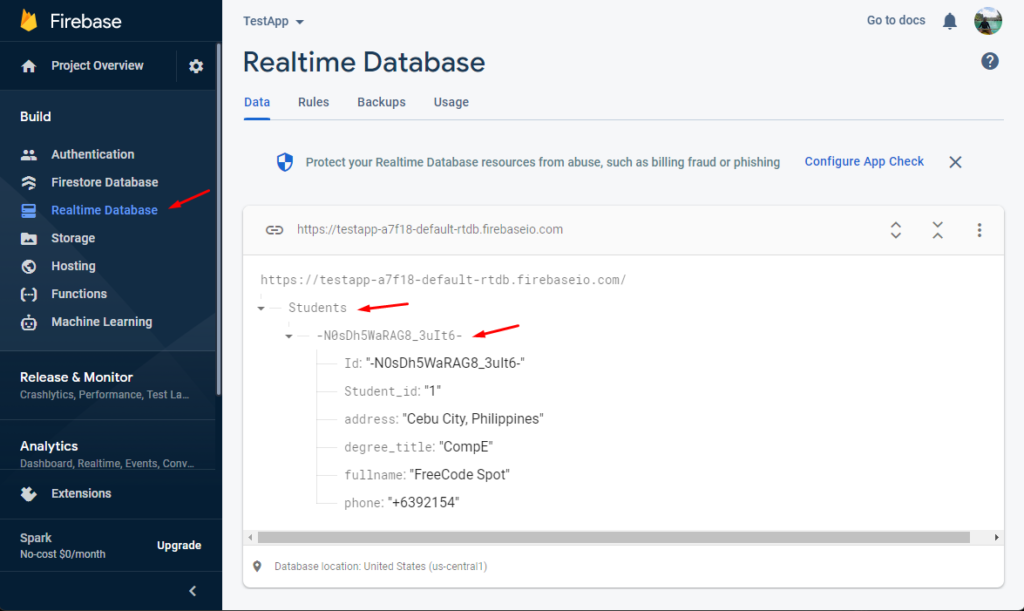
}If you try to execute this create action. This is what it looks like on the Firebase RealTime Database.
IX. Read Operation
After successfully adding the record to the Firebase Database, let’s retrieve the record and displayed it on our Web Application. For these steps, we are going to modify the default index action method inside StudentController.
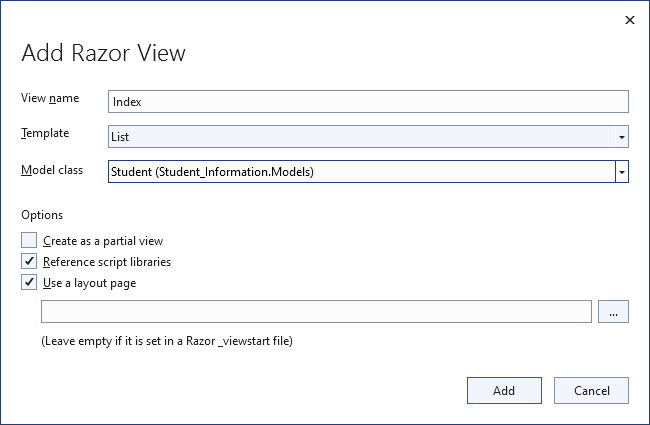
1.. Add a view for the index action method to display data. To do this follow the steps we did in the create operation, Right-click on the Index action method then select add View to generate an HTML form to display student information. For the template select “List”.
2. This is what my final index view looks like. See the code snippet below for your reference.
@model IEnumerable<Student_Information.Models.Student>

@{
    ViewBag.Title = "Index";
    Layout = "~/Views/Shared/_Layout.cshtml";
}

<h2>Index</h2>

<p>
    @Html.ActionLink("Create New", "Create")
</p>
<table class="table">
    <tr>
         <th>
            @Html.DisplayNameFor(model => model.Id)
        </th>
        <th>
            @Html.DisplayNameFor(model => model.Student_id)
        </th>
        <th>
            @Html.DisplayNameFor(model => model.fullname)
        </th>
        <th>
            @Html.DisplayNameFor(model => model.degree_title)
        </th>
        <th>
            @Html.DisplayNameFor(model => model.address)
        </th>
        <th>
            @Html.DisplayNameFor(model => model.phone)
        </th>
        <th></th>
    </tr>

@foreach (var item in Model) {
    <tr>
        <td>
            @Html.DisplayFor(modelItem => item.Id)
        </td>
        <td>
            @Html.DisplayFor(modelItem => item.Student_id)
        </td>
        <td>
            @Html.DisplayFor(modelItem => item.fullname)
        </td>
        <td>
            @Html.DisplayFor(modelItem => item.degree_title)
        </td>
        <td>
            @Html.DisplayFor(modelItem => item.address)
        </td>
        <td>
            @Html.DisplayFor(modelItem => item.phone)
        </td>
        <td>
            @Html.ActionLink("Edit", "Edit", new {  id=item.Id  }) |

            @Html.ActionLink("Delete", "Delete", new { id = item.Id })
        </td>
    </tr>
}

</table>
3. Now, let’s modify the Index action method to retrieve the Student record from the firebase database and display it on our View in a table. See the code snippet below for my final index action method.
 public ActionResult Index()
        {
            client = new FireSharp.FirebaseClient(config);
            FirebaseResponse response = client.Get("Students");
            dynamic data = JsonConvert.DeserializeObject<dynamic>(response.Body);
            var list = new List<Student>();
            if(data != null)
            {
                foreach (var item in data)
                {
                    list.Add(JsonConvert.DeserializeObject<Student>(((JProperty)item).Value.ToString()));
                }
            }

            return View(list);
        }
The above code fetches data from the Students firebase database using “FirebaseResponse response = client.Get(“Students”)” and returns in a JSON format then the fetched data is deserialized to convert from JSON format to a .NET object.
X. Update Operation
Now, let’s create update functionality, This will update the Student records by id on the Firebase database. Follow the steps below.
- Create Edit GET and POST action Method.
Just like the Create action method. We need an HTTP GET and HTTP POST action method.
HTTPGET
This will return and display the student record on the Edit view
[HttpGet]
        public ActionResult Edit(string id)
        {
            client = new FireSharp.FirebaseClient(config);
            FirebaseResponse response = client.Get("Students/" + id);
            Student data = JsonConvert.DeserializeObject<Student>(response.Body);
            return View(data);
        }
HTTPPOST
This will submit the updated record to the Firebase Database
  [HttpPost]
        public ActionResult Edit(Student student)
        {
            client = new FireSharp.FirebaseClient(config);
            SetResponse response = client.Set("Students/" + student.Student_id, student);
            return RedirectToAction("Index");
        }
In the above code, the action method class public ActionResult Edit(string id) fetches and returns data from the Students database by id. The action method public ActionResult Edit(Student student) checks the id selected then checks in the database for a corresponding value then updates the data.
2. Create a view by Right-Clicking Edit Action method, then choose Add View. Give the view a name “Edit” and for the template select “Edit”. See the image below.
This is the final code from my Edit View.
@model Student_Information.Models.Student

@{
    ViewBag.Title = "Edit";
    Layout = "~/Views/Shared/_Layout.cshtml";
}

<h2>Edit</h2>

@using (Html.BeginForm())
{
    @Html.AntiForgeryToken()

    <div class="form-horizontal">
        <h4>Student</h4>
        <hr />
        @Html.TextBoxFor(model => model.Id, htmlAttributes: new {  @readonly = "readonly", @hidden="true" })
        @Html.ValidationSummary(true, "", new { @class = "text-danger" })

        <div class="form-group">
            @Html.LabelFor(model => model.Student_id, htmlAttributes: new { @class = "control-label col-md-2" })
            <div class="col-md-10">
                @Html.EditorFor(model => model.Student_id, new { htmlAttributes = new { @class = "form-control" } })
                @Html.ValidationMessageFor(model => model.Student_id, "", new { @class = "text-danger" })
            </div>
        </div>

        <div class="form-group">
            @Html.LabelFor(model => model.fullname, htmlAttributes: new { @class = "control-label col-md-2" })
            <div class="col-md-10">
                @Html.EditorFor(model => model.fullname, new { htmlAttributes = new { @class = "form-control" } })
                @Html.ValidationMessageFor(model => model.fullname, "", new { @class = "text-danger" })
            </div>
        </div>

        <div class="form-group">
            @Html.LabelFor(model => model.degree_title, htmlAttributes: new { @class = "control-label col-md-2" })
            <div class="col-md-10">
                @Html.EditorFor(model => model.degree_title, new { htmlAttributes = new { @class = "form-control" } })
                @Html.ValidationMessageFor(model => model.degree_title, "", new { @class = "text-danger" })
            </div>
        </div>

        <div class="form-group">
            @Html.LabelFor(model => model.address, htmlAttributes: new { @class = "control-label col-md-2" })
            <div class="col-md-10">
                @Html.EditorFor(model => model.address, new { htmlAttributes = new { @class = "form-control" } })
                @Html.ValidationMessageFor(model => model.address, "", new { @class = "text-danger" })
            </div>
        </div>

        <div class="form-group">
            @Html.LabelFor(model => model.phone, htmlAttributes: new { @class = "control-label col-md-2" })
            <div class="col-md-10">
                @Html.EditorFor(model => model.phone, new { htmlAttributes = new { @class = "form-control" } })
                @Html.ValidationMessageFor(model => model.phone, "", new { @class = "text-danger" })
            </div>
        </div>

        <div class="form-group">
            <div class="col-md-offset-2 col-md-10">
               <input type="submit" value="Save" class="btn btn-primary" />
            </div>
        </div>
    </div>
}

<div>
    @Html.ActionLink("Back to List", "Index")
</div>
XI. Delete Operation
Now, let’s create delete functionality, This will delete Student records by id in the Firebase database. Follow the steps below.
Create Delete action method. See the code snippet below.
public ActionResult Delete(string id)
        {
            client = new FireSharp.FirebaseClient(config);
            FirebaseResponse response = client.Delete("Students/" + id);
            return RedirectToAction("Index");
        }
The code above will Delete the record from the Firebase database and then redirect the user to the index method which is the list of students in a table.
XII. Set the Default Controller to StudentController
To make Student Controller a default controller to load. Open program.cs file modify MapControllerRoute. See the code below.
app.MapControllerRoute(
    name: "default",
    pattern: "{controller=Student}/{action=Index}/{id?}");
Once, done we are ready to test all the functionality that we created in the previous steps.
XIII. Testing
1.. Run our application to create a new Student
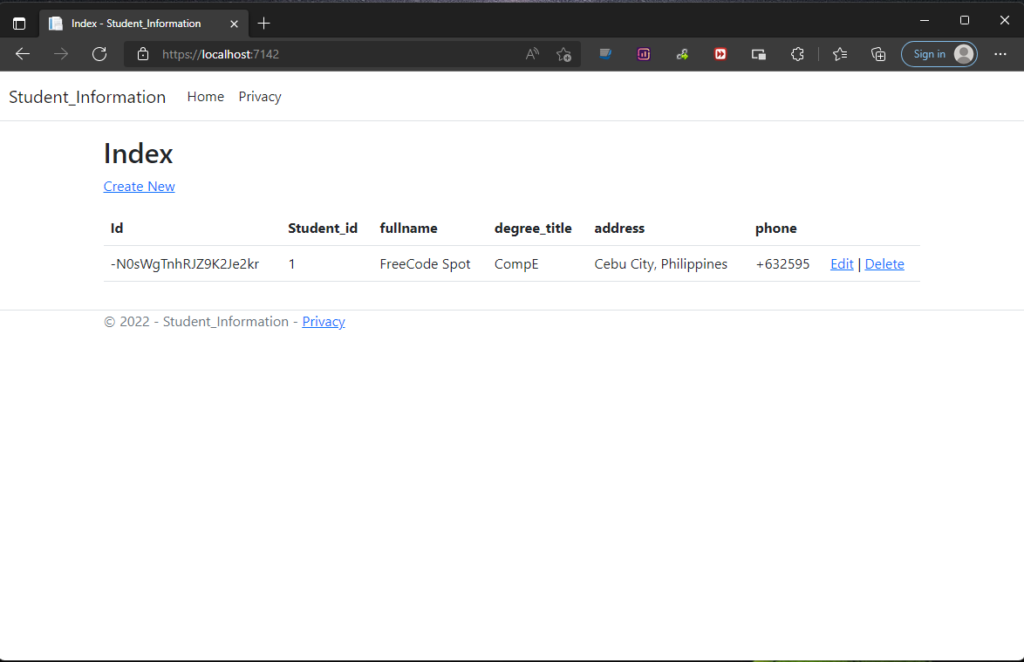
2. Once, the application launch, you will be redirected to Student/Index which is set on the program.cs as the default action method.
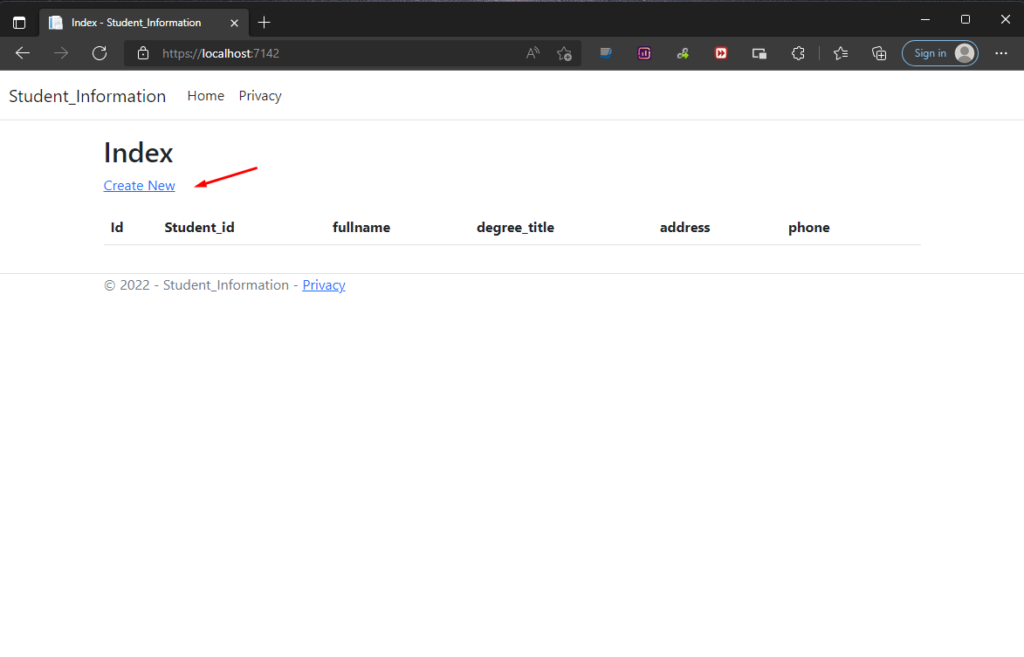
3. To test the Create function. Click the “Create New” highlighted on the image above. You will be redirected to the Create view.
4. For a successful insertion you will be prompted with the following notification. See the image below.
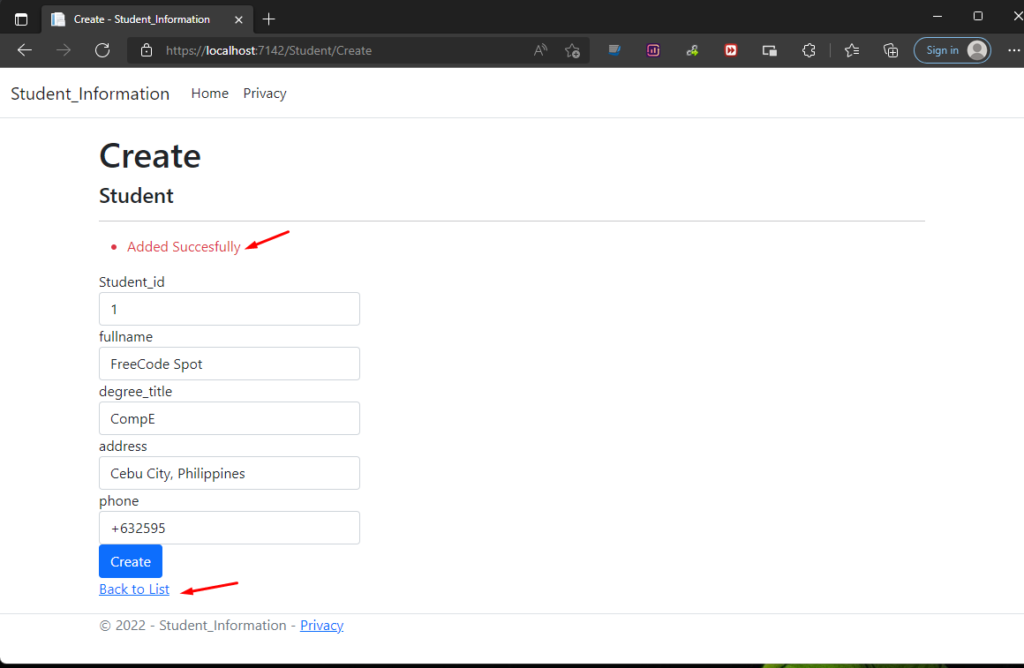
5. To move back to the table view list, which is the https://localhost:7142/Student/index URL, click on the “back to List” link.
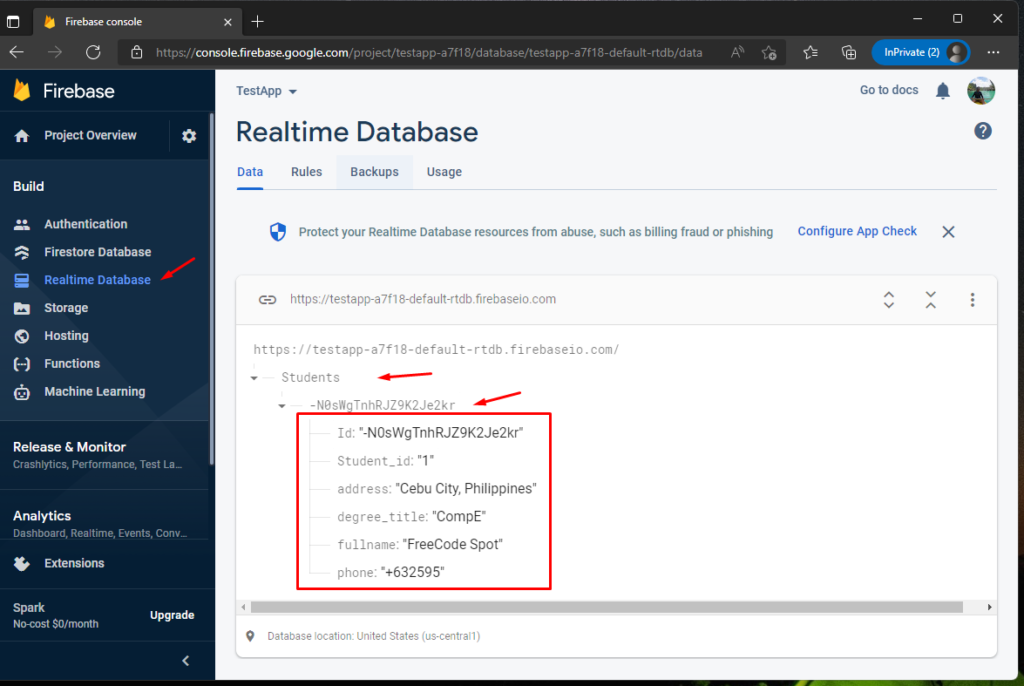
6. You can also verify the record from your Firebase RealTime Database. See the image below.
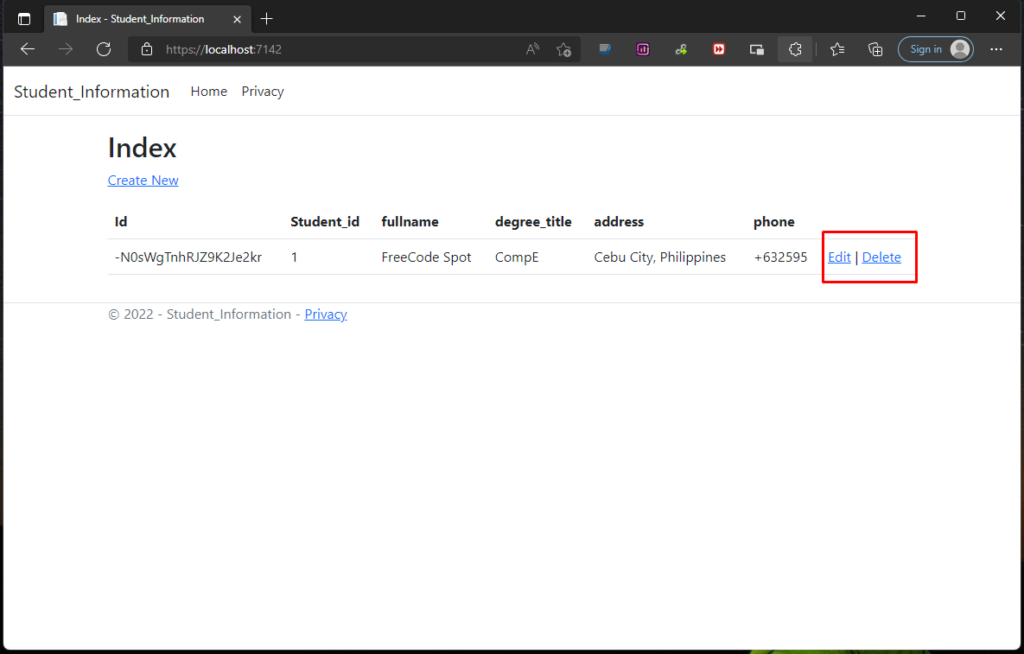
7. Then try the remaining functions which are Edit and Delete. Click on the Delete and edit link on each record. See the image below.
If you encounter an error during your testing, you may check the source code from my GitHub account for your reference.
Summary
In this tutorial, we have learned how to develop ASP NET Core CRUD Operation with Firebase Database. We created four basic CRUD operations to show how easy it is to use firebase with ASP NET Core MVC. Hopefully, this tutorial will help you with your future projects.
KEEP CODING!