
In the previous post, we created a simple project Flutter login and registration using Firebase, this time we will make a simple Crud Operation in flutter using Firebase. We are going to implement a CRUD(create, read, update and delete operations) with Firebase FireStore Database.
- I. Setup Flutter on VSCode
- II. Create a Flutter App
- III. Setup Firebase Project
- IV. Create Firebase Android App
- V. Enabling Cloud Firestore
- VI. Add Firebase dependencies on Flutter App.
- VII. Flutter Project Overview
- VIII. Create Models
- IX. Create CRUD Operation Class
- X. Create pages or screens
- XI. Initialize Firebase on main.dart
- Summary
What is FireStore Database?
Firestore is a document-oriented database that provides far more structure than RTDB. All of your information is saved as documents, which can contain an unlimited amount of entries (Booleans, strings, or even other objects). Documents are referred to as collections when they are collected together.
If you have already set up your flutter development on your local machine you may proceed to the next step to create a flutter project but if not follow the steps below.
I. Setup Flutter on VSCode
These are just brief steps for you to start your configuration. But if you want full technical documentation you may visit Flutter’s official website using this link. I am using Windows OS for this tutorial.
- Install git for windows. link.
- Download Flutter SDK. link.
- Extract Flutter SDK. In my case, I extracted it on this location “D:\flutter\flutter”
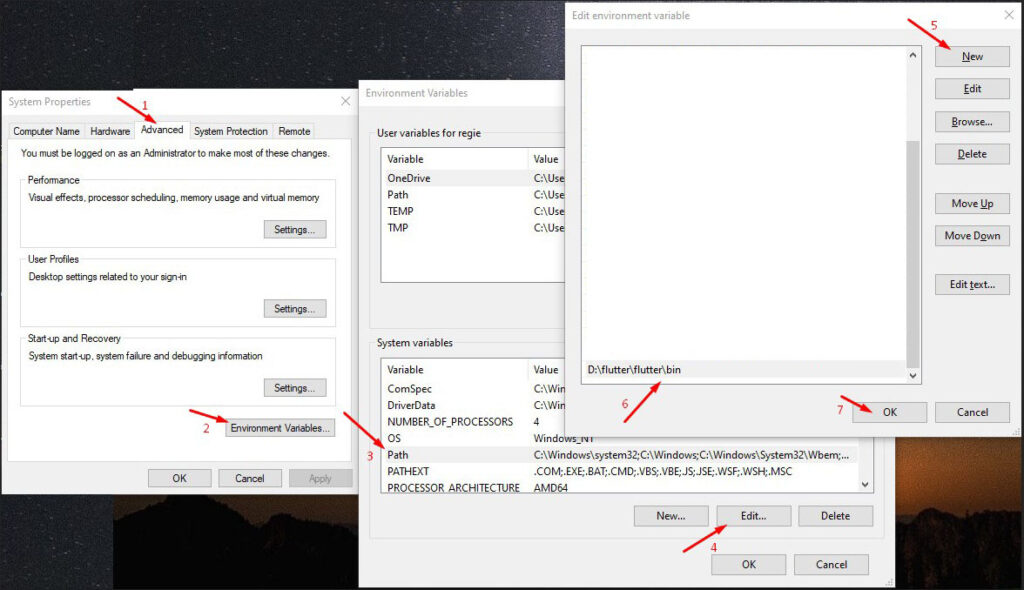
- Add “flutter\bin” to the Environment Variable. See the image below.
5. Now, open git Bash or command prompt then run the “flutter doctor” command to check the installation. If an error occurs follow the steps provided on the result.
6. Download android studio here
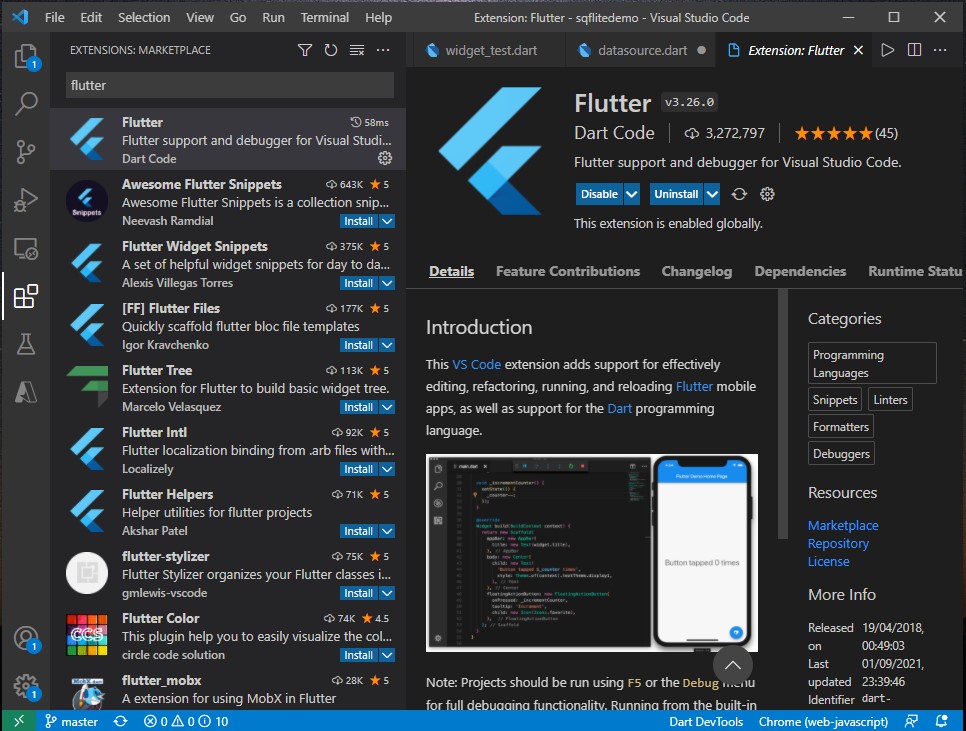
7. Download and install Visual Studio Code here. Open vscode and install the Flutter extension.
II. Create a Flutter App
Now, it’s time to create the Flutter App.
- Create a folder and choose a location where you want to put your Apps.
- Open vscode then open the folder you just created using File » Open Folder.
- Open vscode terminal by going to View » Terminal.
- Then use this command to create the App. “flutter create fl_cruddemo“
- Change your directory to the newly created App which in my case “cd fl_cruddemo“
- Now, run flutter by using “flutter run” command.
III. Setup Firebase Project
In order for us to create a flutter login and registration using Firebase, we have to register and create a project on the Firebase website. Follow the steps below.
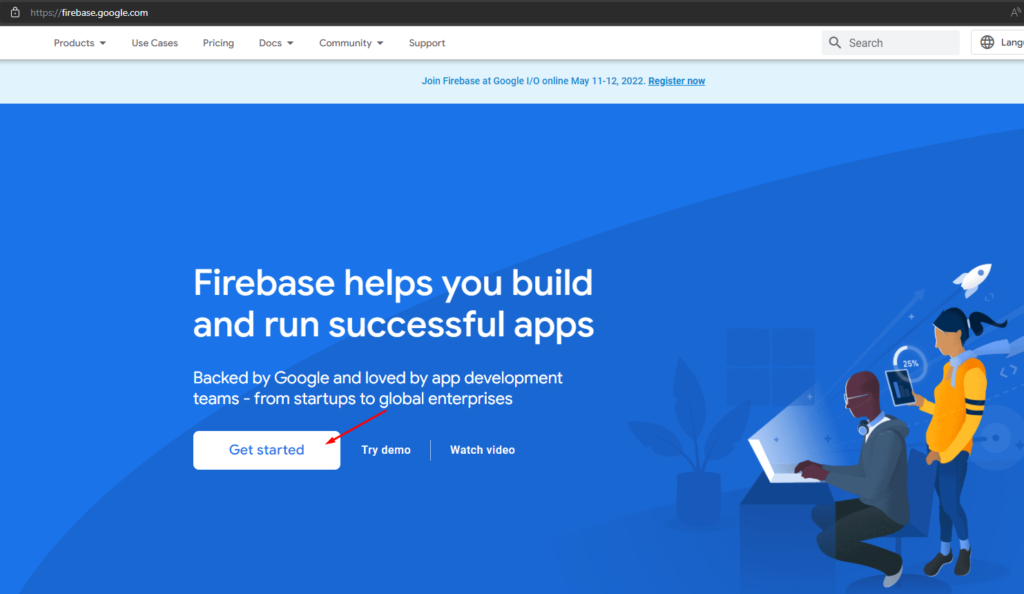
1.. Open https://firebase.google.com on your browser then click on Get Started. Login using your Gmail account.
2. Once you have successfully login. You will be prompted with a screen that will ask you to add a project. Click on Add project and fill in the necessary field.

3. Fill in your project information and click continue.
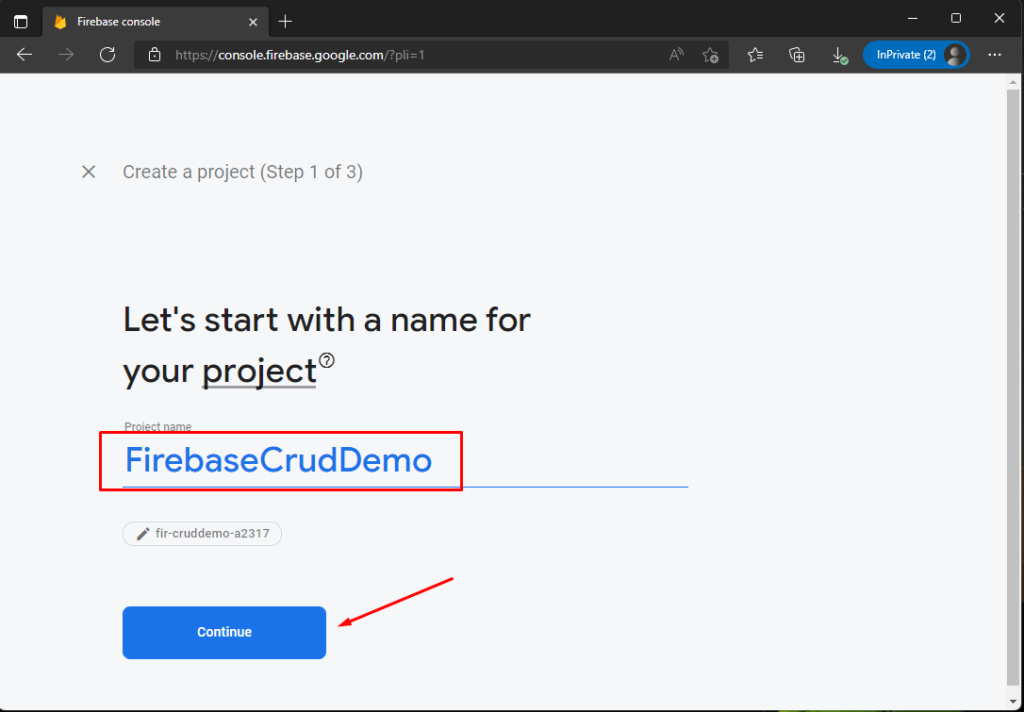
4. Click Create Project button to proceed.
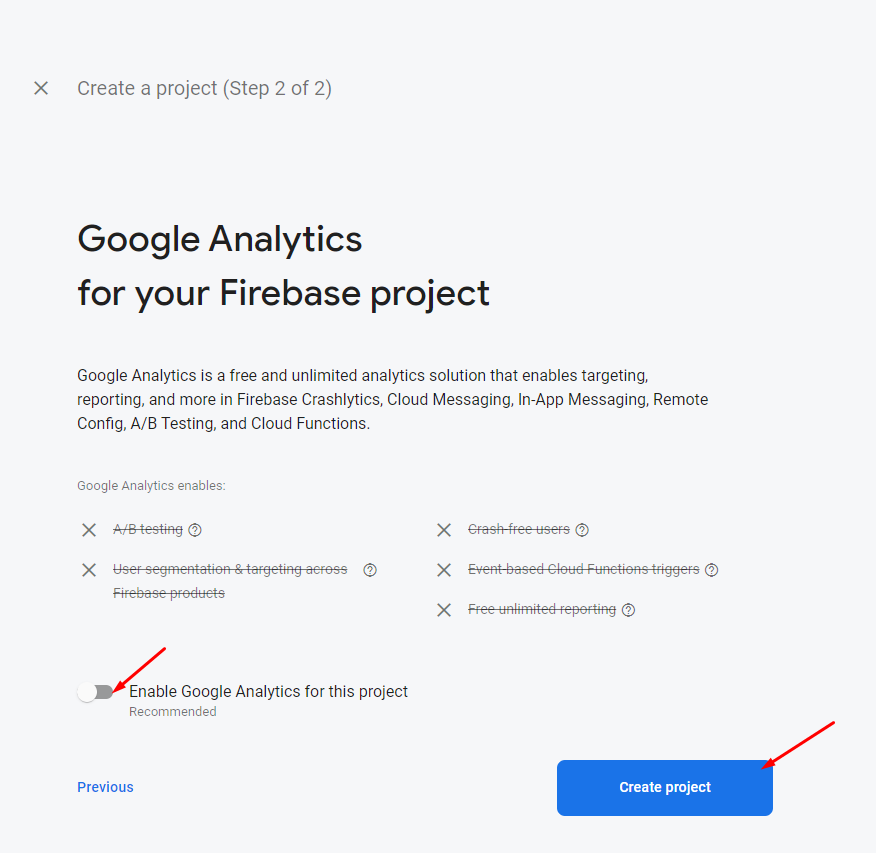
5. Once the process is done you will see this screen. Click Continue and you will be navigated to the firebase dashboard.
By this time, Our firebase project is successfully created. Now, we are ready to create our first Android App.
IV. Create Firebase Android App
Let’s create our first Firebase Android application. Follow the steps below.
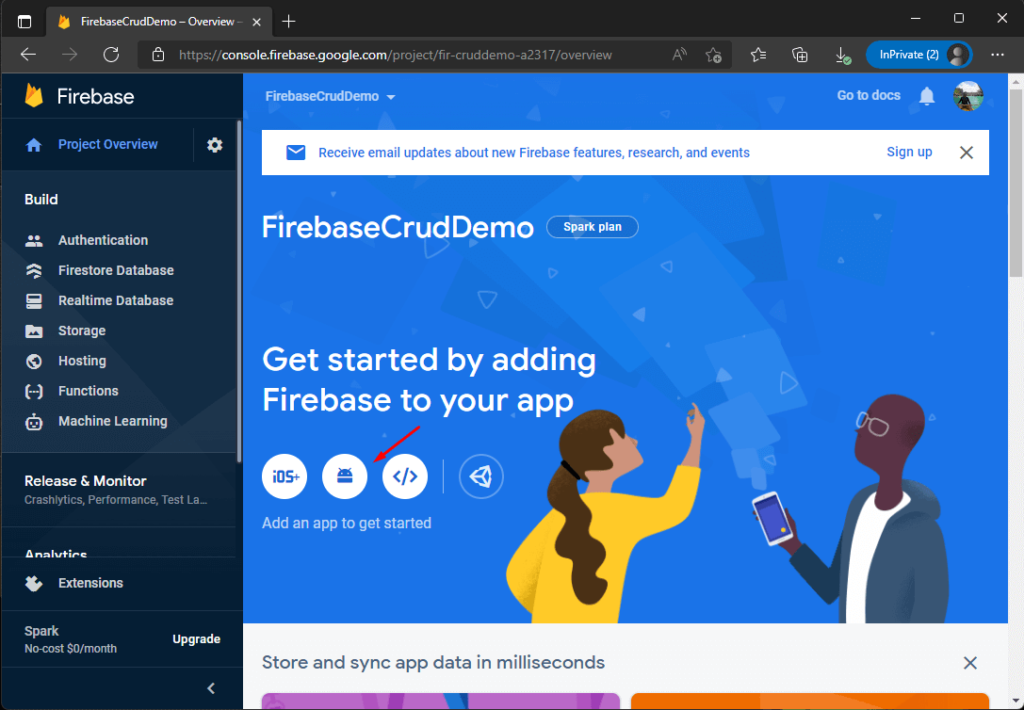
- Find an android icon on the Firebase Dashboard homepage and click to add an App. This is what the firebase dashboard looks like if this is your first time using it. See the image below.
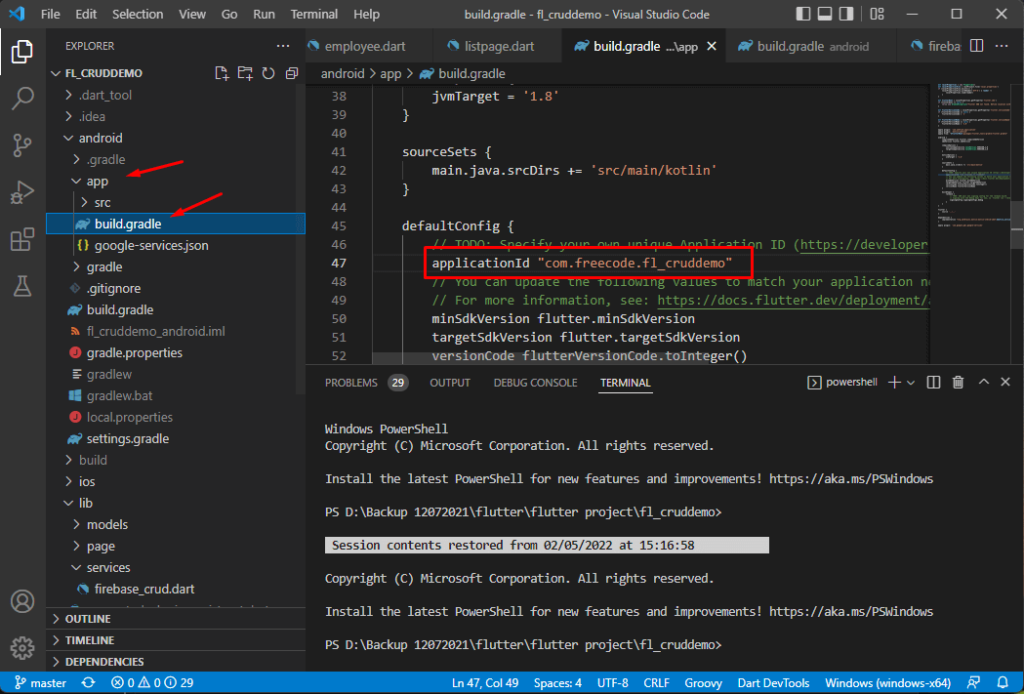
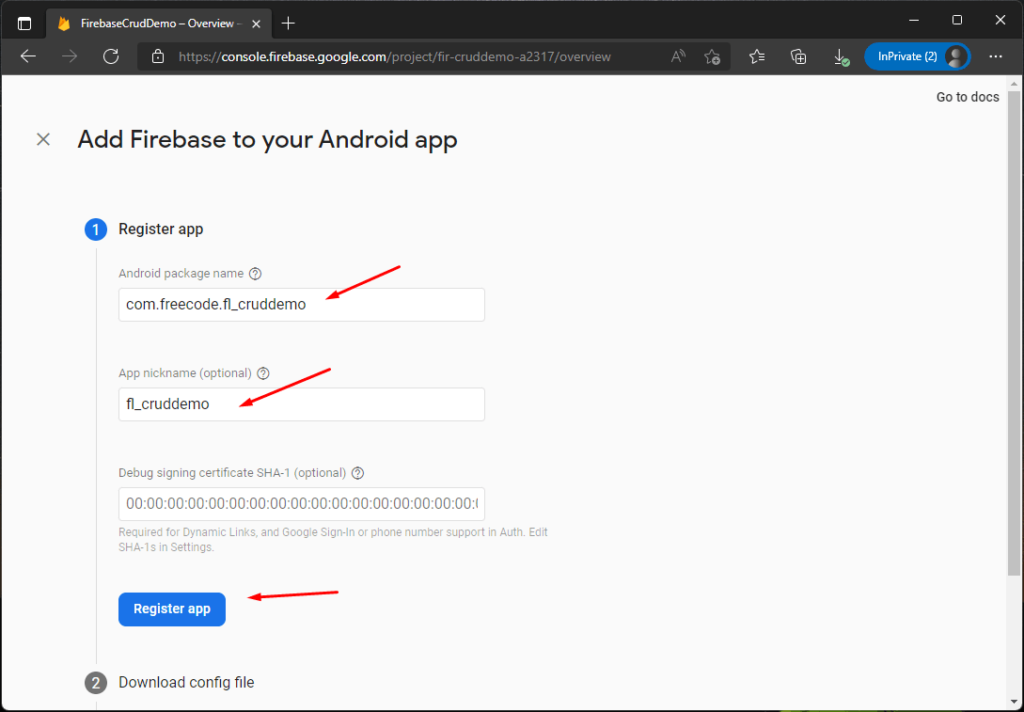
2. Fill in on the information needed to add Firebase to your App. One of the requirements is to add your Application package name. You can find it on the new flutter project you created a while ago. In my case fl_cruddemo App. You need to find your application id on your flutter App which can be found at this location Project Name » Android » App » build.gradle.
Note: You may change your default applicationId, in my case I name it com.freecode.fl_cruddemo
3. Copy the application ID from your flutter project and fill it in on the form below and then click the Register app button to proceed.
4. Now, you will be instructed to download a configuration file. Just follow the step and download google-services.json file.
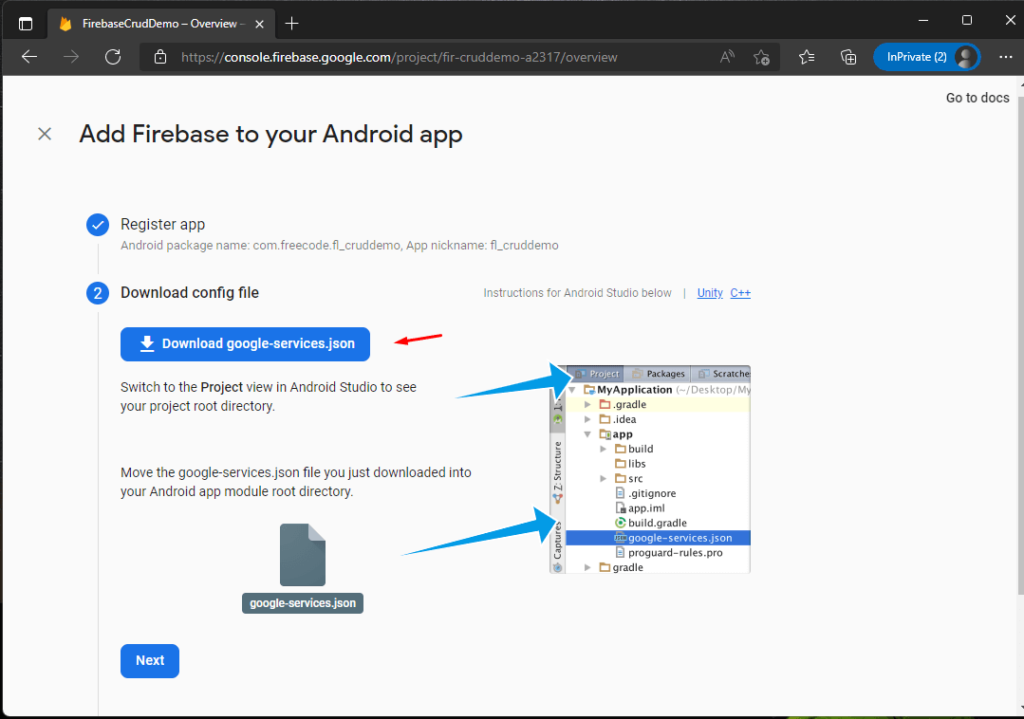
5. After downloading the file place the google-services.json file in your App folder.

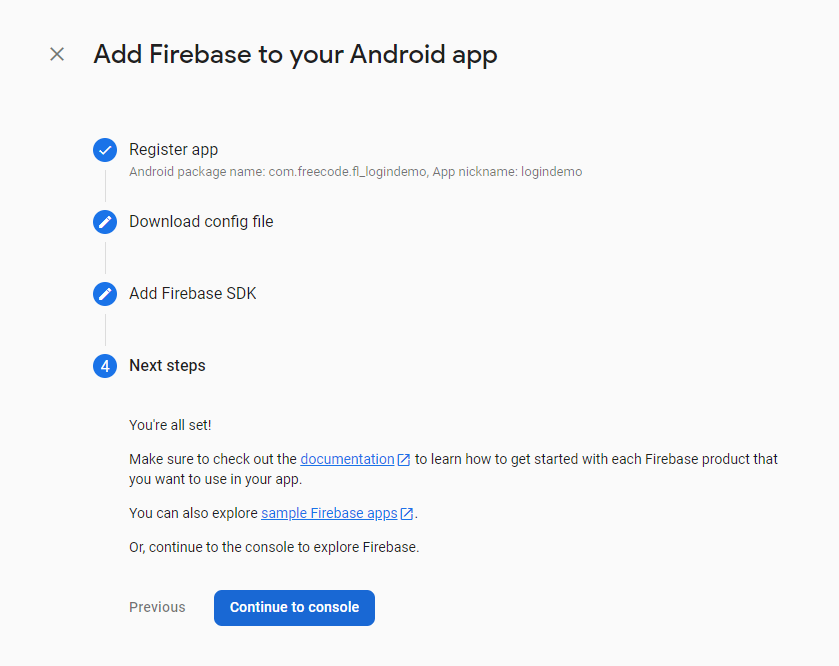
6. Add Firebase SDK dependencies. Follow the instructions prompted in this step.
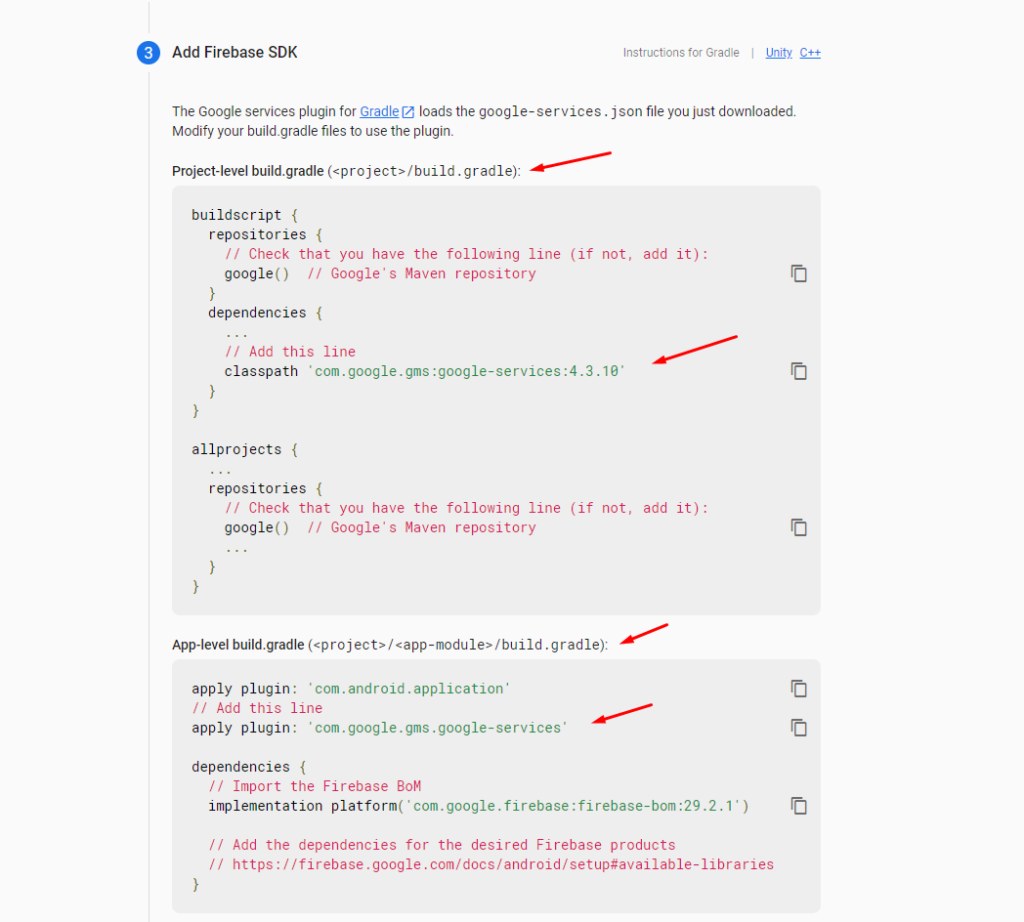
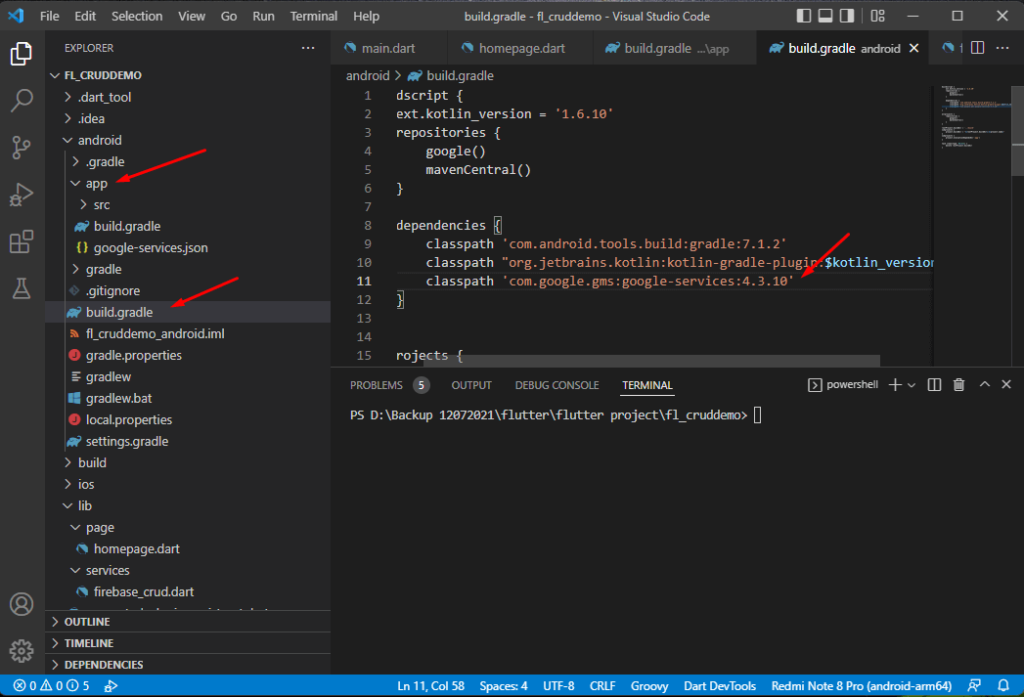
7. Add com.google.gms:google-services:4.3.10 on build.gradle located inside Android » build.gradle inside your flutter project. See the image below.
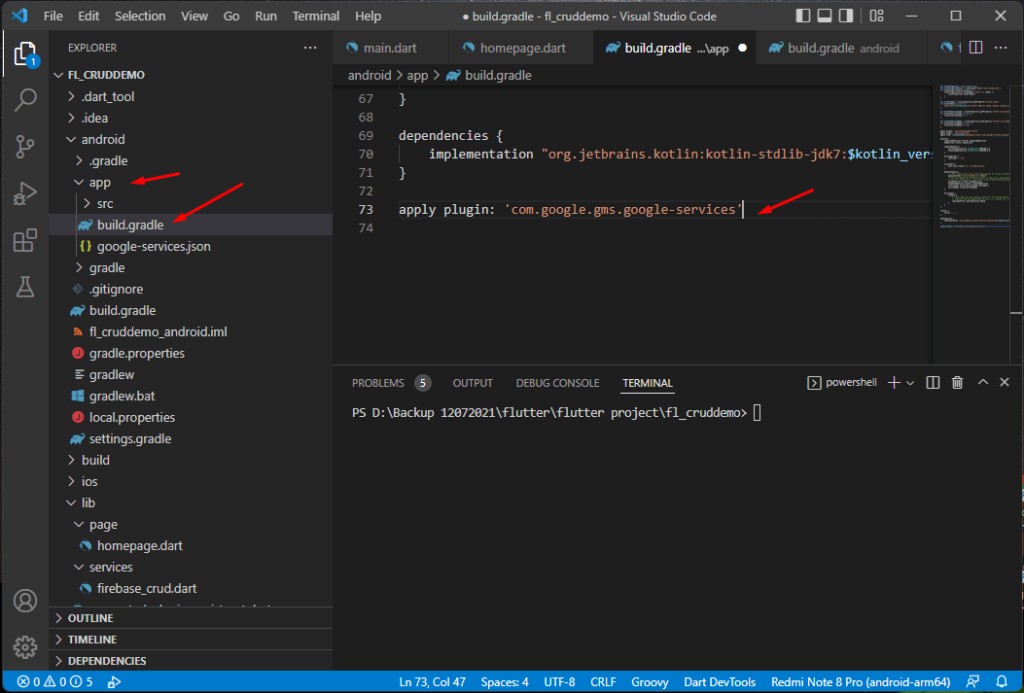
8. Add com.google.gms.google-services plugin on build.gradle under Android » App » buid.gradle inside your flutter project(fl_cruddemo).
9. Now, that we have executed all the steps on Registering our android app. Click on Continue to Console to move back to the Firebase dashboard.
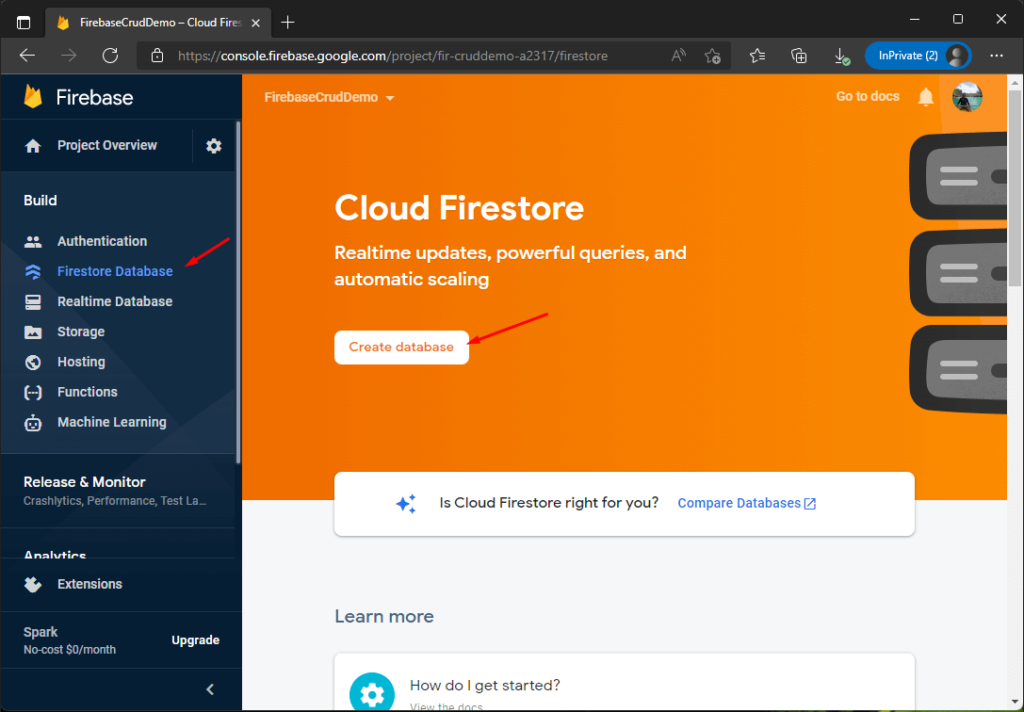
V. Enabling Cloud Firestore
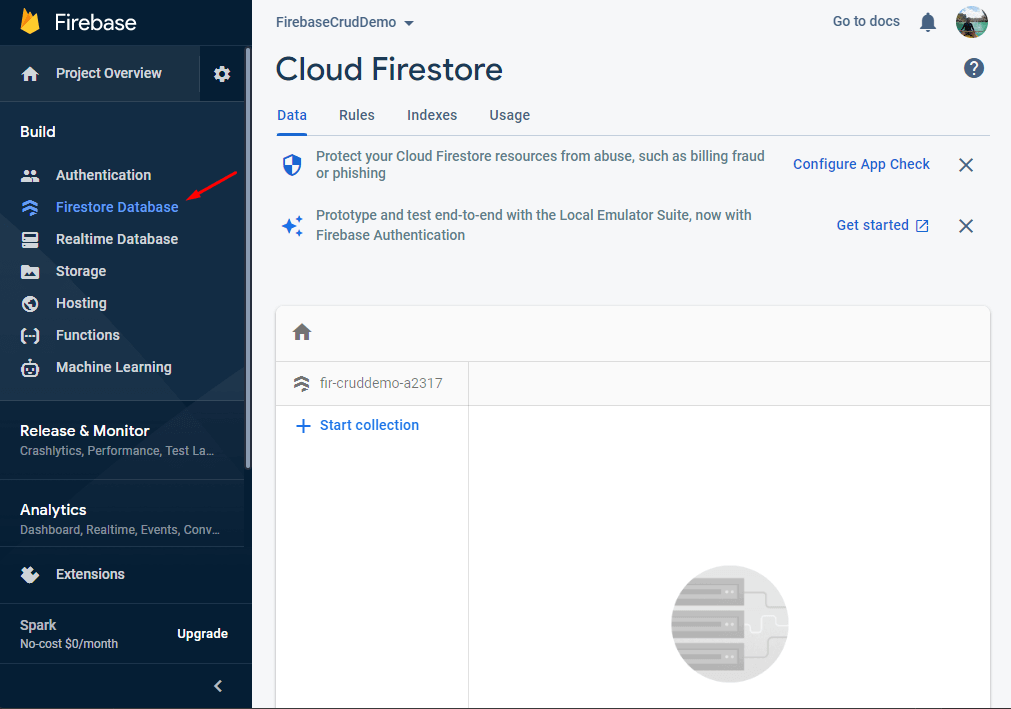
To enable the Firestore database, navigate back to your firebase account console dashboard then select Firestore database from the left menu. Then click Create Database.
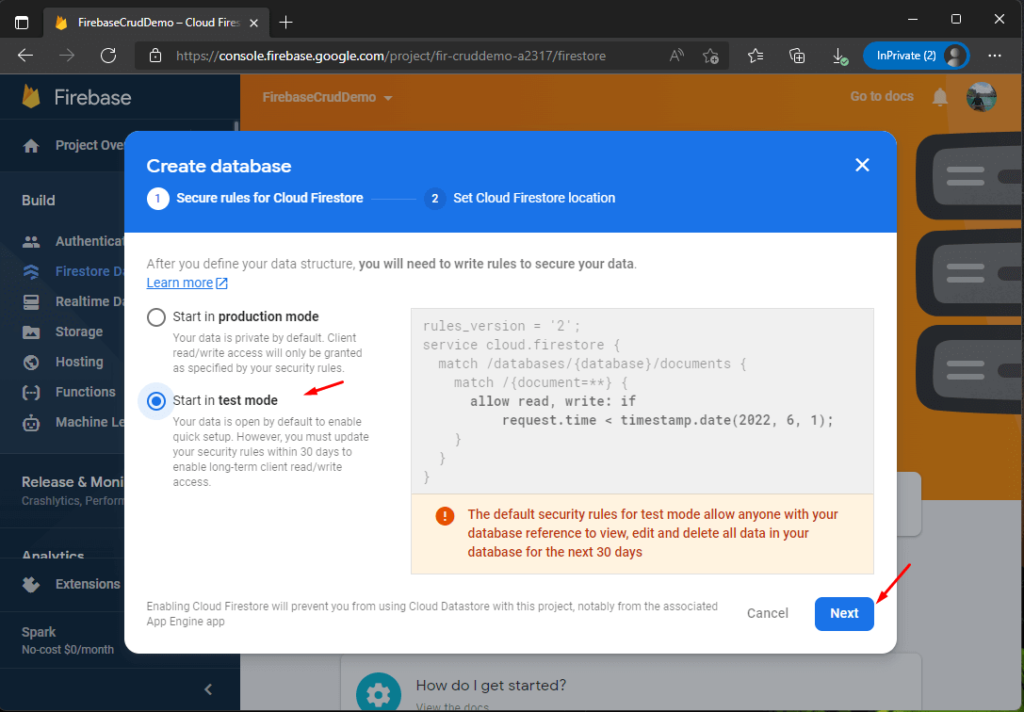
The next window will pop up asking you to select a type of security rule. For this tutorial, we are going to choose test mode since we don’t need strict security authentication. Using test mode will allow our database to be open to all and it won’t check for any kind of authentication. Then click the Next button to proceed.
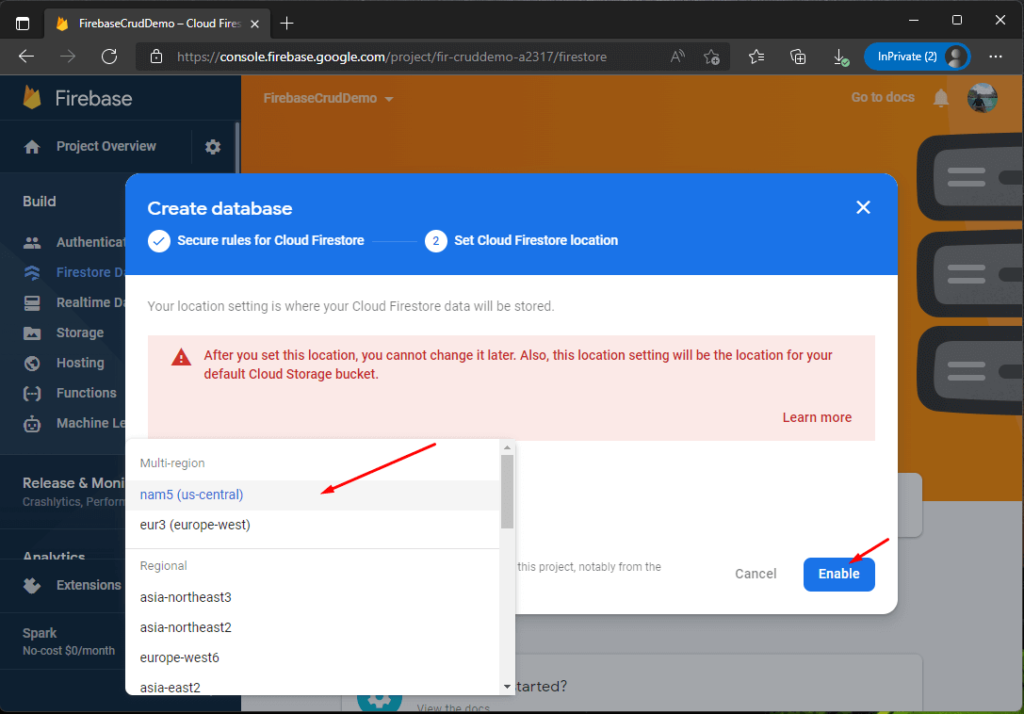
Select a Cloud Firestore location and click on Enable.
You will be taken to an empty Firestore database structure. See the image below.
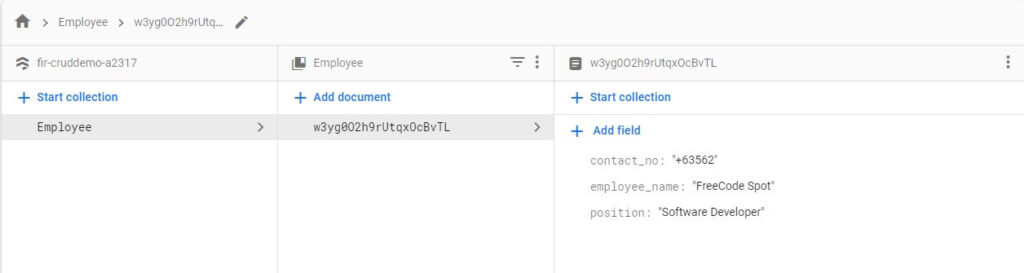
This is the final structure we will achieve on this crud operation in flutter using the firebase example project. See the image below.
VI. Add Firebase dependencies on Flutter App.
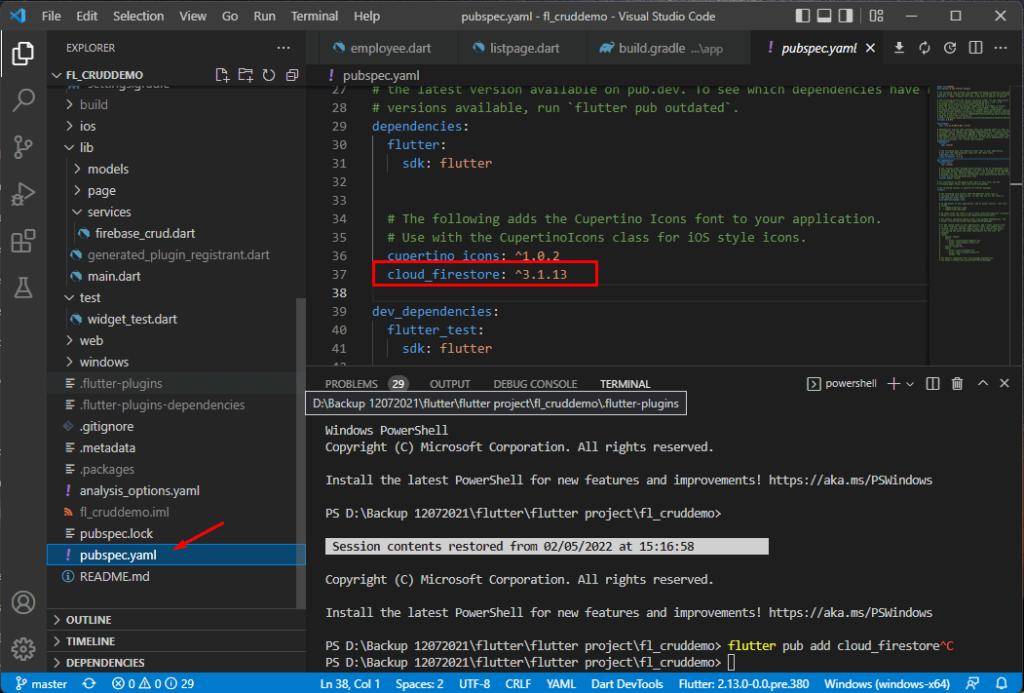
Before we proceed with the coding part on our crud operation in flutter using firebase, we need to add these dependencies in order for us to utilize Firebase Firestore Database. Below are the plugins that we need for this project.
To install these dependencies, Navigate to your flutter project(fl_cruddemo) and open pubspec.yaml . This is where we can register plugins to be utilized inside your app. Once you have added the plugin above, press save, vscode will automatically download and install the plugins.
You can also execute this command flutter pub add cloud_firestore, to add the dependency.
After adding the plugins you may have an error requiring you to upgrade your minimum SDK version. This will depend on the required minimum SDK of the version of the plugins you use. In my case, cloud_firestore requires me to use a higher SDK version. See the image below.
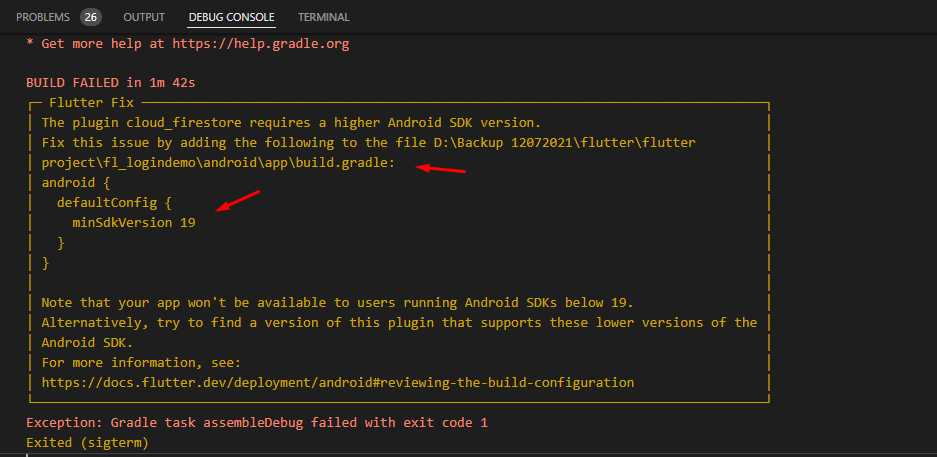
If you have encountered the error above you need to update your minimum SDK version. To do that, follow the steps below.
You can refer to this post on changing your minimum SDK version Change Flutter Minimum SDK version.
VII. Flutter Project Overview
Before, we move on to creating our crud operation in flutter using firebase. I’ll explain here the main folder structure for the expected result for this tutorial. This will help you understand the flow as we go through the coding part.
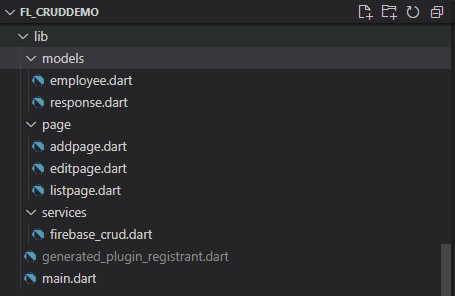
- main.dart » This is the first function executed when you run your flutter app
- models » employee.dart » contains properties for the fields we will use for this tutorial
- models » response.dart » this will be used later as a success response once we perform CRUD operation in Firestore
- page » addpage.dart » This is the form for adding employee details
- page » editpage.dart » This is the form for editing existing employee details
- page » listpage.dart » This is a screen where I display a list of employees in card
- service » firebase_crud » This class contains all the Firestore database CRUD operation
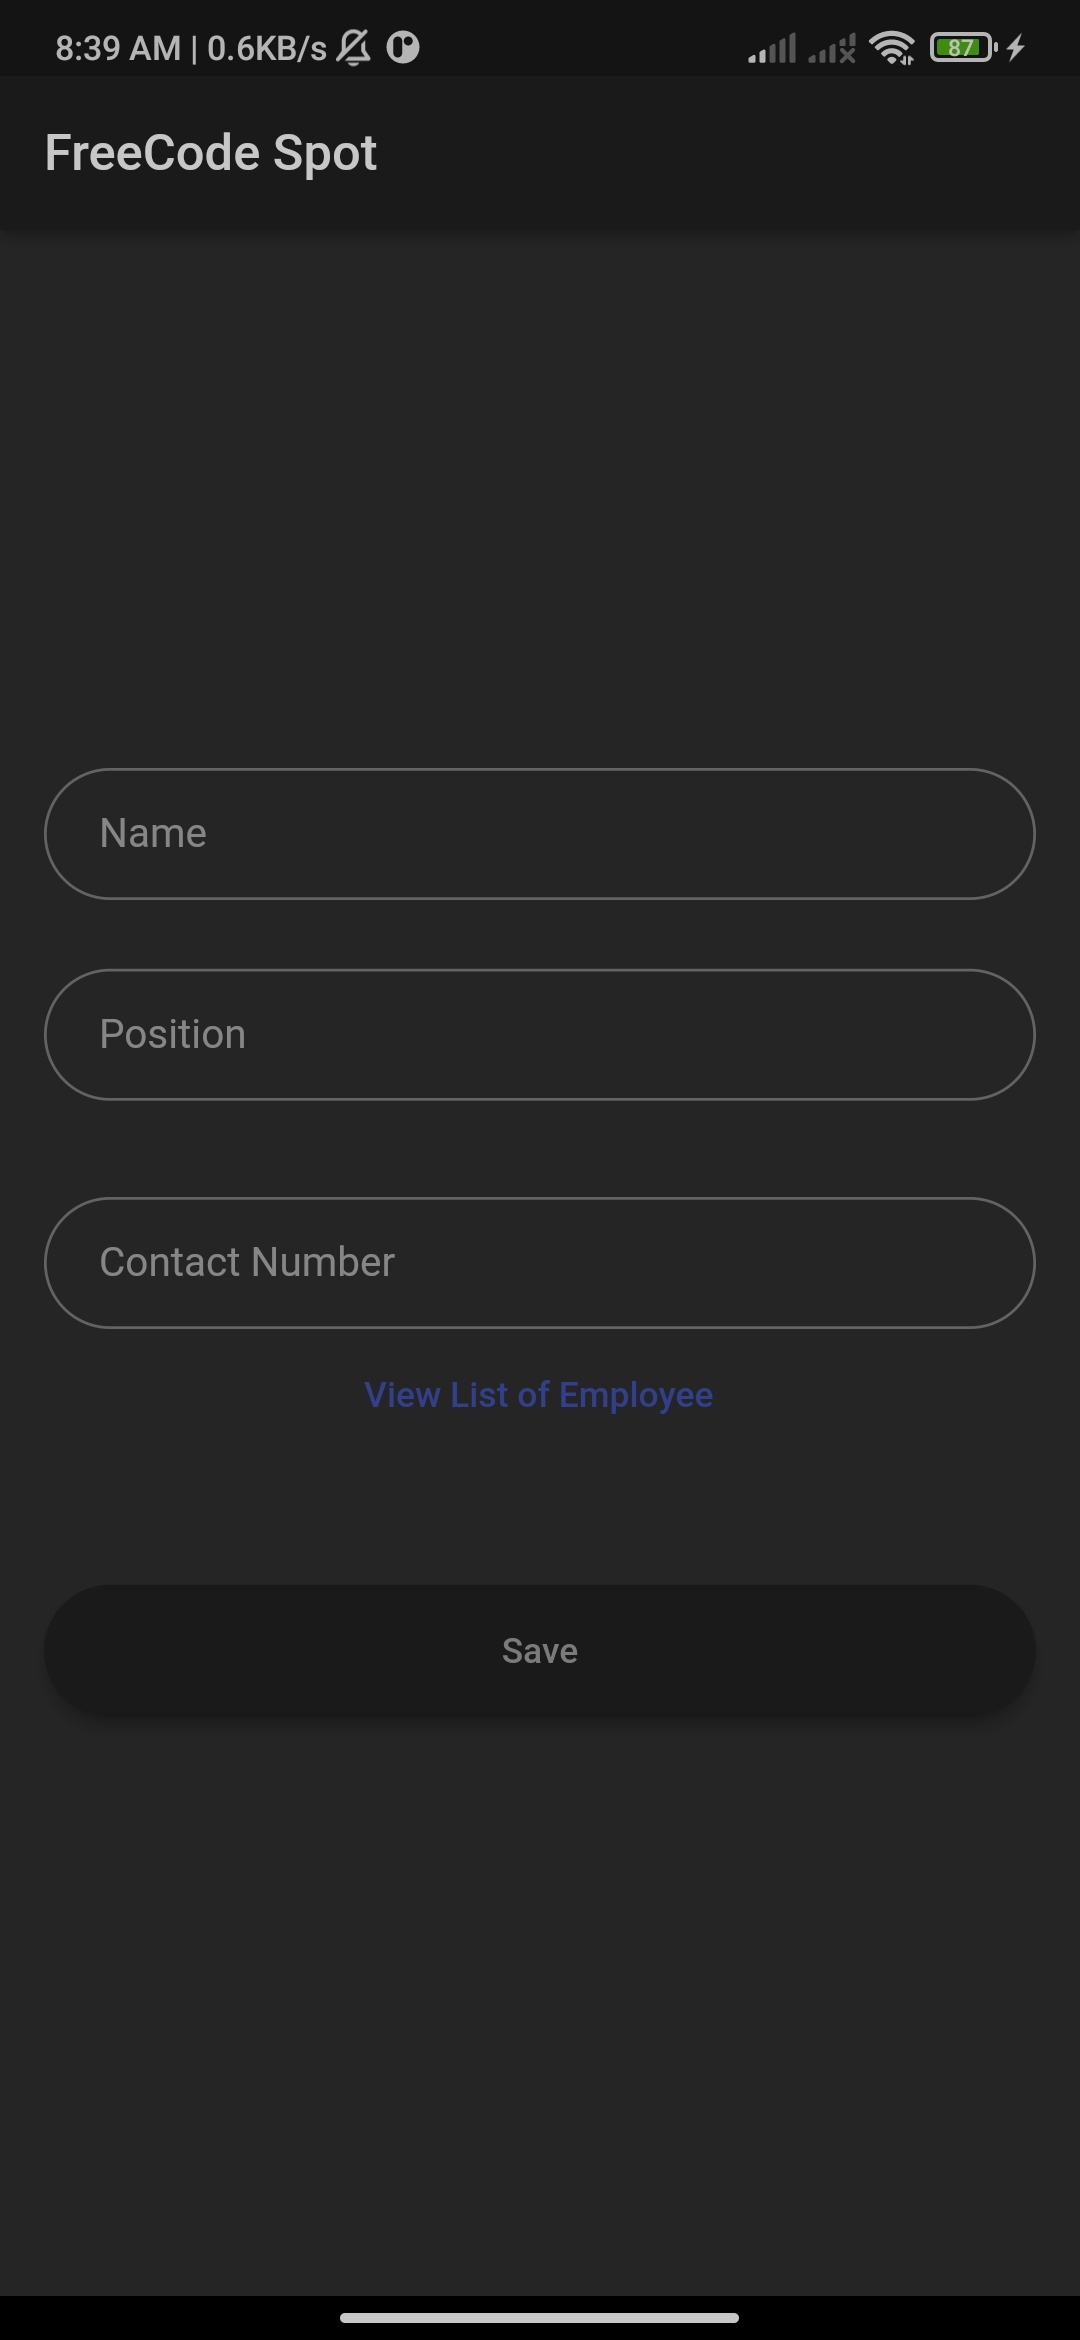
This is the final UI look of the output for this project. See the image below.
VIII. Create Models
Now, open your flutter project then create a models folder. This folder will contain the properties that we need later for storing employee records.
1. employee.dart
class Employee{
  String? uid;
  String? employeename;
  String? position;
  String? contactno;

  Employee({this.uid,this.employeename,this.position,this.contactno});
}
For this tutorial, I use the properties declared above to insert to the firestore database we enable a while ago.
2. response.dart
class Response{
  int? code;
  String? message;
  Response({this.code,this.message});
}
The properties above will handle success or failed insertion once we perform the CRUD operation later.
IX. Create CRUD Operation Class
Now, let’s create the CRUD method we need for our app. Create a folder named services then create the firebase_crud.dart file. This is where we put all our CRUD functionality. See the code below.
Before we can create a CRUD functionality, we need to declare the code below to initiate Firebase Firestore and then create FirebaseCrud class.
import 'package:cloud_firestore/cloud_firestore.dart';
import '../models/response.dart';

final FirebaseFirestore _firestore = FirebaseFirestore.instance;
final CollectionReference _Collection = _firestore.collection('Employee');
class FirebaseCrud {
//CRUD method here
}
Once you’ve added the code snippet above, we can now start adding the CRUD operation. Follow the source code below.
CREATE employee record
  static Future<Response> addEmployee({
    required String name,
    required String position,
    required String contactno,
  }) async {

    Response response = Response();
    DocumentReference documentReferencer =
        _Collection.doc();

    Map<String, dynamic> data = <String, dynamic>{
      "employee_name": name,
      "position": position,
      "contact_no" : contactno
    };

    var result = await documentReferencer
        .set(data)
        .whenComplete(() {
          response.code = 200;
          response.message = "Sucessfully added to the database";
        })
        .catchError((e) {
            response.code = 500;
            response.message = e;
        });

        return response;
  }
Read employee records
  static Stream<QuerySnapshot> readEmployee() {
    CollectionReference notesItemCollection =
        _Collection;

    return notesItemCollection.snapshots();
  }
Update employee record
static Future<Response> updateEmployee({
    required String name,
    required String position,
    required String contactno,
    required String docId,
  }) async {
    Response response = Response();
    DocumentReference documentReferencer =
        _Collection.doc(docId);

    Map<String, dynamic> data = <String, dynamic>{
      "employee_name": name,
      "position": position,
      "contact_no" : contactno
    };

    await documentReferencer
        .update(data)
        .whenComplete(() {
           response.code = 200;
          response.message = "Sucessfully updated Employee";
        })
        .catchError((e) {
            response.code = 500;
            response.message = e;
        });

        return response;
  }
Delete Employee record
  static Future<Response> deleteEmployee({
    required String docId,
  }) async {
     Response response = Response();
    DocumentReference documentReferencer =
        _Collection.doc(docId);

    await documentReferencer
        .delete()
        .whenComplete((){
          response.code = 200;
          response.message = "Sucessfully Deleted Employee";
        })
        .catchError((e) {
           response.code = 500;
            response.message = e;
        });

   return response;
  }
X. Create pages or screens
Now, that we have all the services we need which is the CRUD(Create, Read, Update and Delete) , let’s start creating the forms for user interaction. In this tutorial, we are going to create a simple UI or screens which is add page, list page and edit page.
screens » addpage.dart
This page is a UI form that contains properties we need to collect to be inserted on Firestore Database
Below are the simple and straightforward forms we need for this example.
import 'package:fl_cruddemo/page/listpage.dart';
import 'package:flutter/material.dart';

import '../services/firebase_crud.dart';

class AddPage extends StatefulWidget {
  @override
  State<StatefulWidget> createState() {
    // TODO: implement createState
    return _AddPage();
  }
}

class _AddPage extends State<AddPage> {
  final _employee_name = TextEditingController();
  final _employee_position = TextEditingController();
  final _employee_contact = TextEditingController();

  final GlobalKey<FormState> _formKey = GlobalKey<FormState>();

  @override
  Widget build(BuildContext context) {
    final nameField = TextFormField(
        controller: _employee_name,
        autofocus: false,
        validator: (value) {
          if (value == null || value.trim().isEmpty) {
            return 'This field is required';
          }
        },
        decoration: InputDecoration(
            contentPadding: const EdgeInsets.fromLTRB(20.0, 15.0, 20.0, 15.0),
            hintText: "Name",
            border:
                OutlineInputBorder(borderRadius: BorderRadius.circular(32.0))));
    final positionField = TextFormField(
        controller: _employee_position,
        autofocus: false,
        validator: (value) {
          if (value == null || value.trim().isEmpty) {
            return 'This field is required';
          }
        },
        decoration: InputDecoration(
            contentPadding: const EdgeInsets.fromLTRB(20.0, 15.0, 20.0, 15.0),
            hintText: "Position",
            border:
                OutlineInputBorder(borderRadius: BorderRadius.circular(32.0))));
    final contactField = TextFormField(
        controller: _employee_contact,
        autofocus: false,
        validator: (value) {
          if (value == null || value.trim().isEmpty) {
            return 'This field is required';
          }
        },
        decoration: InputDecoration(
            contentPadding: const EdgeInsets.fromLTRB(20.0, 15.0, 20.0, 15.0),
            hintText: "Contact Number",
            border:
                OutlineInputBorder(borderRadius: BorderRadius.circular(32.0))));

    final viewListbutton = TextButton(
        onPressed: () {
          Navigator.pushAndRemoveUntil<dynamic>(
            context,
            MaterialPageRoute<dynamic>(
              builder: (BuildContext context) => ListPage(),
            ),
            (route) => false, //To disable back feature set to false
          );
        },
        child: const Text('View List of Employee'));

    final SaveButon = Material(
      elevation: 5.0,
      borderRadius: BorderRadius.circular(30.0),
      color: Theme.of(context).primaryColor,
      child: MaterialButton(
        minWidth: MediaQuery.of(context).size.width,
        padding: const EdgeInsets.fromLTRB(20.0, 15.0, 20.0, 15.0),
        onPressed: () async {
          if (_formKey.currentState!.validate()) {
            var response = await FirebaseCrud.addEmployee(
                name: _employee_name.text,
                position: _employee_position.text,
                contactno: _employee_contact.text);
            if (response.code != 200) {
              showDialog(
                  context: context,
                  builder: (context) {
                    return AlertDialog(
                      content: Text(response.message.toString()),
                    );
                  });
            } else {
              showDialog(
                  context: context,
                  builder: (context) {
                    return AlertDialog(
                      content: Text(response.message.toString()),
                    );
                  });
            }
          }
        },
        child: Text(
          "Save",
          style: TextStyle(color: Theme.of(context).primaryColorLight),
          textAlign: TextAlign.center,
        ),
      ),
    );

    return Scaffold(
      resizeToAvoidBottomInset: false,
      appBar: AppBar(
        title: const Text('FreeCode Spot'),
        backgroundColor: Theme.of(context).primaryColor,
      ),
      body: Column(
        mainAxisAlignment: MainAxisAlignment.center,
        children: [
          Form(
            key: _formKey,
            child: Padding(
              padding: const EdgeInsets.all(16.0),
              child: Column(
                crossAxisAlignment: CrossAxisAlignment.center,
                mainAxisAlignment: MainAxisAlignment.center,
                children: <Widget>[
                  nameField,
                  const SizedBox(height: 25.0),
                  positionField,
                  const SizedBox(height: 35.0),
                  contactField,
                  viewListbutton,
                  const SizedBox(height: 45.0),
                  SaveButon,
                  const SizedBox(height: 15.0),
                ],
              ),
            ),
          ),
        ],
      ),
    );
  }
}
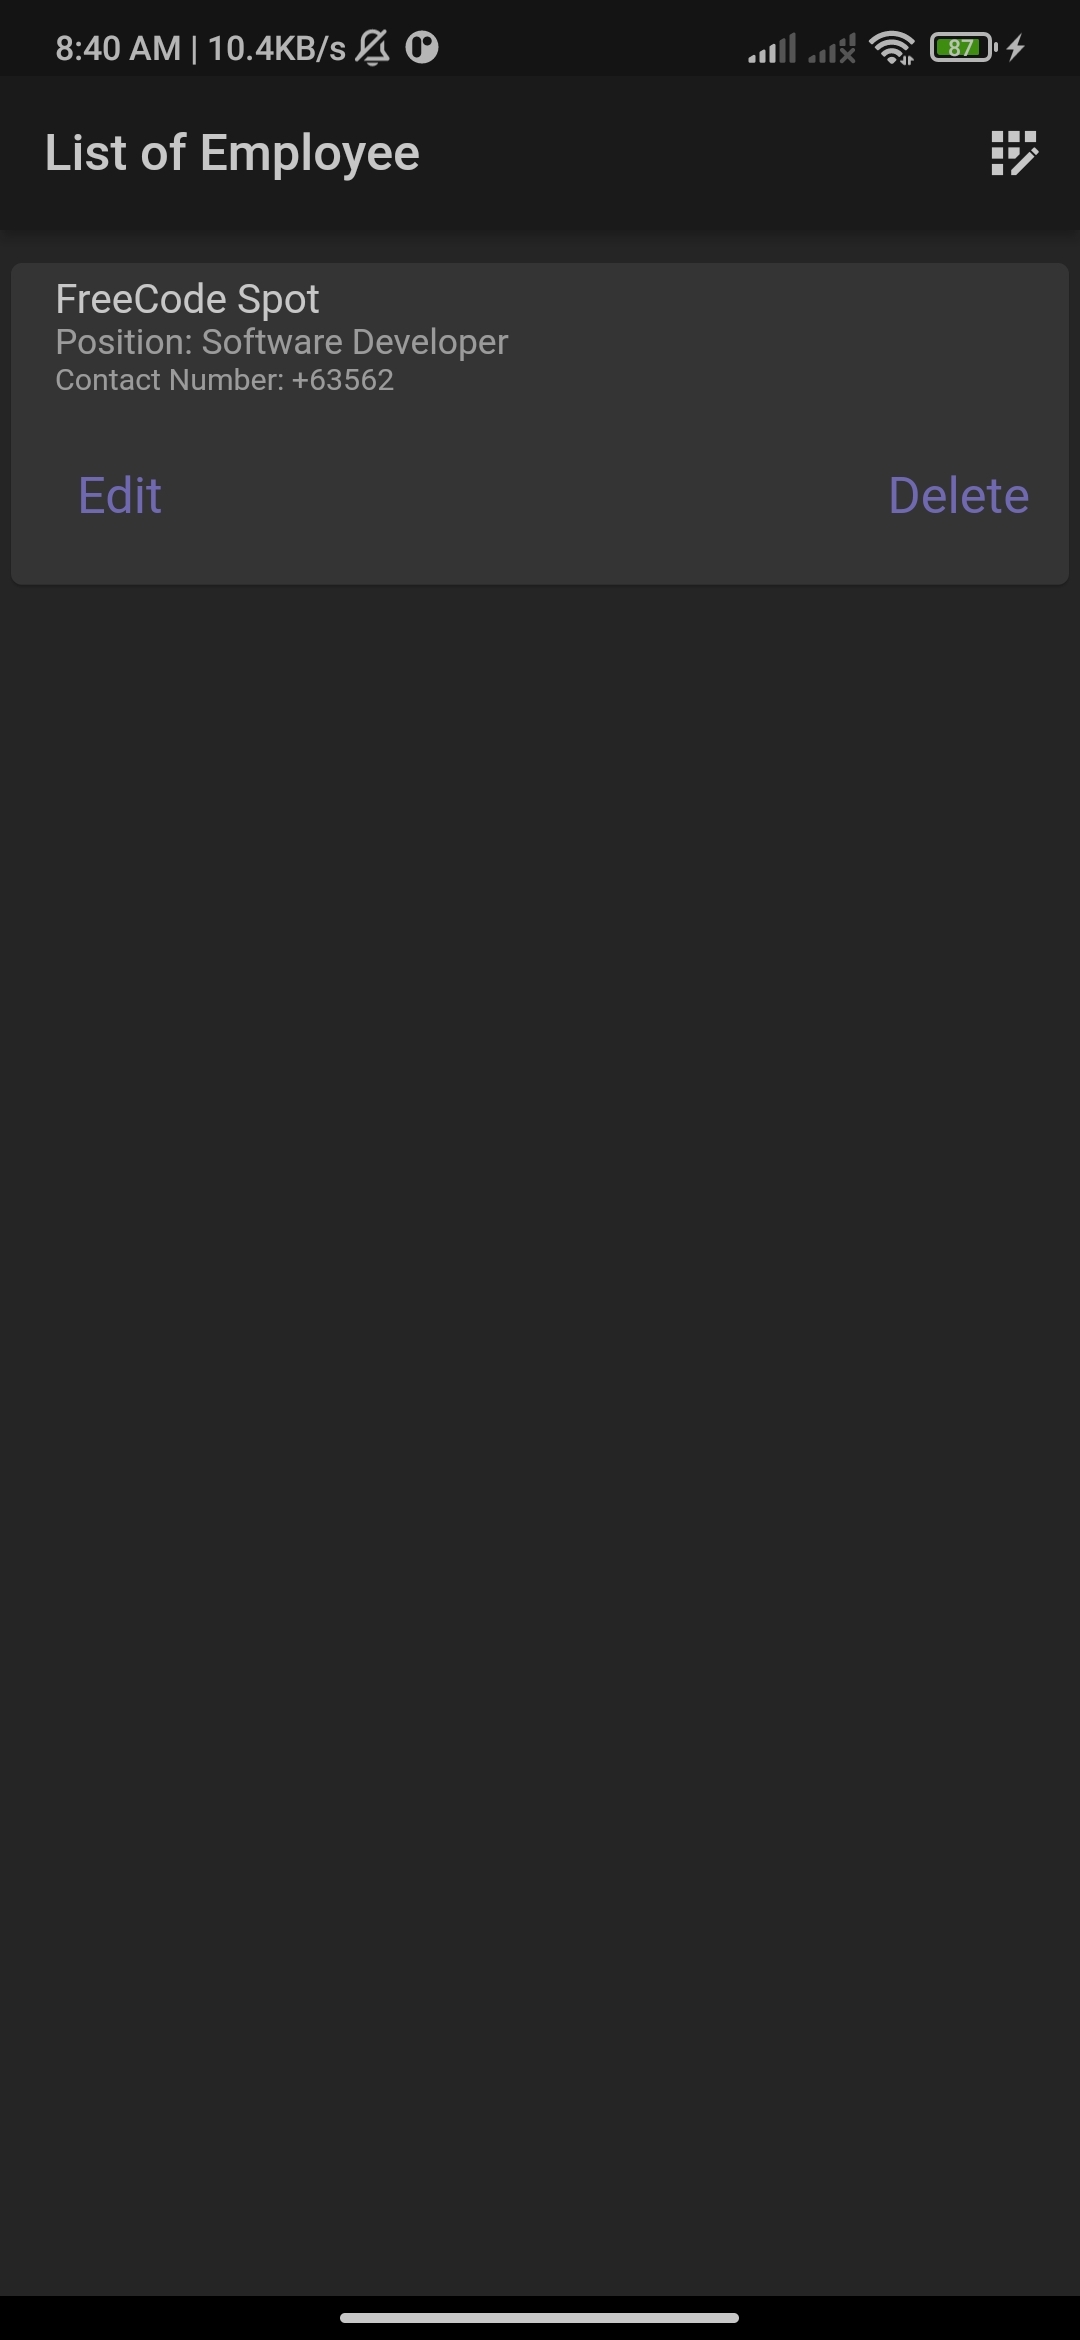
screens » listpage.dart
This page or screens will display the list of employee inserted into our Firestore database
See the code snippet below.
import 'package:cloud_firestore/cloud_firestore.dart';
import 'package:fl_cruddemo/models/employee.dart';
import 'package:fl_cruddemo/page/addpage.dart';
import 'package:fl_cruddemo/page/editpage.dart';
import 'package:flutter/material.dart';

import '../services/firebase_crud.dart';

class ListPage extends StatefulWidget {
  @override
  State<StatefulWidget> createState() {
    return _ListPage();
  }
}

class _ListPage extends State<ListPage> {
  final Stream<QuerySnapshot> collectionReference = FirebaseCrud.readEmployee();
  //FirebaseFirestore.instance.collection('Employee').snapshots();
  @override
  Widget build(BuildContext context) {
    return Scaffold(
      resizeToAvoidBottomInset: false,
      appBar: AppBar(
        title: const Text("List of Employee"),
        backgroundColor: Theme.of(context).primaryColor,
        actions: <Widget>[
          IconButton(
            icon: Icon(
              Icons.app_registration,
              color: Colors.white,
            ),
            onPressed: () {
              Navigator.pushAndRemoveUntil<dynamic>(
                context,
                MaterialPageRoute<dynamic>(
                  builder: (BuildContext context) => AddPage(),
                ),
                (route) =>
                    false, //if you want to disable back feature set to false
              );
            },
          )
        ],
      ),
      body: StreamBuilder(
        stream: collectionReference,
        builder: (BuildContext context, AsyncSnapshot<QuerySnapshot> snapshot) {
          if (snapshot.hasData) {
            return Padding(
              padding: const EdgeInsets.only(top: 8.0),
              child: ListView(
                children: snapshot.data!.docs.map((e) {
                  return Card(
                      child: Column(children: [
                    ListTile(
                      title: Text(e["employee_name"]),
                      subtitle: Container(
                        child: (Column(
                          crossAxisAlignment: CrossAxisAlignment.start,
                          children: <Widget>[
                            Text("Position: " + e['position'],
                                style: const TextStyle(fontSize: 14)),
                            Text("Contact Number: " + e['contact_no'],
                                style: const TextStyle(fontSize: 12)),
                          ],
                        )),
                      ),
                    ),
                    ButtonBar(
                      alignment: MainAxisAlignment.spaceBetween,
                      children: <Widget>[
                        TextButton(
                          style: TextButton.styleFrom(
                            padding: const EdgeInsets.all(5.0),
                            primary: const Color.fromARGB(255, 143, 133, 226),
                            textStyle: const TextStyle(fontSize: 20),
                          ),
                          child: const Text('Edit'),
                          onPressed: () {
                            Navigator.pushAndRemoveUntil<dynamic>(
                              context,
                              MaterialPageRoute<dynamic>(
                                builder: (BuildContext context) => EditPage(
                                  employee: Employee(
                                      uid: e.id,
                                      employeename: e["employee_name"],
                                      position: e["position"],
                                      contactno: e["contact_no"]),
                                ),
                              ),
                              (route) =>
                                  false, //if you want to disable back feature set to false
                            );
                          },
                        ),
                        TextButton(
                          style: TextButton.styleFrom(
                            padding: const EdgeInsets.all(5.0),
                            primary: const Color.fromARGB(255, 143, 133, 226),
                            textStyle: const TextStyle(fontSize: 20),
                          ),
                          child: const Text('Delete'),
                          onPressed: () async {
                            var response =
                                await FirebaseCrud.deleteEmployee(docId: e.id);
                            if (response.code != 200) {
                              showDialog(
                                  context: context,
                                  builder: (context) {
                                    return AlertDialog(
                                      content:
                                          Text(response.message.toString()),
                                    );
                                  });
                            }
                          },
                        ),
                      ],
                    ),
                  ]));
                }).toList(),
              ),
            );
          }

          return Container();
        },
      ),
    );
  }
}
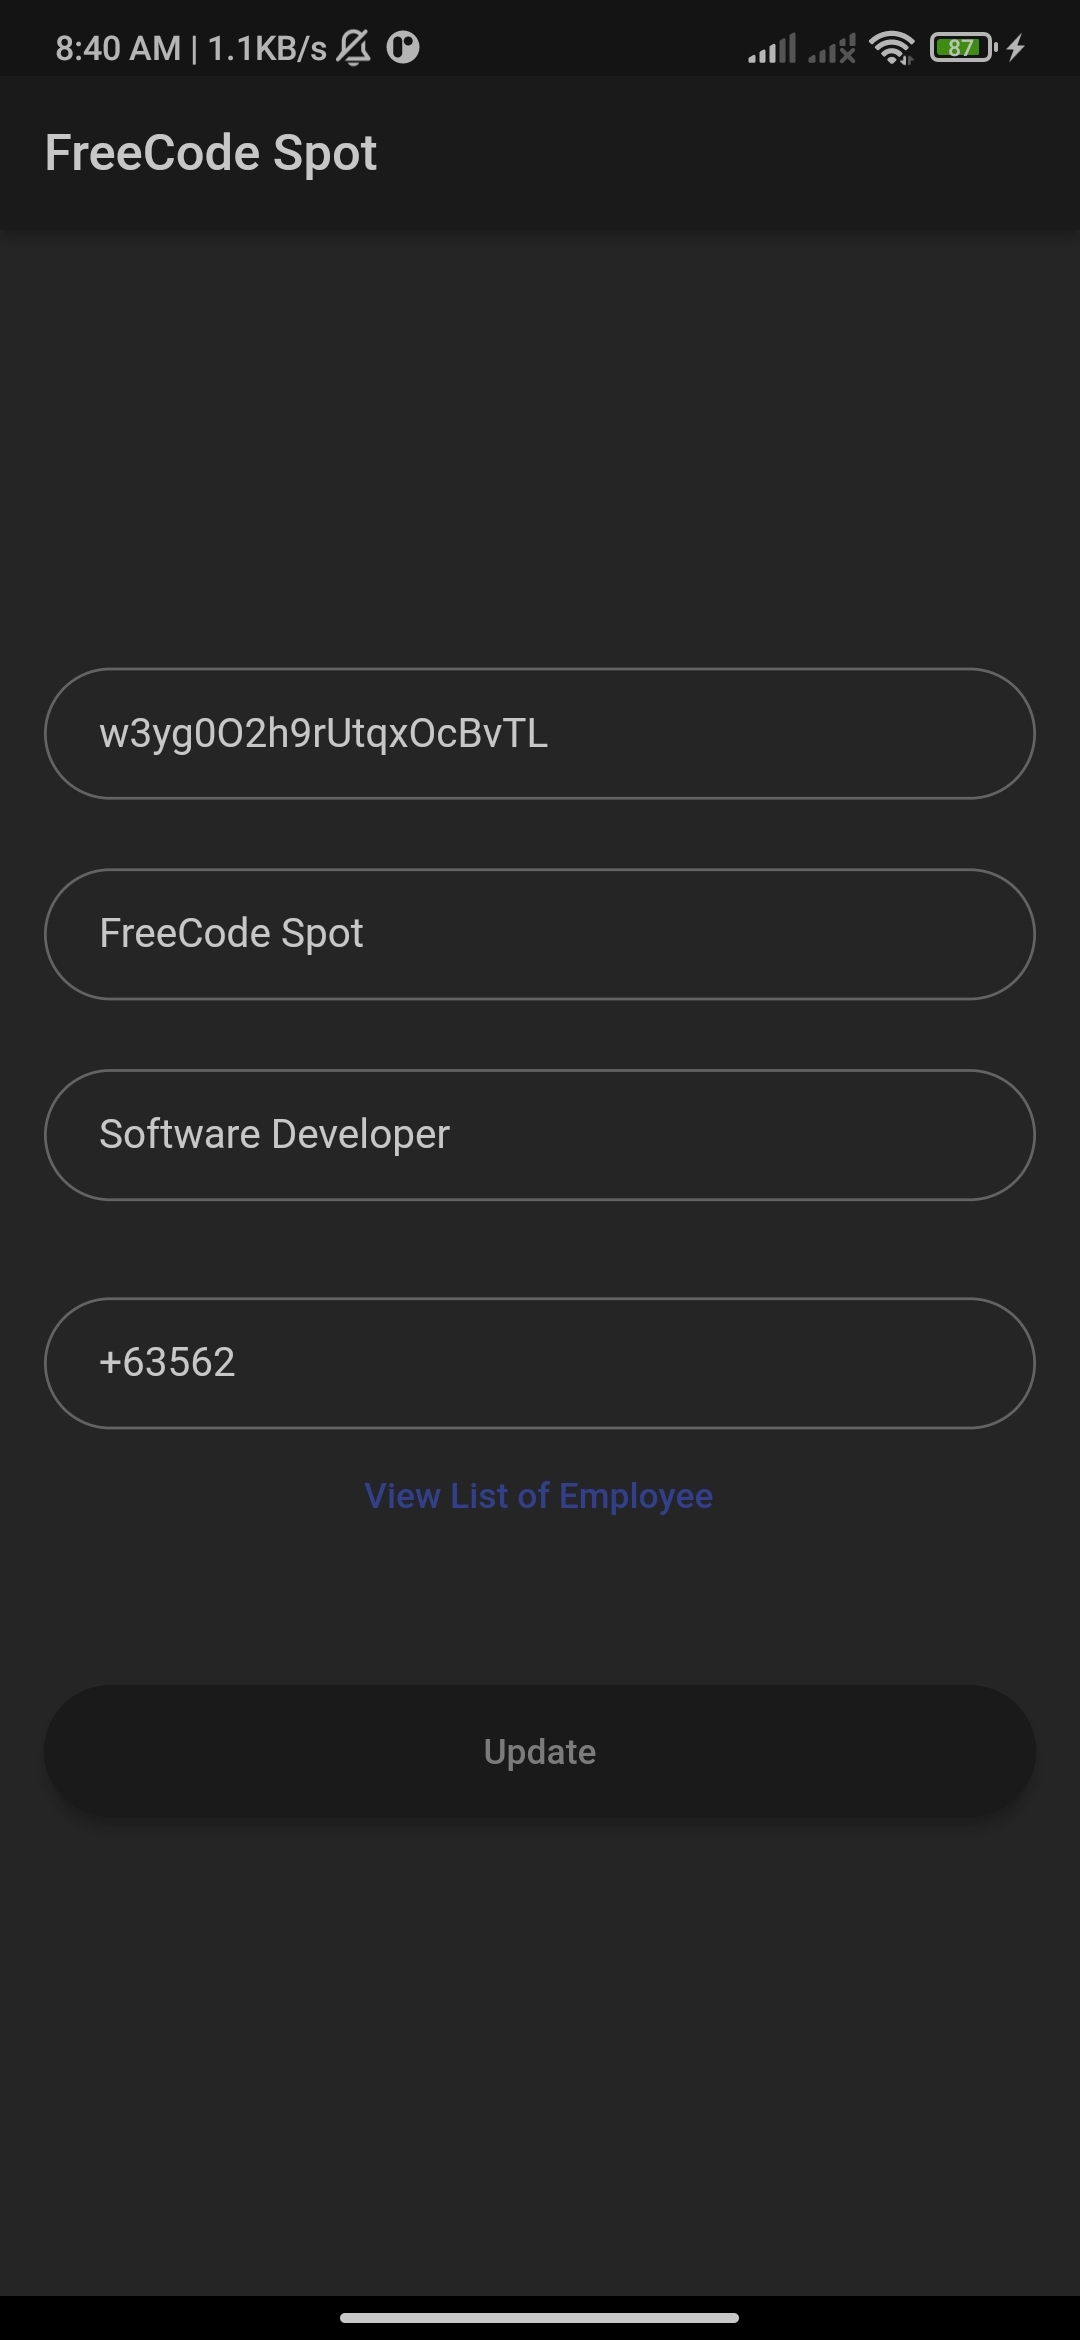
screens » editpage.dart
This will display the selected employee details from the list page and allow user to change it’s values
We can use the code from the addpage.dart but we will add additional Texfield which is the document id. The document ID is needed to identify the record we need to update on the Firestore database. See the code snippet below.
import 'package:fl_cruddemo/page/listpage.dart';
import 'package:flutter/material.dart';

import '../models/employee.dart';
import '../services/firebase_crud.dart';

class EditPage extends StatefulWidget {
final Employee? employee;
 EditPage({this.employee});

  @override
  State<StatefulWidget> createState() {
    // TODO: implement createState
    return _EditPage();
  }
}

class _EditPage extends State<EditPage> {
  final _employee_name = TextEditingController();
  final _employee_position = TextEditingController();
  final _employee_contact = TextEditingController();
  final _docid = TextEditingController();


  final GlobalKey<FormState> _formKey = GlobalKey<FormState>();

@override
  void initState() {
    // TODO: implement initState
    _docid.value = TextEditingValue(text: widget.employee!.uid.toString());
    _employee_name.value = TextEditingValue(text: widget.employee!.employeename.toString());
    _employee_position.value = TextEditingValue(text: widget.employee!.position.toString());
    _employee_contact.value = TextEditingValue(text: widget.employee!.contactno.toString());

  }

  @override
  Widget build(BuildContext context) {


    final DocIDField = TextField(
        controller: _docid,
        readOnly: true,
        autofocus: false,
        decoration: InputDecoration(
            contentPadding: const EdgeInsets.fromLTRB(20.0, 15.0, 20.0, 15.0),
            hintText: "Name",
            border:
                OutlineInputBorder(borderRadius: BorderRadius.circular(32.0))));


    final nameField = TextFormField(
        controller: _employee_name,
        autofocus: false,
        validator: (value) {
          if (value == null || value.trim().isEmpty) {
            return 'This field is required';
          }
        },
        decoration: InputDecoration(
            contentPadding: const EdgeInsets.fromLTRB(20.0, 15.0, 20.0, 15.0),
            hintText: "Name",
            border:
                OutlineInputBorder(borderRadius: BorderRadius.circular(32.0))));
    final positionField = TextFormField(
        controller: _employee_position,
        autofocus: false,
        validator: (value) {
          if (value == null || value.trim().isEmpty) {
            return 'This field is required';
          }
        },
        decoration: InputDecoration(
            contentPadding: const EdgeInsets.fromLTRB(20.0, 15.0, 20.0, 15.0),
            hintText: "Position",
            border:
                OutlineInputBorder(borderRadius: BorderRadius.circular(32.0))));
    final contactField = TextFormField(
        controller: _employee_contact,
        autofocus: false,
        validator: (value) {
          if (value == null || value.trim().isEmpty) {
            return 'This field is required';
          }
        },
        decoration: InputDecoration(
            contentPadding: const EdgeInsets.fromLTRB(20.0, 15.0, 20.0, 15.0),
            hintText: "Contact Number",
            border:
                OutlineInputBorder(borderRadius: BorderRadius.circular(32.0))));

    final viewListbutton = TextButton(
        onPressed: () {
          Navigator.pushAndRemoveUntil<dynamic>(
            context,
            MaterialPageRoute<dynamic>(
              builder: (BuildContext context) => ListPage(),
            ),
            (route) => false, //if you want to disable back feature set to false
          );
        },
        child: const Text('View List of Employee'));

    final SaveButon = Material(
      elevation: 5.0,
      borderRadius: BorderRadius.circular(30.0),
      color: Theme.of(context).primaryColor,
      child: MaterialButton(
        minWidth: MediaQuery.of(context).size.width,
        padding: const EdgeInsets.fromLTRB(20.0, 15.0, 20.0, 15.0),
        onPressed: () async {
          if (_formKey.currentState!.validate()) {
            var response = await FirebaseCrud.updateEmployee(
                name: _employee_name.text,
                position: _employee_position.text,
                contactno: _employee_contact.text,
                docId: _docid.text);
            if (response.code != 200) {
              showDialog(
                  context: context,
                  builder: (context) {
                    return AlertDialog(
                      content: Text(response.message.toString()),
                    );
                  });
            } else {
              showDialog(
                  context: context,
                  builder: (context) {
                    return AlertDialog(
                      content: Text(response.message.toString()),
                    );
                  });
            }
          }
        },
        child: Text(
          "Update",
          style: TextStyle(color: Theme.of(context).primaryColorLight),
          textAlign: TextAlign.center,
        ),
      ),
    );

    return Scaffold(
      resizeToAvoidBottomInset: false,
      appBar: AppBar(
        title: const Text('FreeCode Spot'),
        backgroundColor: Theme.of(context).primaryColor,
      ),
      body: Column(
        mainAxisAlignment: MainAxisAlignment.center,
        children: [
          Form(
            key: _formKey,
            child: Padding(
              padding: const EdgeInsets.all(16.0),
              child: Column(
                crossAxisAlignment: CrossAxisAlignment.center,
                mainAxisAlignment: MainAxisAlignment.center,
                children: <Widget>[
                  DocIDField,
                  const SizedBox(height: 25.0),
                  nameField,
                  const SizedBox(height: 25.0),
                  positionField,
                  const SizedBox(height: 35.0),
                  contactField,
                  viewListbutton,
                  const SizedBox(height: 45.0),
                  SaveButon,
                  const SizedBox(height: 15.0),
                ],
              ),
            ),
          ),
        ],
      ),
    );
  }
}
XI. Initialize Firebase on main.dart
Now the last thing we need to do is to set which what page we set as default screen once the user open the apps then initialize Firebase to be utilize on our app. To do that, see the code snippet below.
import 'package:fl_cruddemo/page/addpage.dart';
import 'package:flutter/material.dart';
import 'package:firebase_core/firebase_core.dart';

void main() async {
  WidgetsFlutterBinding.ensureInitialized();
   await Firebase.initializeApp();
  runApp(MyApp());
}

class MyApp extends StatelessWidget {
  @override
  Widget build(BuildContext context) {
    return MaterialApp(
      title: 'FreeCode Spot',
      debugShowCheckedModeBanner: false,
      theme: ThemeData(
        primarySwatch: Colors.indigo,
        brightness: Brightness.dark,
      ),
      home: AddPage(),
    );
  }
}
Check out the source code on my GitHub account.
Summary
We have learned in this tutorial how we can easily create crud operation in flutter using firebase. This is just a simple flutter app that can be upgraded later and could be more realistic and be used on a real-life application. Hopefully, this can help you with your future projects. For more flutter tutorials visit this link.
KEEP CODING!!