In this article, we are going to learn How to use MongoDB with ASP NET Core Web API. To do that we will create a basic CRUD functionality using ASP.NET Core Web API with MongoDB as our database.
- I. Installing MongoDB
- II. Create ASP.NET Core Web Application
- III. Add Dependencies (NuGet packages)
- IV. Appsettings.JSON configuration
- V. Creating Models
- VI. Adding Services Classes
- Program.cs Code
- VII. Controllers
- VIII. CREATE OPERATION
- IX. READ OPERATION
- X. UPDATE/PUT OPERATION
- XI. DELETE OPERATION
- XII. TESTING THE API
- Summary
Related Topic: ASP.NET Core 6 using Firebase
What is MongoDB?
MongoDB is a document-oriented NoSQL database used for high-volume data storage. Instead of using tables and rows as in the traditional relational databases, MongoDB makes use of collections and documents.
What is the difference between SQL and NoSQL?
Before we look at SQL and NOSQL it is important we understand what relational databases and non-relational databases are.
A relational database is a type of database that contains a collection of tables used to store data. In simple terms, it is a collection of one or more tables. A non-relational database is a type of database that contains collections and documents. A collection is similar to a table in relational databases and a document is similar to a table row.
We can therefore say SQL is a programming language used to interface with relational databases while NoSQL is a non-relational database.
Before we start, please make sure you have installed the following
- MongoDB
- Visual Studio 2022
I. Installing MongoDB
The first thing we need to do in order for us to use MongoDB with ASP NET Core Web API application is to install MongoDB on our local machine. Follow the steps below.
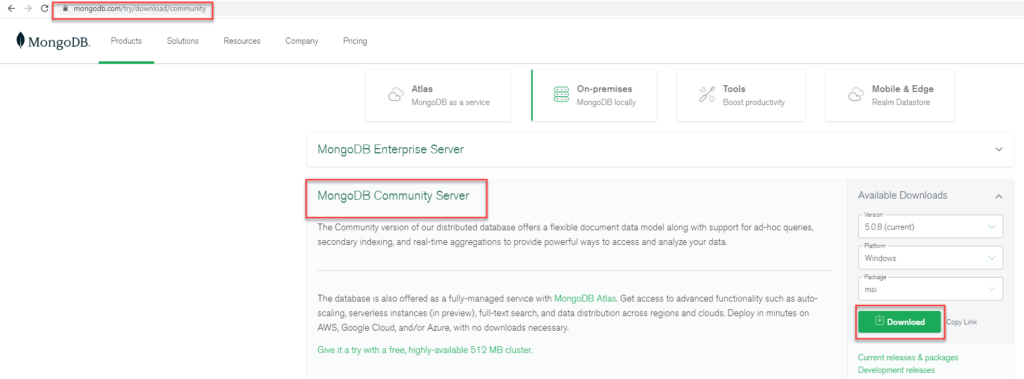
- Go to https://www.mongodb.com/try/download/community and click download. After downloading run the setup to complete the installation process.
After successfully installing MongoDB let’s create a new database to hold our data.
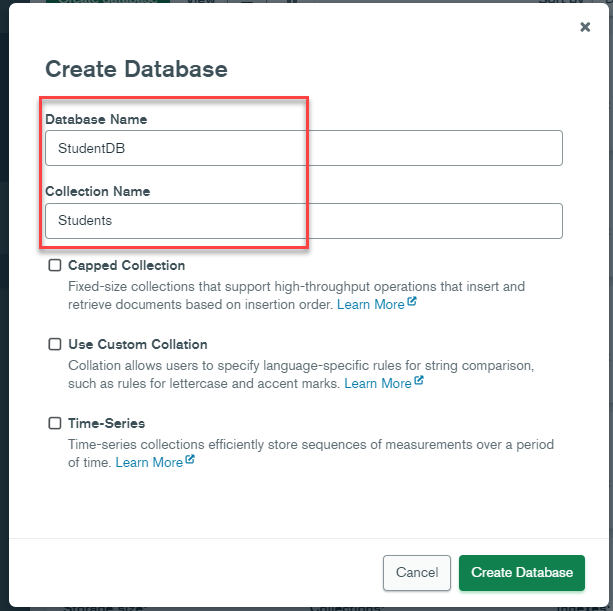
2. To do this launch the software then click Create database

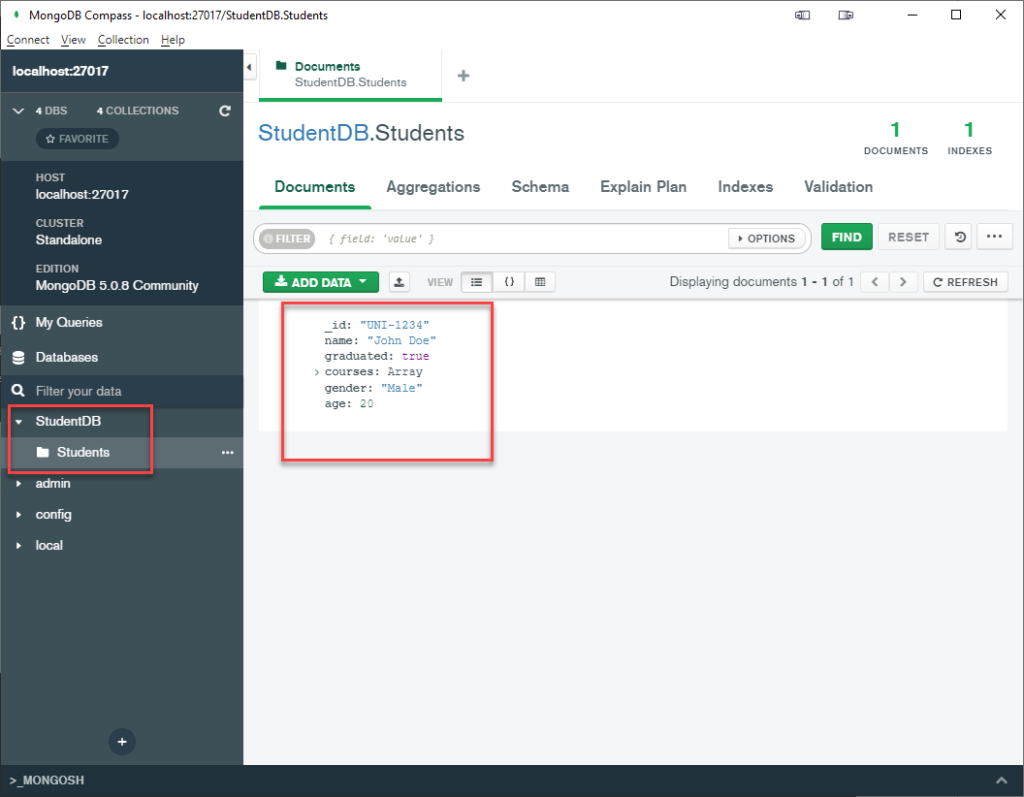
3. Give your database the name “StudentDB” and the Collection Name “Students” then click “Create Database” to finish setting up the database.
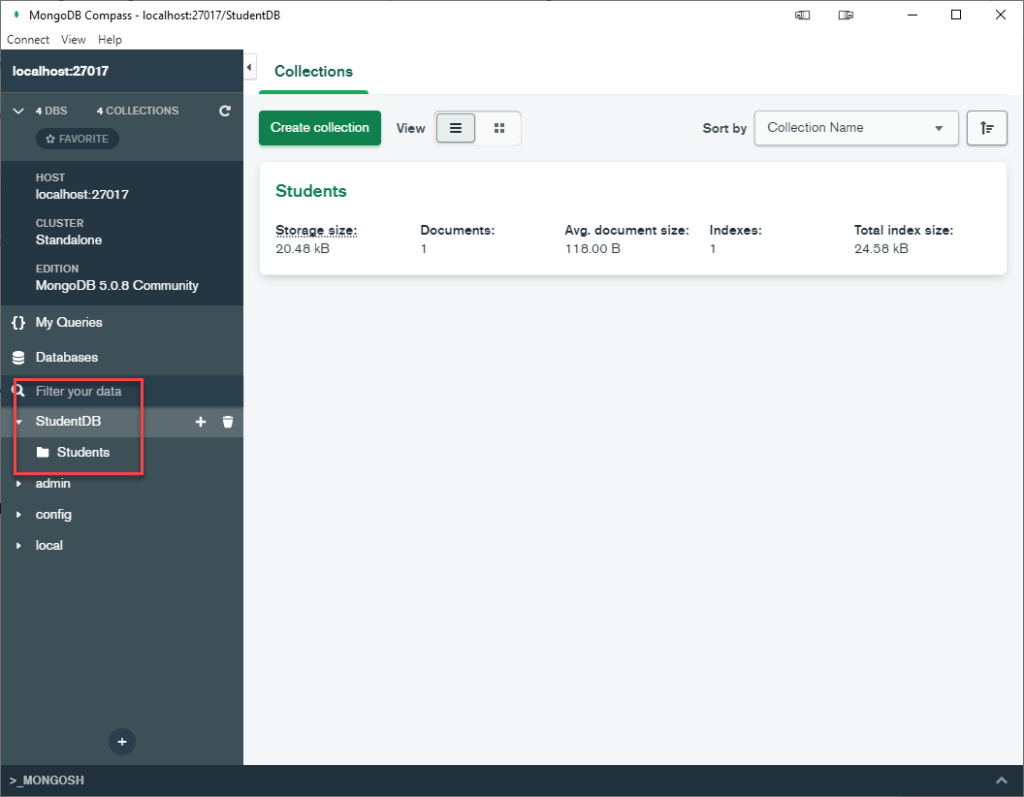
Once created the database will appear in a dashboard similar to the image shown below
II. Create ASP.NET Core Web Application
We have completed setting up our MongoDB database. It’s time to create an ASP NET Core WEB API application.
To do this follow the steps below
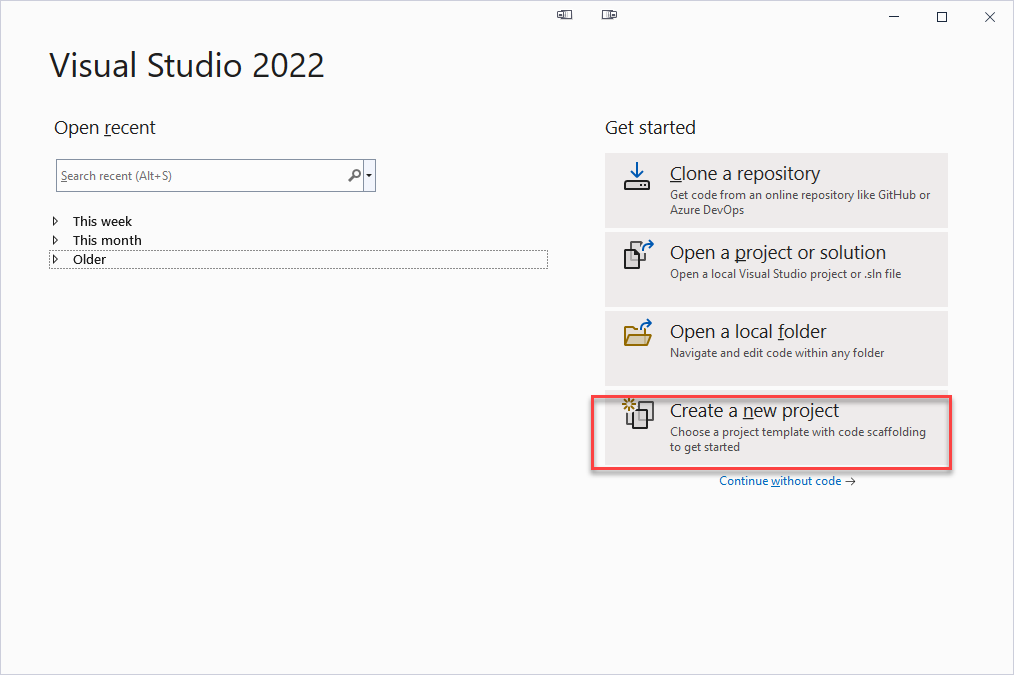
- Launch Visual Studio 2022
- Create a new project
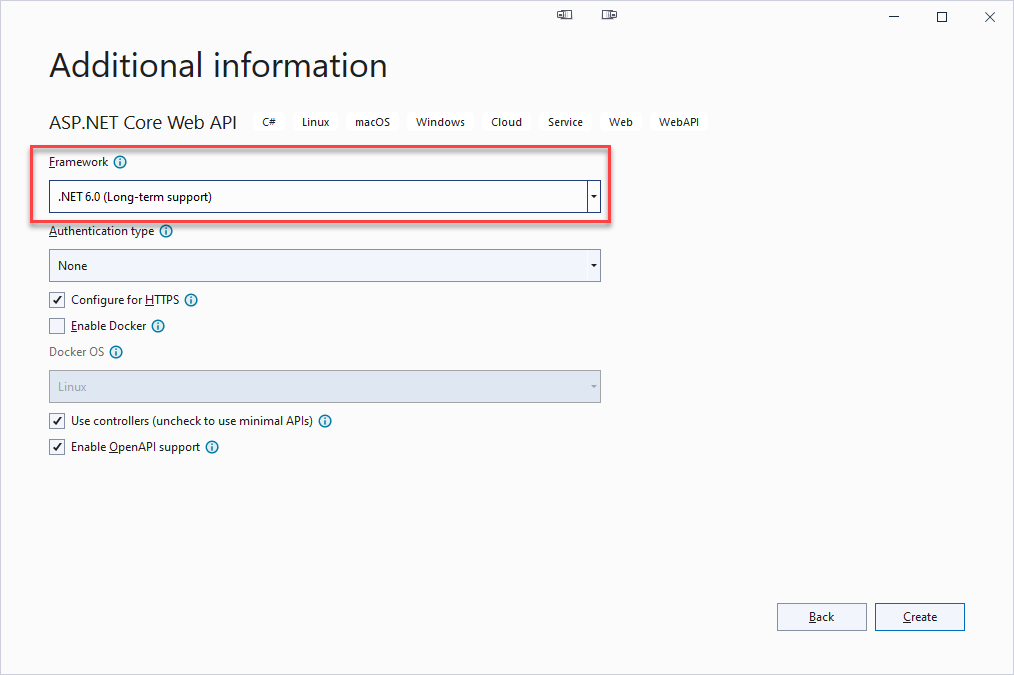
3. Select ASP.NET Core Web API

4. Give your project the name “Student Information API”, or you may choose a different name.

5. Select .NET 6.0 framework (Long-term support) then click “Create” to automatically set up the project.
III. Add Dependencies (NuGet packages)
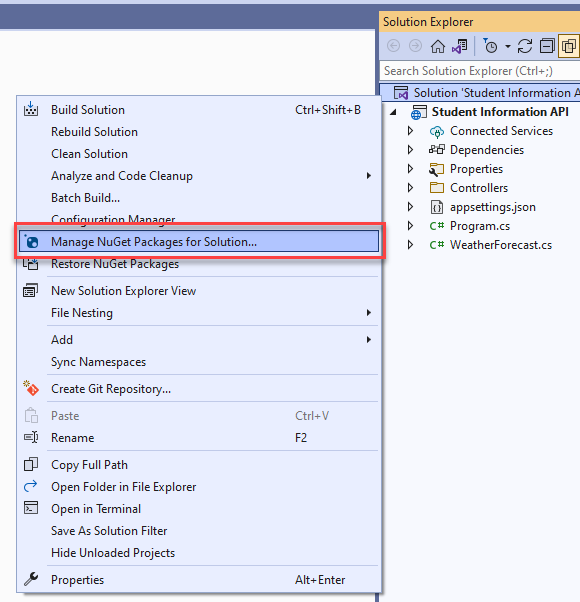
After the successful creation of our application, We need to install the MongoDB driver package to enable our ASP.NET Core application to communicate with the StudentDB database we created in the previous step.
- To install this package right-click on project solution then select“Manage NuGet Packages for solution”
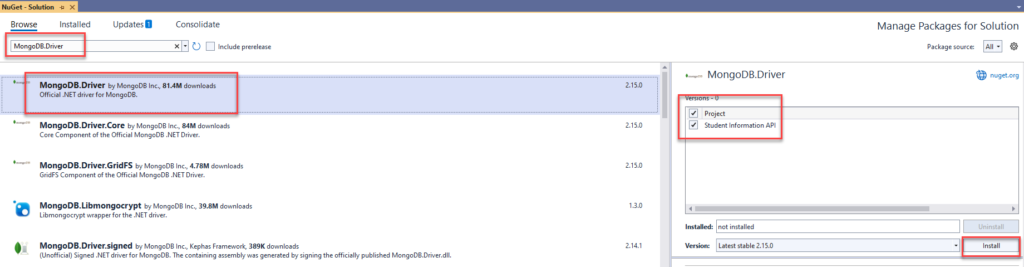
2. On the Browse tab search for “MongoDB.Driver” and click on it then install. This will prompt you to accept the terms and conditions, and click agree to finish installing the package.
IV. Appsettings.JSON configuration
We are going to modify appsettings.json by adding the Database name, Collection name, and the connection string as shown below:
"StudentDBSettings": {
    "DatabaseName": "StudentDB",
    "StudentCoursesCollectionName": "Students",
    "ConnectionString": "mongodb://localhost:27017"
  }
The DatabaseName refers to the database we created a while ago which is the “StudentDB”
StudentCoursesCollectionName refers to the Collection name which means a group of documents it is similar to a table in relational databases such as SQL. It is defined when creating a new database in our case we called it “Students”.
By default, after installing MongoDB the connection string is auto-created. See the image below.
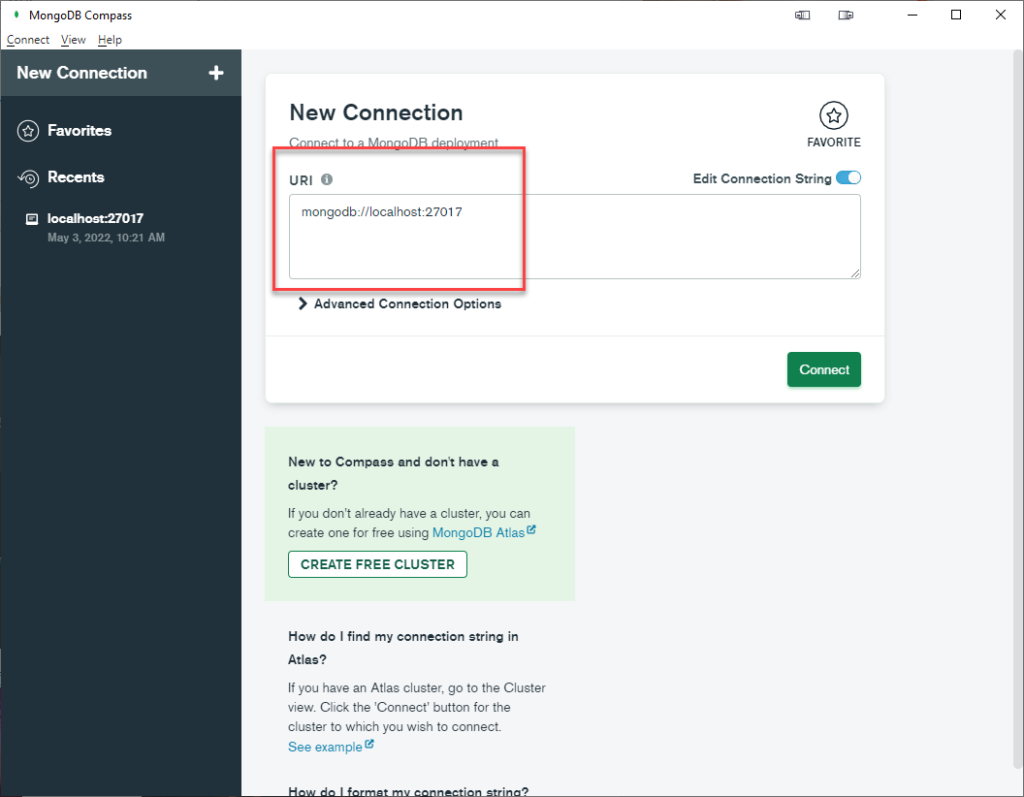
Once done setting up your appsettings.json let’s initialize a MongoClient on program.cs class. program.cs is located on your project root directory. Open program.cs then add the following code.
using MongoDB.Driver;

builder.Services.AddSingleton<IMongoClient>(s =>
new MongoClient(builder.Configuration.GetValue<string>("StudentDBSettings:ConnectionString")));
V. Creating Models
Let’s add some properties we will use for this tutorial.
To do this follow the steps below
- Right-click on the solution and add a Models folder
- Right-click on the Models folder and add a new class “Students.cs”. In the Class, we are going to declare all the Student information that we require. Some of the information we need is the Student id, Full name, the Course title, Gender, and Age.
- You can add as many properties as you like but, in our case, I used the properties shown below.
using MongoDB.Bson;
using MongoDB.Bson.Serialization.Attributes;
namespace Student_Information_API.Models
{
    public class Student
    {
        [BsonId]

        public string? Id { get; set; }

        [BsonElement("fullnames")]
        public string? Name { get; set; }

        [BsonElement("courses")]
        public string[]? Courses { get; set; }

        [BsonElement("gender")]
        public string Gender { get; set; } = String.Empty;

        [BsonElement("age")]
        public int Age { get; set; }
    }
}
In the Models folder we are going to add two classes “IStudentDBSettings.cs” and “StudentDBSettings.cs”.These classes will store our database settings which we are going to access through dependency injection.
4. Open IStudentDBSettings.cs and add the following code
namespace Student_Information_API.Models
{
    public class IStudentDBsettings
    {
        public string StudentCoursesCollectionName { get; set; }
        public string ConnectionString { get; set; }
        public string DatabaseName { get; set; }
    }
}
5. Open StudentDBSettings.cs and add the following code
namespace Student_Information_API.Models
{
    public class StudentDBsettings : IStudentDBsettings
    {
        public string StudentCoursesCollectionName { get; set; } = String.Empty;
        public string ConnectionString { get; set; } = String.Empty;
        public string DatabaseName { get; set; } = String.Empty;
    }
}
6. Now, open the program.cs class then add the following code. This will register the model properties we created above to our application.
// Add services to the container.
builder.Services.Configure<StudentDBsettings>(
builder.Configuration.GetSection(nameof(StudentDBsettings)));

builder.Services.AddSingleton<IStudentDBsettings>(sp =>
sp.GetRequiredService<IOptions<StudentDBsettings>>().Value);
VI. Adding Services Classes
In ASP.NET the code that calls the Mongo API is kept in a different layer called the service layer. This layer separates the Web API Controller from the database. It is useful when planning to change a database layer and is considered a good practice.
We are going to create a Services folder and place two classes in it. To do that, create a new folder called Services. In the Services folder add a class “IStudentService.cs” and add the following code
using Student_Information_API.Models;
namespace Student_Information_API.Services
{
    public interface IStudentService
    {
        List<Student> Get();
        Student Get(string id);
        Student Create(Student student);
        void Update(string id, Student student);
        void Remove(string id);
    }
}
Add another class “StudentService.cs” and add the following code.
using MongoDB.Driver;
using Student_Information_API.Models;
namespace Student_Information_API.Services
{
    public class StudentService
    {
        private readonly IMongoCollection<Student> _students;

        public StudentService(IStudentDBsettings settings, IMongoClient mongoClient)
        {
            var database = mongoClient.GetDatabase(settings.DatabaseName);
            _students = database.GetCollection<Student>(settings.StudentCoursesCollectionName);
        }

        public Student Create(Student student)
        {
            _students.InsertOne(student);
            return student;
        }

        public List<Student> Get()
        {
            return _students.Find(student => true).ToList();
        }

        public Student Get(string id)
        {
            return _students.Find(student => student.Id == id).FirstOrDefault();
        }

        public void Remove(string id)
        {
            _students.DeleteOne(student => student.Id == id);
        }

        public void Update(string id, Student student)
        {
            _students.ReplaceOne(student => student.Id == id, student);
        }
    }
}
In the above code we have created a MongoClient variable to represent the database settings defined by the connection string then called GetDatabase to represent our database. Finally, we called the GetCollection Method to represent our MongoDB collection as the _students variable.
This variable we are going to use is the Mongo API to perform CRUD operations on our stored data.
Within the StudentService class, we are also defining the member methods to wrap around the MongoDB driver methods. We are going to use these member methods in our API controller.
Now, that our services are set let’s add a scoped on the program.cs so that our application will recognize the interface and implementation we will use. See the code snippet below.
builder.Services.AddScoped<IStudentService, StudentService>();Program.cs Code
Here’s the full source code on our program.cs class.
using Microsoft.Extensions.Options;
using MongoDB.Driver;
using Student_Information_API.Models;
using Student_Information_API.Services;

var builder = WebApplication.CreateBuilder(args);

// Add services to the container.
builder.Services.Configure<StudentDBsettings>(
builder.Configuration.GetSection(nameof(StudentDBsettings)));

builder.Services.AddSingleton<IStudentDBsettings>(sp =>
sp.GetRequiredService<IOptions<StudentDBsettings>>().Value);

builder.Services.AddSingleton<IMongoClient>(s =>
new MongoClient(builder.Configuration.GetValue<string>("StudentDBSettings:ConnectionString")));
builder.Services.AddScoped<IStudentService, StudentService>();
builder.Services.AddControllers();
// Learn more about configuring Swagger/OpenAPI at https://aka.ms/aspnetcore/swashbuckle
builder.Services.AddEndpointsApiExplorer();
builder.Services.AddSwaggerGen();

var app = builder.Build();

// Configure the HTTP request pipeline.
if (app.Environment.IsDevelopment())
{
    app.UseSwagger();
    app.UseSwaggerUI();
}

app.UseHttpsRedirection();

app.UseAuthorization();

app.MapControllers();

app.Run();
VII. Controllers
Let’s create our API Controller that will use the Services classes we created above.
- Add a new controller and give it the name “StudentsController”
- In the class add the following code
        private readonly IStudentService studentService;
        public StudentsController(IStudentService studentService)
        {
            this.studentService = studentService;
        }
3. Add the following ActionResult class
public ActionResult<List<Student>> Get()
        {
            return studentService.Get();
        }
VIII. CREATE OPERATION
Now, let’s add the create functionality. This will add a new student record to the MongoDB Database. To do that follow the steps below.
- Add the following code in the Student controller class
        [HttpPost]
        public ActionResult<Student> Post([FromBody] Student student)
        {
            studentService.Create(student);

            return CreatedAtAction(nameof(Get), new { id = student.Id }, student);
        }
IX. READ OPERATION
After successfully adding the record to our database, let’s retrieve the record and display it on our Web Application. For this, we are going to create an Action method inside StudentsController. Add the following code.
        [HttpGet("{id}")]
        public ActionResult<Student> Get(string id)
        {
            var student = studentService.Get(id);

            if (student == null)
            {
                return NotFound($"Student with Id = {id} not found");
            }

            return student;
        }
X. UPDATE/PUT OPERATION
Now, let’s create update functionality, this will update the Student records by id on the Mongo database. Follow the steps below.
- Create an Action method with the following code
        [HttpPut("{id}")]
        public ActionResult Put(string id, [FromBody] Student student)
        {
            var existingStudent = studentService.Get(id);

            if (existingStudent == null)
            {
                return NotFound($"Student with Id = {id} not found");
            }

            studentService.Update(id, student);

            return NoContent();
        }
XI. DELETE OPERATION
Now, let’s create delete functionality, this will delete Student records by id in the Mongo database. Follow the steps below. Add the following code snippet
        [HttpDelete("{id}")]
        public ActionResult Delete(string id)
        {
            var student = studentService.Get(id);

            if (student == null)
            {
                return NotFound($"Student with Id = {id} not found");
            }

            studentService.Remove(student.Id);

            return Ok($"Student with Id = {id} deleted");
        }
The code above will check a record by the id and then delete it from the database, if a student id is blank the code will display a message that the specific Student with that Id is not found.
XII. TESTING THE API
In our tutorial we are going to test our API using swagger UI, alternatively, you can use other tools to test the API e.g., POSTMAN. To test the API follow the below steps.
POST DATA
Insert new record to the Database
- Run the code from Visual Studio
A default screen similar to the one below launches
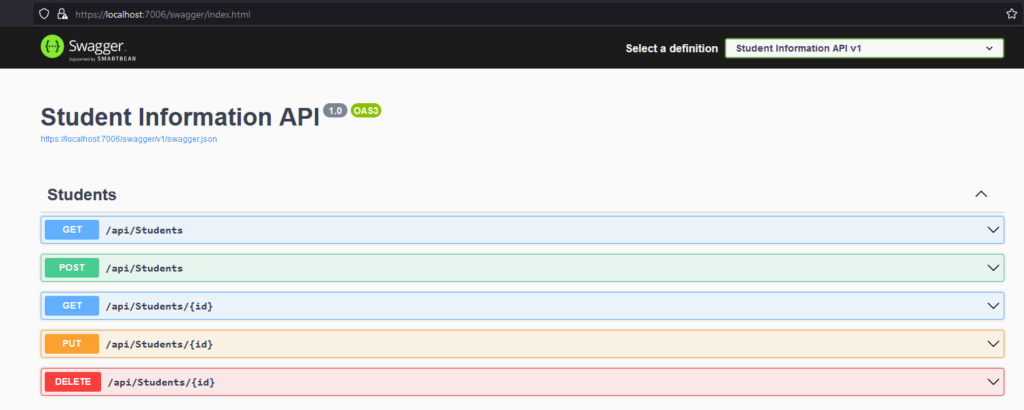
2. Go to the tab named Post then click “Try it out”
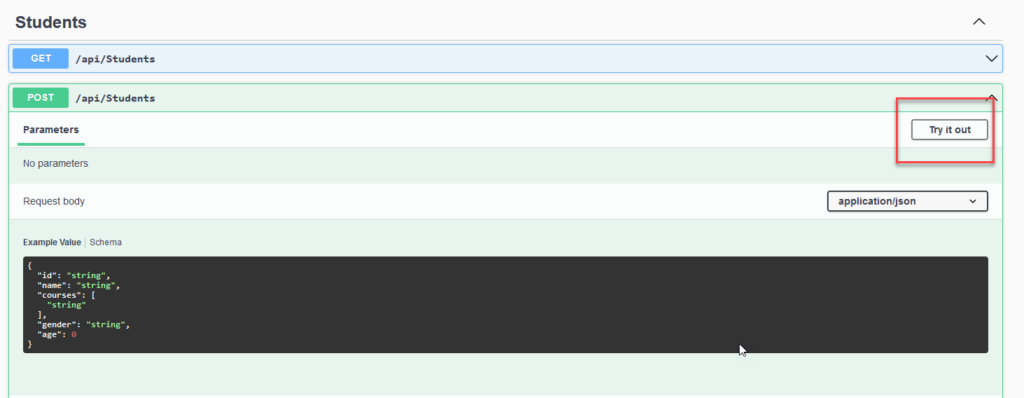
3. Edit the JSON data as you desire then click Execute to post the data in the database.
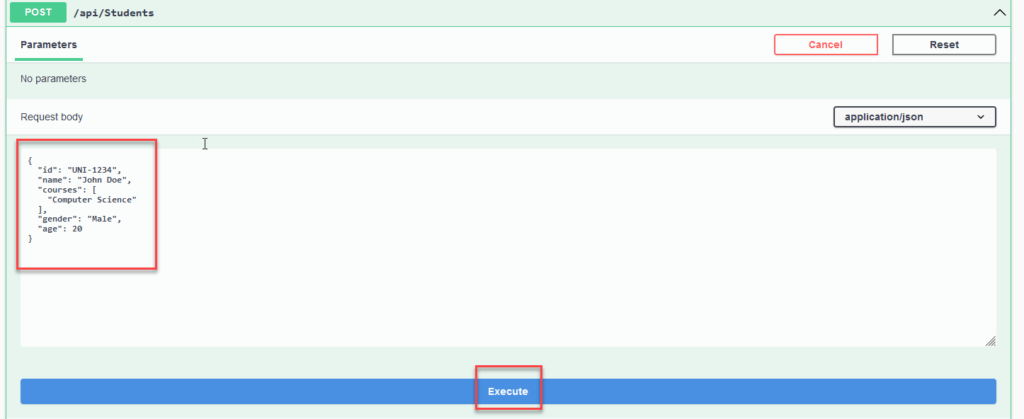
4. On successful posting the data will appear in the database as shown below
Get Data
Retrieved record from the database
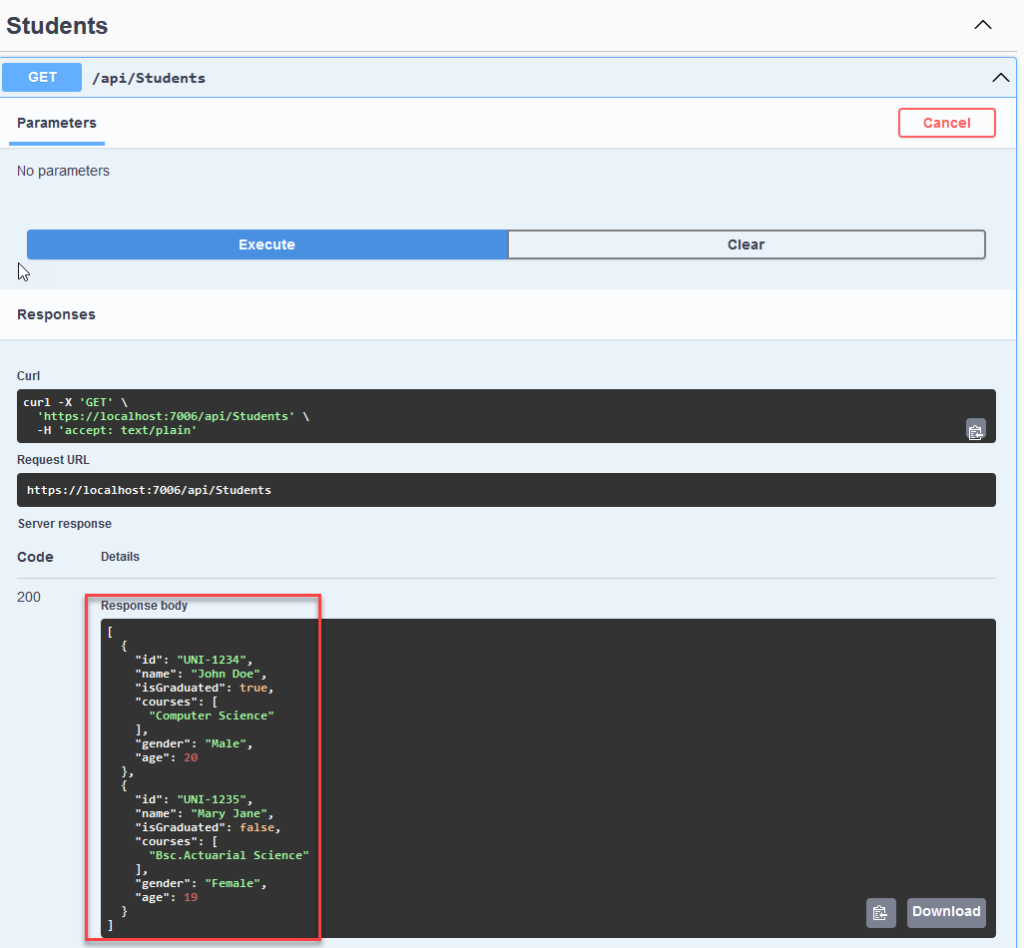
Get Data returns all Student data in the database. In our tutorial we have two types of HTTP GET methods, one method returns all data in the database as shown below.
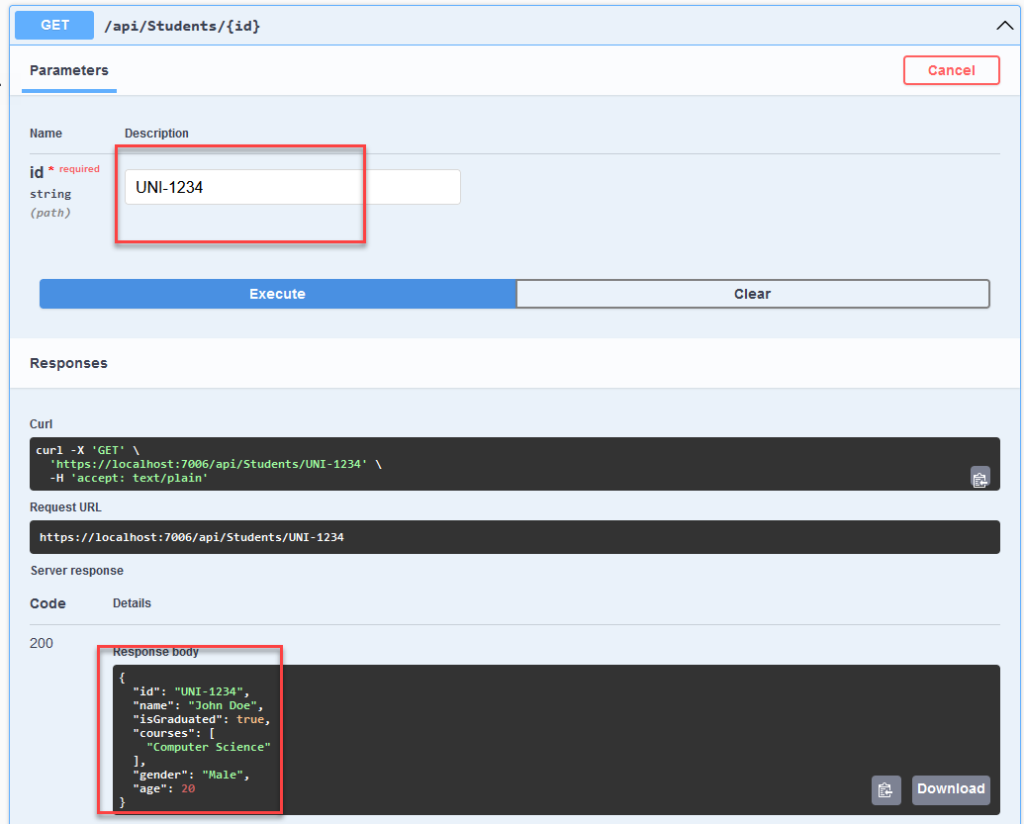
The second GET Students{id} method returns student data by the ID.
PUT/UPDATE data
Update specific record on the database
PUT updates the student data by the ID. To do this expand the PUT tab, and type in the id you want to update in this case “UNI-1234”.
In the request, body edits the fields as you would want them to be updated e.g., in our case we are going to update the name from John doe to John Mark Doe and the age from 20 to 25.

Once done click execute button to apply the changes. Go to the Get by id tab and search for the id that you updated, If the PUT execution was successful the new changes will show.
Delete Data
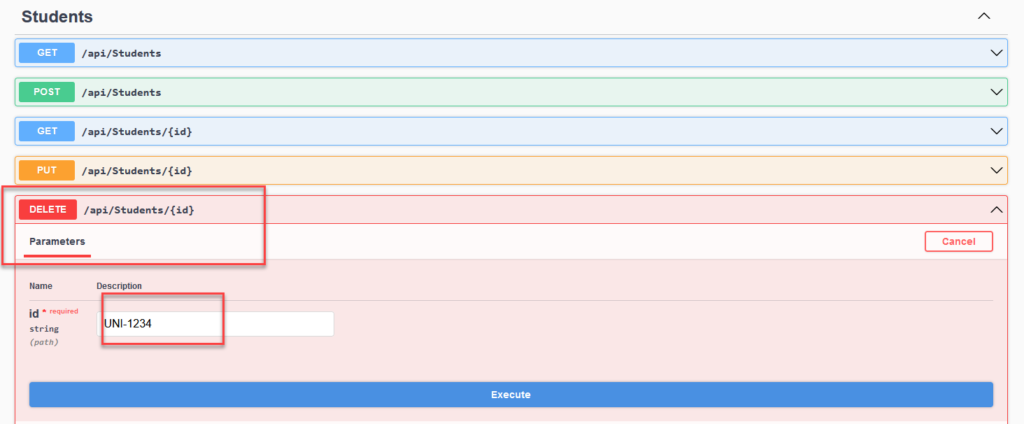
Delete record by ID in the database
If you want to delete data for a particular student, go to the delete tab enter the id of the student then click execute to apply the changes.
You may also download the source code on Github.
Summary
In this tutorial, we have learned How to use MongoDB with ASP NET Core Web API. We created four basic CRUD operations to show how easy it is to use MongoDB with ASP NET Core MVC. Hopefully, this tutorial will help you with your future projects.