
In this tutorial, we are going to learn how to Integrate Firebase in ASP NET Core MVC and make a simple Asp.net Core MVC 6 app using Firebase sign-in provider.
- I. Signup and Setup Firebase Account
- II. Create and Setup a new ASP.NET Core MVC Application
- III. Configure the session package to the Program.cs file
- IV. Create LoginModel
- V. FirebaseException Model
- VI. Generate Firebase Web API Key
- VII. Firebase Configuration in HomeController
- VIII. Registration Function and UI
- IX. SignIn Function and UI
- X. SignOut
- XI. Create HomePage View and add the SignOut button
- Summary
Firebase is a mobile application development platform created by Google and is used to build and grow apps. It is great for integrating authentication based on social networks, email, or phone numbers into your client app. Whether you are building a web app or a mobile app, firebase provides one of the easiest ways to authenticate users so that they can log in to your application and access content.
Before we start, Please make sure to have installed the following
- Visual Studio 2022
- Alternatively, you can also use the Visual Studio Code and download .net Core SDK(.net 6.0)
If you already have installed all of that, proceed to the next step.
I. Signup and Setup Firebase Account
Before you can use firebase in your application, you need to have a firebase account and create a Firebase project to be used on your Web Application.
- Navigate and signup on https://firebase.google.com/ using your Gmail account.
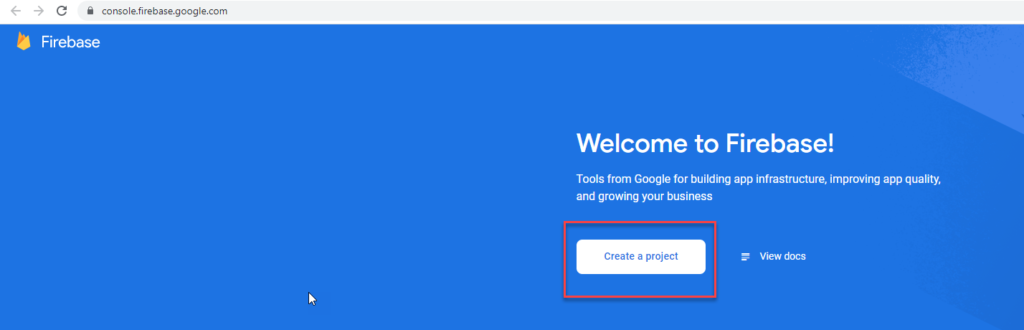
- After successfully sign-in you will be redirected to the firebase console https://console.firebase.google.com/. Click on create a project.
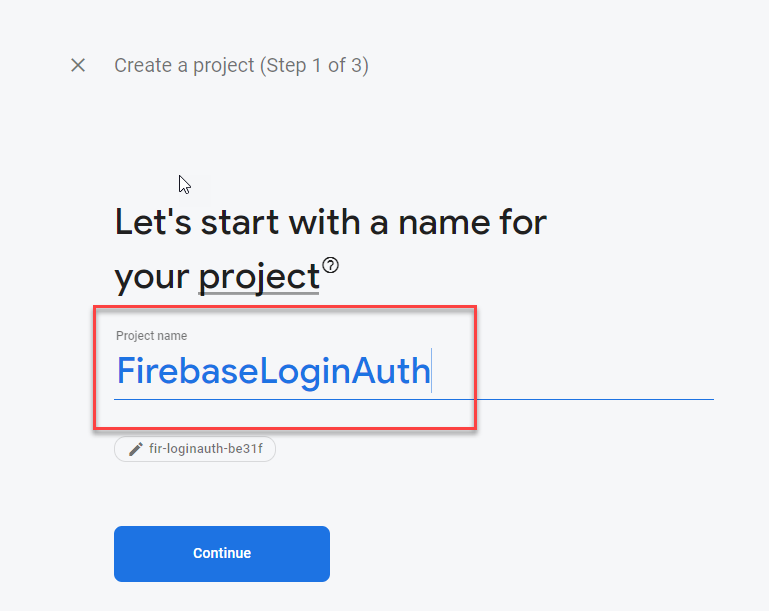
3. Give your project the name “FirebaseLoginAuth” then click continue to finish setting up. Once done the project will be automatically created.
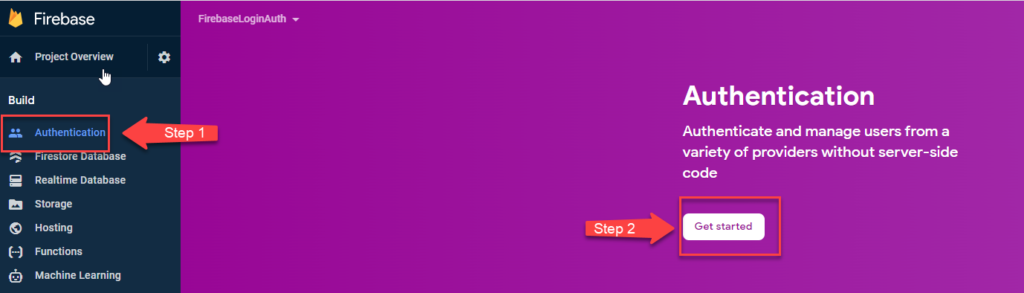
Next, we are going to enable the sign-in method to be used for authentication.
4. Click Authentication and get started.
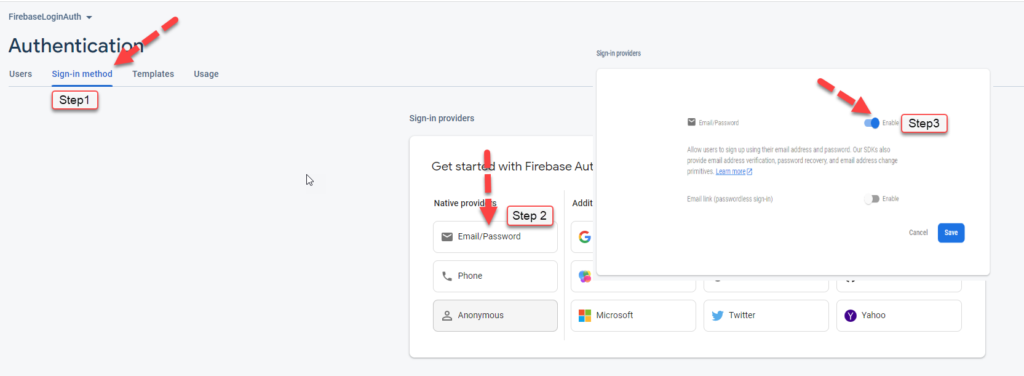
5. Go to the Sign-in method tabs and click Email/Password click on enable then save.
II. Create and Setup a new ASP.NET Core MVC Application
We are done setting up firebase next we are going to create our project in the visual studio.
- To start open up Visual Studio and select “Create a new Project”
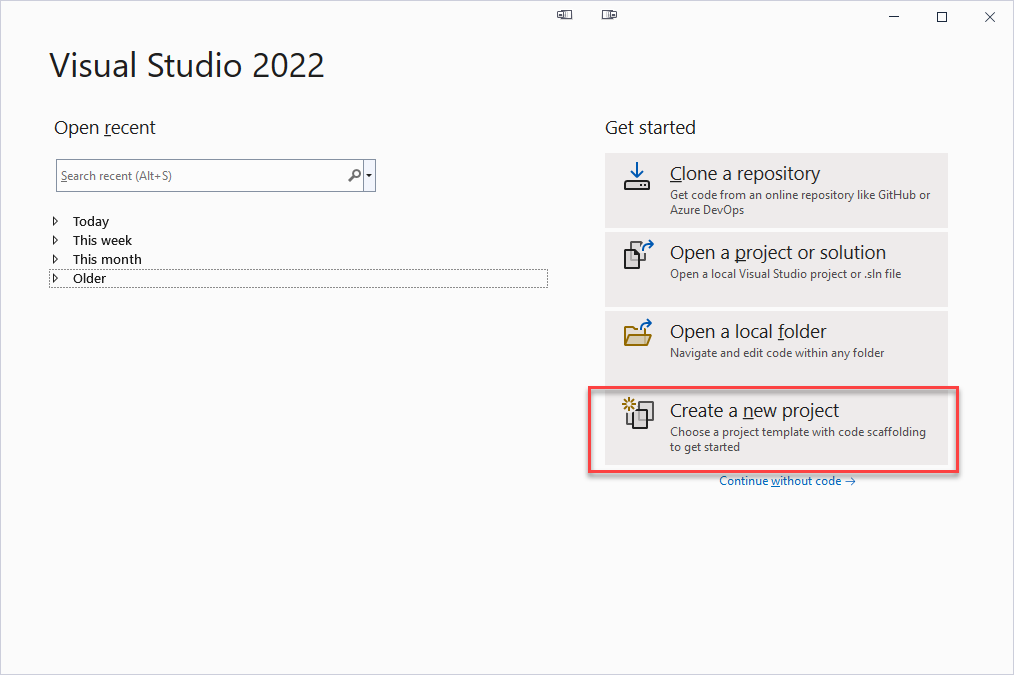
2. To start open up Visual Studio and select “Create a new Project”

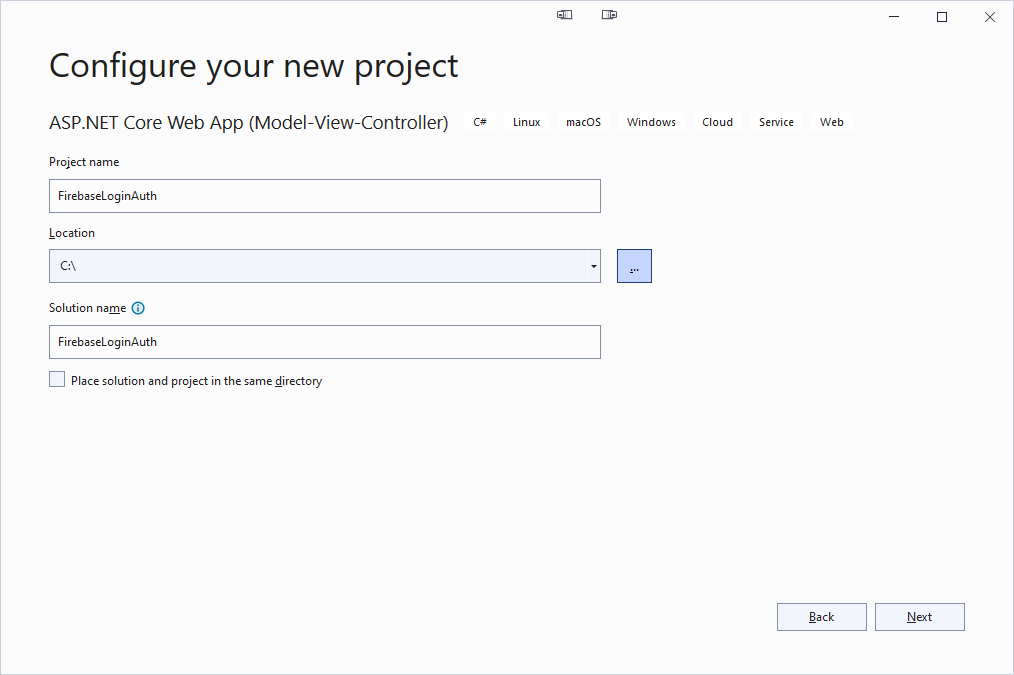
3. Give the project the name “FirebaseLoginAuth” then click next
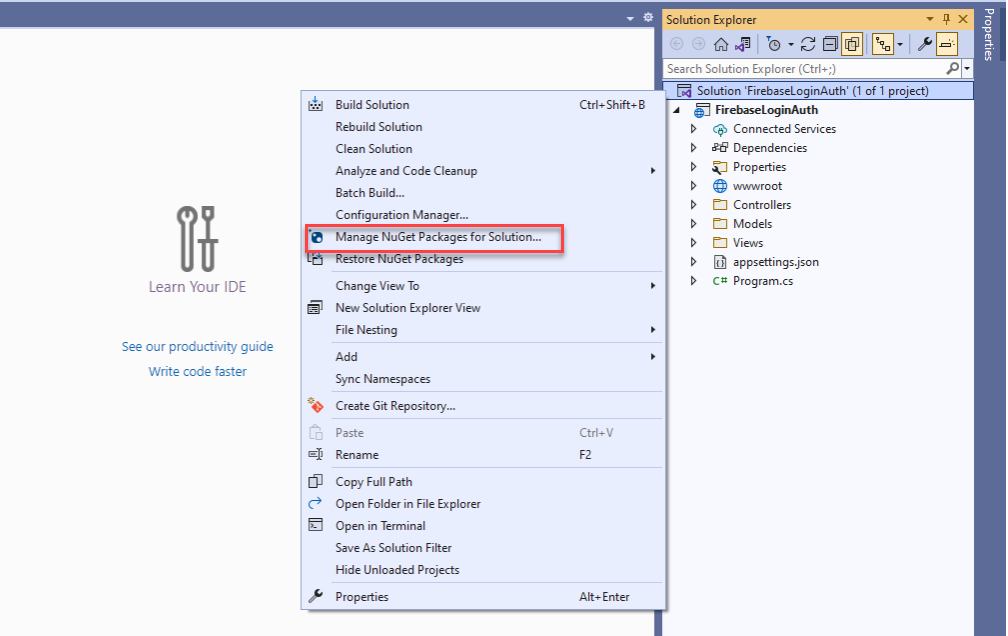
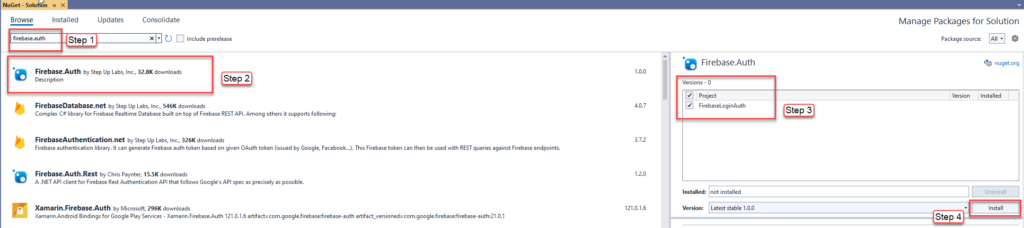
5. Now, we need to install this package to be able to integrate firebase on our ASP.NET Core project
- firebase.auth
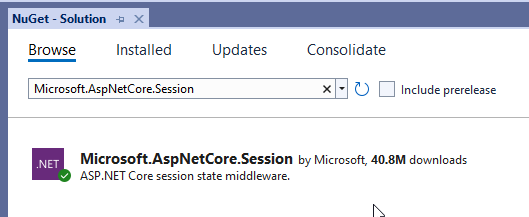
- Microsoft.AspNetCore.Session » This will be used as the storage of the login users.
To install this package, right-click on your Solution then select “Manage Nuget Packages for Solution”
Go to browse tab then search for “firebase.auth” and click on it then install. This will prompt you to accept the terms and conditions, and click agree to finish installing the package.
Then go to the browse tab again and search Microsoft.AspNetCore.Session. Follow the steps as we did above and install it.
III. Configure the session package to the Program.cs file
To be able to use the Session package that we add from the previous step. We need to add the following code to the program.cs file. This will work if you are using the .net 6.0 version.
//Add sessions
builder.Services.AddSession(options =>
{
    options.IdleTimeout = TimeSpan.FromSeconds(10);
    options.Cookie.HttpOnly = true;
    options.Cookie.IsEssential = true;
});
If you are using a previous .net version. You can add the session from the startup file under ConfigureServices method. You can use the code snippet below, but if you follow this tutorial use the code implementation above.
public void ConfigureServices(IServiceCollection services)
{
    services.AddControllersWithViews();

    services.AddMvc().AddSessionStateTempDataProvider();
    services.AddSession();
}
Once you added session service configuration call it by using this code “app.UseSession();“. This is now what the full source code looks like.
var builder = WebApplication.CreateBuilder(args);

// Add services to the container.
builder.Services.AddControllersWithViews();
builder.Services.AddSession(options =>
{
    options.IdleTimeout = TimeSpan.FromSeconds(10);
    options.Cookie.HttpOnly = true;
    options.Cookie.IsEssential = true;
});
var app = builder.Build();

// Configure the HTTP request pipeline.
if (!app.Environment.IsDevelopment())
{
    app.UseExceptionHandler("/Home/Error");
    // The default HSTS value is 30 days. You may want to change this for production scenarios, see https://aka.ms/aspnetcore-hsts.
    app.UseHsts();
}

app.UseHttpsRedirection();
app.UseStaticFiles();

app.UseRouting();
app.UseSession();
app.UseAuthorization();

app.MapControllerRoute(
    name: "default",
    pattern: "{controller=Home}/{action=Index}/{id?}");

app.Run();
IV. Create LoginModel
Now, let’s create properties for our login credentials. This model would handle the validation for the username and password we required in our application. To do that, create a new class inside the Models folder.
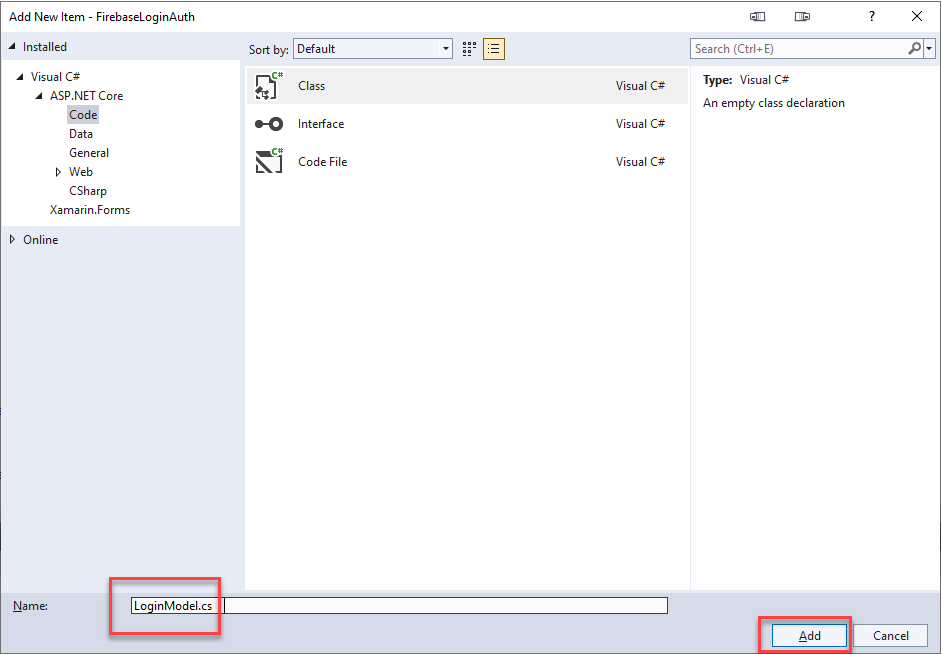
To create a model class right-click on the Models folder then select Add » Class
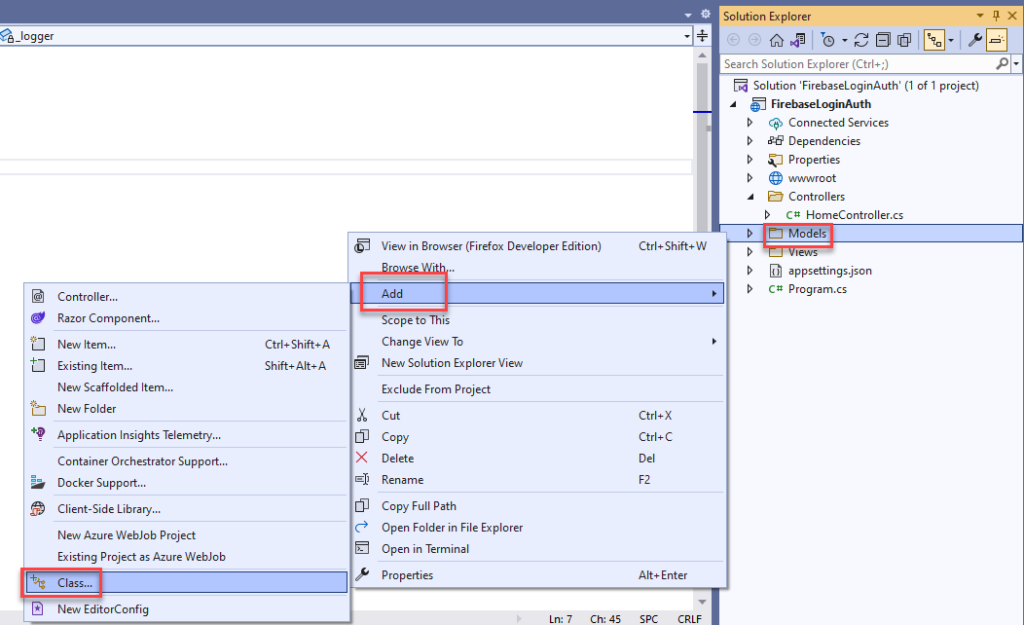
Give the class a name “LoginModel” then click Add.
Inside the LoginModel class we created we are going to add two properties email and password as shown below.
using System.ComponentModel.DataAnnotations;

namespace FirebaseLoginAuth.Models
{
    public class LoginModel
    {
        [Required]
        [EmailAddress]
        public string Email { get; set; }
        [Required]
        public string Password { get; set; }
    }
}
The email and password objects created above will be used to handle the data passed between firebase authentication and the view or UI that we will create later.
V. FirebaseException Model
To be able to handle the exception response from the Firebase Sign-in method, we need to properly contain the response from the FirebaseException. To do that, I generated model properties based on the actual FirebaseException ResponseData which is in JSON format. Create a new class inside the Models folder then use the code snippet below.
namespace FirebaseLoginAuth.Models
{
    public class FirebaseError
    {
        public Error error { get; set; }
    }


    public class Error
    {
        public int code { get; set; }
        public string message { get; set; }
        public List<Error> errors { get; set; }
    }
}
You can deserialize FirebaseException ResponseData by using the code below.
var firebaseEx = JsonConvert.DeserializeObject<FirebaseError>(ex.ResponseData);Then you may call the properties using this format firebaseEx.error.message.
VI. Generate Firebase Web API Key
Now, to be able to use Firebase API we need to get the WEB API key from the Firebase project that we created a while ago. To do that, follow the steps below.
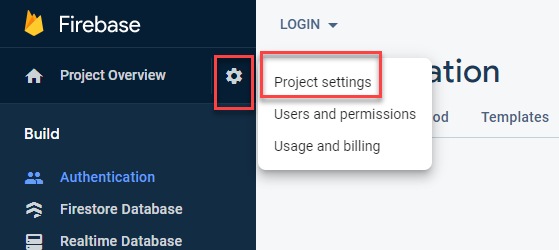
- On the Project, Overview Menu click on the Gear Icon then select project settings as shown below.
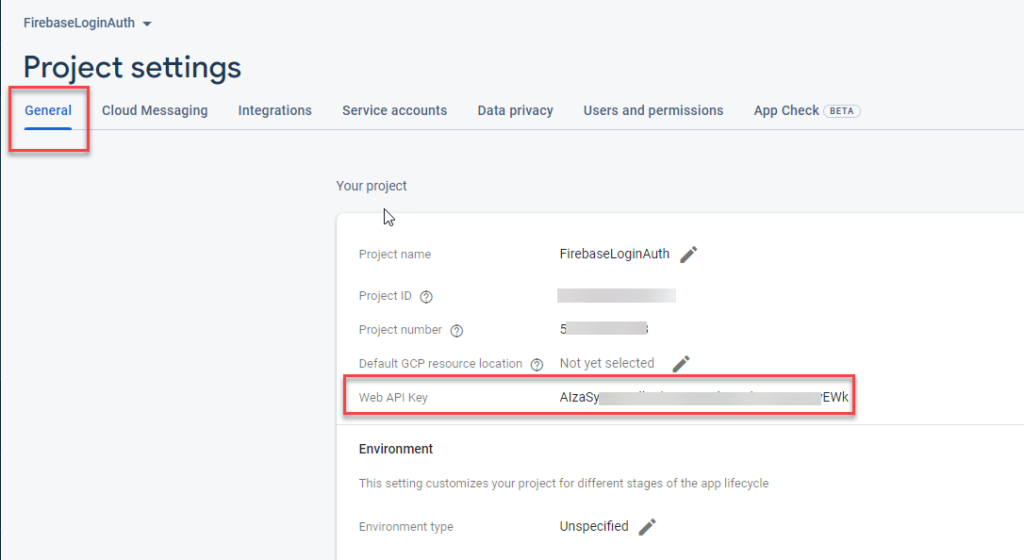
2. Under the General tab copy the web API Key. See the image below.
VII. Firebase Configuration in HomeController
To simplify this tutorial, we are going to use the default HomeController. Open HomeController under the controller folder then initialize FirebaseAuthProvider and set the Firebase Web API token.
using Firebase.Auth;
using Microsoft.AspNetCore.Mvc;

using System.Diagnostics;

namespace FirebaseLoginAuth.Controllers
{
    public class HomeController : Controller
    {
        FirebaseAuthProvider auth;

        public HomeController()
        {
            auth = new FirebaseAuthProvider(
                            new FirebaseConfig("Fireabase WEB API Token here!"));
        }


        public IActionResult Index()
        {
                return View();
        }

    }
}
By setting the WEB API token we generated from our Firebase project, we have authenticated our Web application to access firebase API.
Now, we are ready to create our Registration and Login functionality.
VIII. Registration Function and UI
We need to create Registration functionality first before we can be able to log in. To do that, Go back to HomeController and create a Registration method or copy the code below.
HTTPGET » This will return the Registration UI
public IActionResult Registration()
  {
            return View();
  }
HTTPPOST » This will validate and process the registration request submitted by the user
[HttpPost]
public async Task<IActionResult> Registration(LoginModel loginModel)
{
try
{
//create the user
await auth.CreateUserWithEmailAndPasswordAsync(loginModel.Email, loginModel.Password);
//log in the new user
var fbAuthLink = await auth
.SignInWithEmailAndPasswordAsync(loginModel.Email, loginModel.Password);
string token = fbAuthLink.FirebaseToken;
//saving the token in a session variable
if (token != null)
{
HttpContext.Session.SetString("_UserToken", token);
return RedirectToAction("Index");
}
}
catch (FirebaseAuthException ex)
{
var firebaseEx = JsonConvert.DeserializeObject<FirebaseError>(ex.ResponseData);
ModelState.AddModelError(String.Empty, firebaseEx.error.message);
return View(loginModel);
}
return View();
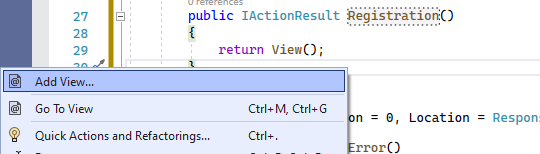
}Now, create the registration view. Right-click on the registration method then select add View.
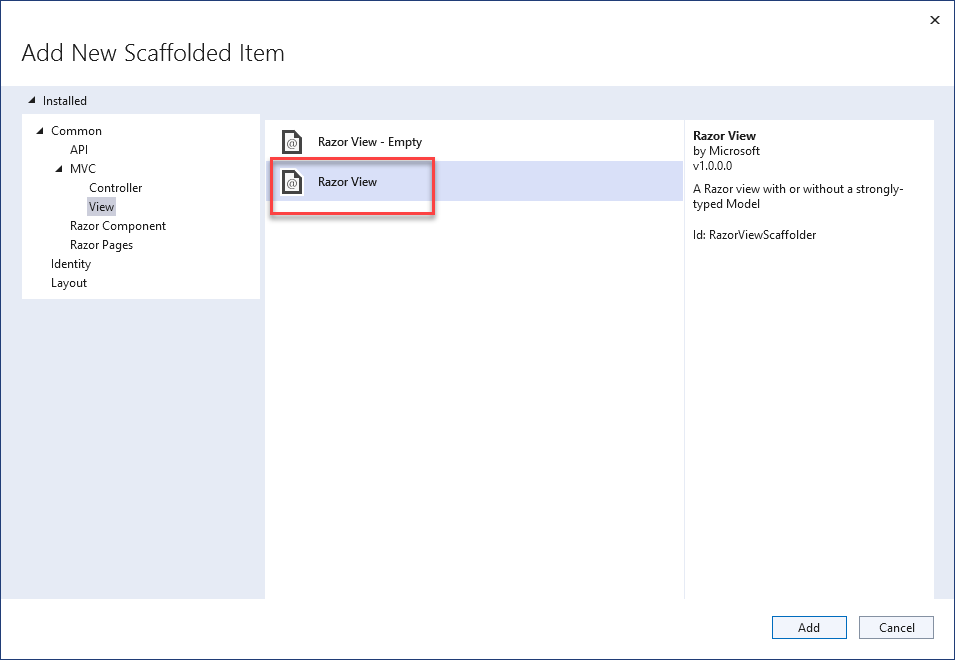
Select razor view then click add button.
On the template section choose “Create” from the selection list, On the Model, class select the name of the model class we created previously which is the LoginModel then click add to generate the view.
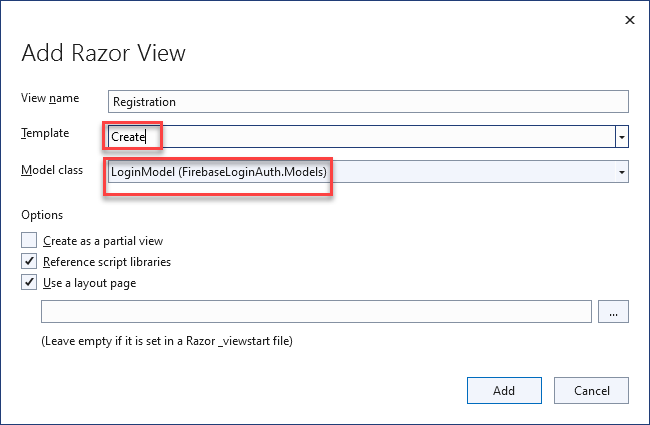
Once done set the password input to type password to hide the password when typing.
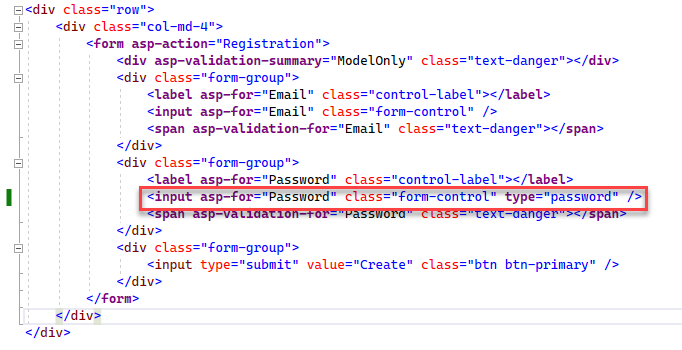
See the full HTML code on my registration view.
@model FirebaseLoginAuth.Models.LoginModel
@{
ViewData["Title"] = "Registration";
}
<h1>Registration</h1>
<h4>LoginModel</h4>
<hr />
<div class="row">
<div class="col-md-4">
<form asp-action="Registration">
<div asp-validation-summary="All" class="text-danger"></div>
<div class="form-group">
<label asp-for="Email" class="control-label"></label>
<input asp-for="Email" class="form-control" />
<span asp-validation-for="Email" class="text-danger"></span>
</div>
<div class="form-group">
<label asp-for="Password" class="control-label"></label>
<input asp-for="Password" class="form-control" type="password" />
<span asp-validation-for="Password" class="text-danger"></span>
</div>
<div class="form-group">
<input type="submit" value="Create" class="btn btn-primary" />
</div>
</form>
</div>
</div>
<div>
<a asp-action="SignIn">Already have an account?Sign In</a>
</div>
@section Scripts {
@{await Html.RenderPartialAsync("_ValidationScriptsPartial");}
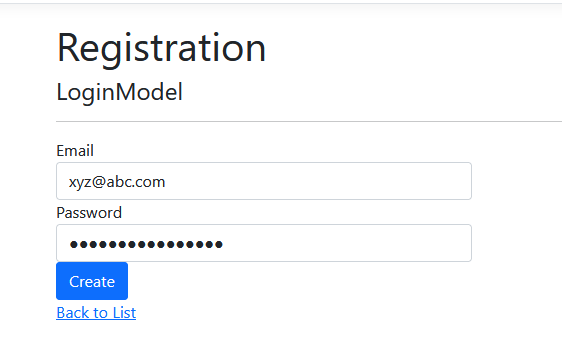
}This HTML above will result in this simple Registration view. See the image below.
IX. SignIn Function and UI
Now, create the sign-in function. To do that, create SignIn method using the code below.
HTTPGET » This will return the Registration UI
        public IActionResult SignIn()
        {
            return View();
        }
HTTPPOST » This will validate and process the sign-in request submitted by the user
[HttpPost]
        public async Task<IActionResult> SignIn(LoginModel loginModel)
        {
            try
            {
                //log in an existing user
                var fbAuthLink = await auth
                                .SignInWithEmailAndPasswordAsync(loginModel.Email, loginModel.Password);
                string token = fbAuthLink.FirebaseToken;
                //save the token to a session variable
                if (token != null)
                {
                    HttpContext.Session.SetString("_UserToken", token);

                    return RedirectToAction("Index");
                }

            }
            catch (FirebaseAuthException ex)
            {
                var firebaseEx = JsonConvert.DeserializeObject<FirebaseError>(ex.ResponseData);
                ModelState.AddModelError(String.Empty, firebaseEx.error.message);
                return View(loginModel);
            }

            return View();
        }
Now, create the view by following the steps on how we create the Registration view. Then you should be able to generate the HTML below.
@model FirebaseLoginAuth.Models.LoginModel

@{
    ViewData["Title"] = "SignIn";
}

<h1>SignIn</h1>

<h4>LoginModel</h4>
<hr />
<div class="row">
    <div class="col-md-4">
        <form asp-action="SignIn">
            <div asp-validation-summary="All" class="text-danger"></div>
            <div class="form-group">
                <label asp-for="Email" class="control-label"></label>
                <input asp-for="Email" class="form-control" />
                <span asp-validation-for="Email" class="text-danger"></span>
            </div>
            <div class="form-group">
                <label asp-for="Password" class="control-label"></label>
                <input asp-for="Password" class="form-control" type="password" />
                <span asp-validation-for="Password" class="text-danger"></span>
            </div>
            <div class="form-group">
                <input type="submit" value="SignIn" class="btn btn-primary" />
            </div>
        </form>
    </div>
</div>

<div>
    <a asp-action="Registration">Register new User</a>
</div>

@section Scripts {
    @{await Html.RenderPartialAsync("_ValidationScriptsPartial");}
}
X. SignOut
To create the sign-out process, we can simply remove the session and redirect the user to the log-in page.
        public IActionResult LogOut()
        {
            HttpContext.Session.Remove("_UserToken");
            return RedirectToAction("SignIn");
        }
XI. Create HomePage View and add the SignOut button
Now, all we need is a landing page. We will create a View that will be displayed once a user is successfully authenticated. Before we do that, let’s add a validation filter on HomeController index, that will filter the user that is not authenticated and redirects them to the sign-in form.
We can simply check the _UserToken that we assign during the sign-in process. See the code below.
public IActionResult Index()
        {
            var token = HttpContext.Session.GetString("_UserToken");

            if (token != null)
            {
                return View();
            }
            else
            {
                return RedirectToAction("SignIn");
            }

        }
The code above will redirect the user to the home page if authenticated and redirect the user to the sign-in page for an unauthenticated user.
Now, for the home page view. Open index.cshtml under the Views folder then use the code snippet below.
@{
ViewData["Title"] = "Home Page";
}
<div class="text-center">
<h1 class="display-4">Welcome you have succesfully signed in</h1>
<a asp-action="LogOut">Sign Out</a>
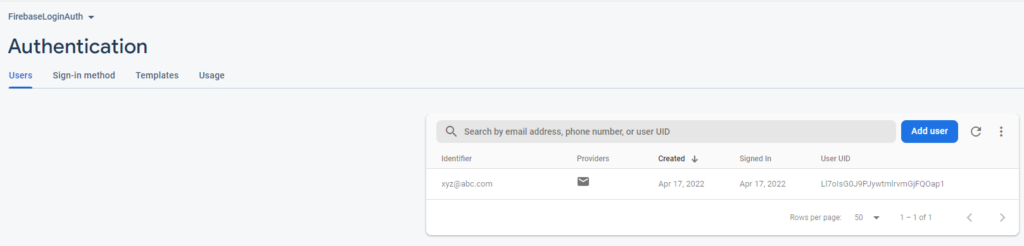
</div>Now, we are ready to run our application. You can now, try the sign-in and Registration functionality. You can verify the user you use for registration on your Firebase Project. Go back to https://console.firebase.google.com/ then under Authentication click users and your created user will appear.
If you encounter an error, you may check the source code from my GitHub account.
Summary
In this tutorial, we have learned how to Integrate Firebase in ASP NET Core MVC. We also created simple login and registration process to show how easy it is to integrate firebase in the ASP NET Core MVC web application. We just implemented one of the many sign-in providers of firebase, to use other sign-in methods you can enable it from your Firebase project. Hopefully, this tutorial will help you with your future projects.
KEEP CODING!!
You can also check out this article. ASP.NET Login and Registration using Identity