In this tutorial, we will add claims to a Form Authentication in ASP NET MVC. Adding claims will help us store additional information about the users like address, phone number, etc. This way, we can retrieve this information later if we need it wherever in our Web App.
What is Claims Identity?
Claims Identity is part of the authorization process to add additional user data that you will need later in your application. Or if you are trying to add a custom security feature where you want to check the user’s age or address before you authorize a user. A claim is just additional information attach to the identity that is validated.
Authentication is the process of verifying who a user is, while authorization is verifying what they have access to.
I. Download Source Code
Before we proceed, you can download a source code from the previous article to move to the next steps.
- Login and Registration using Form Authentication » link
- GitHub Source Code » coderbugzz
If you downloaded the file and open it, you will see that this project is configured to use form authentication. This is where we will start adding claims.
II. Configure web.config file
FormAuthentication only allows two parameters, a username and a bool parameter for createPersistentCookie. So instead of using the FormAuthentication method, we are going to use SessionAuthenticationModule or SAM. Using this method will give us the option to create custom claims. But before that, we need to configure the web.config file for this to work.
- Open root web.config file then locate the <configuration> tags and paste the code snippet below.
 <configSections>
     <section name="microsoft.identityModel" type="Microsoft.IdentityModel.Configuration.MicrosoftIdentityModelSection, Microsoft.IdentityModel, Version=3.5.0.0, Culture=neutral, PublicKeyToken=31bf3856ad364e35" />
  </configSections>
2. Double check if you have enabled the form authentication by checking the authentication mode. See the code snippet below.
 <authentication mode="Forms">
        <forms loginUrl="~/Account/Index" timeout="2880" />
  </authentication>
3. Add httpModules tag under <system.web>. See the code snippet below.
 <httpModules>
       <add name="SessionAuthenticationModule" type="Microsoft.IdentityModel.Web.SessionAuthenticationModule, Microsoft.IdentityModel, Version=3.5.0.0,  Culture=neutral, PublicKeyToken=31bf3856ad364e35" />
   </httpModules>
4. Add <system.webserver> on the root of <configuration> tag.
 <system.webServer>
     <validation validateIntegratedModeConfiguration="false" />
     <modules>
       <add name="SessionAuthenticationModule" type="Microsoft.IdentityModel.Web.SessionAuthenticationModule,  Microsoft.IdentityModel, Version=3.5.0.0, Culture=neutral, PublicKeyToken=31bf3856ad364e35" preCondition="managedHandler" />
     </modules>
   </system.webServer>
5. Lastly, add IdentityModel configuration you can turn it to false if your are not using SSL certificate.
 <microsoft.identityModel>
     <service>
       <federatedAuthentication>
         <cookieHandler name="WebToken" requireSsl="false" />
       </federatedAuthentication>
     </service>
 </microsoft.identityModel>
III. Add claims and write session to cookie
Now, it’s time to use the SessionAuthenticationModule that we configure in our web.config file. And add some dummy text as our custom claim. You can perform this after your login validation. See the code snippet below.
I used List<User> user = new List<User>(); as a dummy data that I converted to JSON and Add it to the claims.
SessionAuthenticationModule sam = (SessionAuthenticationModule)this.HttpContext.ApplicationInstance.Modules["SessionAuthenticationModule"];
IClaimsPrincipal principal = new Microsoft.IdentityModel.Claims.ClaimsPrincipal(new GenericPrincipal(new GenericIdentity(model.Email), null));
List<User> user = new List<User>();
user.Add(new Models.User { Email = "freecodespot@gmail.com",Date = DateTime.Now});
user.Add(new Models.User { Email = "freecodespot@gmail.com", Date = DateTime.Now });
user.Add(new Models.User { Email = "freecodespot@gmail.com", Date = DateTime.Now });
user.Add(new Models.User { Email = "freecodespot@gmail.com", Date = DateTime.Now });
string dummy = JsonConvert.SerializeObject(user);
principal.Identities[0].Claims.Add(new Microsoft.IdentityModel.Claims.Claim(Microsoft.IdentityModel.Claims.ClaimTypes.Email, model.Email));
principal.Identities[0].Claims.Add(new Microsoft.IdentityModel.Claims.Claim(Microsoft.IdentityModel.Claims.ClaimTypes.UserData, dummy));
principal.Identities[0].Claims.Add(new Microsoft.IdentityModel.Claims.Claim(Microsoft.IdentityModel.Claims.ClaimTypes.Role, "Admin"));
principal.Identities[0].Claims.Add(new Microsoft.IdentityModel.Claims.Claim("custom", "freecodespot custom claims"));
var token = sam.CreateSessionSecurityToken(principal, null, DateTime.Now, DateTime.Now.AddMinutes(20), false);
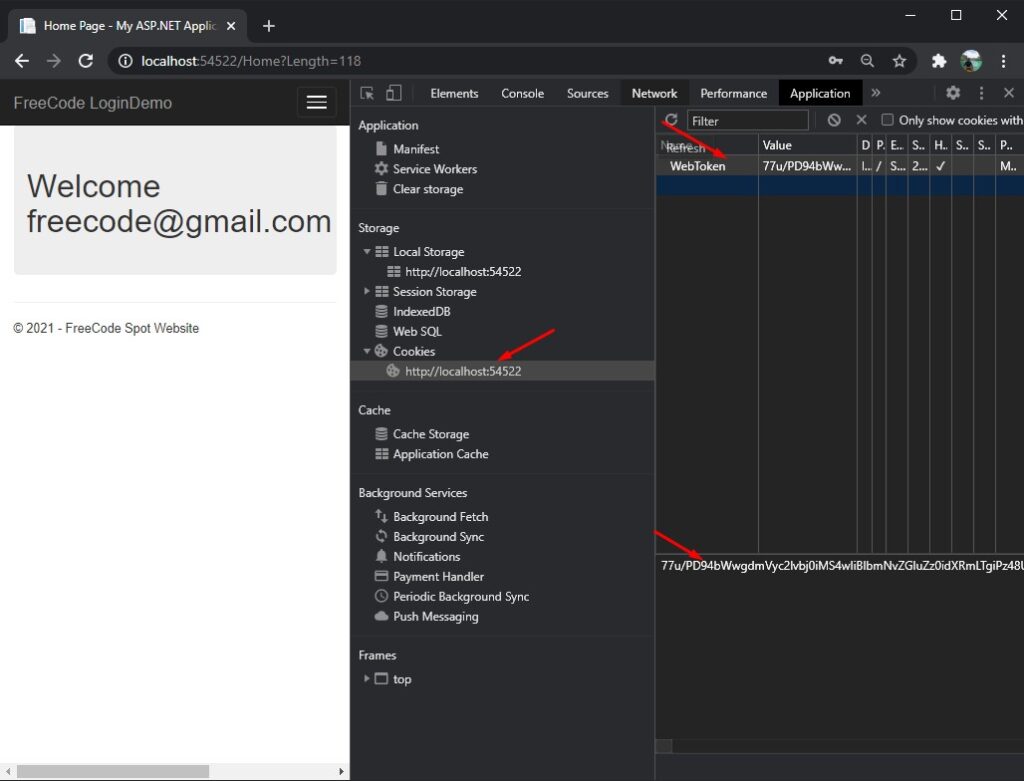
sam.WriteSessionTokenToCookie(token); This is how the browser cookies look like.
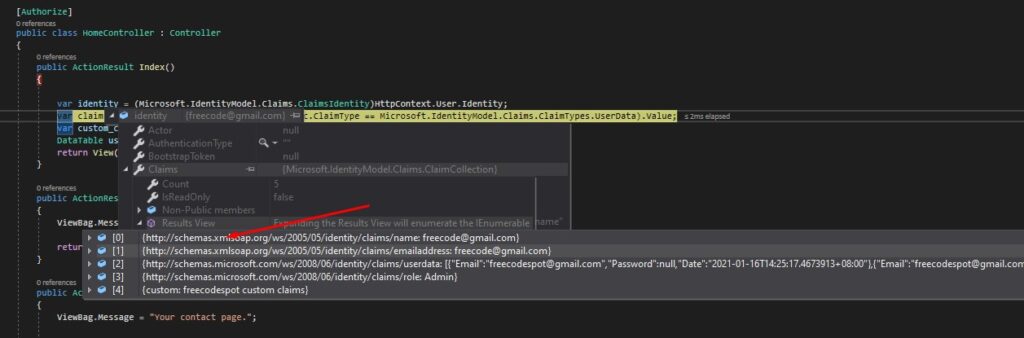
IV. How to Retrived Claims
Once you have added the claim , you can get the claim value later using the code snippet below.
 var identity = (Microsoft.IdentityModel.Claims.ClaimsIdentity)HttpContext.User.Identity;

var claim = identity.Claims.FirstOrDefault(c => c.ClaimType == Microsoft.IdentityModel.Claims.ClaimTypes.UserData).Value;

var custom_claim = identity.Claims.FirstOrDefault(c => c.ClaimType == "custom").Value;
See the screenshot below for the attached user claims.
You can download the source code for this tutorial on my GitHub Account. coderbugzz. You can also visit my previous article to see how I created this project. Link here.
Summary
This tutorial is just a quick configuration tutorial on setting up SessionAuthenticationModule or SAM. This authentication is how you can add Claims to a Form Authentication in ASP NET MVC. Hopefully, this simple guide will help you.
KEEP CODING!