This tutorial will show you how to create a model from an existing database in Entity Framework. This approach allows developers to build software applications using existing databases. The process connects to a specific database and uses EF Core to scaffold database tables into models and generate a DBContext class.
Generate Models from Existing Database
If you are working with an existing database, this approach is a convenient way to map your database tables and create a bridge between your application and the database. Using a simple Scaffold command, you can generate a models base on your existing Database. Below is the command format to create a model from an existing database in Entity Framework.
Visual Studio Code(CLI)
dotnet ef DBContext scaffold "Server=CODERSIGN\SQLEXPRESS01;Database=UserDB;User Id=freecode;Password=freecodespot" Microsoft.EntityFrameworkCore.SqlServer -o ModelsVisual Studio – Package Manager Console
Scaffold-DbContext "Server=CODERSIGN\SQLEXPRESS01;Database=UserDB;Trusted_Connection=True;Id=freecode;Password=freecodespot" Microsoft.EntityFrameworkCore.SqlServer -OutputDir ModelsIf you want to see this in actual project creation, you can proceed with the steps below. I created a simple Web Application with CRUD functionality and executed a scaffold command to generate the model from my database structure.
Before you proceed with the steps below, please ensure that you have the latest version of the following installer.
- Visual Studio Code
- SQL Server
I. Setup a new ASP.NET Core Web Application Project
- Open Visual Studio Code Terminal and use the command below to create a New MVC Core Web Application.
dotnet new mvc -n CoreDBFirst2. Open your new project and navigate to your project’s solution. Open the Visual Studio code terminal and add the packages listed below by using dotnet add command.
If you are using Visual Studio you can add the packages using the NuGet Package Manager.
dotnet add package Microsoft.EntityFrameworkCore- Microsoft.EntityFrameworkCore
- Microsoft.EntityFrameworkCore.SqlServer
- Microsoft.EntityFrameworkCore.SqlServer.Design
- Microsoft.EntityFrameworkCore.Tools
II. Create SQL Database and Table
Now our project is ready. Let’s create the database that we will use for this tutorial.
- To create a database, open your SQL Server Application and create a database using the command below.
CREATE DATABASE UserDB;2. Now, inside UserDB database, create a table using the command below.
USE [UserDB]
 GO

 SET ANSI_NULLS ON
 GO
 SET QUOTED_IDENTIFIER ON
 GO
 CREATE TABLE [dbo].[users](
     [ID] [int] IDENTITY(1,1) NOT NULL,
     [FirstName] nvarchar NULL,
     [LastName] nvarchar NULL,
     [MiddleName] nvarchar NULL,
     [Contact] nvarchar NULL,
  CONSTRAINT [PK_users] PRIMARY KEY CLUSTERED
 (
     [ID] ASC
 )WITH (PAD_INDEX = OFF, STATISTICS_NORECOMPUTE = OFF, IGNORE_DUP_KEY = OFF, ALLOW_ROW_LOCKS = ON, ALLOW_PAGE_LOCKS = ON, OPTIMIZE_FOR_SEQUENTIAL_KEY = OFF) ON [PRIMARY]
 ) ON [PRIMARY] TEXTIMAGE_ON [PRIMARY]
 GO
Below is the screenshot of my database structure.

III. Generate Model from UserDB Database table
Entity Framework is an Object Relational Mapping (ORM), we need model properties to map to the database. To do that, we will use the Scaffold command to generate a model based on our table’s structure.
- To do that from the visual studio code terminal, paste the command below. Replace the connection string with your existing SQL Server connection from your local machine.
dotnet ef DBContext scaffold "Server=CODERSIGN\SQLEXPRESS01;Database=UserDB;User Id=freecode;Password=freecodespot" Microsoft.EntityFrameworkCore.SqlServer -o Models This command will output your scaffold model inside the Models folder. Refer to the video above to see it in action. I only have a single table in my UserDB database, it will only generate a User Model and a UserDBContext. See the screenshot below.
User.cs
User Table from UserDB
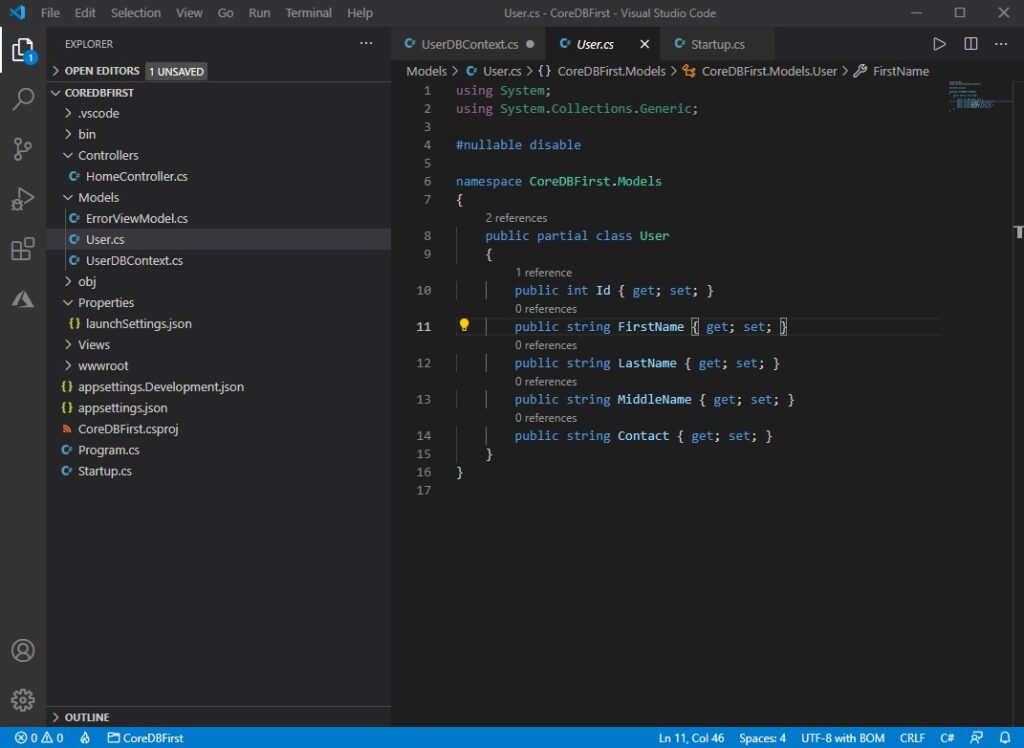
UserDBContext
A bridge between your Web Application or entity classes and the database.

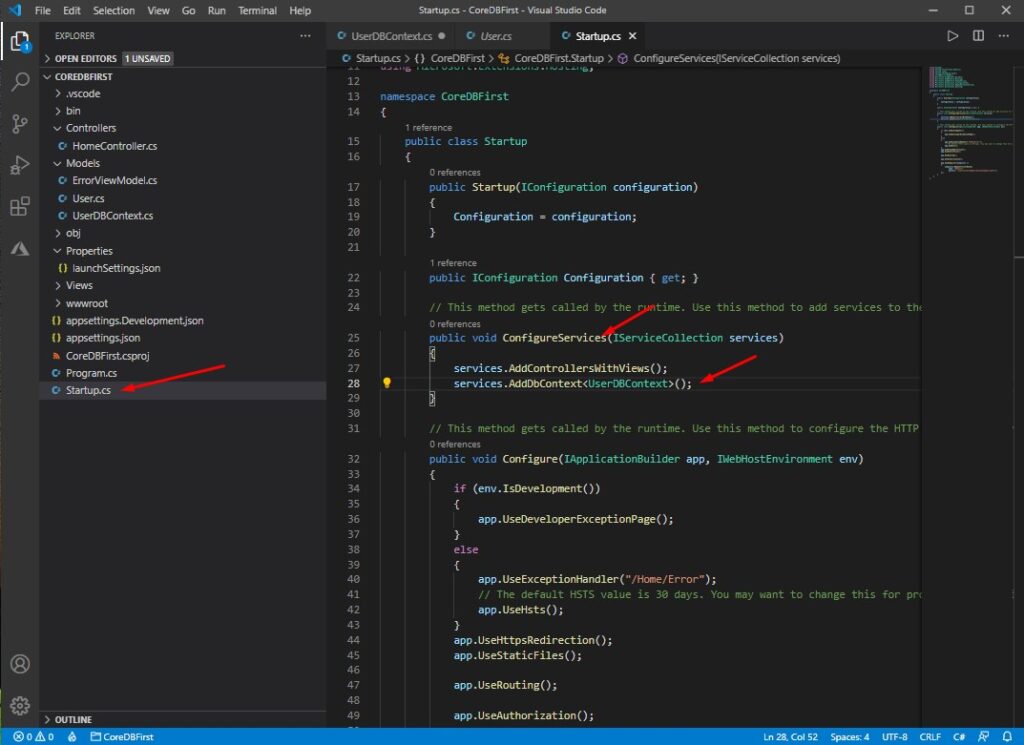
2. Register UserDBContext to your web application. To use the generated UserDBContext, we need to configure Startup.cs. Open Startup.cs and inside ConfigureServices() method. Copy and paste the code snippet below.
services.AddDbContext<UserDBContext>();See the screenshot below.
IV. Create a Repository Class
This class will handle all the SQL database query that we need for the CRUD functionality. Using EF Core, we can easily do that using the UserDBContext class that we generated awhile ago.
- Create Response Model inside Models folder. This model will handle the response from our repository. See the code snippet below.
namespace CoreDBFirst.Models
{
    public class Response<T>
    {
        public T Data { get; set; }
        public string message { get; set; }
    }
}
2. Create a folder from the root directory of your application.
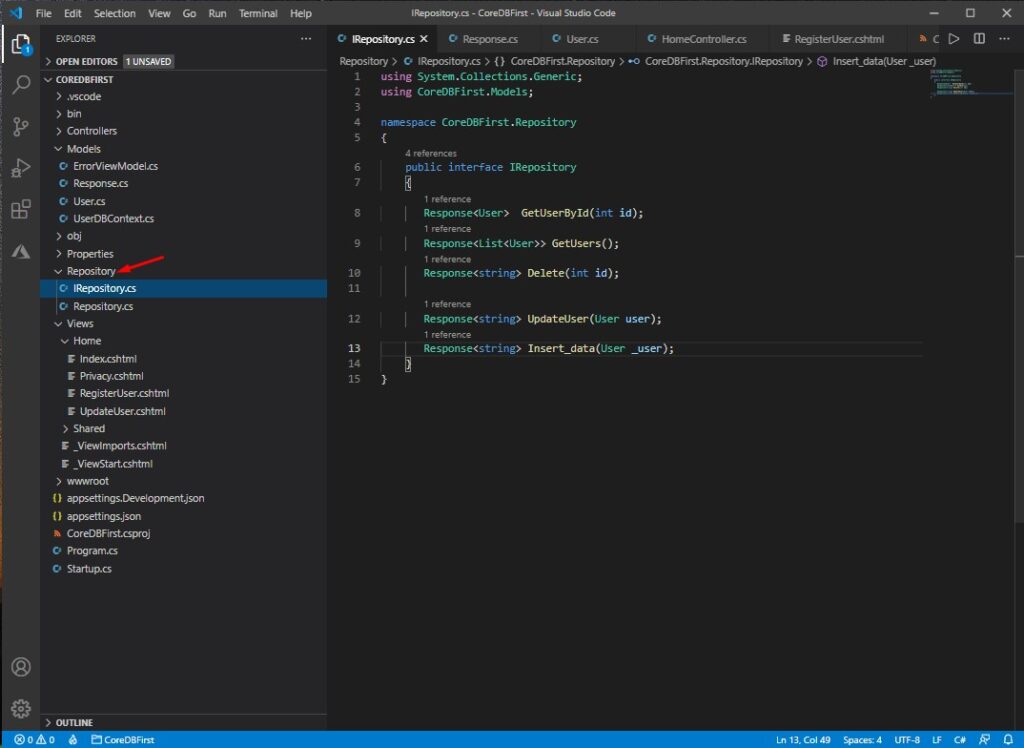
3. Inside the Repository folder, create an IRepository.cs interface. This is the Interface for our repository class. See the code snippet below.
using System.Collections.Generic;
using CoreDBFirst.Models;

namespace CoreDBFirst.Repository
{
    public interface IRepository
    {
       Response<User>  GetUserById(int id);
       Response<List<User>> GetUsers();
       Response<string> Delete(int id);

       Response<string> UpdateUser(User user);
       Response<string> Insert_data(User _user);
    }
}
4. Create the Implementation for IRepository Interface. Navigate back to the Repository folder then create another file Inside name it Repository.cs. This class will consume the UserDBContext to query data from the database.
CRUD methods:
- GetUserById(int id); » Get User per ID
- GetUsers(); » Get all users from the database
- Delete(int id); » remove user from the database
- UpdateUser(User user); » Update user information
- Insert_data(User _user); » Register new User to our application
This is the code inside my Repository.cs
using System;
using System.Collections.Generic;
using System.Linq;
using CoreDBFirst.Models;

namespace CoreDBFirst.Repository
{
    public class Repository : IRepository
    {
        private readonly UserDBContext _dbContext;
        public Repository(UserDBContext dbContext)
        {
            _dbContext = dbContext;

        }
        public Response<User> GetUserById(int id)
        {
            Response<User> result = new Response<User>();
            result.Data = _dbContext.Users.Find(id);
            return result;
        }

        public Response<List<User>> GetUsers()
        {
            Response<List<User>> result = new Response<List<User>>();
            result.Data = _dbContext.Users.ToList();
            return result;
        }
        public Response<string> Delete(int id)
        {
            Response<string> result = new Response<string>();
            try
            {
                    User data = _dbContext.Users.FirstOrDefault(u => u.Id == id);
                    _dbContext.Users.Remove(data);
                    var res =  _dbContext.SaveChanges();
                    if (res == 1)
                    {
                        result.message = "Success";
                    }
                    else
                    {
                        result.message = "Failed";
                    }

            }
            catch (Exception ex)
            {
                result.message = ex.Message;

            }
            return result;
        }

        public Response<string> UpdateUser(User user)
        {
            Response<string> result = new Response<string>();
            try
            {

                    User data = _dbContext.Users.FirstOrDefault(d => d.Id == user.Id);

                    data.FirstName = user.FirstName;
                    data.LastName = user.LastName;
                    data.MiddleName = user.MiddleName;
                    data.Contact = user.Contact;

                    var res = _dbContext.SaveChanges();
                    if (res == 1)
                    {
                        result.Data = "Success";
                    }
                    else
                    {
                        result.Data = "Failed";
                    }

            }
            catch (Exception ex)
            {
                result.Data = ex.Message;
            }
            return result;
        }

        public Response<string> Insert_data(User _user)
        {
            Response<string> result = new Response<string>();
            try
            {

                    var user = _dbContext.Users.FirstOrDefault(d => d.FirstName == _user.FirstName && d.LastName == _user.LastName);
                    if (user != null) //if name exist update data
                    {
                        result.Data = "User already Exists!";
                    }
                    else
                    {
                        _dbContext.Users.Add(_user);
                        var res = _dbContext.SaveChanges();
                        if (res == 1)
                        {
                            result.Data = "Success";
                        }
                        else
                        {
                            result.Data = "Failed";
                        }

                    }
            }
            catch (Exception ex)
            {
                result.Data = ex.Message;

            }
            return result;
        }
    }
}
5. Register IRository.cs and Repository class to our application by adding a Scope inside Startup.cs. Under the ConfigureServices method, add the code below.
services.AddScoped<IRepository, Repository.Repository>();V. Create Controller and ActionResults(CRUD)
Now, to create the UI for this application and use the Repository class. Create a controller. In this tutorial, I will use the default controller, which is the HomeController. Below is the code I had in my HomeController.
IActionResult from HomeController
Below are the action available from HomeController
| IActionResult | Method | Description |
| Index() | HTTPGET | Display all the list of Users |
| RegisterUser() | HTTPGET | Display the Register User form |
| RegisterUser(User user) | HTTPPOST | Process the registration process of the new User |
| UpdateUser(int Id) | HTTPGET | Get a Specific User by ID and display the Edit User form |
| UpdateUser(User user) | HTTPPOST | Process the updating of user information |
| DeleteUser(int Id) | HTTPGET | Remove User by ID |
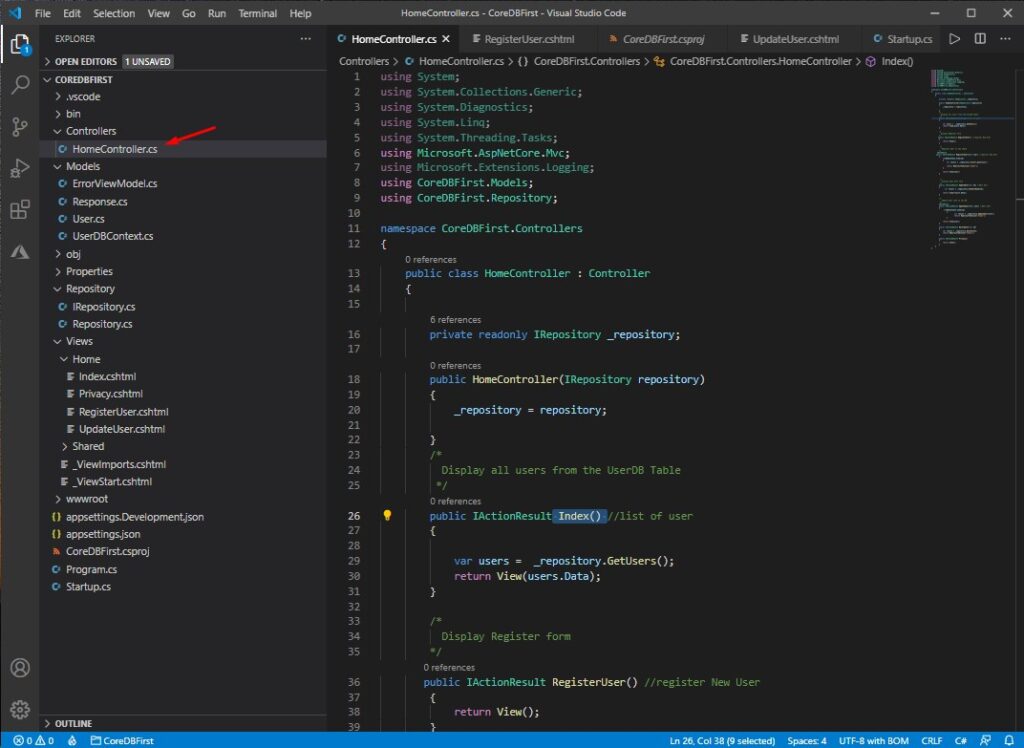
Below are the codes from my HomeController.
using System;
using System.Collections.Generic;
using System.Diagnostics;
using System.Linq;
using System.Threading.Tasks;
using Microsoft.AspNetCore.Mvc;
using Microsoft.Extensions.Logging;
using CoreDBFirst.Models;
using CoreDBFirst.Repository;

namespace CoreDBFirst.Controllers
{
    public class HomeController : Controller
    {

        private readonly IRepository _repository;

        public HomeController(IRepository repository)
        {
            _repository = repository;

        }
        /*
          Display all users from the UserDB Table
         */
        public IActionResult Index() //list of user
        {

            var users =  _repository.GetUsers();
            return View(users.Data);
        }

        /*
          Display Register form
        */
       public IActionResult RegisterUser() //register New User
        {
            return View();
        }

         /*
           Register User to the table
        */
      [HttpPost]
     public IActionResult RegisterUser(User user) //register New User
        {
            if(ModelState.IsValid)
            {
                var result = _repository.Insert_data(user);

                return RedirectToAction("Index");
            }

            return View(user);
        }


         /*
           Display Edit User form
         */
        public IActionResult UpdateUser(int Id) //Edit User
        {
              var result = _repository.GetUserById(Id);

            return View(result.Data);
        }

        /*
           Update User info in the DB
         */
        [HttpPost]
        public IActionResult UpdateUser(User user) //Edit User
        {
             if(ModelState.IsValid)
                {
                        var result = _repository.UpdateUser(user);
                        return RedirectToAction("Index");
                }

            return View(user);
        }

        public IActionResult DeleteUser(int Id)
        {
            var result = _repository.Delete(Id);
            return RedirectToAction("Index");
        }

        public IActionResult Privacy()
        {
            return View();
        }
    }
}
VI. Create cshtml Views(UI)
Base on the HomeController IActionresult below are the Views that we need.
| View | IActionResult(HomeController) | Description |
| 1. index.cshtml | Index() | Display list of users using a table |
| 2. RegisterUser.cshtml | RegisterUser() | Display Registration Forms |
| 3. UpdateUser.cshmtl | UpdateUser() | Display Update User Form |
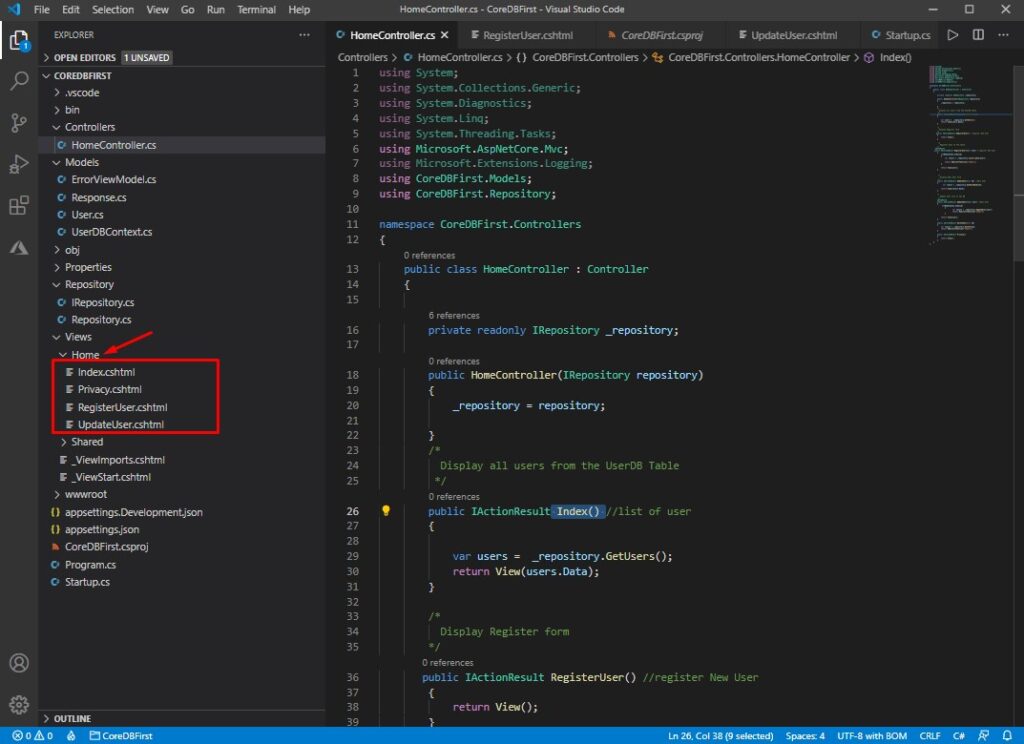
1. index.cshtml
Display List of Users in Table
@model List<CoreDBFirst.Models.User>
@{
    ViewData["Title"] = "Home Page";
}
<div class="">
    <a class="btn btn-primary" asp-action="RegisterUser">Register User</a>
</div>
<br/>
<div class="text-center">
    <table class="table">
        <thead>
            <tr>
                <th>ID</th>
                <th>First Name</th>
                <th>Last Name</th>
                <th>Middle Name</th>
                <th>Contact Number</th>
                <th colspan="2">Option</th>
            </tr>
        </thead>
        <tbody id="Table_data">
            @{
                foreach (var row in Model)
                {
                        <tr>
                            <td>@row.Id</td>
                            <td>@row.FirstName</td>
                            <td>@row.LastName</td>
                            <td>@row.MiddleName</td>
                            <td>@row.Contact</td>
                            <td><a class="btn btn-primary" asp-action="UpdateUser" asp-controller="Home" asp-route-Id=@row.Id>Edit User</a></td>
                            <td><a class="btn btn-danger" asp-action="DeleteUser" asp-controller="Home" asp-route-Id=@row.Id>Delete</a></td>
                        </tr>
                }
            }
        </tbody>
    </table>
</div>
2. RegisterUser.cshtml
Registration form for new Users
@model CoreDBFirst.Models.User
@{
    ViewData["Title"] = "Register";
}

<h1>Register</h1>

<div class="row">
    <div class="col-md-12">
        <form method="post">
          <div asp-validation-summary="All" class="text-danger"></div>
            <div class="form-group">
                <label asp-for="FirstName"></label>
                <input asp-for="FirstName" class="form-control" />
                <span asp-validation-for="FirstName" class="text-danger"></span>
            </div>

            <div class="form-group">
                <label asp-for="LastName"></label>
                <input asp-for="LastName" class="form-control" />
                <span asp-validation-for="LastName" class="text-danger"></span>
            </div>

            <div class="form-group">
                <label asp-for="MiddleName"></label>
                <input asp-for="MiddleName" class="form-control" />
                <span asp-validation-for="MiddleName" class="text-danger"></span>
            </div>

              <div class="form-group">
                <label asp-for="Contact"></label>
                <input asp-for="Contact" class="form-control" />
                <span asp-validation-for="Contact" class="text-danger"></span>
            </div>
            <button type="submit" class="btn btn-primary">Register</button>
            <a class="btn btn-primary" asp-controller="Home" asp-action="Index">Cancel</a>
        </form>

    </div>
</div>
3. UpdateUser.cshmtl
Update User form
@model CoreDBFirst.Models.User
@{
    ViewData["Title"] = "Edit User";
}

<h1>Edit User</h1>

<div class="row">
    <div class="col-md-12">
        <form method="post">
            <div asp-validation-summary="All" class="text-danger"></div>
             <input asp-for="Id" class="form-control" hidden/>
            <div class="form-group">
                <label asp-for="FirstName"></label>
                <input asp-for="FirstName" class="form-control" />
                <span asp-validation-for="FirstName" class="text-danger"></span>
            </div>

            <div class="form-group">
                <label asp-for="LastName"></label>
                <input asp-for="LastName" class="form-control" />
                <span asp-validation-for="LastName" class="text-danger"></span>
            </div>

            <div class="form-group">
                <label asp-for="MiddleName"></label>
                <input asp-for="MiddleName" class="form-control" />
                <span asp-validation-for="MiddleName" class="text-danger"></span>
            </div>

              <div class="form-group">
                <label asp-for="Contact"></label>
                <input asp-for="Contact" class="form-control" />
                <span asp-validation-for="Contact" class="text-danger"></span>
            </div>
            <button type="submit" class="btn btn-primary">Update</button>
            <a class="btn btn-primary" asp-controller="Home" asp-action="Index">Cancel</a>
        </form>

    </div>
</div>
You may get the source code from this tutorial in my GitHub Account @coderbugzz. You may also visit this article for the list of Entity Framework related topic on this site ASP.NET Core checklist.
Also check this great article from codingsonata.com about building a restful API in ASP.NET Core using Entity Framework
Summary
This tutorial teaches us how to create a model from an existing database in Entity Framework. We Implement this using a sample ASP.NET Web Core application to understand how the Database approach is implemented fully. Hopefully, this tutorial helps you and can be a reference for your future projects.
KEEP CODING!