If you are looking for JQuery Datatables server-side processing in ASP NET Core, you’ve come to the right place. In this tutorial, we are going to create a real-life web application example. If you are still wondering if there is a way to display more than a thousand records on your view page all at once without using server-side processing? Well, there isn’t, Even if it did work you’re probably looking several minutes to even load the data to the page.
- What is server-side processing?
- I. Setup ASP.NET Core Web Application
- II. Create Model
- III. Migration
- IV. Update Database
- V. Insert dummy Data on users table
- VI. Add JQuery Datatable Libraries
- VII. Modify HomeController View
- VIII. Create an API Controller
- IX. Implement Jquery Datatable
- X. Add the script on the Index.cshtml
- Source Code:
- Summary
The solution would be to use pagination and server-side processing in ASP NET Core because browsers just aren’t designed to show that much content all at once. This is where Jquery Datatable comes in handy, you can perform server-side processing in ASP NET Core which gives you control over the record you wanted to load on your view page.
What is server-side processing?
Server-side processing in JQuery Datatable is an implementation that instead of passing the data to the view page all at once, we have to cut it into chunks and display it on the datable.
Visit Datatables.net for JQuery Datatable documentation here for more information.
In this tutorial, we are going to create a real-life scenario application to perform Server-side processing using Datatables.net.
Before we start, Please make sure to have installed the following:
- The latest version of Visual Studio
- Alternatively, you can also use the Visual Studio Code.
- SQL Server
If you already have installed all of that, then let’s start.
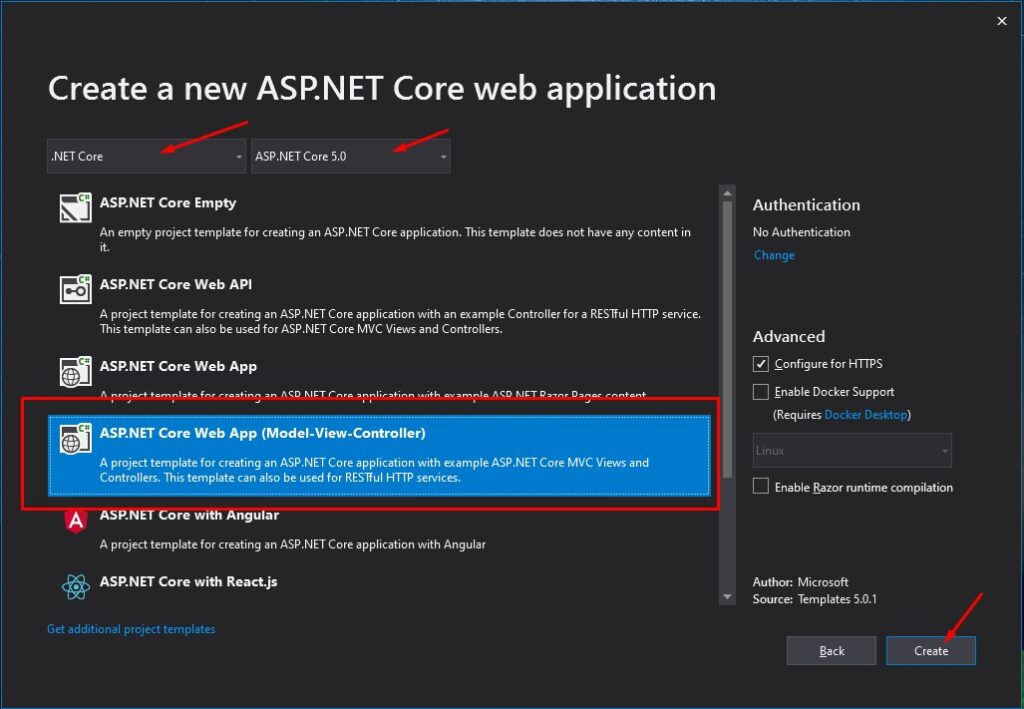
I. Setup ASP.NET Core Web Application
- First, create your ASP.NET Core Web Application. To do that just follow the steps below.
- Select File > New > Project.
- Select ASP.NET Core Web Application. Name the project DatatableDemo to have the same namespace as my project. Click OK.
- Select an ASP.NET Core Web Application.
- Lastly, Click on Create.
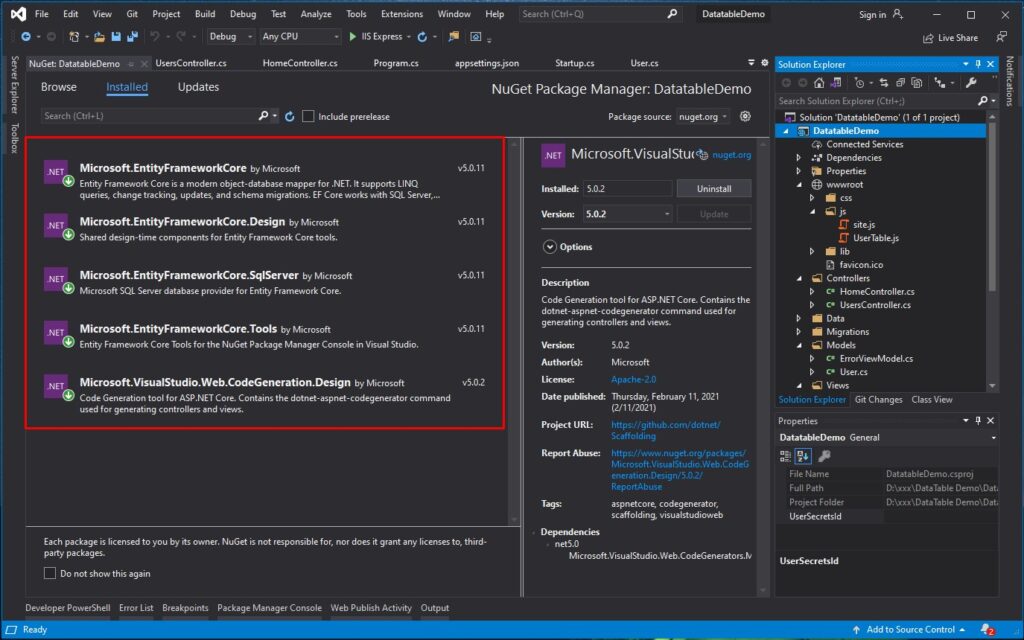
2. Now we need to install the required packages for this project. I have listed it all below.
- Microsoft.EntityFrameworkCore
- Microsoft.EntityFrameworkCore.Design
- Microsoft.EntityFrameworkCore.SqlServer
- Microsoft.EntityFrameworkCore.Tools
- Microsoft.VisualStudio.Web.CodeGeneration.Design
Use NuGet Package Manager to install this package. If this is your first time using this you can visit this article.
3. After we gather all the necessary package, we need to configure our Web Application to connect to our SQL Server. Open your Startup.cs file and follow these three simple steps.
3.1 Setup your SQL Server Configure Connection inside appsettings.json file
"ConnectionStrings": {
     "Default": "Server=CODERSIGN\SQLEXPRESS01;Database=DbDemo;User Id=freecode;Password=freecoder;"
   }
3.2 Configure your startup class by adding the below code inside the ConfigureServices method. This will read the connection string we put inside appsettings.json and initialize our web Application to use the SQL Server Database.
string connectionString = Configuration.GetConnectionString("default");
services.AddDbContext(c => c.UseSqlServer(connectionString));
II. Create Model
- Now, create the properties needed for this scenario. We will add a User model inside the Models folder.
public class User
     {
             public int Id { get; set; }
             public string FirstName { get; set; }
             public string LastName { get; set; }
             public string Contact { get; set; }
             public string Email { get; set; }
             public string Address { get; set; }
     }
2. To handle our database structure and queries using Entity Framework, we need to create a DBContext Class. This we will handle the handshake with our Web Application and to the Database. Create AppDBContext Class under the data folder and copy the code below.
  using DatatableDemo.Models;
 using Microsoft.EntityFrameworkCore;
 using System;
 using System.Collections.Generic;
 using System.Linq;
 using System.Threading.Tasks;

 namespace DatatableDemo.Data
 {
     public class AppDBContext : DbContext
     {
         private readonly DbContextOptions<AppDBContext> _options;

         public AppDBContext(DbContextOptions<AppDBContext> options) : base(options)
         {
             _options = options;
         }

         public DbSet<User> users { get; set; }
     }
 }
III. Migration
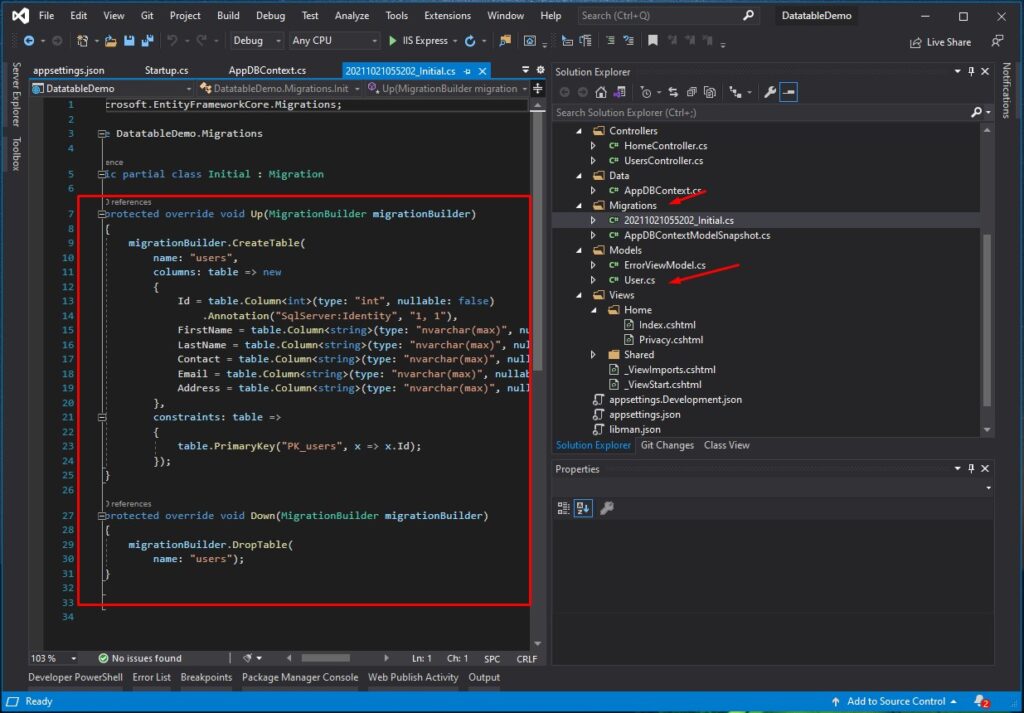
Now, we need to create a migration. These steps will generate a Migration builder that contains all the Table schema we need. This schema is based on the properties of the User Model.
- Package Manager Console > Add-Migration innitial
- Visual Studio Code Terminal > dotnet ef migration add innitial
This will create a Migration folder and classes base on the User model.
IV. Update Database
This time all we need to do is to perform this command to automatically create the database structure that we need for this tutorial.
- Package Manager Console > Update-Database
- Visual Studio Code Terminal > dotnet ef database update
This is now how our database looks like.
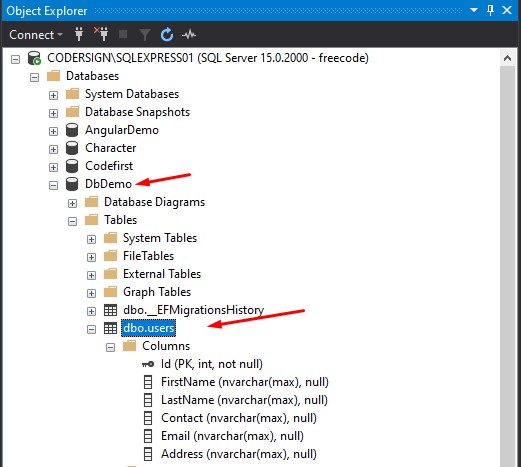
V. Insert dummy Data on users table
Now, that you have set up your database tables, it’s time to add dummy data, Use this link to generate dummy data and then manually add the content on your user table. See the image below.
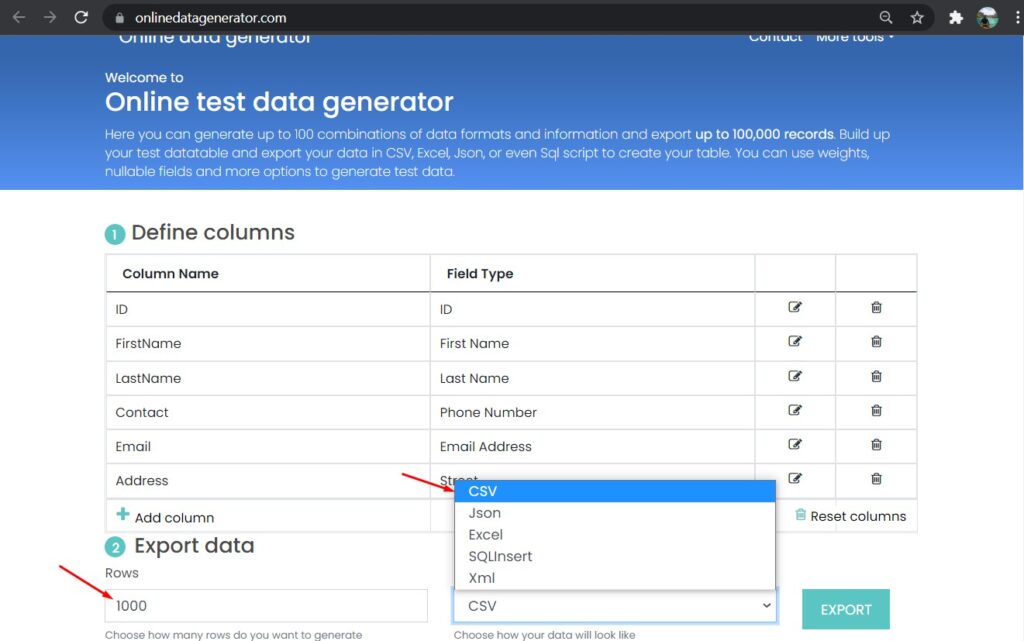
- Modify the columns base on the user model that we created awhile ago.
- Specify the number of rows you want to create. In my case I choose 1000 rows.
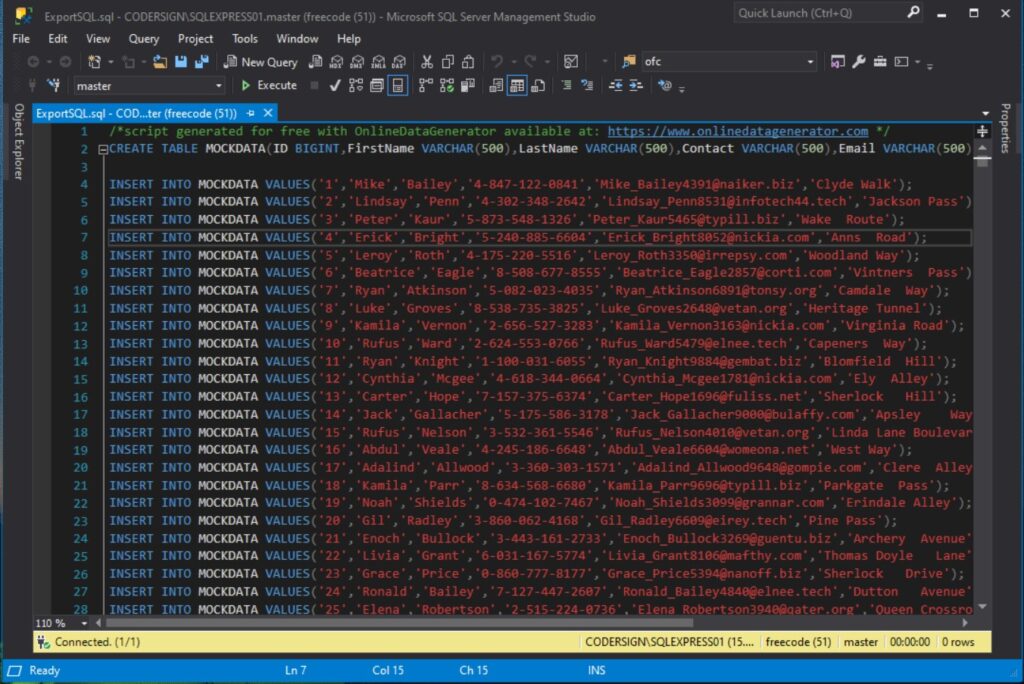
- Choose file format then Export the file. You may use SQLInsert to directly download the SQL script.
- Replace the MOCKDATA with your Table name which is users.
VI. Add JQuery Datatable Libraries
This time let’s add the JQuery Datatable library.
- Add Client-Side library
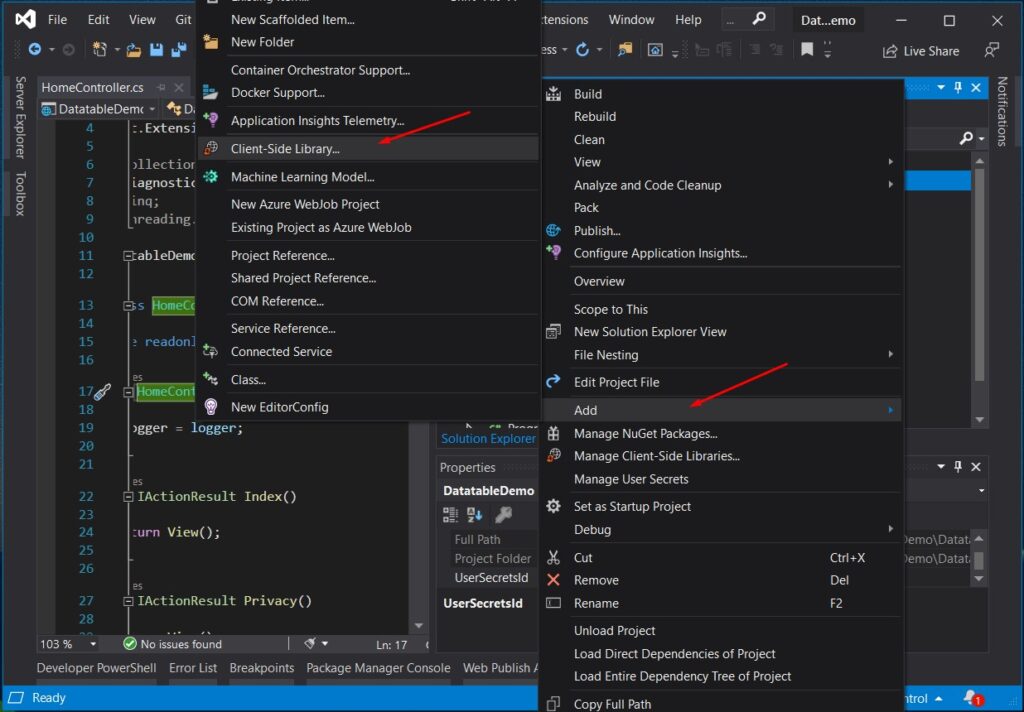
2. Search for “datatables” and select the version.
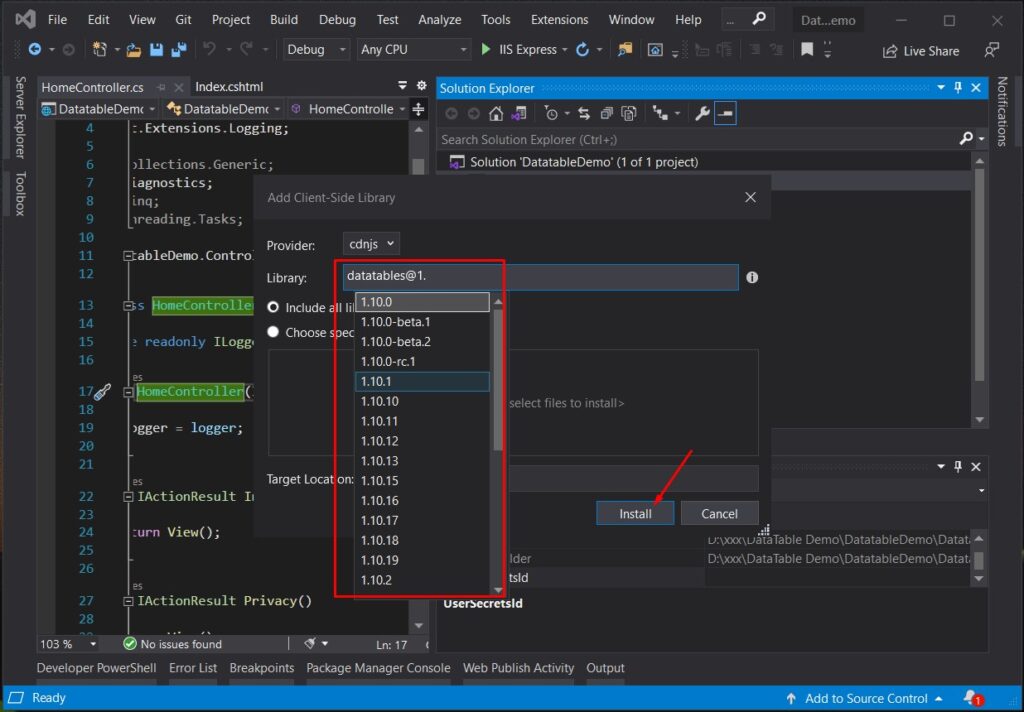
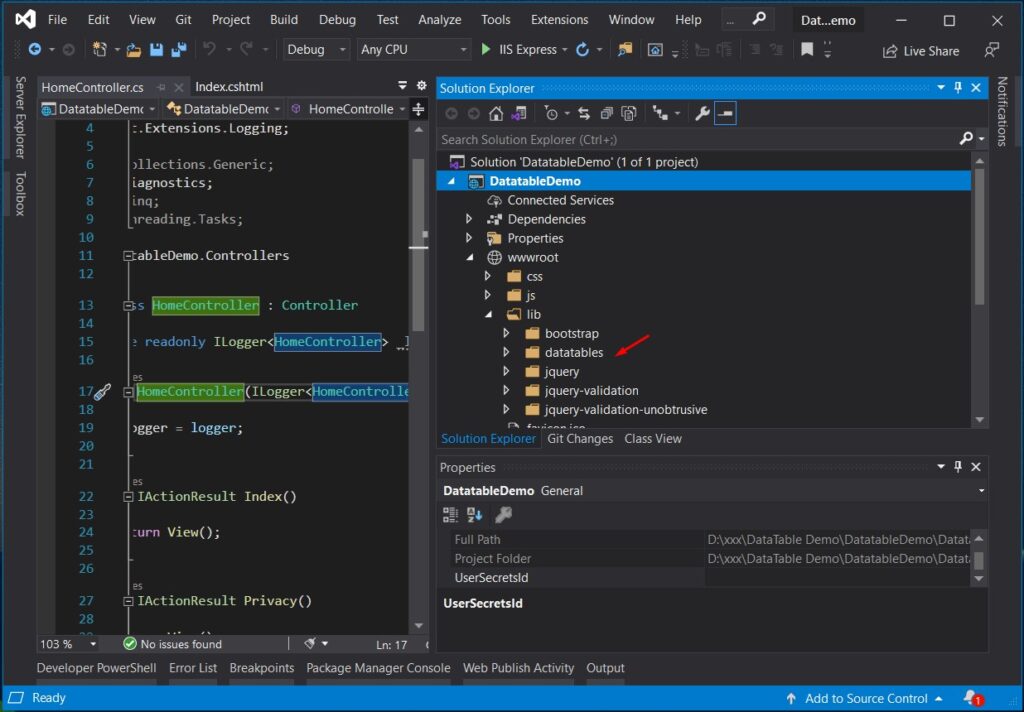
3. Install the Library. This will download the file inside wwwroot»lib folder.
VII. Modify HomeController View
Since we created this project using the ASP.NET Core MVC template. This will generate a default HomeController class. Let’s modify index.cshtml view from HomeController. This is a simple HTML table that will display the data.
 @{
     ViewData["Title"] = "Home Page";
 }

 <link href="~/lib/datatables/css/dataTables.bootstrap4.min.css" rel="stylesheet" />
 <div class="container">
     <br />
     <div style="width:90%; margin:0 auto;">
         <table id="userTable" class="table table-striped table-bordered nowrap" width="100%" cellspacing="0">
             <thead>
                 <tr>
                     <th>ID</th>
                     <th>First Name</th>
                     <th>Last Name</th>
                     <th>Contact</th>
                     <th>Email</th>
                     <th>Address</th>
                 </tr>
             </thead>
         </table>
     </div>
 </div>
 @section Scripts
 {
     <script src="~/lib/datatables/js/jquery.dataTables.min.js"></script>
     <script src="~/lib/datatables/js/dataTables.bootstrap4.min.js"></script>
 }
Initialize datatables by adding the needed CSS and script. See the script below.
CSS – Stylesheet
<link href=”~/lib/datatables/css/dataTables.bootstrap4.min.css” rel=”stylesheet” />
JS » Javascript file
<script src=”~/lib/datatables/js/jquery.dataTables.min.js”></script>
<script src=”~/lib/datatables/js/dataTables.bootstrap4.min.js”></script>
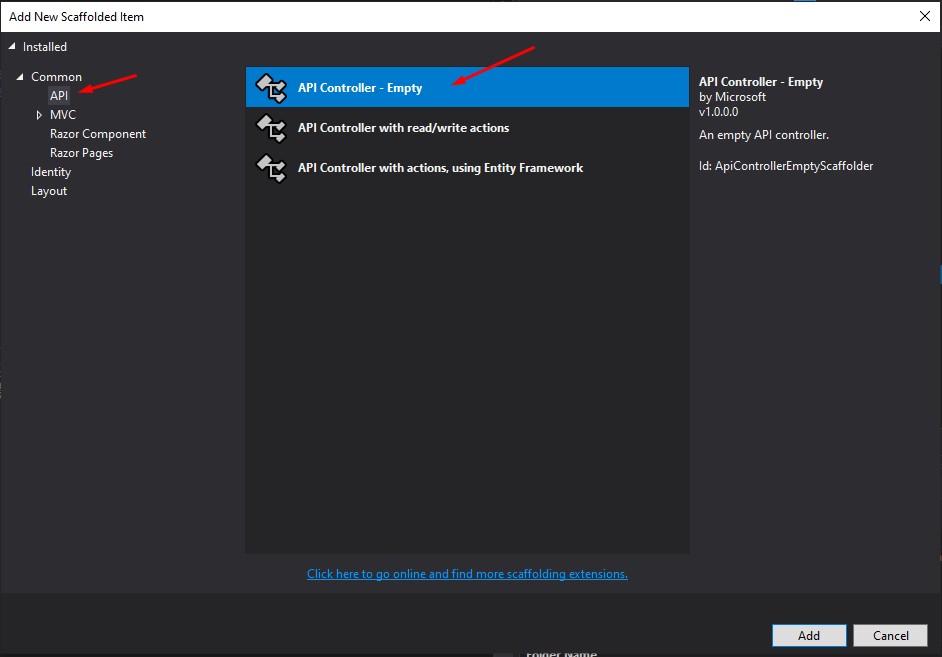
VIII. Create an API Controller
Now that we have the UI ready, let’s create the sample API that will handle the pagination of all the records from the “users” table. We will create a method that performs server-side processing in ASP NET Core.
- Right click on Controllers folder then add New Scaffolded Item.
- Select API then choose API Controller – Empty
- Then name the controller as UsersController.
This is the code snippet in my UsersController. This will use the AppDBContext class that we created a while ago to get all the records from the “users” table and perform pagination to return the data to the view in chunks.
 using DatatableDemo.Data;
 using Microsoft.AspNetCore.Http;
 using Microsoft.AspNetCore.Mvc;
 using System;
 using System.Collections.Generic;
 using System.Linq;
 using System.Threading.Tasks;

 namespace DatatableDemo.Controllers
 {
     [Route("api/[controller]")]
     [ApiController]
     public class UsersController : ControllerBase
     {
         private readonly AppDBContext _context;

         public UsersController(AppDBContext context)
         {
             _context = context;
         }
         [HttpPost("GetUsers")]
         public IActionResult GetUsers()
        {
             try
             {
                 var draw = Request.Form["draw"].FirstOrDefault();
                 var start = Request.Form["start"].FirstOrDefault();
                 var length = Request.Form["length"].FirstOrDefault();
                 var sortColumn = Request.Form["columns[" + Request.Form["order[0][column]"].FirstOrDefault() + "][name]"].FirstOrDefault();
                 var sortColumnDirection = Request.Form["order[0][dir]"].FirstOrDefault();
                 var searchValue = Request.Form["search[value]"].FirstOrDefault();
                 int pageSize = length != null ? Convert.ToInt32(length) : 0;
                 int skip = start != null ? Convert.ToInt32(start) : 0;
                 int recordsTotal = 0;
                 var userData = (from tempuser in _context.users select tempuser);
                 if (!(string.IsNullOrEmpty(sortColumn) && string.IsNullOrEmpty(sortColumnDirection)))
                 {
                     userData = userData.OrderBy(s => sortColumn + " " + sortColumnDirection);
                 }
                 if (!string.IsNullOrEmpty(searchValue))
                 {
                     userData = userData.Where(m => m.FirstName.Contains(searchValue)
                                                 || m.LastName.Contains(searchValue)
                                                 || m.Contact.Contains(searchValue)
                                                 || m.Email.Contains(searchValue)
                                                 || m.Address.Contains(searchValue));
                 }
                 recordsTotal = userData.Count();
                 var data = userData.Skip(skip).Take(pageSize).ToList();
                 var jsonData = new { draw = draw, recordsFiltered = recordsTotal, recordsTotal = recordsTotal, data = data };
                 return Ok(jsonData);
             }
             catch (Exception ex)
             {
                 throw;
             }
         }
     }
 }
IX. Implement Jquery Datatable
Now, let’s get the data and use the Datatable.net server-side processing to display the records using the API method that we in the previous step. I created a userTable.js file under wwwroot » lib » js folder. userTable.js file will contain the custom script that I will add to call the JQuery datable.
To Basic Syntax for Datatable is to call it like this.
$("#userTable").DataTable({})
// userTable is the ID of HTML table from index.cshtml
This is the final code on my userTable script.
$(document).ready(function () {
     $("#userTable").DataTable({
         "processing": true,
         "serverSide": true,
         "filter": true,
         "ajax": {
             "url": "/api/Users/GetUsers",
             "type": "POST",
             "datatype": "json"
         },
         "columnDefs": [{
             "targets": [0],
             "visible": false,
             "searchable": false
         }],
         "columns": [
             { "data": "id", "name": "Id", "autoWidth": true },
             { "data": "firstName", "name": "First Name", "autoWidth": true },
             { "data": "lastName", "name": "Last Name", "autoWidth": true },
             { "data": "contact", "name": "Country", "autoWidth": true },
             { "data": "email", "name": "Email", "autoWidth": true },
             { "data": "address", "name": "Address", "autoWidth": true },
     ] });
 });
JQuery Datatable Parameters
- processing – A boolean property that when enables shows the processing indicator when the table is being processed.
- serverSide – This property enables server-side processing.
- filter – enables/disables the search bar.
- ajax – used to fetch the data from external sources, in this case it’s API
- columnDefs – Here we can define the properties of each column like visibility, isSearchable, and so on.
- columns – Column Initialization
API endpoint that we used in this example.
/api/Users/GetUsers
Methos from UsersController
X. Add the script on the Index.cshtml
To call the script from index.cshml add the script location on your index view. (Home » index.cshtml)
<script src="~/js/UserTable.js"></script> Full Code:
@{
ViewData["Title"] = "Home Page";
}
<link href="~/lib/datatables/css/dataTables.bootstrap4.min.css" rel="stylesheet" />
<div class="container">
<br />
<div style="width:90%; margin:0 auto;">
<table id="userTable" class="table table-striped table-bordered dt-responsive nowrap" width="100%" cellspacing="0">
<thead>
<tr>
<th>ID</th>
<th>First Name</th>
<th>Last Name</th>
<th>Contact</th>
<th>Email</th>
<th>Address</th>
</tr>
</thead>
</table>
</div>
</div>
@section Scripts
{
<script src="~/lib/datatables/js/jquery.dataTables.min.js"></script>
<script src="~/lib/datatables/js/dataTables.bootstrap4.min.js"></script>
<script src="~/js/UserTable.js"></script>
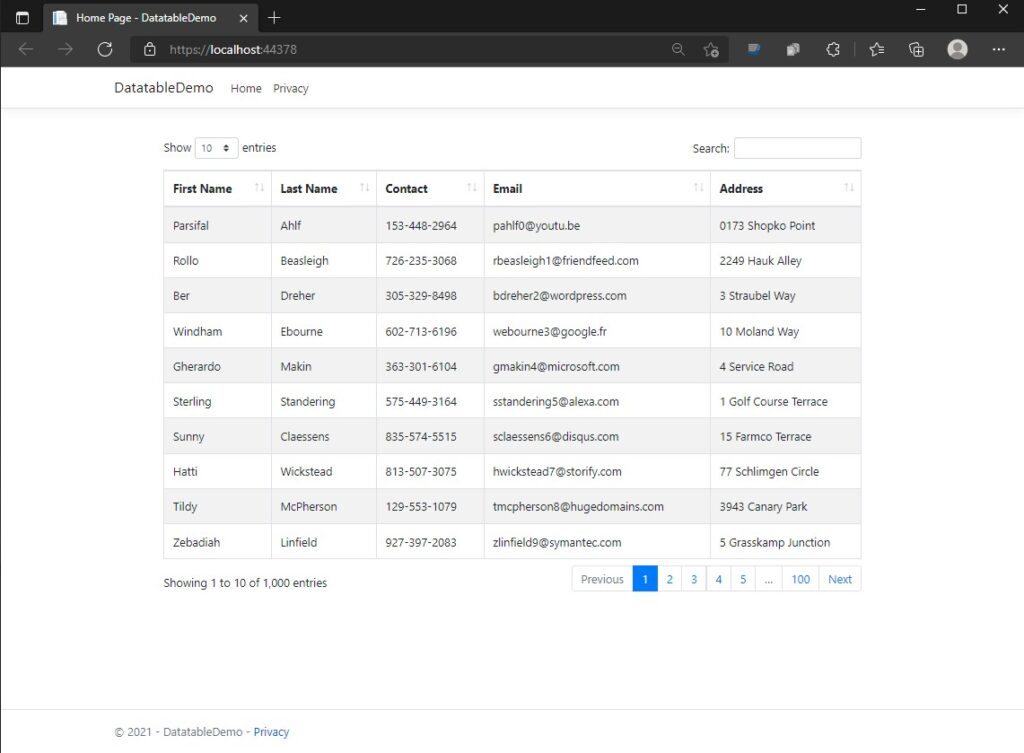
}Now, run your project by pressing ctrl+F5 to run the project without debugging. This is how your website should look like.
Source Code:
In case, something is not working on your end. You may download the source code from my GitHub Account @coderbugz.
Summary
In this tutorial, we created a simple Demo Web application that performs server-side processing in ASP NET Core using JQuery Datatable. This tutorial also shows why you should use JQuery datatable , as it has much built-in functionality that comes in handy when it comes to reporting. Jquery Datatable has searched, filtering, pagination, and even exporting functionality. Hopefully, this will help you with your current and future projects.
KEEP CODING!!