This article will create an application that displays a list of users in an Html table Using JQuery DataTables in ASP.Net Core. We will also use Entity Frameworks in this project. We will create a table using the Entity Framework, insert sample data, and display it on our Datatables Grid.
What is JQuery Datatable?
Jquery Datatable is advance plugins that transform regular HTML table and add advance interaction controls. It provides searching, sorting, pagination, and filtering abilities.
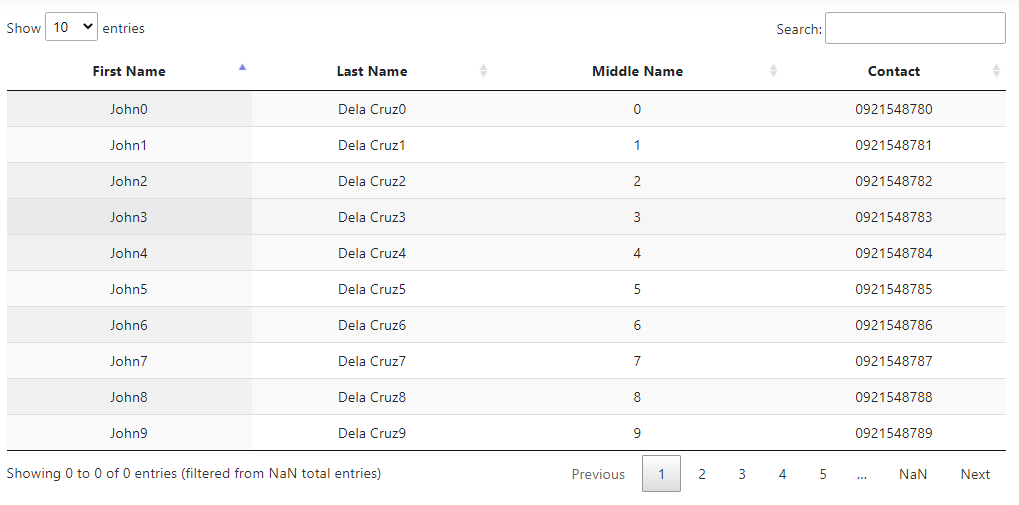
This is how a raw Jquery Datatable Grid will look like.
Before we start, Please make sure to have installed the following
- The latest version of Visual Studio – You can download it here.
- Alternatively, you can also use the Visual Studio Code.
- SQL Server
If the checklist above is already in your machine, we can go ahead and start.
We also have an article in using ASP.NET Core Identity. You can find it here.
I. Setup ASP.NET Core Web Application
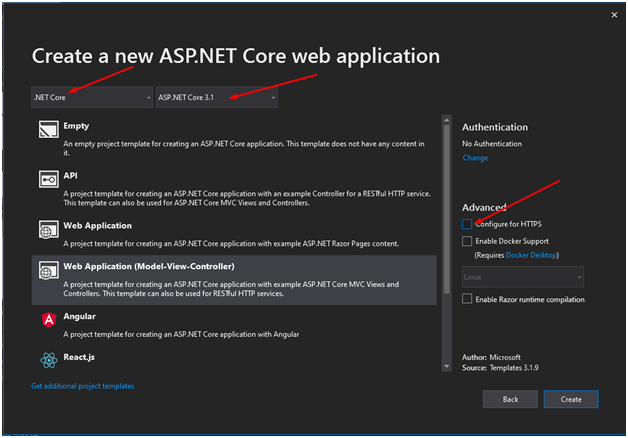
- First, create your ASP.NET Core Web Application. To do that just follow the steps below.
- Select File > New > Project.
- Select ASP.NET Core Web Application. Name the project to whichever you prefer, then click OK.
- Select an ASP.NET Core Web Application. and then uncheck Configure for HTTPS.
- Lastly, Click on Create.
2. Once done, proceed on adding needed packages using Nuget Package Manager on Visual Studio.
- Microsoft.EntityFrameworkCore
- Microsoft.EntityFrameworkCore.SqlServer
- Microsoft.EntityFrameworkCore.Tools
II. Setup Models, Controllers, and Entity Framework Class
1. Now, under your Models folder create a model and name it User. Open the file. Then declare the properties below.

User Properties
public class User
    {
        public string FirstName { get; set; }
        public string LastName { get; set; }
        public string MiddleName { get; set; }

        public string Contact { get; set; }
    }
2. Let’s create AppDBContext class. Since we are using Entity Framework ,this class handles the database connection for us.
 public class AppDBContext: DbContext
    {
        private readonly DbContextOptions _options;

        public AppDBContext(DbContextOptions options) : base(options)
        {
            _options = options;
        }

        public DbSet<User> users { get; set; }
    }
3. Next, we need to setup our connection inside appsettings.json. Open the file and paste the snippet below. Database connection depends on what you configure in your local machine.
  "ConnectionStrings": {
    "default": "Data Source=DESKTOP-4DU98BI\\SQLEXPRESS01;Initial Catalog=UserDB;Integrated Security=True"
  }
4. Configure startup.cs to use the above connection. Add the snippet below under ConfigureServices method.
string connectionString = Configuration.GetConnectionString("default");
services.AddDbContext<AppDBContext>(c => c.UseSqlServer(connectionString));
5. Now you can run Migration command and Update Database to create the database schema for our model.
Migration:
- Package Manager Console > Add-Migration IdentityDBUser
- Visual Studio Code Terminal > dotnet ef migration add IdentityDBUser
Update Database:
- Package Manager Console > Update-Database
- Visual Studio Code Terminal > dotnet ef database update
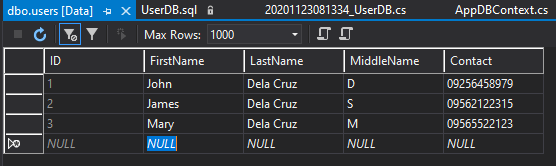
6. Check if the table was created and insert dummy data. This data will be used to populate our Html table.
7. This time, let’s proceed with the HomeController. Open the file and create Index IActionResult and method getAllUsers.
- Index > This display the view.
  public IActionResult Index()
        {
            return View();
}- getAllUsers > Retrieve the data from the User table using Entity Framework.
   public JsonResult getAllUsers()
        {

            List<User> users = new List<User>();
            users = _appDBContext.users.Select(c => c).ToList();

            return Json(new { data = users });
        }
8. We have prepare our data, now it’s time to create the HTML table. See code snippet below.
<div class="text-center">
    <table id="userTable" class="display" style="width:100%">
        <thead>

        </thead>
        <tbody>
        </tbody>
    </table>
</div>
9. To use Jquery Datatable, we need to import script and CSS to our project. To do it we just need to declare the following script to our view.
- CSS
<link rel="stylesheet" type="text/css" href="//cdn.datatables.net/1.10.22/css/jquery.dataTables.min.css">- Script
<script src="https://ajax.googleapis.com/ajax/libs/jquery/3.1.0/jquery.min.js"></script>
<script type="text/javascript" charset="utf8" src="//cdn.datatables.net/1.10.22/js/jquery.dataTables.min.js"></script>
10. Now, all we need to do is create a script to render the data using Ajax call and display using Jquery Datatable. This method will enhance our table and add advanced control.
- sTitle – column name of the table
- data – List of User from getAllUsers method from HomeController.
$(document).ready(function () {
$('#userTable').DataTable({
            "ajax": {
                'url': '@Url.Action("populateHtml", "Home")',
                "type": "GET",
                "datatype": "json"

            },
            "columns": [
                { "sTitle": "First Name",  "data": "firstName"},
                { "sTitle": "Last Name",   "data": "lastName" },
                { "sTitle": "Middle Name", "data": "middleName" },
                { "sTitle": "Contact",     "data" : "contact" }
            ]
        });
});
You may download the source code using this github link. coderbugzz
Summary
We created a Database table using ASP.NET Core Entity Framework. Create a model and a DBContext Class. Then perform migration and update database to create the table. And then Insert a sample data. This data will populate our Html table and transform the table using JQuery Datatable.
This method is one of the best ways to enhance a table Using JQuery DataTables in ASP.Net Core. Hopes this article is useful and will help you with your future projects. Happy coding!