
In this tutorial, we are going to Store Data Locally using SQLite in Flutter. This topic is new to freecode spot since our previous free code is about .NET Core. We will soon try to integrate ASP.NET Core Web API on Flutter but for now, let’s try Flutter with SQLite and create a sample CRUD operation.
What is SQLite?
SQLite Database is an open-source database provided in Android which is used to store data inside the user’s device. We can perform operations we used on an SQL Server such as Create, Read, Update and Delete.
In this freecode tutorial, we will use a package name SQFlite to connect to SQLite. But before we start make sure you have set up Flutter on your Visual Studio Code. If not you may use the steps below.
I. Setup Flutter on VSCode
These are just brief steps for you to start your configuration. But if you want full technical documentation you may visit Flutter’s official website using this link. I am using Windows OS on this tutorial.
- Install git for windows. link.
- Download Flutter SDK. link.
- Extract Flutter SDK. In my case I extracted it on this location “D:\flutter\flutter”
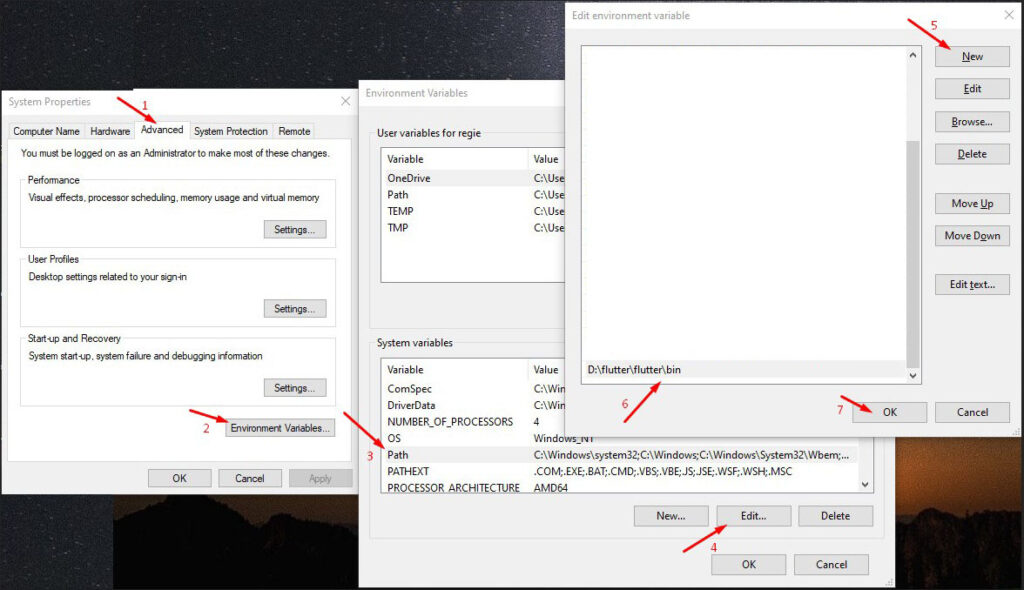
- Add “flutter\bin” to the Environtment Variable. See the image below.
5. Now, open git Bash then run the “flutter doctor” command to check the installation.
6. Download android studio here
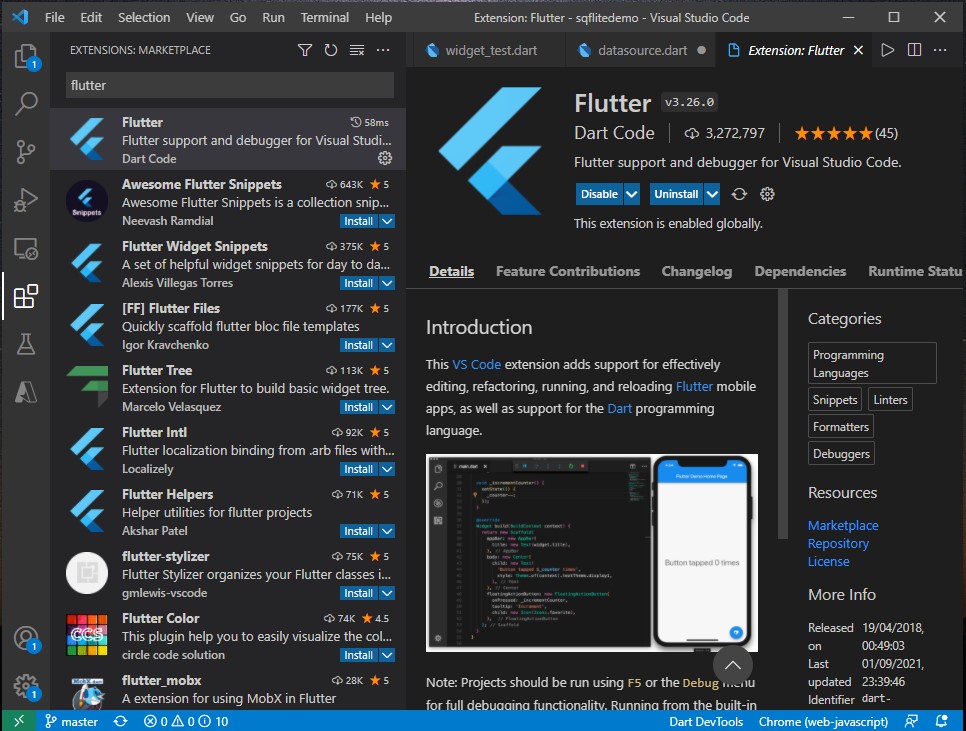
7. Download and install Visual Studio Code here. Open vscode and install Flutter extension.
II. Create a Flutter App
Now, it’s time to create the Flutter App.
- Create and choose a lcation where you want to put your Apps.
- Open vscode the Open the folder you just created using File » Open Folder.
- Open vscode terminal by going to View » Terminal.
- Then use this command to create the App. “flutter create sqflitedemo“
- Change your directory to the newly created App which in my case “cd sqflitedemo“
- Now, run flutter by using “flutter run” command.
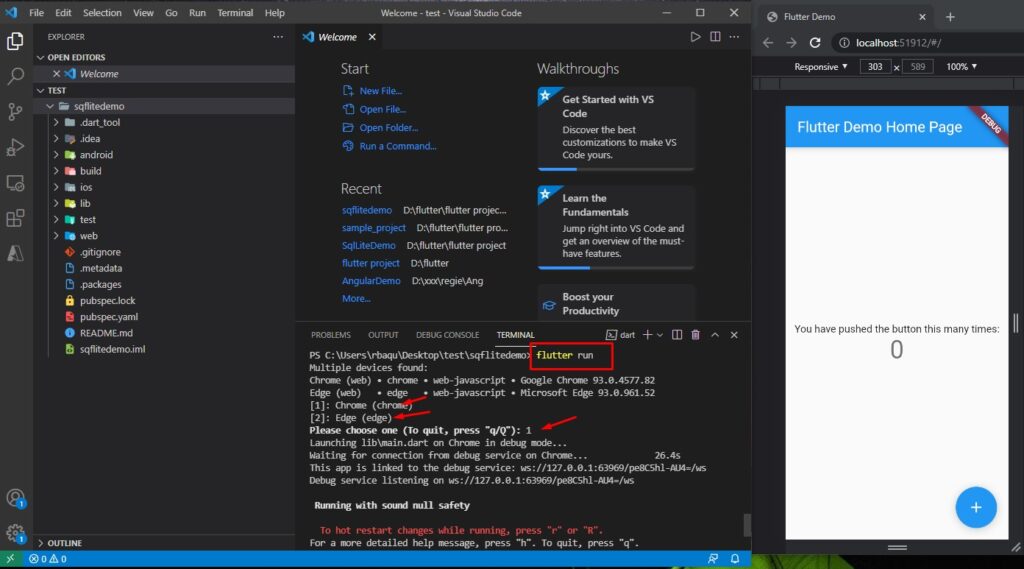
Note: I used a chrome browser on the example image above but for SQLite to work you need to install an android emulator from your Android Studio or use an actual android device and connect it via USB and with USB debugging enabled.
III. Add dependencies
We need to add a package for us to successfully use SQLlite. Open pubspec.yaml file from your project directory then adds the code snippet below.
dependencies:
  flutter:
    sdk: flutter
  sqflite: ^2.0.0+3
  path: ^1.8.0
  intl: ^0.17.0
IV. App Folder Structure
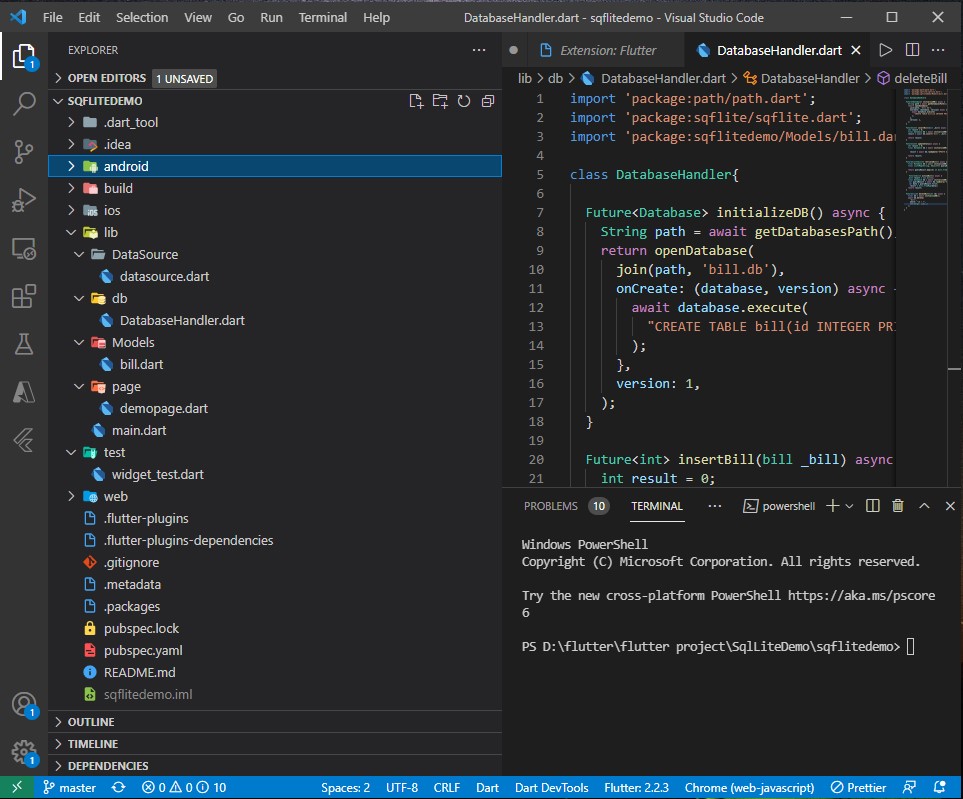
To give you an idea of how our folder structure looks like after this tutorial I have attached here an image of my full folder structure.
V. Create a Database handler Class
This class will initialize the database and handle the CRUD operation for this example. To do that, I created a db folder inside lib and then create an initializer method for our database. You may refer to the App Folder structure from step IV. Below is the code snippet of this class.
class DatabaseHandler{
  Future<Database> initializeDB() async {
    String path = await getDatabasesPath();
    return openDatabase(
      join(path, 'bill.db'),
      onCreate: (database, version) async {
        await database.execute(
          "CREATE TABLE bill(id INTEGER PRIMARY KEY AUTOINCREMENT, Date DateTime NOT NULL,LastReading DECIMAL(18,2) NOT NULL, kWH DECIMAL(18,2) NOT NULL, prevBill DECIMAL(18,2), status TEXT)",
        );
      },
      version: 1,
    );
  }
}
VI. Create a Model Class
We will be using bill.dart as our model. This model will represent columns from our database and will use this as map later from our CRUD functionality. We will create a toMap and fromMap method. Create a Models folder then create a bill.dart file. Use the code snippet below.
import 'package:intl/intl.dart';

class bill{
  final int? id;
  final String? Date;
  final double? LastReading;
  final double? kWH;
  final double? prevBill;
  final String? status;


  bill({
    this.id,
    this.Date,
    this.LastReading,
    this.kWH,
    this.prevBill,
    this.status
  });


  bill.fromMap(Map<String, dynamic> res)
      : id = res["id"],
        Date = DateFormat("dd-MM-yyyy").format(DateTime.parse(res["Date"].toString())),
        LastReading = double.parse(res["LastReading"].toString()),
        kWH = double.parse(res["kWH"].toString()),
        prevBill = double.parse(res["prevBill"].toString()),
        status = res["status"];

  Map<String, Object?> toMap() {
    return {'id':id,'Date': Date, 'LastReading': LastReading, 'kWH': kWH, 'prevBill': prevBill,"status": status};
  }
}
VII. Create a CRUD Operation
Now, it’s time to create the crud functionality. Going back to the DatabaseHandler class import the package listed below.
import 'package:path/path.dart';
import 'package:sqflite/sqflite.dart';
import 'package:sqflitedemo/Models/bill.dart';- Create a Record or Insert Data
  Future<int> insertBill(bill _bill) async {
    int result = 0;
    final Database db = await initializeDB();
    result = await db.insert('bill', _bill.toMap());
    return result;
  }
2. Read or Select Data
Future<List<bill>> retrieveBill() async {
    final Database db = await initializeDB();
    final List<Map<String, Object?>> queryResult = await db.query('bill');
    return queryResult.map((e) => bill.fromMap(e)).toList();
  }

     Future<bill> activeBill() async {
     bill result = new bill();
    final Database db = await initializeDB();
     var queryResult = await db.rawQuery("Select * FROM bill where status = 'Active'");
     var data = queryResult.first;
      result = bill.fromMap(data);
    return result;
  }
3. Update Record
  Future<int> updateStatus() async {
    int result = 0;
    final Database db = await initializeDB();
      result = await db.rawUpdate("UPDATE bill SET status = 'InActive'");
    return result;
  }
4. Delete Record
Future<void> deleteBill(int id) async {
    final db = await initializeDB();
    await db.delete(
      'bill',
      where: "id = ?",
      whereArgs: [id],
    );
  }
VIII. Modify main.dart
Main.dart is the startup process for flutter, this is where your apps are being initialized. In case we might have a different App name you may use the code snippet below to replace your code on your main.dart file.
import 'package:flutter/material.dart';
import '../page/demopage.dart';

void main() => runApp(MyDemoApp());


class MyDemoApp extends StatelessWidget
  {
  @override
  Widget build(BuildContext context) {
    return MaterialApp(
      theme: ThemeData(
        brightness: Brightness.light,
        primaryColor: Colors.black,
        accentColor: Colors.cyan,
        fontFamily: 'Georgia',
        textTheme: const TextTheme(
          headline1: TextStyle(fontSize: 72.0,fontWeight: FontWeight.bold),
          headline2: TextStyle(fontSize: 36.0,fontStyle: FontStyle.italic),
          headline3: TextStyle(fontSize: 14.0, fontFamily: 'Hind')
        )),
        home: new Scaffold(
          resizeToAvoidBottomInset: false,
          appBar: AppBar(
            title: Text('SQL Lite Demo App'),
          ),
          body: Container(
            margin: EdgeInsets.all(10.0),
            child: DemoPage(),
          ),
        ),
    );
  }
}
IX. Create DemoPage()
DemoPage was called on the main.dart file so if you run the project without DemoPage class you will get an error. Create a page folder inside the lib folder then create a demopage.dart file. This file will contain a simple design that will be used as our UI and this is where we will use the CRUD operation from the Database Handler Class. This is my full code snippet on my DemoPage class.
import 'package:flutter/cupertino.dart';
import 'package:flutter/material.dart';
import 'package:flutter/services.dart';
import 'package:sqflitedemo/DataSource/datasource.dart';
import 'package:sqflitedemo/Models/bill.dart';
import 'package:sqflitedemo/db/DatabaseHandler.dart';


class DemoPage extends StatefulWidget{

   @override
  State<StatefulWidget> createState() {
    return _DemoPage();
  }
}

class _DemoPage extends State<DemoPage>{
  late DatabaseHandler handler;
  final GlobalKey<FormState> _formKey = GlobalKey<FormState>();

  final LastReading = TextEditingController();
  final PrevBill = TextEditingController();
  final kWH = TextEditingController();

  final columns = ['Date', 'Reading', 'kWH', 'Bill', 'Delete'];

  List<bill> bills = [];
  DateTime DateCreated = DateTime.now();


  @override
  void initState() {
     super.initState();
    this.handler = DatabaseHandler();
    this.handler.initializeDB().whenComplete(() async {
      bills = await this.handler.retrieveBill();
      setState(() {});
    });
  }

  @override
  Widget build(BuildContext context) {
DataTableSource _data = MyData(bills, handler);
    return Column(
children: <Widget>[
        Form(
            key: _formKey,
            child: Column(
              crossAxisAlignment: CrossAxisAlignment.start,
              children: <Widget>[
                Container(
                  padding: EdgeInsets.all(5.0),
                  height: 70,
                  child: CupertinoDatePicker(
                    mode: CupertinoDatePickerMode.dateAndTime,
                    initialDateTime: DateTime.now(),
                    onDateTimeChanged: (DateTime newDateTime) {
                      DateCreated = newDateTime;
                    },
                    use24hFormat: false,
                    minuteInterval: 1,
                  ),
                ),
                TextFormField(
                  controller: LastReading,
                  inputFormatters: [
                    FilteringTextInputFormatter.allow(RegExp(r'[0-9.]')),
                    TextInputFormatter.withFunction((oldValue, newValue) {
                      try {
                        final text = newValue.text;
                        if (text.isNotEmpty) double.parse(text);
                        return newValue;
                      } catch (e) {}
                      return oldValue;
                    })
                  ],
                  decoration: const InputDecoration(hintText: 'Last Reading'),
                  validator: (String? value) {
                    if (value == null || value.isEmpty) {
                      return 'Please input Last kWH reading';
                    }
                    return null;
                  },
                ),
                TextFormField(
                  controller: kWH,
                  inputFormatters: [
                    FilteringTextInputFormatter.allow(RegExp(r'[0-9.]')),
                    TextInputFormatter.withFunction((oldValue, newValue) {
                      try {
                        final text = newValue.text;
                        if (text.isNotEmpty) double.parse(text);
                        return newValue;
                      } catch (e) {}
                      return oldValue;
                    })
                  ],
                  decoration: const InputDecoration(hintText: 'Amount per kWH'),
                  validator: (String? value) {
                    if (value == null || value.isEmpty) {
                      return 'Please input amount per kWH';
                    }
                    return null;
                  },
                ),
                TextFormField(
                  controller: PrevBill,
                  inputFormatters: [
                    FilteringTextInputFormatter.allow(RegExp(r'[0-9.]')),
                    TextInputFormatter.withFunction((oldValue, newValue) {
                      try {
                        final text = newValue.text;
                        if (text.isNotEmpty) double.parse(text);
                        return newValue;
                      } catch (e) {}
                      return oldValue;
                    })
                  ],
                  decoration: const InputDecoration(hintText: 'Previous Bill'),
                  validator: (String? value) {
                    if (value == null || value.isEmpty) {
                      return 'Please input previous bill';
                    }
                    return null;
                  },
                ),
                Padding(
                  padding: const EdgeInsets.symmetric(vertical: 16.0),
                  child: ElevatedButton(
                    onPressed: () async {
                      if (_formKey.currentState!.validate()) {
                        String response = '';
                        int res = await addBill(
                            DateCreated.toString(),
                            double.parse(LastReading.text),
                            double.parse(kWH.text),
                            double.parse(PrevBill.text));

                        bills = await this.handler.retrieveBill();

                        setState(() {});
                        if (res > 0) {
                          response = "Succesfully Inserted!";
                        } else {
                          response =
                              "oooopps! Something went wrong! Response Code:" +
                                  res.toString();
                        }
                      }
                    },
                    child:const Text('Submit'),
                  ),
                ),
              ],
            )),
             Padding(
                  padding: const EdgeInsets.symmetric(vertical: 5.0),
                  child: IconButton(icon: Icon(Icons.refresh),onPressed: () async{
                    bills = await this.handler.retrieveBill();
                        setState(() {});
                  },)
                ),
        Column(
          children: [
            SizedBox(
              height: 5,

            ),
            PaginatedDataTable(columns: getColumns(columns),
            source: _data,
            columnSpacing: 60,
            horizontalMargin: 5,
            rowsPerPage: 5,
            showCheckboxColumn: false,
            )
          ],
        ),
      ],
    );
  }

  List<DataColumn> getColumns(List<String> columns) => columns
      .map((String column) => DataColumn(
            label: Text(column),
          ))
      .toList();

    Future<int> addBill(
    String dateTime, double lastreading, double kWH, double prevBill) async {
    bill _bill = bill(
        Date: dateTime,
        LastReading: lastreading,
        kWH: kWH,
        prevBill: prevBill,
        status: 'Active');
    this.handler.updateStatus();
    return await this.handler.insertBill(_bill);
  }
}
X. Create DataSource for Paginated Datatable
If you observed from the code above these steps, we used Paginated Datable so in order for it to work, we need a Datasource which in my example I created a separate class for this. Now, create the DataSource folder then create datasource.dart file. Open the file then use the code below.
import 'package:flutter/material.dart';
import 'package:sqflitedemo/Models/bill.dart';
import 'package:sqflitedemo/db/DatabaseHandler.dart';

class MyData extends DataTableSource {
DatabaseHandler handler;
List<bill> _bill;
MyData(this._bill, this.handler);


  bool get isRowCountApproximate => false;
  int get rowCount => _bill.length;
  int get selectedRowCount => 0;
  DataRow getRow(int index) {
    return DataRow(cells: [
      DataCell(Text(_bill[index].Date.toString())),
      DataCell(Text(_bill[index].LastReading.toString())),
      DataCell(Text(_bill[index].kWH.toString())),
      DataCell(Text(_bill[index].prevBill.toString())),
      DataCell(IconButton(
        icon: Icon(Icons.delete),
        onPressed: (){
          var f = _bill[index].id.toString();
         handler.deleteBill(int.parse(_bill[index].id.toString()));
      },)),
    ]);
  }

List<DataRow> getRows(List<bill> users) => users.map((bill _bills) {
        final cells = [
          _bills.Date,
          _bills.LastReading,
          _bills.kWH,
          _bills.prevBill
        ];

        return DataRow(cells: getCells(cells));
      }).toList();

  List<DataCell> getCells(List<dynamic> cells) =>
      cells.map((data) => DataCell(Text('$data'))).toList();

}
Now, run your application using the flutter run command. This is how your application will look like.
If you encounter some error from this tutorial you may get the actual source code from my GitHub Account @coderbugz.
Summary
In this tutorial, we have demonstrated how to Store Data Locally using SQLite in Flutter. In real-life scenario’s this will help us store user information. That instead of getting the same record over and over again from a server, we will then store it locally. Hopefully, this tutorial will help you with your future flutter project.
KEEP CODING!!