
In Git, a .gitignore file plays a crucial role in managing your repository. It specifies which files and directories should be ignored by Git, preventing them from being tracked and included in your version control history. This is essential for excluding files that are not necessary for the project, such as build artifacts, temporary files, and sensitive data.
Adding a .gitignore file to an existing repository can help clean up your version control, ensure sensitive information isn’t exposed, and improve project organization. Whether you’re starting a new project or maintaining an ongoing one, managing your .gitignore file effectively is vital.
For example, to ignore all files with the .log extension and the build/ directory, your .gitignore file might look like this:
# Ignore log files
*.log

# Ignore the build directory
build/
Step-by-Step Guide
Adding a .gitignore file to an existing repository is straightforward. Follow these steps for your operating system:
Windows
1. Navigate to Your Repository
cd path\to\your\repository2. Create the .gitignore File
Open a command prompt and run.
type nul > .gitignore3. Edit the .gitignore File
Open the file with a text editor like Notepad
notepad .gitignoreAdd the patterns for files and directories you want to ignore. For example:
# Ignore node_modules
node_modules/

# Ignore log files
*.log

# Ignore environment files
.env
4. Save and Commit the .gitignore File
git add .gitignore
git commit -m "Add .gitignore file"
macOS and Linux
1. Navigate to Your Repository
cd /path/to/your/repository
2. Create the .gitignore File
touch .gitignore3. Edit the .gitignore File
Open the file with a text editor like nano
nano .gitignoreAdd the patterns for files and directories you want to ignore. For example:
# Ignore node_modules
node_modules/

# Ignore log files
*.log

# Ignore environment files
.env
4. Save and Commit the .gitignore File
git add .gitignore
git commit -m "Add .gitignore file"
Add a .gitignore in Visual Studio Project
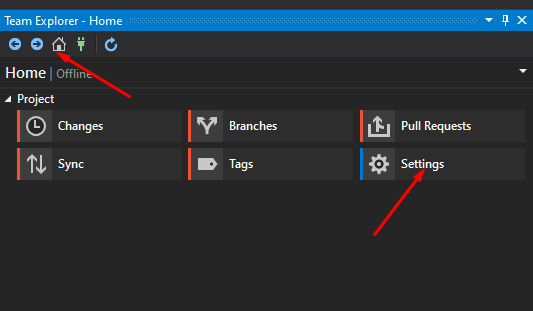
Let’s start by opening a Visual Studio project once you’ve done that, open Team Explorer.

Then click on the home icon to navigate to the Home menu and click the settings option
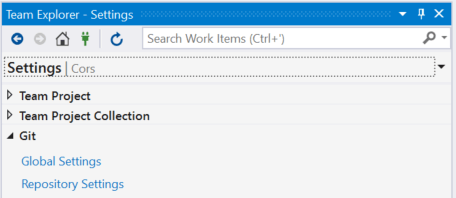
Then click Repository Settings.
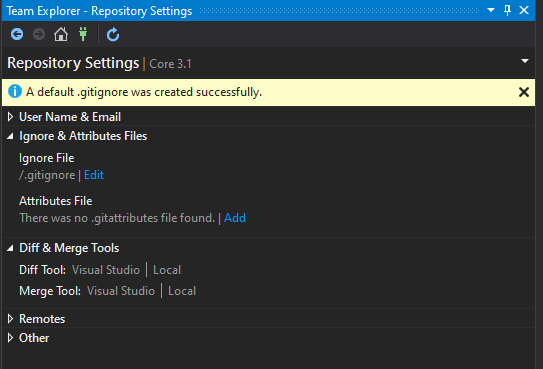
If you already added an ignore file, the Edit button will be displayed instead of Add.

Now click on the Add link from the Ignore File option. This option will add a .gtiignore file with default sets of files excluded for tracking. This file is based on the template for Visual Studio projects. You could also add the file manually. You can refer to this GitHub repo. This repository contains templates for the .gitignore file for the Visual Studio Project.
You can edit the file if you want to add specific files to exclude from tracking changes.
This step is how you can Add Git Ignore to the existing repository in the Visual Studio Project. Sometimes adding a .ignore file may not work as expected, especially if you have added your project to a Git Repository without adding the Ignore file. To fix that, you may follow the steps.
Handling Tracked Files
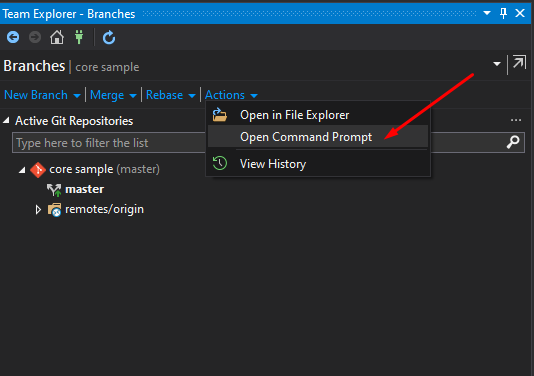
If you have files already tracked by Git that you now want to ignore, you need to untrack them. To stop tracking the files and ignore the file, open a command prompt, navigate the directory containing your solution file (.sln), and run the following commands.
Note: Make sure you have Git Installed on your machine.
1. Commit all your changes
Make sure that all your changes are committed, including your .gitignore file.
2. Removes all the file from the index
To do that, use the command below. This command will remove all your file from the index but leaves it in the working directory.
| git rm -r –cached . |
- rm this command will remove all or specific files.
- -r will allow recursive removal
- –cached will only remove files from the index. But retain your file from your physical file directory.
- The
.indicates that include all files will be untracked. You can also untrack a specific file withgit rm --cached files.txt.
The rm command will untrack all your files from your project directory. If you wish to try what it does beforehand, add the -n or --dry-run flag to test things out.
3. Re-add Everything
| git add . |
4. Commit all Files
| git commit -m “.gitignore” |
To avoid this situation on your next projects. Make sure you have added the Git ignore file before proceeding to push your file to a Git repository.
Common .gitignore Configurations
Here are some examples of common .gitignore configurations for various programming languages and frameworks:
Node.js
node_modules/
npm-debug.log
yarn-error.log
.env
Python
__pycache__/
*.py[cod]
*.so
.env
Java
target/
*.class
*.log
*.jar
*.war
*.ear
C#
bin/
obj/
*.exe
*.dll
*.pdb
General
# Logs
*.log

# Temporary files
*.tmp

# OS generated files
.DS_Store
Thumbs.db
Customize your .gitignore file according to the specific needs of your project.
Best Practices
- Regular Updates: Regularly update your .gitignore file to reflect new files and directories that should be ignored.
- Project Specific: Tailor your .gitignore file to suit the specific requirements of your project.
- Use Templates: Use .gitignore templates available for various languages and frameworks as a starting point.
- Sensitive Information: Ensure sensitive information like API keys and configuration files are ignored.
Troubleshooting
Common Issues
- Ignored Files Still Showing Up:
- Make sure the .gitignore file is in the root of your repository.
- Ensure the patterns in .gitignore are correct.
- Changes Not Reflected:
- If you modify .gitignore, you might need to remove the cached files:
git rm -r --cached .
git add .
git commit -m "Update .gitignore"
Checking .gitignore
To check if your .gitignore file is working correctly, use:
git statusThis command shows the files being tracked. Files and directories listed in .gitignore should not appear.
Conclusion
Adding a .gitignore file to an existing Git repository is a crucial step for maintaining a clean and organized project. By following the steps outlined above, you can efficiently add and manage your .gitignore file, ensuring your repository only tracks the necessary files. Regular updates and adherence to best practices will help keep your project organized and free from unwanted files.
For more tutorials like this, you can visit freecodespot.