In this article we will explore real-time communication in web applications using asynchronous methods, focusing on Asynchronous Communication with SQL Service Broker. We’ll simplify the process by combining SQL Service Broker and SignalR in ASP.NET API, ensuring smooth and responsive user experiences. Developers will gain practical insights to implement these tools effectively for efficient real-time updates.
- What is Asynchronous Communication?
- Send Data from SQL Server to ASP.NET Core using ASP.NET Web API and Service Broker
- I. Setting Up SQL Service Broker
- II. Integrate SQL Service Broker with ASP.NET Core API
- III. Integrate SignalR in your Web API Application
- IV. Create a New ASP.NET Core Web Application with SignalR
- V. Test your Application
- VI. Download Source Code
- VII. Summary
What is Asynchronous Communication?
Asynchronous communication involves tasks operating independently, allowing concurrent execution without waiting for each to finish. This method enhances efficiency and responsiveness, making it valuable for scenarios requiring real-time updates in web applications.
Let’s dive down and learn how to implement this with a real-life application.
Send Data from SQL Server to ASP.NET Core using ASP.NET Web API and Service Broker
Before you begin, make sure you have the following prerequisites in place:
- The latest version of Visual Studio
- SQL Server
- Sufficient permissions to create databases and enable Service Broker.
If you already have installed all of that, then let’s start.
I. Setting Up SQL Service Broker
Asynchronous Communication with SQL Service Broker functions as a reliable messenger for a database, ensuring different parts can share information efficiently. It works behind the scenes to manage messages, making sure they are sent and received smoothly, akin to a seamless office mail system for databases
Follow the steps below to set up SQL Service Broker.
Step 1. Enable Service Broker on the Database
Open SQL Server Management Studio (SSMS) and connect to your database server. Run the following query in the database where you want to enable Service Broker.
USE TestDB;
GO

ALTER DATABASE TestDB SET ENABLE_BROKER;
GO
Replace “TestDB” with the name of your database. This query enables the Service Broker on the specified database.
Step 2. Create a Message Type
Service Broker uses message types to define the format of messages that can be exchanged between services. Create a message type using the SQL script as follows:
USE TestDB;
GO

CREATE MESSAGE TYPE [Test.XMLMessage]
VALIDATION = WELL_FORMED_XML;
GO
In this example, WELL_FORMED_XML it is used for validation, which ensures that the XML messages are well-formed.
Step 3. Create a Contract
Contracts define the message types that will be used to be exchanged between services. Create a contract using the following script:
USE TestDB;
GO

CREATE CONTRACT [Test.Contract.freecodespot]
([Test.XMLMessage] SENT BY INITIATOR);
GO
Replace “Test.Contract.freecodespot” and “Test.XMLMessage” with appropriate names. The SENT BY INITIATOR clause specifies that the initiator of the conversation sends messages of the specified type.
Step 4. Create Queues
Queues are used to store messages in the Service Broker. Create two queues—one for the initiator and one for the target—using the following script:
USE TestDB;
GO

CREATE QUEUE InitiatorQueue;
CREATE QUEUE TargetQueue;
GO
Step 5. Create Services
Services represent the endpoints that initiate or receive messages. Create services for the initiator and target using the following script:
USE TestDB;
GO

CREATE SERVICE InitiatorService
ON QUEUE InitiatorQueue
([Test.Contract.freecodespot]);

CREATE SERVICE TargetService
ON QUEUE TargetQueue
([Test.Contract.freecodespot]);
GO
Replace “Test.Contract.freecodespot” with the name of the contract you created earlier.
Step 6. Start a Conversation
Now, let’s start a conversation between the initiator and target services. Execute the following script:
USE TestDB;
GO

DECLARE @dialogHandle UNIQUEIDENTIFIER;

BEGIN DIALOG CONVERSATION @dialogHandle
FROM SERVICE InitiatorService
TO SERVICE 'TargetService'
ON CONTRACT [Test.Contract.freecodespot]
WITH ENCRYPTION = OFF;

PRINT 'Dialog Handle: ' + CAST(@dialogHandle AS NVARCHAR(50)); --this will print the identifier for the current created dialog handle
Replace “[Test.Contract.freecodespot]” with your contract name. This script initiates a conversation and returns a unique identifier, which you can use to send and receive messages within the conversation.
Step 7. Send and Receive Messages
Now that the conversation is initiated, you can send and receive messages between services using the SEND and RECEIVE statements. Here’s an example of sending a message:
USE TestDB;
GO

DECLARE @dialogHandle UNIQUEIDENTIFIER;
DECLARE @xmlMessage XML;
-- Assume @dialogHandle is obtained from the previous step
SET @dialogHandle = '2A883182-7AC6-EE11-9F3C-95957EC95038';
SET @xmlMessage = '<root><message>Hello, XML Service Broker!</message></root>';
SEND ON CONVERSATION @dialogHandle
MESSAGE TYPE [Test.XMLMessage]
(@xmlMessage);
Replace the @dialogHandle value with the value you generated from the previous step.
You can also use this script to retrieve the dialog handle you created.
 SELECT conversation_handle FROM sys.conversation_endpoints
 WHERE far_service = 'TargetService' and state_desc = 'CONVERSING';
Replace “TargetService” with the service you use to create your conversation.
To receive messages, use the RECEIVE statement:
USE TestDB;
GO

DECLARE @receivedMessage NVARCHAR(MAX);

RECEIVE TOP(1)
    @receivedMessage = message_body
FROM TargetQueue;

PRINT 'Received message: ' + @receivedMessage;
Replace the TargetQueue, if you created a different queue name on your end.
Congratulations! You’ve successfully created a basic Service Broker setup in SQL Server. This framework opens up a world of possibilities for building scalable and decoupled applications.
II. Integrate SQL Service Broker with ASP.NET Core API
Now, let’s explore Asynchronous Communication with SQL Service Broker by integrating it with an actual application. We will create a web API that retrieves messages from the service broker. To do that, follow the steps below:
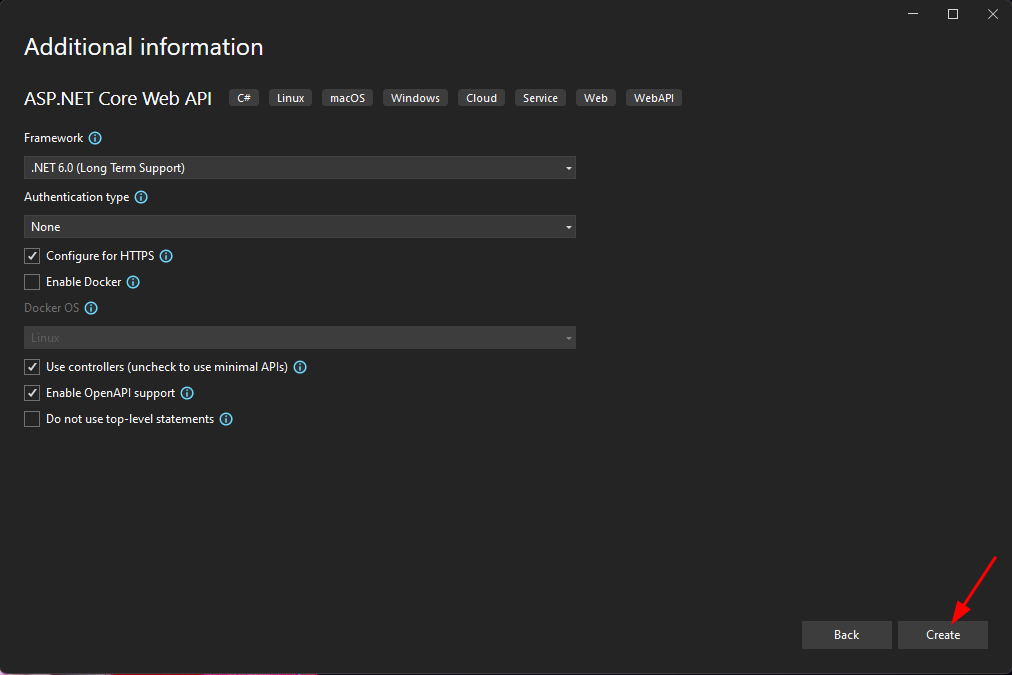
Step 1. First, create your ASP.NET Core Web API. To do that just follow the steps below.
- Select File > New > Project.
- Select ASP.NET Core Web API. Name the project DemoAPI to have the same namespace as my project. Then click Next.
- Choose Framework which in my case I’ll use .Net 6.0
- Lastly, Click on Create.
After the project is created remove unnecessary files like WeatherForecastController.cs and WeatherForecast.cs.
Step 2. Create a folder named ServiceBrokerManager. We will place the service broker class inside this folder.
Step 3. Add SQL Connection string inside the application.json file.
    "ServiceBrokerConfig": {
        "ConnectionString": "Server=LAPTOP-DVVB07L9\\SQLEXPRESS;Database=TestDB;Trusted_Connection=True;",
        "SerivceBrokerQueueName": "TargetQueue",
    }
Replace ServerName with your actual SQL database server and TargetQueue is the SQL Service broker queue you created previously.
Step 4. Moving back to the ServiceBrokerManager, Inside create an Interface class, IServiceBrokerManager, and add runServiceBrokerListener method.
namespace DemoAPI.ServiceBrokerManager
{
    public interface IServiceBrokerQueueManager
    {
        void runServiceBrokerListener();
    }
}
This method will run a listener that will constantly check the service broker for a new message.
Step 5. Create an Implementation class for IServiceBrokerQueueManager. Named it ServiceBrokerQueueManagerand inside the file add the following code snippet.
using DemoAPI.Hub;
using Microsoft.AspNetCore.SignalR;
using Microsoft.Extensions.Configuration;
using Newtonsoft.Json;
using System;
using System.Data;
using System.Data.SqlClient;
using System.Xml;

namespace DemoAPI.ServiceBrokerManager
{
    public class ServiceBrokerQueueManager : IServiceBrokerQueueManager
    {

        private string _connectionString;
        private string _queueName;
        private readonly IHubContext<ApiHub> _hubContext;
        private readonly IConfiguration _configuration;

        public ServiceBrokerQueueManager(IHubContext<ApiHub> hubContext, IConfiguration configuration)
        {
            _hubContext = hubContext;
            _configuration = configuration;
            _connectionString = _configuration.GetSection("ServiceBrokerConfig:ConnectionString").Get<string>();
            _queueName = _configuration.GetSection("ServiceBrokerConfig:SerivceBrokerQueueName").Get<string>();
        }


        public void runServiceBrokerListener()
        {
            Thread _sbListener = new Thread(monitorServiceBroker)
            {
                IsBackground = true
            };
            _sbListener.Start();
        }

        private void monitorServiceBroker()
        {
            try
            {
                try
                {
                    while (true)
                    {
                        ListenServiceBrokerQueue();
                        Thread.Sleep(1);
                    }
                }
                catch (Exception ex)
                {

                }
            }
            catch (Exception ex)
            {

            }
        }

        private void ListenServiceBrokerQueue()
        {
            string query = "WAITFOR (receive top (1) cast(message_body as XML),conversation_handle, message_type_id from [" + _queueName + "])";

            using (var connection = new SqlConnection(_connectionString))
            {
                using (var command = new SqlCommand(query, connection))
                {
                    var ds = new DataTable();
                    command.CommandTimeout = 60;
                    using (var da = new SqlDataAdapter(command))
                    {
                        try
                        {
                            connection.Open();
                            da.Fill(ds);
                            foreach (DataRow row in ds.Rows)
                            {
                                var xmlMessage = new XmlDocument();
                                xmlMessage.LoadXml(row.ItemArray[0].ToString());
                                string jsonText = JsonConvert.SerializeXmlNode(xmlMessage);

                            }
                        }
                        catch (SqlException sqlException)
                        {

                        }
                    }
                }
            }
        }

    }
}
runServiceBrokerListener()
This will create a new thread that will run in the background and execute monitorServiceBroker() method
monitorServiceBroker()
This method perform a while loop condition that will constantly call the method ListenServiceBrokerQueue()
ListenServiceBrokerQueue()
This will initiate a database query that will received the message send on SQL Service Broker.
Step 6. Now, add the runServiceBrokerListener() method in program.cs. This will run the method when you start your web application.
using (var serviceScope = app.Services.CreateScope())
{
    var services = serviceScope.ServiceProvider;
    var myDependency = services.GetRequiredService<IServiceBrokerQueueManager>();
    myDependency.runServiceBrokerListener();

}
Step 7. Run your Web API application and place a breakpoint on ListenServiceBrokerQueue(). Check the value from the code below.
string jsonText = JsonConvert.SerializeXmlNode(xmlMessage);This will convert the XML message we send from the SQL service broker. To test open your SQL server and send a message using the script below.
   DECLARE @xmlMessage XML
   DECLARE @dialogHandle UNIQUEIDENTIFIER;
   SELECT @dialogHandle = conversation_handle FROM sys.conversation_endpoints WHERE far_service = 'TargetService' and state_desc = 'CONVERSING';
    SET  @xmlMessage = '<root><message>Hello, XML Service Broker!</message></root>';
	SEND ON CONVERSATION @dialogHandle
	MESSAGE TYPE [Test.XMLMessage]
	(@xmlMessage);
III. Integrate SignalR in your Web API Application
Now, if we want to know how we can leverage asynchronous Communication with the SQL Service Broker works. We may need to display the message to the front end in real-time. To do that, we need a third-party library like SignalR.
What is SignalR?
SignalR is a technology that enables instant communication between a web server and a browser, facilitating real-time updates in web applications. It’s commonly used for features like live chat and notifications, enhancing user interaction.
Follow the Steps Below.
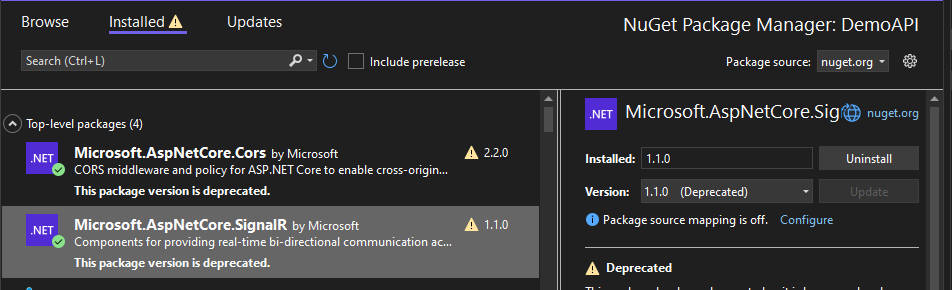
Step 1. Open the DemoAPI we created in the previous steps and Add a Nuget Package.
- Microsoft.AspNetCore.SignalR » version 1.1.0
- Microsoft.AspNetCore.Cors
Step 2. Create A folder on the root directory and name it Hub
Step 3. Inside the folder create a class file named ApiHub and copy the script below.
namespace DemoAPI.Hub
{
    using Microsoft.AspNetCore.SignalR;
    public class ApiHub : Hub
    {
        public async Task SendDataToClients(string message)
        {
            if (Clients != null)
            {
                await Clients.All.SendAsync("ReceiveData", message);
            }
        }
    }
}
The method SendDataToClients will send a message to all clients connected to SignalR.
Step 4. Register the SignalR hub on your program.cs
builder.Services.AddSignalR();app.MapHub<ApiHub>("/apiHub");Step 5. We also need to add a Cors policy. Use the script below and add it to program.cs.
builder.Services.AddCors(options =>
{
    options.AddPolicy("AllowAll",
        builder =>
        {
            builder.WithOrigins("https://localhost:7130") // Add your frontend domain here
                   .AllowAnyHeader()
                   .AllowAnyMethod()
                   .AllowCredentials();

        });
});app.UseCors("AllowAll");Step 6. Now, open ServiceBrokerQueueManager.cs and add the following line inside ListenServiceBrokerQueue() method.
_hubContext.Clients.All.SendAsync("ReceiveData", jsonText);The script above will send the JSON format text we receive from the SQL Service Broker to all Clients connected to SignalR.
Now, All we need is a client application to run your test.
IV. Create a New ASP.NET Core Web Application with SignalR
This web application is a demo client that will display the message sent from the SQL Service Broker. To do that, follow the steps below.
Step 1. First, add a new Web App Project to your existing solution. To do that just follow the steps below.
- Right-click the project solution.
- Select Add » New Project
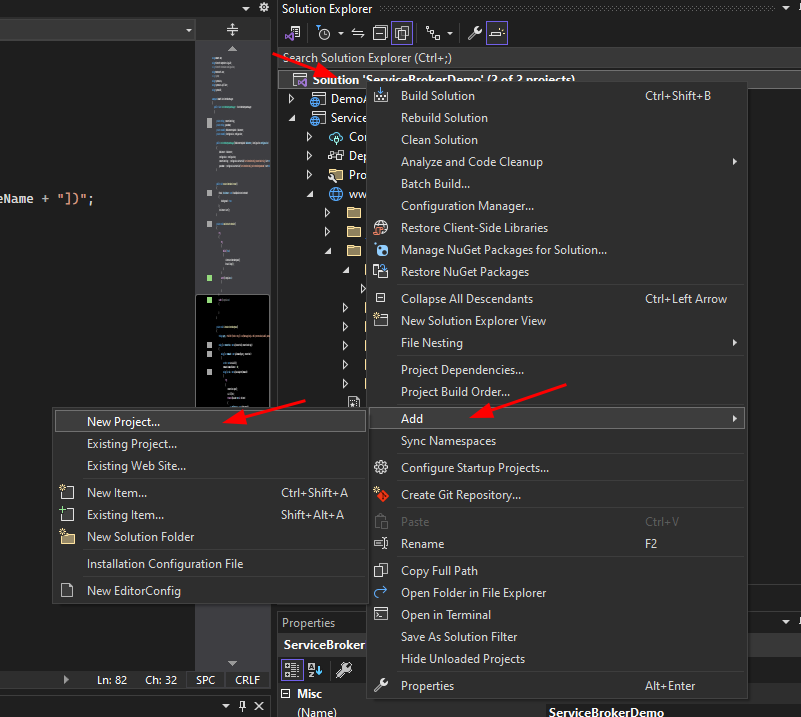
- Select Asp.Net Core Web App then click next
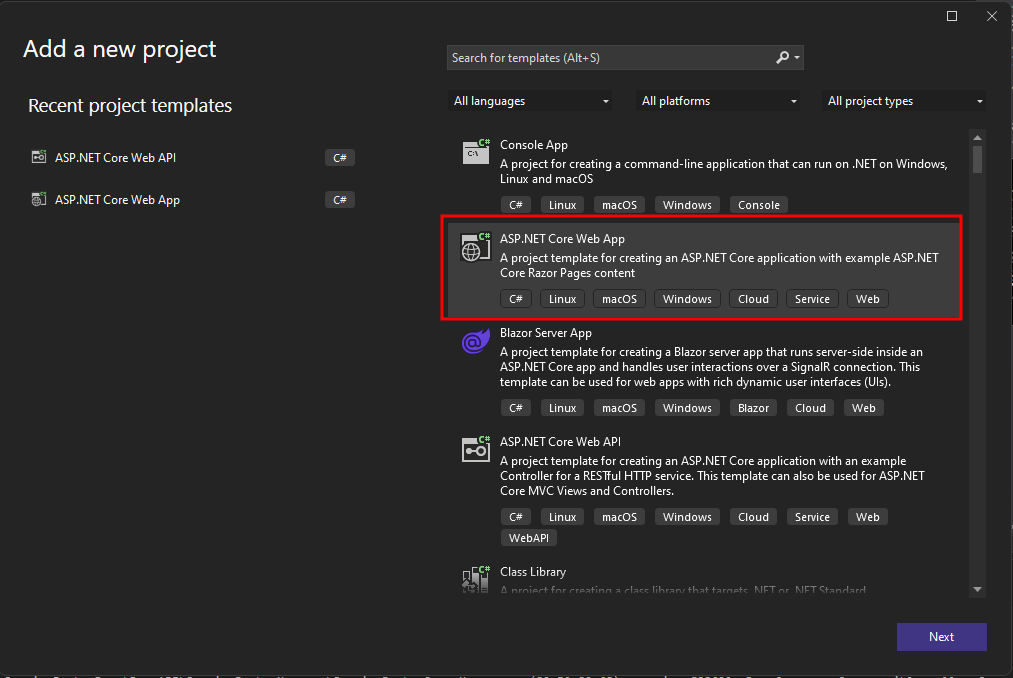
- Name the project ServiceBrokerDemo then click Next
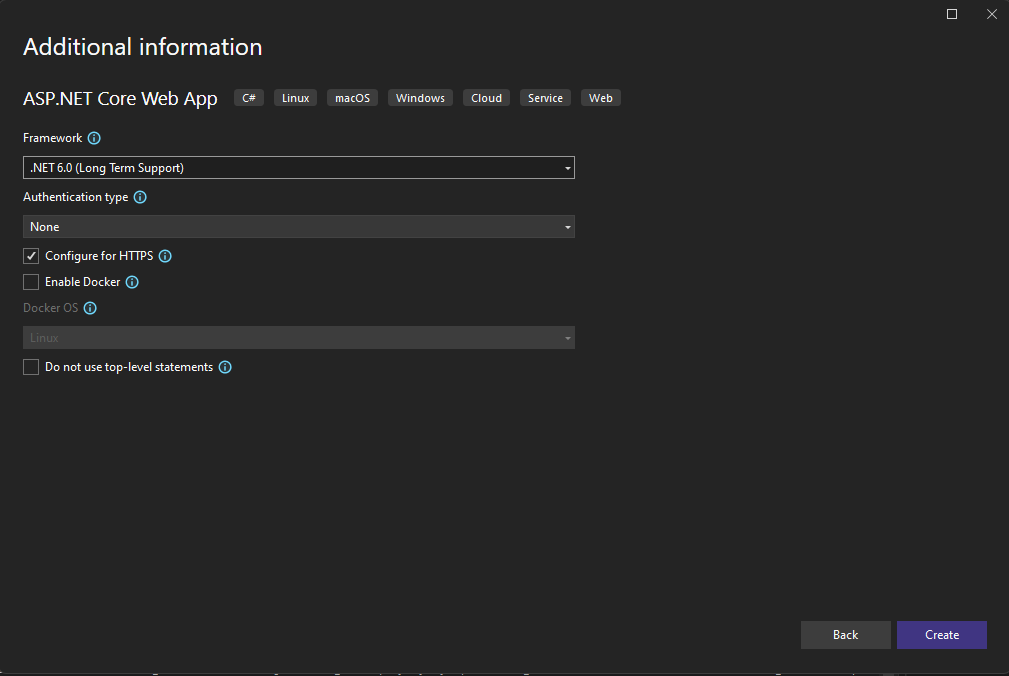
- Choose Framework which in my case I’ll use .Net 6.0
- Lastly, Click on Create.
Step 2. Add SignalR script to the Project.
- Right-Click project
- Select Add » Client-Side Library
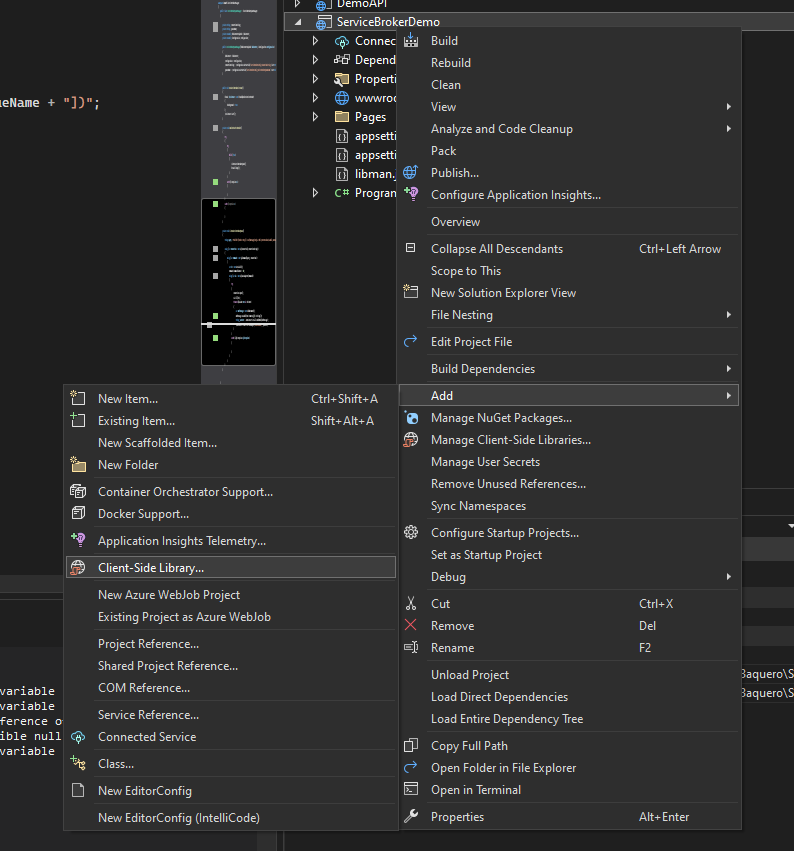
- Select unpkg as provider
- Then search for @aspnet/signalr@1.1.0 » and choose the version you use in your API project.
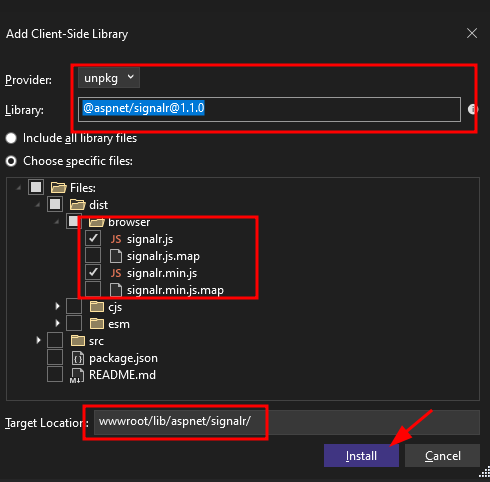
Click Install and verify the target location.
Step 2. Create a chat.js file inside wwwroot » js and copy the script below.
const connection = new signalR.HubConnectionBuilder()
    .withUrl("https://localhost:7218/apiHub")
    .configureLogging(signalR.LogLevel.Information)
    .build();

connection.start().then(() => {
    console.log("SignalR Connected");

}).catch(err => console.error(err));

connection.on("ReceiveData", (message) => {

    var jsonObj = JSON.parse(message);
    var table = document.getElementById("tableData");
    var row = document.createElement("tr")

    var c1 = document.createElement("td")
    var c2 = document.createElement("td")

    c1.innerText = jsonObj.data.userid;
    c2.innerText = jsonObj.data.message;

    row.appendChild(c1);
    row.appendChild(c2);

    table.appendChild(row)

});
Step 3. Open index.cshtml file inside the Pages folder and replace the content with this script.
@page
@model IndexModel
@{
    ViewData["Title"] = "Home page";
}

<table class="table" >
    <thead>
        <tr>
            <th scope="col">UserID</th>
            <th scope="col">Message</th>
        </tr>
    </thead>
    <tbody id="tableData">

 </tbody>
</table>


@section scripts {
    <script src="https://cdnjs.cloudflare.com/ajax/libs/jquery/3.6.0/jquery.min.js"></script>

    <script src="~/lib/signalr/dist/browser/signalr.js"> </script>
    <script src="~/js/chat.js"> </script>
}
Now, we have a fully functional client application. We can now perform our test.
V. Test your Application
1. To test this project, I created a stored procedure to send message to SQL Broker Queue
USE [TestDB]
GO
/****** Object:  StoredProcedure [dbo].[SendMessage]    Script Date: 10/02/2024 3:11:25 pm ******/
SET ANSI_NULLS ON
GO
SET QUOTED_IDENTIFIER ON
GO
-- =============================================
-- Author:		<Author,,Name>
-- Create date: <Create Date,,>
-- Description:	<Description,,>
-- =============================================
Create PROCEDURE [dbo].[SendMessage]
	@xmlMessage XML
AS
BEGIN
  DECLARE @dialogHandle UNIQUEIDENTIFIER;
    SELECT @dialogHandle = conversation_handle FROM sys.conversation_endpoints WHERE far_service = 'TargetService' and state_desc = 'CONVERSING';

	SEND ON CONVERSATION @dialogHandle
	MESSAGE TYPE [Test.XMLMessage]
	(@xmlMessage);

END
2. Execute the stored procedure above using the following script.
USE [TestDB]
GO

DECLARE	@return_value int

EXEC	@return_value = [dbo].[SendMessage]
		@xmlMessage = N'<data><userid>2</userid><message>Hello, XML Service Broker!</message></data>'

SELECT	'Return Value' = @return_value

GO
3. Then run your web API and ASP.Net core project simultaneously by setting your Visual Studio to run multiple projects.
4. Right-click Project Solution then select properties and start all projects.
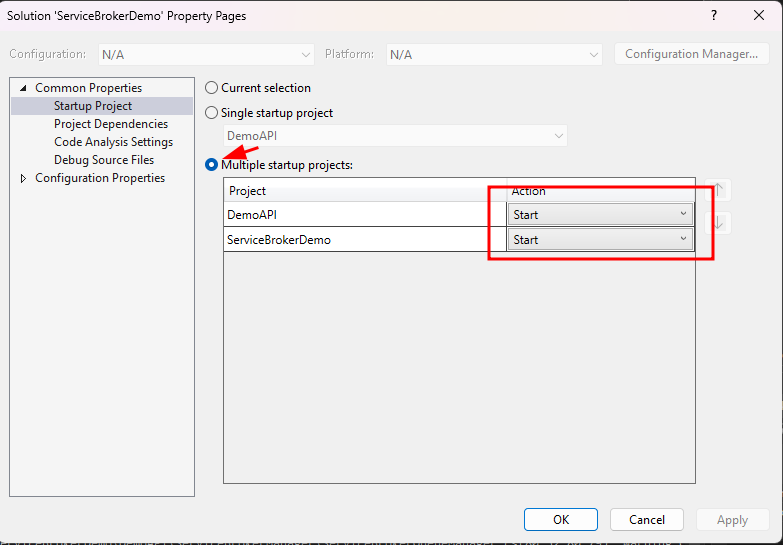
Now, run your project and run your test.
VI. Download Source Code
If you want you can download the source code from Github Repository. It’s free but make sure to follow us for more articles like this.
VII. Summary
In conclusion, the fusion of SQL Service Broker, Web API, and SignalR has yielded a robust and efficient solution for real-time communication between databases and client applications. The asynchronous nature of SQL Service Broker facilitates seamless message exchange, while the Web API efficiently processes and receives these messages, enhancing the overall system’s capabilities for Asynchronous Communication with SQL Service Broker. Leveraging SignalR, the system ensures instantaneous updates to the client UI, enhancing the overall responsiveness and user experience.
This integration not only improves the scalability and performance of data-driven applications but also provides a reliable mechanism for delivering timely information, making it a compelling choice for developers seeking to build modern and dynamic applications with real-time capabilities.
Keep Coding!
Follow us for more: