In this tutorial, we will create a ClickOnce Auto-Update installer alternative using ASP NET Core 5. We will use the ASP.NET Core project to automate downloading the update of a windows form application.
- I. Setup ASP.NET Core Web Application with Identity
- II. Create Model properties
- III. Create AppDBContext Class
- IV. Configure Services in Startup.cs
- V. Migration and Update Database
- VI. Upload MSI Installer setup
- VII. Upload Update Files
- VIII. Method for Checking Update and Download Update File
- VIII. Create Auto Updater WinForm
- IX. Create an MSI installer using Visual Studio 2019
- Project Source Code
- Summary
The concept of this project is to generate an MSI installer of our WinForms application and upload it to our web application which is then used to auto-download the update installer. This tutorial is one of the many ways to implement a ClickOnce Auto-Update installer alternative and distribute your WinForms application to your client.
Now, before you proceed with the steps below, please ensure that you have the latest version of the following installer.
- Visual Studio Code
- SQL Server
Let’s start first with the ASP.NET Core application that will handle the ClickOnce Auto-Update installer alternative and automate the process of our WinForm installer.
I. Setup ASP.NET Core Web Application with Identity
- First, create your ASP.NET Core Web Application. To do that just follow the steps below.
- Select File > New > Project.
- Select ASP.NET Core Web App(Model-View-Controller). Name the project AutoUpdateDemo to have the same namespace as my project. Click OK.
- Select an ASP.NET Core Web Application. and then uncheck Configure for HTTPS.
- Lastly, Click on Create.

2. Now we need to install required packages for this project. I have listed it all below.
- Microsoft.AspNetCore.Identity.EntityFrameworkCore
- Microsoft.EntityFrameworkCore
- Microsoft.EntityFrameworkCore.SqlServer
- Microsoft.EntityFrameworkCore.Tools
Use NuGet Package Manager to install this package. If this is your first time using this, you can visit this article.
3. After we gather all the necessary package, we need to configure our Web Application to connect to our SQL Server. Open your appsettings.json, then add your connection string. See the code snippet below.
"ConnectionStrings": {
     "default": "Server=CODERSIGN\SQLEXPRESS01;Database=InstallerDemo;User Id=freecode;Password=freecodespot.com;"
   }
II. Create Model properties
Below are the models that we need for this auto-update installer project. Later on, you will know why we need this model. Please follow the source code below.
Installer_info
This will be used as the table structure for our database installer table.
public class Installer_Info
     {
         [Key]
         public int ID { get; set; }
         [Column(TypeName = "nvarchar(50)")]
         public string System { get; set; }
         [Column(TypeName = "nvarchar(10)")]
         public string cur_version { get; set; }
         [Column(TypeName = "nvarchar(300)")]
         public string location { get; set; }
         public DateTime date { get; set; }
     }
Installer_Update
This will be used as the table structure for our database updates.
public class Installer_Update
     {
         [Key]
         public int ID { get; set; }
         public int installer_ID { get; set; }
         [Column(TypeName = "nvarchar(10)")]
         public string version { get; set; }
         [Column(TypeName = "nvarchar(300)")]
         public string update_location { get; set; }
         public DateTime Date { get; set; }
     }
InstallerViewModel
A view model for the form of the installer view
public class InstallerViewModel
     {
         public int ID { get; set; }
         public string System { get; set; }
         public string cur_version { get; set; }
         public string location { get; set; }
         public IFormFile attachment { get; set; }
         public DateTime date { get; set; }
         public List installers { get; set; }
     }
UpdateViewModel
A view model for the form of the installer update
public class UpdateViewModel
{
public int ID { get; set; }
public int installer_ID { get; set; }
public string version { get; set; }
public string update_location { get; set; }
public IFormFile attachment { get; set; }
public DateTime Date { get; set; }
public List<Installer_Update> updates { get; set; }
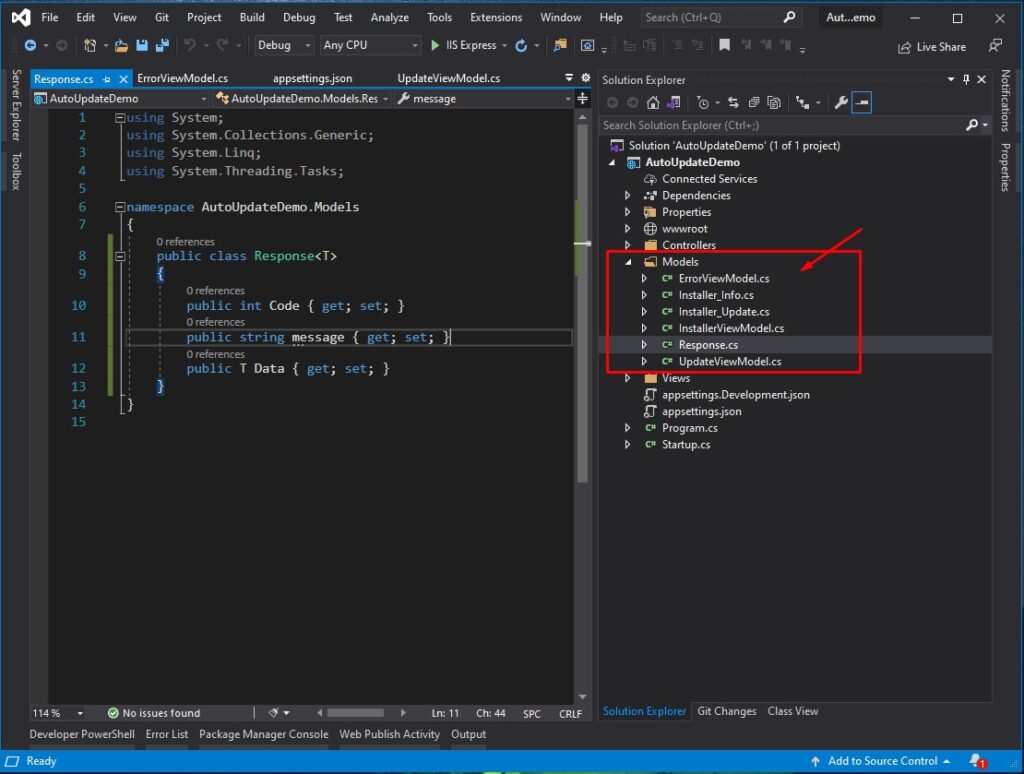
}Response
Model that will handle the reponse
public class Response
     {
         public int Code { get; set; }
         public string message { get; set; }
         public T Data { get; set; }
     }
Now, that we have all the model that we need. Let’s create the DBContext class for this project.
III. Create AppDBContext Class
This class will handle the connection between our Web Application to the SQL Database. We will use this class to access tables from our database.
using Microsoft.EntityFrameworkCore;
using System;
using System.Collections.Generic;
using System.Linq;
using System.Threading.Tasks;
namespace AutoUpdateDemo.Models
{
public class AppDBContext : DbContext
{
private readonly DbContextOptions _options;
public AppDBContext(DbContextOptions options) : base(options)
{
_options = options;
}
public DbSet<Installer_Info> installers { get; set; }
public DbSet<Installer_Update> updates { get; set; }
protected override void OnModelCreating(ModelBuilder modelBuilder)
{
base.OnModelCreating(modelBuilder);
}
}
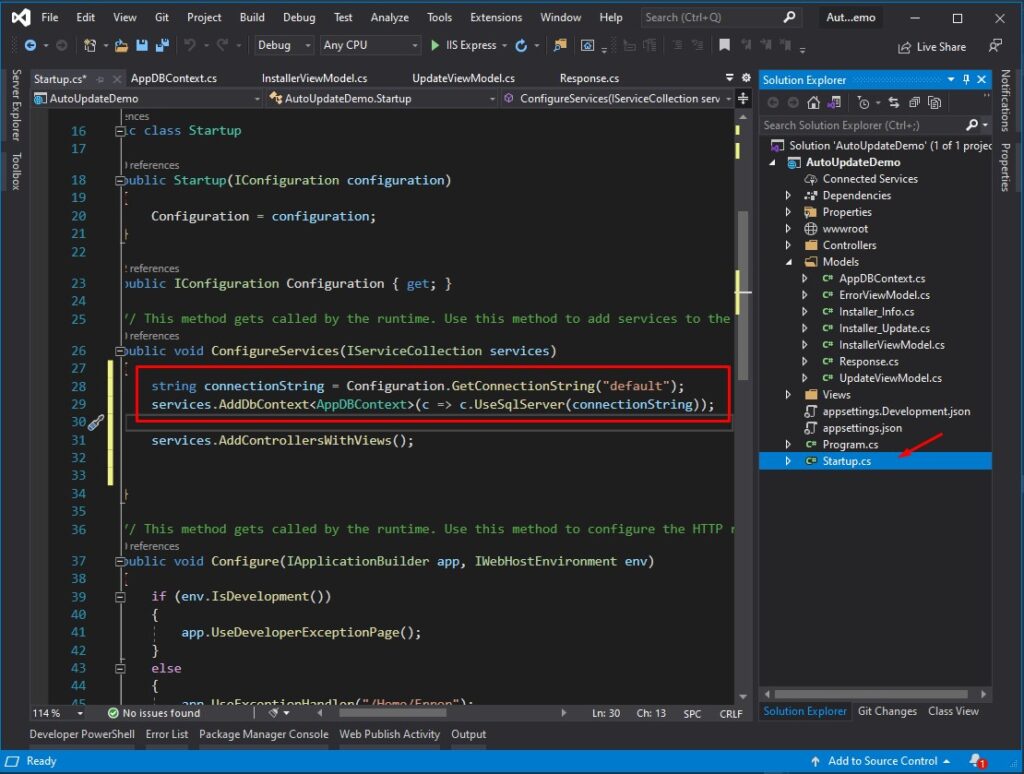
} IV. Configure Services in Startup.cs
Now, all we need to do is set the connection string and AppDBContext inside the ConfigureServices method. Open your startup.cs, then add the code snippet below under the ConfigureService method.
string connectionString = Configuration.GetConnectionString("default");
services.AddDbContext(c => c.UseSqlServer(connectionString));
This Add the DBContext that we created awhile ago and set it’s connection string.
V. Migration and Update Database
We are all set. Let’s create a migration and update-database to create the database and properties we set inside the AppDBContext.
- Create the migration using the code below.
- Package Manager Console > Add-Migration innitial_table
- Visual Studio Code Terminal > dotnet ef migration add attachment_table
This will create a Migration folder and classes base on AppDBContext class the we created awhile ago.

2. Once the migration is created execute the migration using update-database command.
- Package Manager Console > Update-Database
- Visual Studio Code Terminal > dotnet ef database update
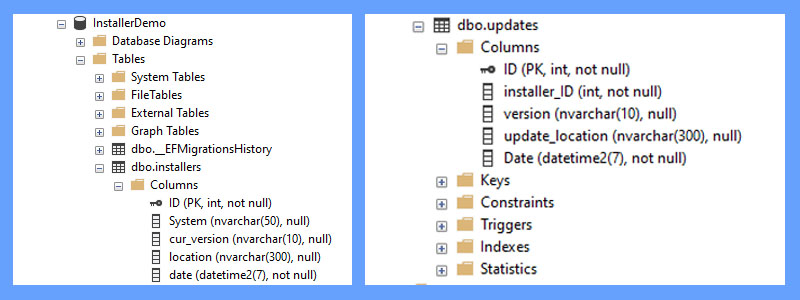
3. Open your SQL Server and check if the table was created. Based on the connection string that I declare inside appsettings.json, I expect to generate a database name FileDemo and table attachments. Here’s a screenshot of my Database structure.
VI. Upload MSI Installer setup
Now, let’s create the action and View for uploading the installer. Instead of creating a new Controller, we will make use of the default controller which is the Home Controller.
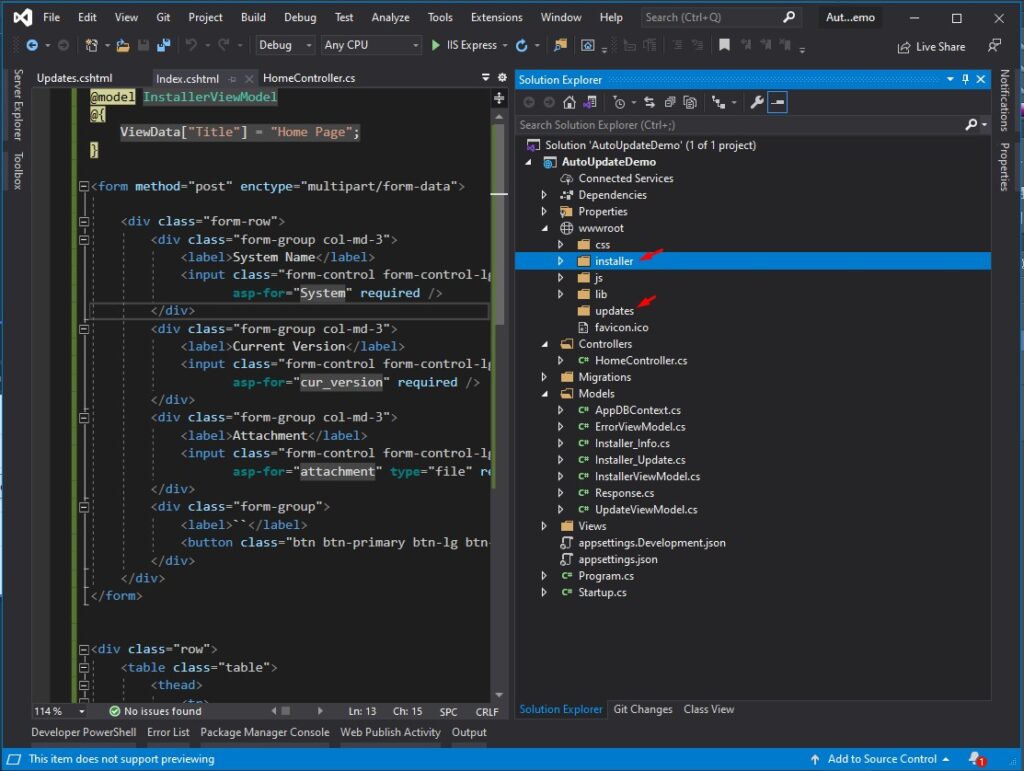
1.Create a folder named installer and updates inside root directory. See the image below.
- installer » contains the MSI installer
- updates » contains updates
2. Open Home Controller and declare the code snippet below.
 private readonly IWebHostEnvironment _hostingEnvironment;
 private readonly AppDBContext _appContext;

 public HomeController(IWebHostEnvironment hostingEnvironment,
                        AppDBContext appContext)
    {
             _hostingEnvironment = hostingEnvironment;
             _appContext = appContext;
    }
3. Now, from your index action place the code snippet below. This will retrieve the list of the installer from the database and display it to the view.
InstallerViewModel model = new InstallerViewModel();
model.installers = _appContext.installers.Select(m => m).ToList();
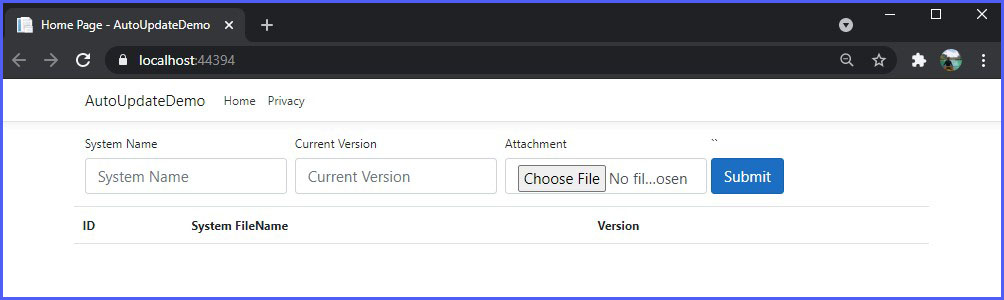
return View(model); 4. On the index.cshtml, create a form and display the list of installers inside an HTML table. You may use the code below.
  @model InstallerViewModel
 @{
     ViewData["Title"] = "Home Page";
 }

 <form method="post" enctype="multipart/form-data">

     <div class="form-row">
         <div class="form-group col-md-3">
             <label>System Name</label>
             <input class="form-control form-control-lg" placeholder="System Name"
                    asp-for="System" required />
         </div>
         <div class="form-group col-md-3">
             <label>Current Version</label>
             <input class="form-control form-control-lg" placeholder="Current Version"
                    asp-for="cur_version" required />
         </div>
         <div class="form-group col-md-3">
             <label>Attachment</label>
             <input class="form-control form-control-lg" placeholder="Middle Name"
                    asp-for="attachment" type="file" required />
         </div>
         <div class="form-group">
             <label>``</label>
             <button class="btn btn-primary btn-lg btn-block" type="submit">Submit</button>
         </div>
     </div>
 </form>


 <div class="row">
     <table class="table">
         <thead>
             <tr>
                 <th>ID</th>
                 <th>System FileName</th>
                 <th>Version</th>
                 <th></th>
                 <th></th>
             </tr>
         </thead>
         <tbody>
             @if (Model != null)
             {

                 @foreach (var row in Model.installers)
                 {
                     <tr>
                         <td> @row.ID</td>
                         <td> @row.System</td>
                         <td> @row.cur_version</td>
                         <td><a class="btn btn-primary" asp-action="Updates" asp-controller="Home" asp-route-systemID="@row.ID">View Updates</a></td>
                         <td><a class="btn btn-primary" asp-action="GetFileStreamResultDemo" asp-controller="Home" asp-route-filename="@row.System">Download</a></td>
                     </tr>
                 }

             }

         </tbody>
     </table>
 </div>
This is how the view will look like.
5. Now, back to the Home Controller create a Post method for index. This will handle the post action of the form. Write the uploaded file to the wwwroot folder and then save the details to the database. See the code below.
          [HttpPost]
         public IActionResult Index(InstallerViewModel model)
         {
             if (model.attachment != null)
             {
                 //write file to a physical path
                 var uniqueFileName = model.attachment.FileName;
                 var uploads = Path.Combine(_hostingEnvironment.WebRootPath, "installer");
                 var filePath = Path.Combine(uploads, uniqueFileName);
                 model.attachment.CopyTo(new FileStream(filePath, FileMode.Create));

                 //save the attachment to the database
                 Models.Installer_Info attachment = new Models.Installer_Info();
                 attachment.System = uniqueFileName;
                 attachment.cur_version = model.cur_version;
                 attachment.location = filePath;

                 _appContext.installers.Add(attachment);
                 _appContext.SaveChanges();
             }
             return RedirectToAction("index");
         }
5. Add the download method. To have the option for the client-side application to download the actual installer that we uploaded. This will download the installer from the wwwroot » installer folder. See the code below.
         [HttpGet]
         public FileStreamResult GetFileStreamResultDemo(string filename) //download file
         {
             string path = "wwwroot/installer/" + filename;
             var stream = new MemoryStream(System.IO.File.ReadAllBytes(path));
             string contentType = GetContenttype(filename);
             return new FileStreamResult(stream, new MediaTypeHeaderValue(contentType))
             {
                 FileDownloadName = filename
             };
         }
VII. Upload Update Files
Now, that we have done uploading the installer of our windows form application. We need to upload the update file of the installer. To do that, follow the steps below.
1. Add the Updates action result in Home Controller. This will redirect us to the update form and display the update details of the installer. See the code snippet below.
 public IActionResult Updates(int systemID)
         {
             //ViewBag.installerID = systemID;

             UpdateViewModel model = new UpdateViewModel();
             model.updates = _appContext.updates.Select(m => m).Where(m => m.installer_ID == systemID).ToList();
             model.installer_ID = systemID;

             return View(model);
         }
2. Then create the view of the Update form and details. You may use the code below.
 @model UpdateViewModel
 @{
     ViewData["Title"] = "Update";
 }

 <form method="post" enctype="multipart/form-data">

     <div class="form-row">
         <input type="hidden" asp-for="installer_ID" />
         <div class="form-group col-md-3">
             <label>Update Version</label>
             <input class="form-control form-control-lg" placeholder="System Name"
                    asp-for="version" required />
         </div>

         <div class="form-group col-md-3">
             <label>Attachment</label>
             <input class="form-control form-control-lg" placeholder="Middle Name"
                    asp-for="attachment" type="file" required />
         </div>
         <div class="form-group">
             <label>``</label>
             <button class="btn btn-primary btn-lg btn-block" type="submit">Submit</button>
         </div>
     </div>
 </form>


 <div class="row">
     <table class="table">
         <thead>
             <tr>
                 <th>ID</th>
                 <th>Installer ID</th>
                 <th>Version</th>
             </tr>
         </thead>
         <tbody>
             @if (Model != null && Model.updates != null)
             {

                 @foreach (var row in Model.updates)
                 {
                     <tr>
                         <td> @row.ID</td>
                         <td> @row.installer_ID</td>
                         <td> @row.version</td>
                     </tr>
                 }

             }

         </tbody>
     </table>
 </div>
This is how the updates form look like. Almost just the as the uploading of the main installer.

VIII. Method for Checking Update and Download Update File
Now, create updates action post method. This method writes the upload file to the wwwroot » updates folder and saves the upload details to the database.
          [HttpPost]
         public IActionResult Updates(UpdateViewModel model)
         {
             if (model.attachment != null)
             {
                 //write file to a physical path
                 var uniqueFileName = model.attachment.FileName;
                 var uploads = Path.Combine(_hostingEnvironment.WebRootPath, "updates");
                 string subpath = uploads + "\\" + uniqueFileName.Split('.')[0] + "_" + model.version;
                 System.IO.Directory.CreateDirectory(subpath);

                 var filePath = Path.Combine(subpath, uniqueFileName);
                 model.attachment.CopyTo(new FileStream(filePath, FileMode.Create));

                 //save the attachment to the database
                 Models.Installer_Update attachment = new Models.Installer_Update();
                 attachment.installer_ID = model.installer_ID;
                 attachment.version = model.version;
                 attachment.update_location = "wwwroot\\updates" + "\\" + uniqueFileName.Split('.')[0] + "_" + model.version + "\\" + uniqueFileName;

                 _appContext.updates.Add(attachment);


                 //retrieve system record
                 Models.Installer_Info installer = new Models.Installer_Info();
                 installer = _appContext.installers.Select(m => m).Where(m => m.ID == model.installer_ID).FirstOrDefault();
                 installer.cur_version = model.version;

                 _appContext.installers.Update(installer);

                 _appContext.SaveChanges();


             }
             return RedirectToAction("index");
         }
Let’s also add an additional method for checking the installer updates. This method will return a message if an update is available.
         [HttpGet]
         public Response<Models.Installer_Info> checkupdate(string version,int systemID)
         {
             Response<Models.Installer_Info> response = new Response<Models.Installer_Info>();
             Models.Installer_Info installer = new Models.Installer_Info();
             installer = _appContext.installers.Select(m => m).Where(m=> m.ID == systemID).FirstOrDefault();
             if (installer != null)
             {
                 if (installer.cur_version == version)
                 {
                     response.Code = 300;
                     response.message = "No updates found";
                 }
                 else
                 {
                     response.Code = 200;
                     response.message = "New update available";
                     response.Data = installer;
                 }
             }
             return response;
         }
5. If an update is available we will create a method to download the update file and update it on the user’s local machine. Below is the method for downloading the update.
        [HttpGet]
         public FileStreamResult GetUpdateFile(int systemID) //download file
         {
             Models.Installer_Info installer = new Models.Installer_Info();
             Installer_Update update = new Installer_Update();
             installer = _appContext.installers.Select(m => m).Where(m => m.ID == systemID).FirstOrDefault();
             if (installer != null)
             {
                 update = _appContext.updates.Select(m => m).Where(m => m.version == installer.cur_version && m.installer_ID == installer.ID).FirstOrDefault();

             }
             string path = update.update_location;//"wwwroot/updates/" + filename;
             var stream = new MemoryStream(System.IO.File.ReadAllBytes(path));
             int path_count = update.update_location.Split('\\').Count();
             var filename = update.update_location.Split('\\')[path_count - 1];
             string contentType = GetContenttype(filename);

             FileStreamResult result = new FileStreamResult(stream, new MediaTypeHeaderValue(contentType))
             {
                 FileDownloadName = filename
             };
             return result;
         }

         public static string GetContenttype(string fileName)
         {
             var provider =
                 new Microsoft.AspNetCore.StaticFiles.FileExtensionContentTypeProvider();
             string contentType;
             if (!provider.TryGetContentType(fileName, out contentType))
             {
                 contentType = "application/octet-stream";
             }
             return contentType;
         }
Now, We are all set. Let’s create a sample demo windows application and see this automation in action.
VIII. Create Auto Updater WinForm
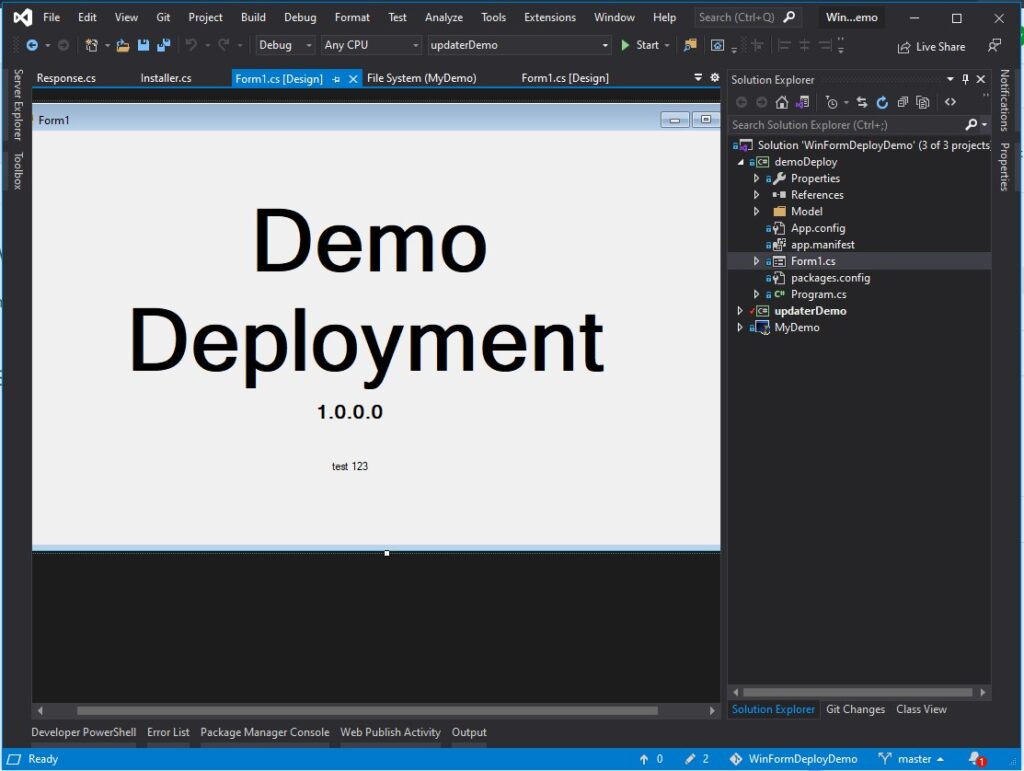
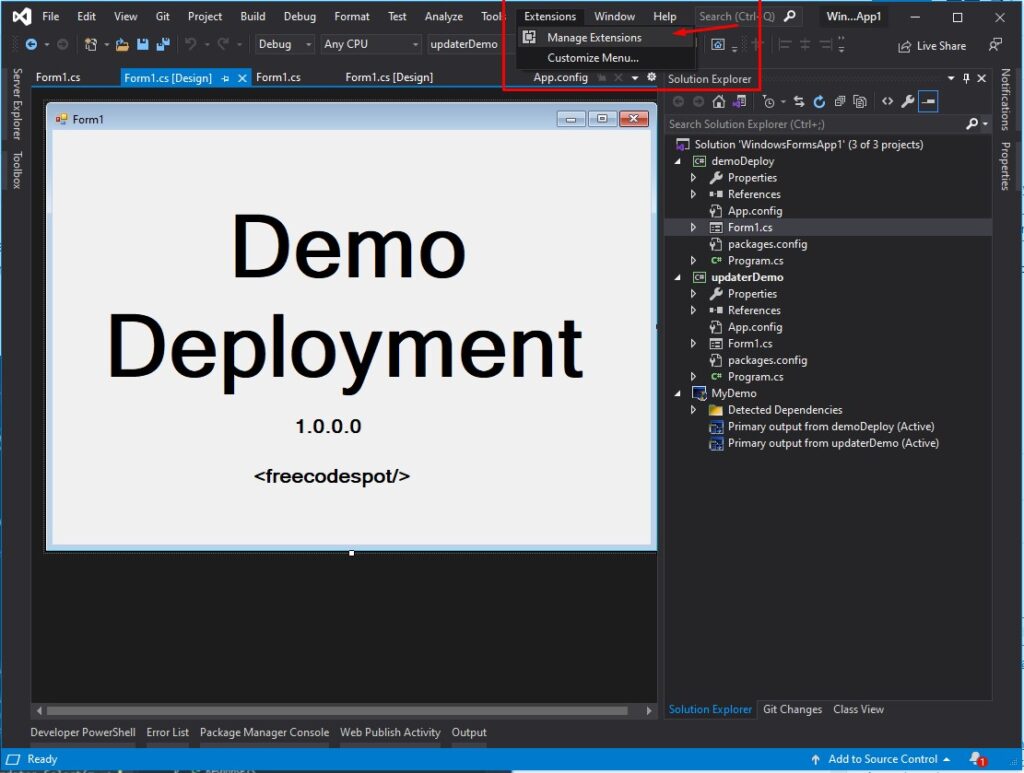
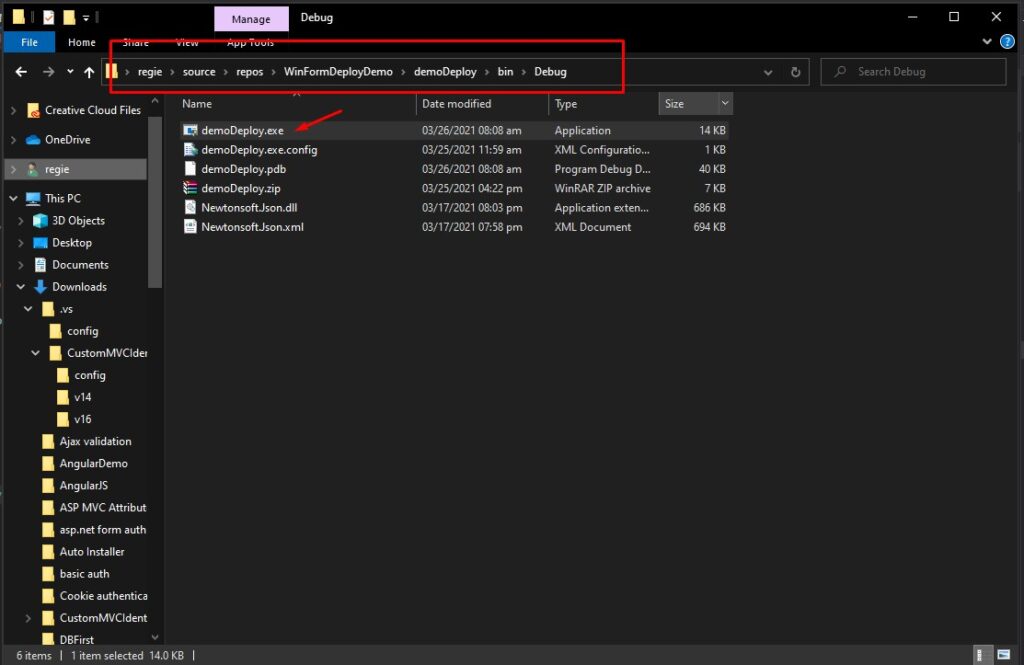
To create a ClickOnce Auto-Update installer alternative we need to create a sample demo windows application. Let’s say you have windows form application that you wanted to share or install with one of your clients. For example, you have this Demo Application as your Windows form application that you want to share. See the image below.
To apply an automated updating of your application we need an auto-updater that will download and update our local files.
Create auto updater:
- Create a new windows form application in the same project solution and name it updaterDemo. You can use a console application for this one, but in my case, I will just use windows form.
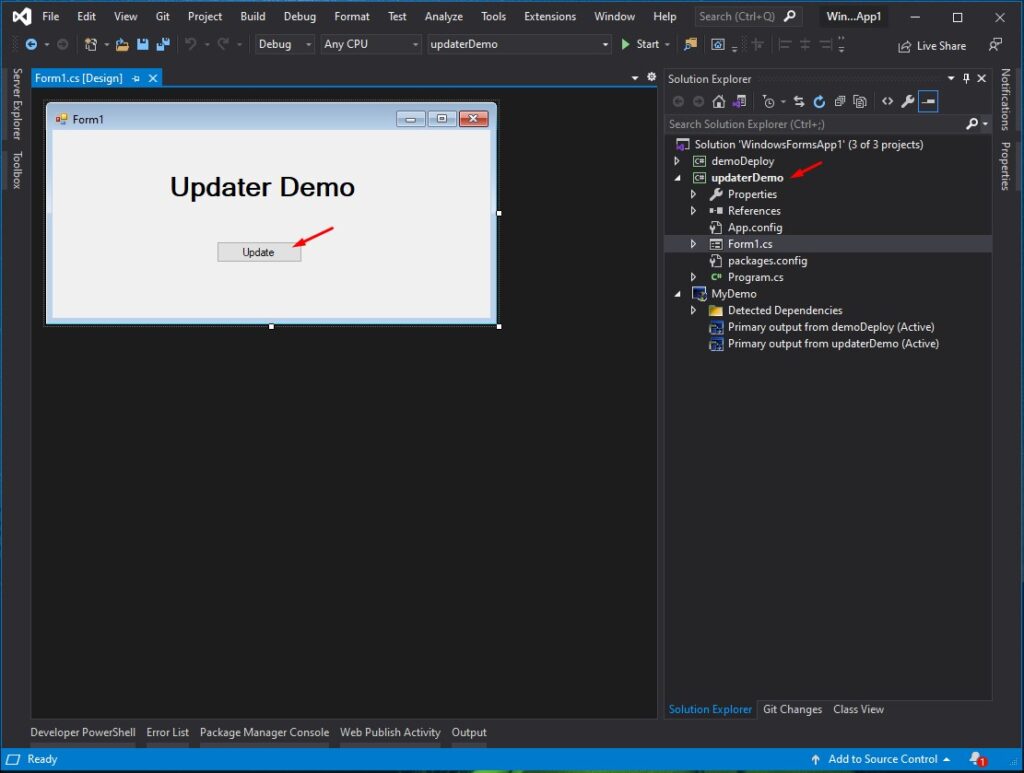
2. On the update button event of updaterDemo project add the code below. This will delete the existing demoDeploy.exe file which is the .exe file from the debug folder of the main demoDeploy project. And extract a new one from the uploaded file on our ASP.NET Core Web Application. You will understand it later once we generated our MSI installer setup file on Visual studio
private void button1_Click(object sender, EventArgs e)
{
try
{
if (File.Exists(@".\demoDeploy.exe")) //If file exists delete it
{
File.Delete(@".\demoDeploy.exe");
File.Delete(@".\demoDeploy.exe.config");
}
if (File.Exists(@".\demoDeploy.zip"))
{
File.Delete(@".\demoDeploy.zip");
}
var client = new WebClient();
client.DownloadFile(new Uri("https://localhost:44394/Home/GetUpdateFile?systemID=1"), @".\demoDeploy.zip");
string zipPath = @".\demoDeploy.zip";
string extract_path = @".\";
ZipFile.ExtractToDirectory(zipPath, extract_path);
File.Delete(@".\demoDeploy.zip");
Process.Start(@".\demoDeploy.exe");
this.Close();
}
catch (Exception ex)
{
MessageBox.Show("main catch " + ex.Message);
}
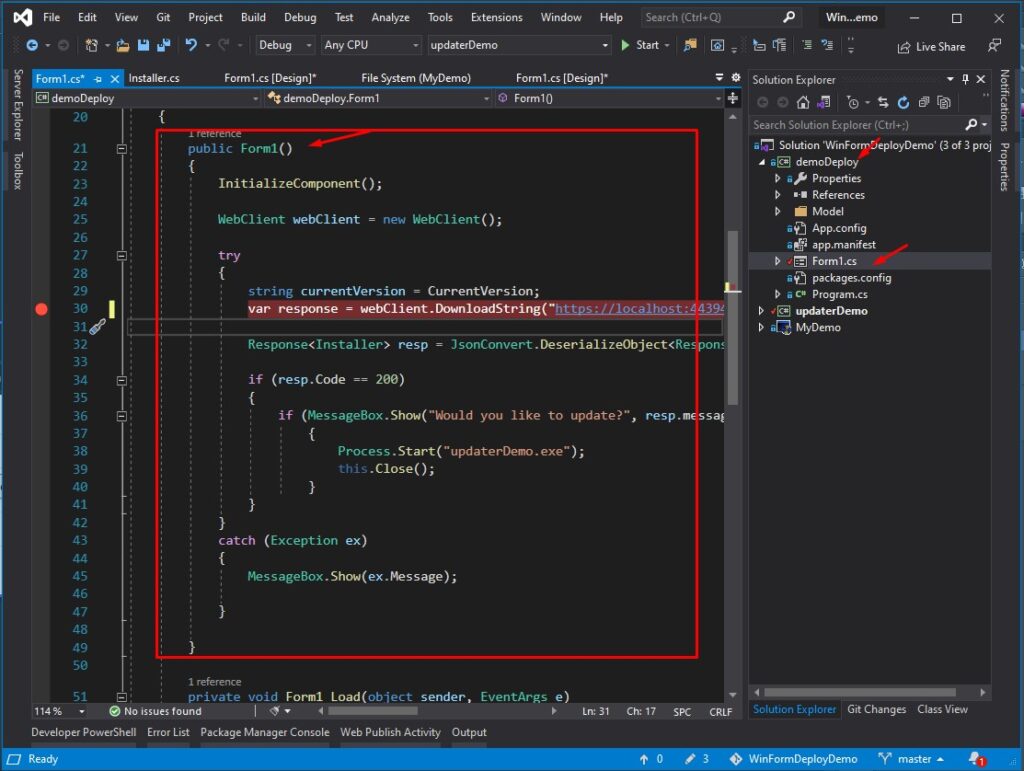
} 3. Now, that we set up our auto-updater, we will add a code to the main application to check if an update is available. Once a new update file is detected this will prompt the user with an option to download the updates. Open deployDemo project » form1 then add the code snippet below.
WebClient webClient = new WebClient();
             try
             {
                 string currentVersion = CurrentVersion;
                 var response = webClient.DownloadString("https://localhost:44394/Home/checkupdate?version=" + currentVersion + "&systemID=1");

                 Response<Installer> resp = JsonConvert.DeserializeObject<Response<Installer>>(response);

                 if (resp.Code == 200)
                 {
                     if (MessageBox.Show("Would you like to update?", resp.message, MessageBoxButtons.YesNo) == DialogResult.Yes) using (var client = new WebClient())
                         {
                             Process.Start("updaterDemo.exe");
                             this.Close();
                         }
                 }
             }
             catch (Exception ex)
             {
                 MessageBox.Show(ex.Message);

             }
I have attached below a screenshot of where I added the code above for additional reference.
Below are the codes from my demoDeploy Project.
 using Newtonsoft.Json;
 using System;
 using System.Collections.Generic;
 using System.ComponentModel;
 using System.Data;
 using System.Deployment.Application;
 using System.Diagnostics;
 using System.Drawing;
 using System.IO;
 using System.Linq;
 using System.Net;
 using System.Reflection;
 using System.Text;
 using System.Threading;
 using System.Threading.Tasks;
 using System.Windows.Forms;

 namespace WindowsFormsApp1
 {
     public partial class Form1 : Form
     {
         public Form1()
         {
             InitializeComponent();

             WebClient webClient = new WebClient();
             try
             {
                 string currentVersion = CurrentVersion;
                 var response = webClient.DownloadString("https://localhost:44394/Home/checkupdate?version=" + currentVersion + "&systemID=1");

                 Response<Installer> resp = JsonConvert.DeserializeObject<Response<Installer>>(response);

                 if (resp.Code == 200)
                 {
                     if (MessageBox.Show("Would you like to update?", resp.message, MessageBoxButtons.YesNo) == DialogResult.Yes)
                         {
                             Process.Start("updaterDemo.exe");

                             this.Close();
                     }
                 }
             }
             catch (Exception ex)
             {
                 MessageBox.Show(ex.Message);

             }
         }

         private void Form1_Load(object sender, EventArgs e)
         {
             var cur_version = CurrentVersion;
             label2.Text = "Version" + cur_version; //display current version
         }

         public string CurrentVersion
         {
             get
             {
                 return ApplicationDeployment.IsNetworkDeployed
                        ? ApplicationDeployment.CurrentDeployment.CurrentVersion.ToString()
                        : Assembly.GetExecutingAssembly().GetName().Version.ToString();
             }
         }
     }

     public class Installer
     {
         public int ID { get; set; }
         public string System { get; set; }
         public string cur_version { get; set; }
         public string location { get; set; }
         public DateTime date { get; set; }
     }

     public class Response<T>
     {
         public int Code { get; set; }
         public string message { get; set; }
         public T Data { get; set; }
     }
 }
IX. Create an MSI installer using Visual Studio 2019
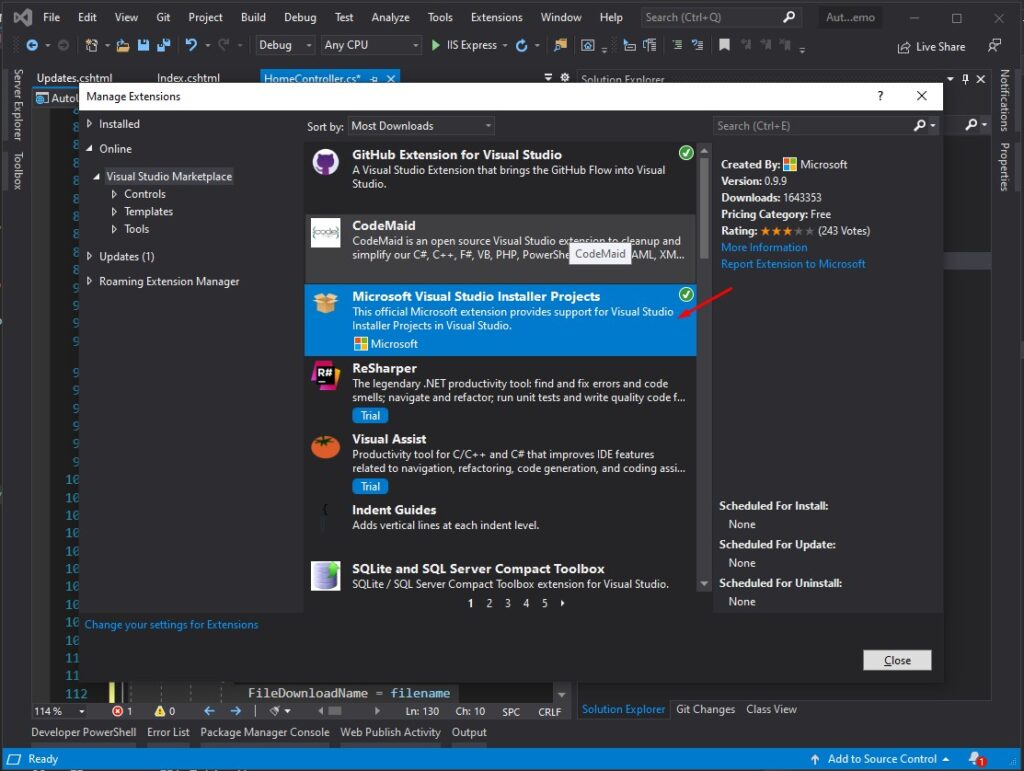
It’s time to create the actual installer. To generate an MSI Application we need to install an extension to our visual studio application to enable this option. To do that, follow the steps below.
- Open, Manage extension from your Visual Studio Menu. See the image below.
2. Once the extension windows is open search for Microsoft Visual Studio installer and then download and install. It will ask you to restart your application. Just do the following and wait for the extension to be installed.
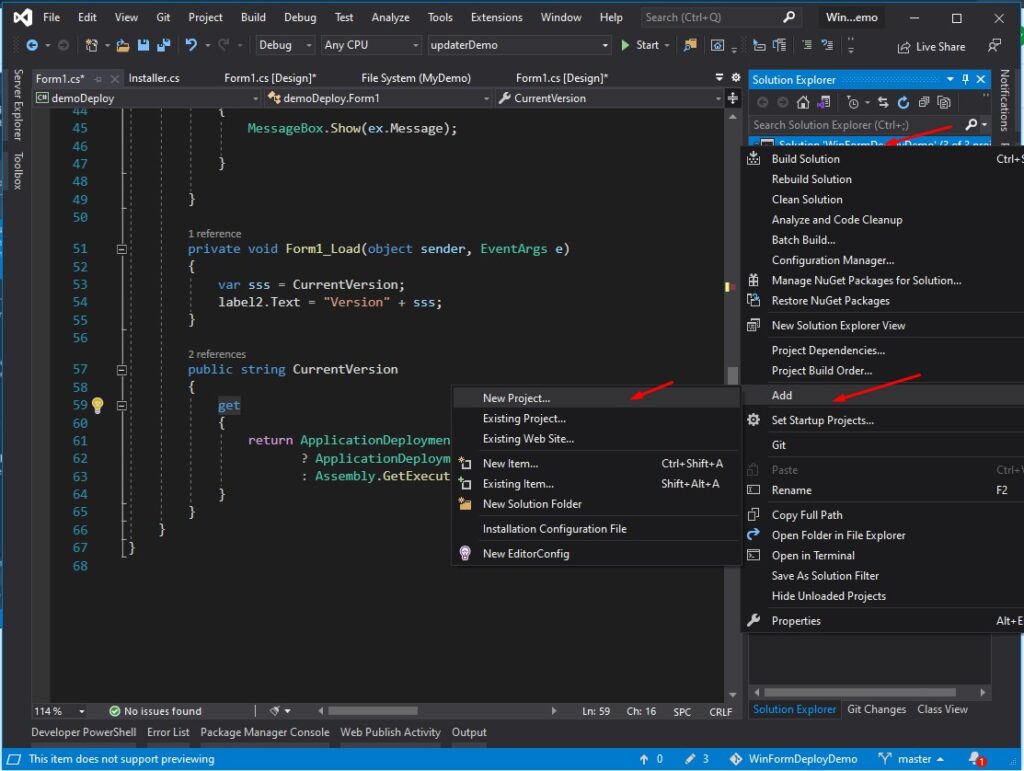
3. Create a new Project by right-clicking on the project solution . See the image below.
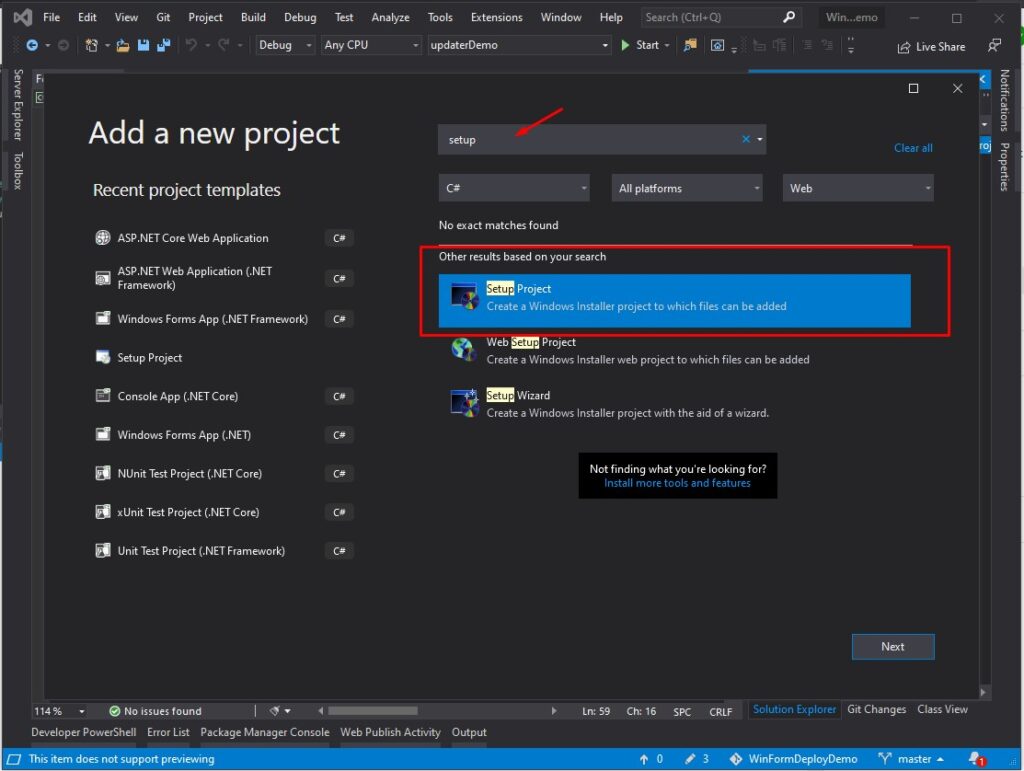
4. Once, Add a new project window appear search for setup project. Then name it MyDemo. See the image below.
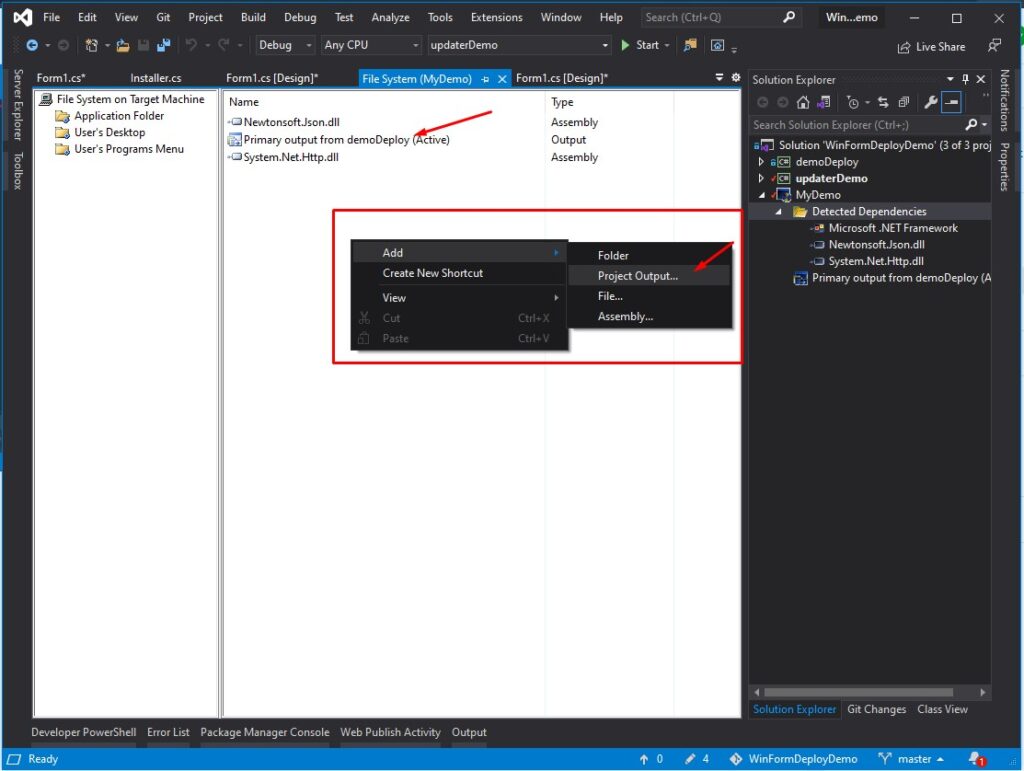
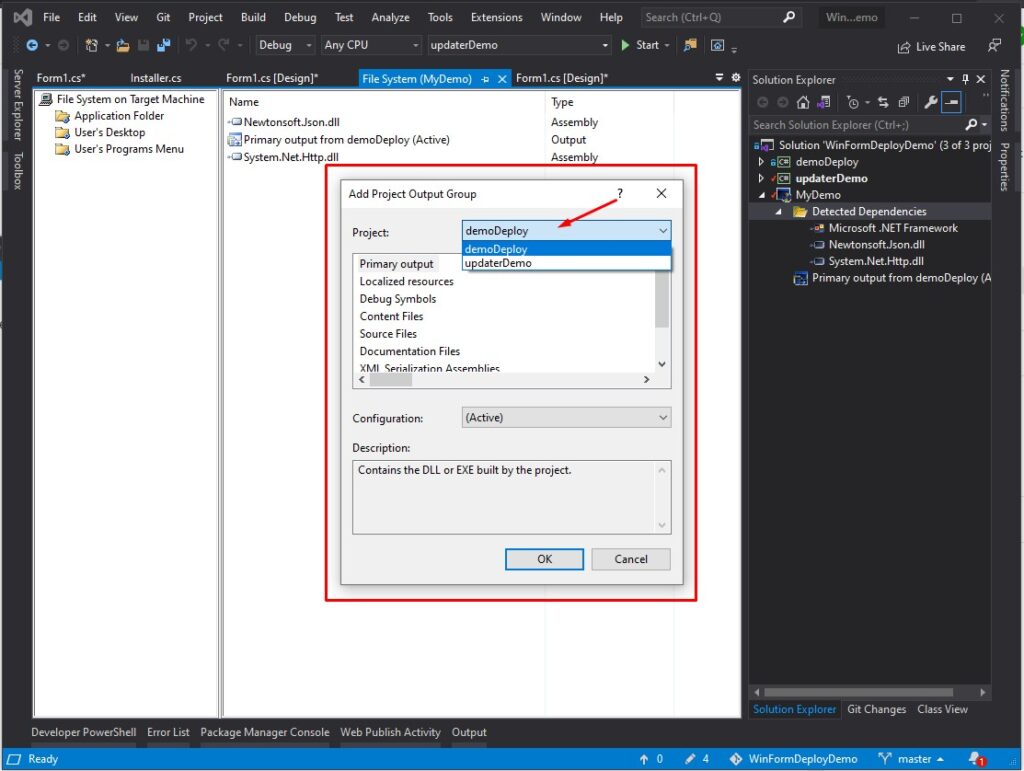
5. Add project output to your project setup. Add both demoDeploy output and updaterDemo output. See the image below.
Then choose the project you want to include in this setup. You can also create a shortcut and drag it on the User’s Desktop folder to have easy access on your desktop. See the image below.
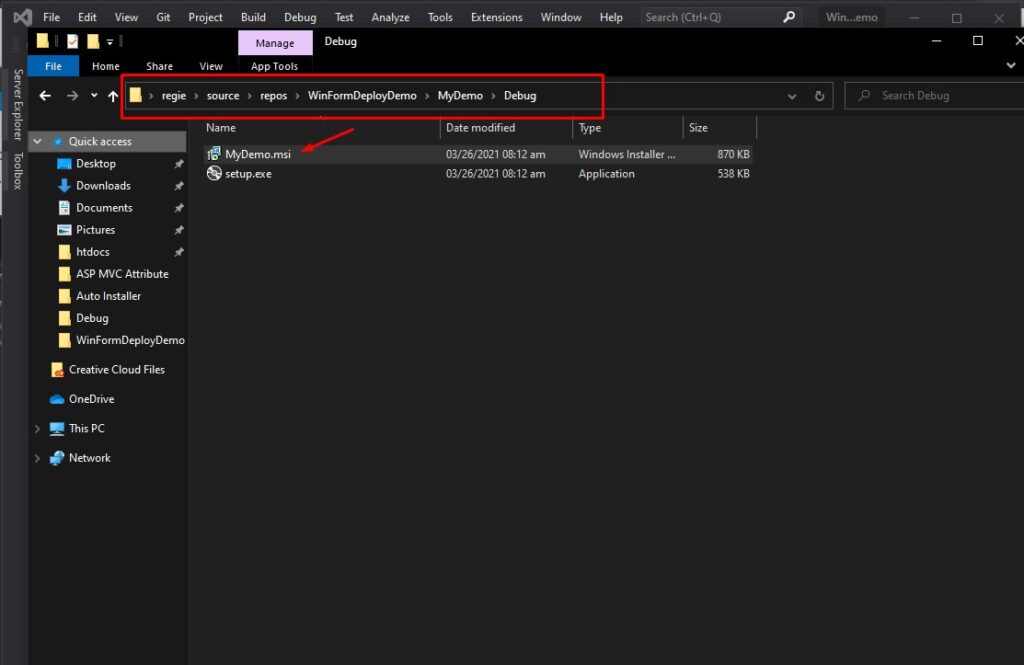
6. Now, we are almost done. Build your setup project and then navigate to the debug folder. You will see an MSI file. This is the file that we will upload to our ASP.NET Core Updater. See the image below.
7. For the update file, all we need to do is to get the .exe file of our main project which is demoDeploy project. Open debug or release folder and send it to a zip file. I prefer using a zip file in case I wanted to include additional dll on my project. See the image below.
8. Once you install the MSI Installer, below are the files extracted.
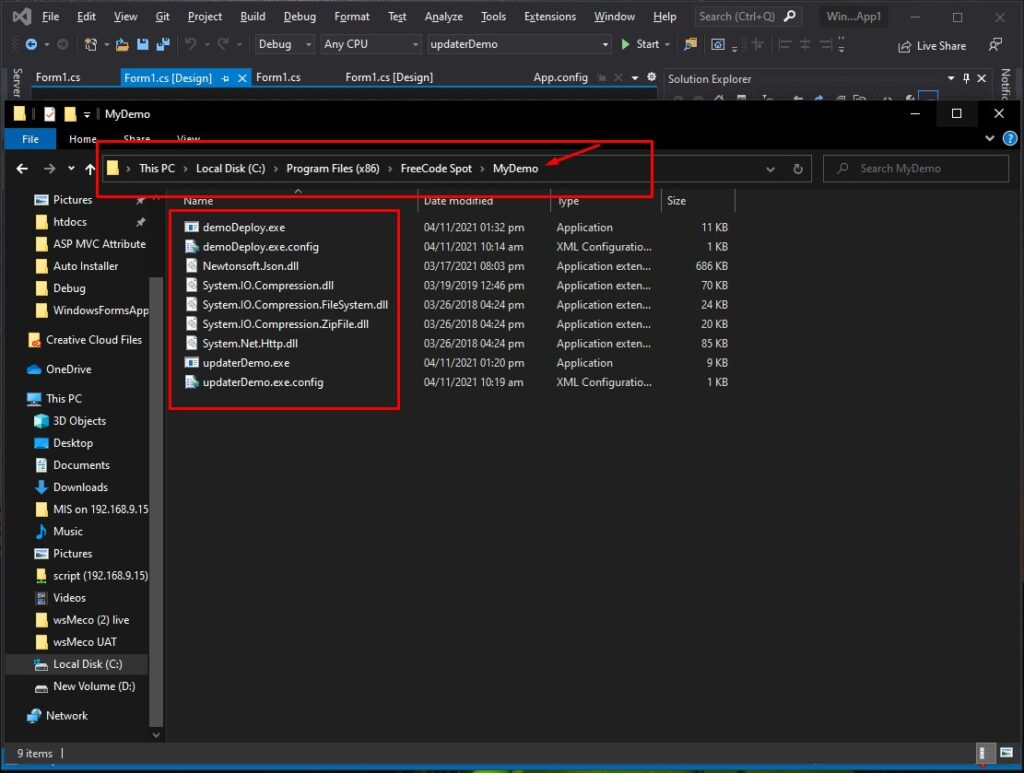
You will see on the image above the .exe file of demodeploy project and updaterDemo project. To update the demo deploy all we need to do is to replace the demodeploy.exe file.
Project Source Code
In case I missed some of the details on this tutorial, you can get my source code my GitHub account.
- Winform Demo » https://github.com/coderbugzz/WindowsFormsApp1.git
- ASP.NET Core Update » https://github.com/coderbugzz/AutoUpdateDemo.git
Summary
This tutorial, show you a ClickOnce Auto-Update installer alternative to implement an auto-update installer for the windows form application. Hopefully, you can get some ideas on this tutorial and helps you with your future project. This way you can customize options to share your application with your user or client.
KEEP CODING!