
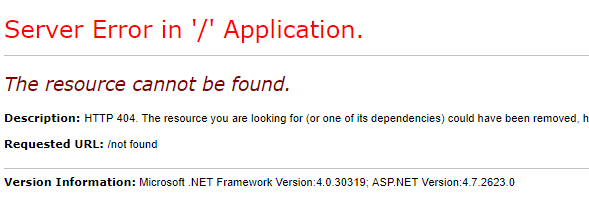
In this post, we will explore ASP NET 404 error handling. The 404 error refers to a not-found resource/URL. The best way to handle the 404 NotFound error in ASP.NET MVC is to create a landing page for this specific error. In this post, I will show you the steps on how to create a 404 Error Handler. Here’s how a default 404 Error notification looks in ASP.NET MVC.
ASP.NET 404 ERROR
There are a lot of ways to handle 404 NotFound error and ASP NET 404 error handling is pretty straightforward. You can set the custom error mode to “On” from your project’s web.config then you can specify a redirect to a specific method to handle the error. You will understand more later about ASP NET 404 error handling and how an actual configuration will look like. Just follow the steps below.
Also Read: ASP.NET MVC Folder Structure
I. Configure Web.Config
To enable error redirection modify your Web.Config file.Search for <system.web> in your Web.Config and Add the code below inside the <system.web></system.web>.
<customErrors mode="On">
      <error statusCode="404" redirect="~/Error/NotFound"/>
</customErrors>
II. Create ErrorController
Now, we need a controller that will handle a 404 error code and as specified on the redirect we set on the web.config what we need is an ErrorController and a NotFound method.
- Navigate to your Controller folder and create a controller named ErrorController.This will serve as our custom error handler.
- Inside this controller, create an action result method. Let’s named it NotFound this will return our custom view for 404 error.
The code snippet below is the controller and the method that I used.
using System;
using System.Collections.Generic;
using System.Linq;
using System.Web;
using System.Web.Mvc;

namespace _404ErrorHandler.Controllers
{
    public class ErrorController : Controller
    {
        public ActionResult NotFound()
        {
                return View();
        }
   }
}
III. Create a View
Now, all we need to do is to set a custom view for our NotFound action result. To do that, follow the steps below.
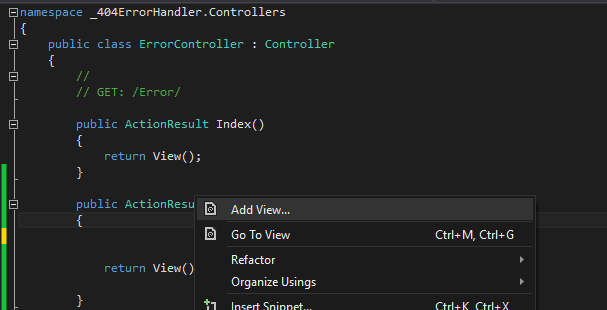
- By default, a view for the controller can be manually created inside the View->Error folder. Or you can do it by simply right-clicking on your NotFound method inside ErrorController and selecting Add View.
Below is the custom error view that I created for this tutorial. You can customize yours depends on your preference.

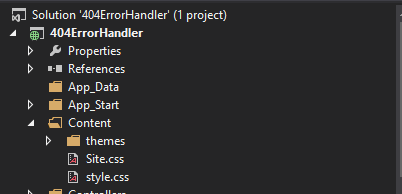
2. Let’s create a CSS stylesheet and add it using the bundle config. To add a bundle, you can copy the code below into your BundleConfig file where ~/Content/style.css is your stylesheet location, and ~/Content/Custom/Error is the name of your bundle.
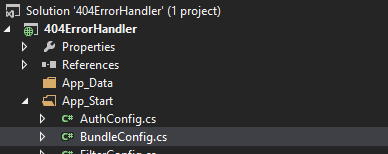
Note: I used Bundle Config inside App_Start folder to call my custom style.css file.
Add(new StyleBundle("~/Content/Custom/Error").Include("~/Content/style.css"));3. Then call this bundle using the code snippet below:
@Styles.Render("~/Content/Custom/Error")4. Below are the codes from my NotFound view. You can copy the code snippet below or you create your own.
@{
    Layout = "~/Views/Shared/_Layout.cshtml";
}
@Styles.Render("~/Content/Custom/Error")

<div class="w3l">
    <div class="text">
        <h1>PAGE NOT FOUND</h1>

        <p>URL link can not be found. Please check the url or go to @Html.ActionLink("Log in", "Login", "Account", routeValues: null, htmlAttributes: new { id = "loginLink" }) and log in using your credentials..</p>
    </div>
    <div class="image">
        <img src="~/images/smile.png" />
    </div>
    <div class="clear"></div>
</div>
5. To add design to the view, we can also add icons. In my case, I used the image below. Which I included inside the image folder. And used <img src=”~/images/smile.png” /> to include image in my view.

6. Create styles for your view. In my case, I create a file name style.css inside the content folder from the project solution.
Style.css Source Code:
body {
    font-family: 'Josefin Sans', sans-serif;
    /*background: #2b82ad;*/
    padding: 60px 80px 20px;
}
.clear{
	clear:both;
}
h1 {
    font-size: 70px;
    text-align: left;
    margin-bottom: 20px;
    margin-top: 0px;
    /*color: #ffffff;*/
    font-weight: 700;
}
p {
    font-weight: 600;
    font-size: 20px;
    text-align: left;
    /*color: #ffffff;*/
    line-height: 32px;
    padding-top: 10px;
}
.agile {
    width: 80%;
    margin: 0 auto;
}
.image {
	width: 30%;
	float: left;
	margin-top:40px;
}
.image img{
	width:100%;
}
.text {
    width: 64%;
    float: left;
    padding: 5em 0em 3em 0em;
}
.text a{
	color:#000;
	text-decoration:undrline;
}
.text a:hover{
	color:#003b64;
	text-decoration:underline;
}
.agileits_main_grid_left h1 {
    font-size: 2.5em;
    color: #000;
}
.agileits_main_grid_right {
    float: right;
    margin: 1.2em 0 0;
}
.agileits_main_grid_left {
    float: left;
}

.back {
    float: left;
}
.wthree {
    background: #000;
    padding: 1em;
}
.back a {
    display: block;
    font-size: 1.2em;
    color: #fff;
    text-decoration: none;
    padding-top: 6px;
}
.w3l {
    margin: 4em 0;
}
/*---- responsive-design -----*/
@media(max-width:1336px){
h1 {
    font-size: 66px;
}
p {
    font-size: 18px;
}
}
@media(max-width:1280px){
h1 {
    font-size: 62px;
}
}
@media(max-width:1024px){
.agile {
    width: 90%;
}
body {
    padding: 53px 53px 20px;
}
h1 {
    font-size: 56px;
}
.w3l {
    margin: 1em 0;
}
}
@media(max-width:800px){
.agile {
    width: 100%;
}
.text {
    width: 70%;
    padding: 3em 0em 3em 0em;
}
h1 {
    font-size: 52px;
}
p {
    font-size: 16px;
}
.footer {
    padding: 1em 0em;
}
}
@media(max-width:768px){

}
@media(max-width:736px){
	.footer p{
		font-size:16px;

	}
	h1 {
    font-size: 48px;
}
.agileits_main_grid_left h1 {
    font-size: 2em;
}
.agileits_main_grid_right {
    margin: 0.8em 0 0;
}
}
@media(max-width:667px){
	.footer p{
		font-size:15px;
	}
	h1 {
    font-size: 43px;
}
.text {
    padding: 3em 0em 1em 0em;
}
}
@media(max-width:640px){
h1 {
    font-size: 40px;
}
p {
    line-height: 26px;
}
.wthree {
    background: #000;
    padding: 0.8em;
}
}
@media(max-width:600px){
h1 {
    font-size: 37px;
}
	.footer p{
		font-size:15px;
	}
}
@media(max-width:568px){
	p{
		font-size:16px;
	}
	.footer p{
		font-size:14px;
	}
	h1 {
    font-size: 34px;
}
.back a {
    font-size: 1em;
    padding-top: 8px;
}
}
@media(max-width:480px){
body {
    padding: 30px;
}
h1 {
    font-size: 32px;
}
.text {
    padding: 3em 0em 0em 0em;
}
}
@media(max-width:414px){
	.text{
		width:100%;
		float: none;
	}
	.footer p{
		font-size:14px;
	}
	.text {
    padding: 2em 0em 0em 0em;
}
body {
    padding: 24px;
}
.image {
    width: 60%;
    float: none;
    margin: 16px auto;
}
.footer {
    padding: 0em 0em;
}
}
@media(max-width:384px){
	.footer p{
		font-size:14px;
		 margin: 0px 0 10px;
}
.wthree {
    padding: 0.5em;
}
}
@media(max-width:375px){

	.footer p{
		font-size:14px;
	}
}
@media(max-width:320px){
	body {
    padding: 16px 16px;
}
.agileits_main_grid_left h1 {
    font-size: 1.8em;
}
h1 {
    font-size: 30px;
	margin-bottom:0;
}
p {
    font-size: 14px;
	line-height:24px;
}
.footer p {
    font-size: 14px;
    padding-top: 0px;
}
.back {
    float: none;
    width: 100%;
    text-align: center;
}
.social-icons {
    float: none;
    width: 100%;
    text-align: center;
    margin-top: 12px;
}
.back a {
    padding-top: 0px;
}
.wthree {
    padding: 0.8em;
}
.text {
    padding: 1em 0em 0em 0em;
}
}
And we are done. That is how we can configure the ASP NET MVC 404 error handling. Suppose you have better ways to handle 404 NotFound error in ASP.NET MVC. Please comment down below. Every time a URL is invalid, this error notification will appear instead of the default 404 error notification.
Thank you for reading!! Happy coding!! Visit my Blog Page for my latest post.