
In this tutorial, we will learn how to upload files in ASP NET Core. We will create a project that will upload files to a physical directory and also save the files to the database. Using ASP.NET Core, we will also explore how we can return the file using the following return type.
- I. Setup ASP.NET Core Web Application with Identity
- II. Create Model properties
- III. Create AppDBContext Class
- IV. Configure Services in Startup.cs
- V. Migration and Update Database
- VI. Create the HTML View
- VII. Create Special Class
- VIII. Upload a File » HomeController
- IX. Return Uploaded Files from a Physical Directory
- X. Return Uploaded files from the database
- Summary
- FileResult
- FileContentResult
- FileStreamResult
- VirtualFileResult
- PhysicalFileResult
Before you proceed with the steps below, please ensure that you have the latest version of the following installer.
- Visual Studio Code
- SQL Server
I. Setup ASP.NET Core Web Application with Identity
- First, create your ASP.NET Core Web Application. To do that just follow the steps below.
- Select File > New > Project.
- Select ASP.NET Core Web App(Model-View-Controller). Name the project FileDemo to have the same namespace as my project. Click OK.
- Select an ASP.NET Core Web Application. and then uncheck Configure for HTTPS.
- Lastly, Click on Create.

2. Now we need to install required packages for this project. I have listed it all below.
- Microsoft.AspNetCore.Identity.EntityFrameworkCore
- Microsoft.EntityFrameworkCore
- Microsoft.EntityFrameworkCore.SqlServer
- Microsoft.EntityFrameworkCore.Tools
Use NuGet Package Manager to install this package. If this is your first time using this, you can visit this article.
3. After we gather all the necessary package, we need to configure our Web Application to connect to our SQL Server. Open your appsettings.json, then add your connection string. See the code snippet below.
"ConnectionStrings": {
     "default": "Server=CODERSIGN\SQLEXPRESS01;Database=FileDemo;User Id=freecode;Password=freecodespot.com;"
   }
II. Create Model properties
In this tutorial, we are going to create two properties an Attachment model and AttachmentViewModel. We will use the attachment on our AppDBContext to represent our project’s table properties, while the ViewModel will be used with our view.
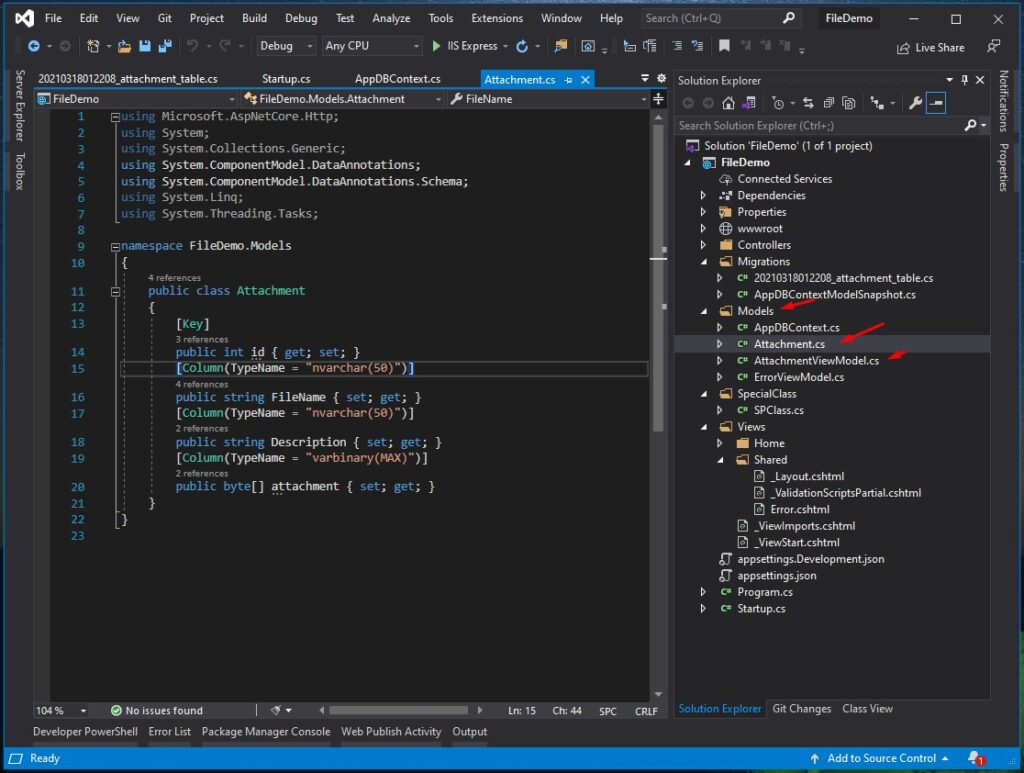
Attachment
public class Attachment
     {
         [Key]
         public int id { get; set; }
         [Column(TypeName = "nvarchar(50)")]
         public string FileName { set; get; }
         [Column(TypeName = "nvarchar(50)")]
         public string Description { set; get; }
         [Column(TypeName = "varbinary(MAX)")]
         public byte[] attachment { set; get; }
     }
AttachmentViewModel
public class AttachmentViewModel
     {
         public string FileName { set; get; }
         public string Description { set; get; }
         public IFormFile attachment { set; get; }
     public List<Attachment> attachments { get; set; }
}
III. Create AppDBContext Class
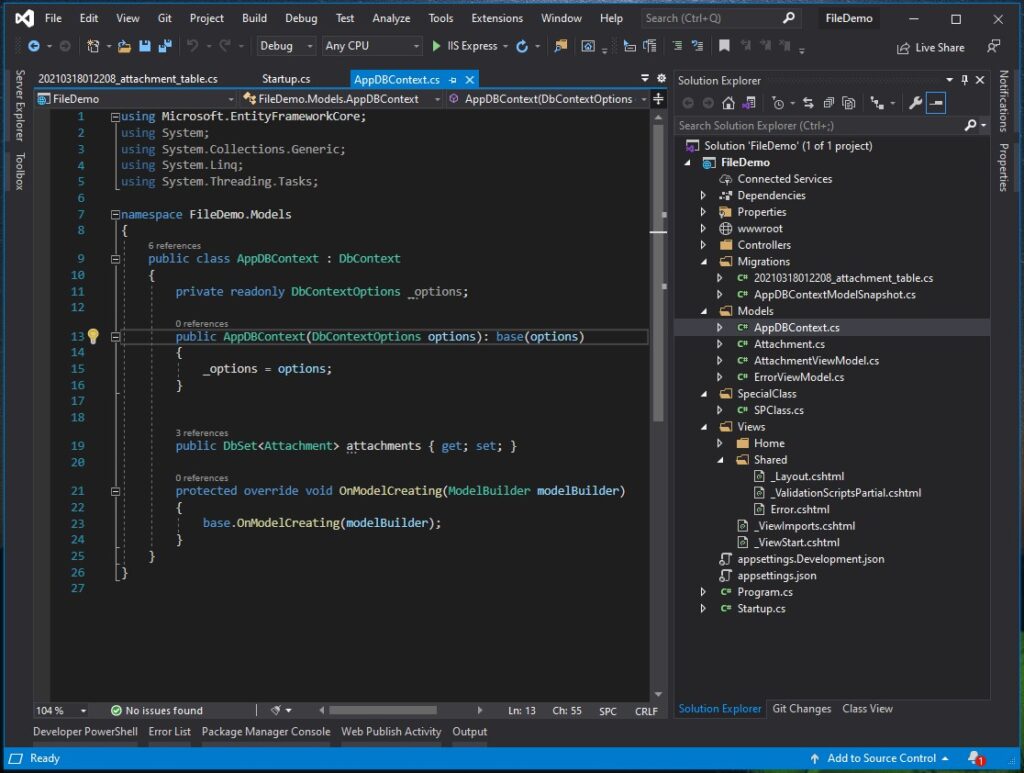
This class will handle the connection between our Web Application to the SQL Database. We will use this class to access tables from our database.
 using Microsoft.EntityFrameworkCore;
 using System;
 using System.Collections.Generic;
 using System.Linq;
 using System.Threading.Tasks;

 namespace FileDemo.Models
 {
     public class AppDBContext : DbContext
     {
         private readonly DbContextOptions _options;

         public AppDBContext(DbContextOptions options): base(options)
         {
             _options = options;
         }


         public DbSet<Attachment> attachments { get; set; }

         protected override void OnModelCreating(ModelBuilder modelBuilder)
         {
             base.OnModelCreating(modelBuilder);
         }
     }
 }
Below are the screenshot of AppDBContext.
IV. Configure Services in Startup.cs
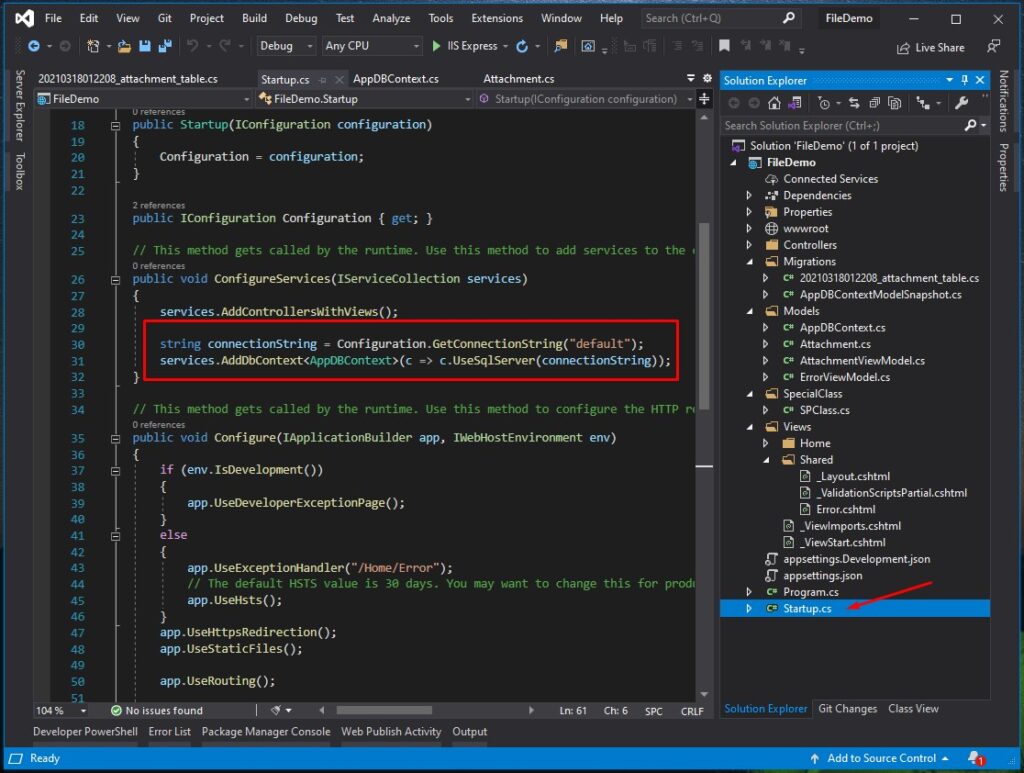
Now, all we need to do is set the connection string and AppDBContext inside the ConfigureServices method. Open your startup.cs, then add the code snippet below under the ConfigureService method.
 string connectionString = Configuration.GetConnectionString("default");
 services.AddDbContext<AppDBContext>(c => c.UseSqlServer(connectionString));
This Add the DBContext that we created awhile ago and set it’s connection string.
V. Migration and Update Database
We are all set. Let’s create a migration and update-database to create the database and properties we set inside the AppDBContext.
- Create the migration using the code below.
- Package Manager Console > Add-Migration attachment_table
- Visual Studio Code Terminal > dotnet ef migration add attachment_table
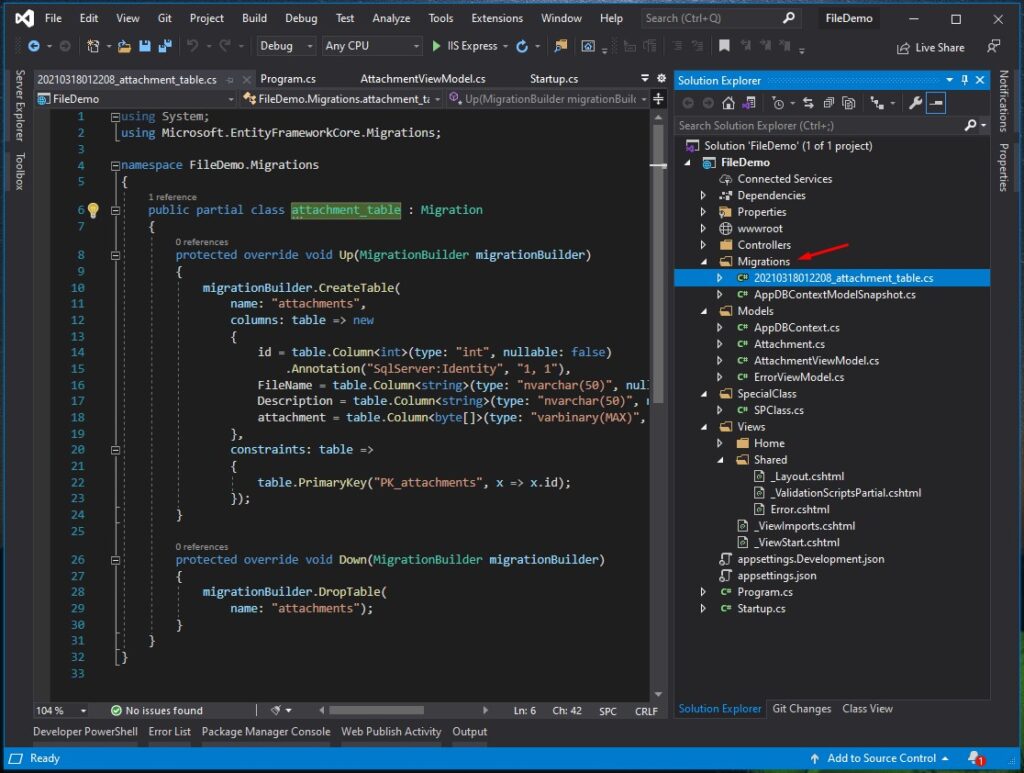
This will create a Migration folder and classes base on AppDBContext class the we created awhile ago.
2. Once the migration is created execute the migration using update-database command.
- Package Manager Console > Update-Database
- Visual Studio Code Terminal > dotnet ef database update
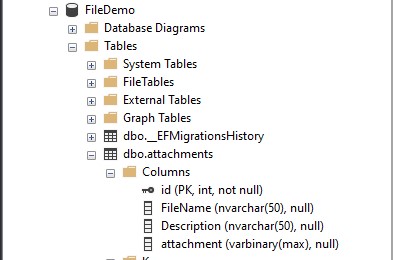
3. Open your SQL Server and check if the table was created. Based on the connection string that I declare inside appsettings.json, I expect to generate a database name FileDemo and table attachments. Here’s a screenshot of my Database structure.
VI. Create the HTML View
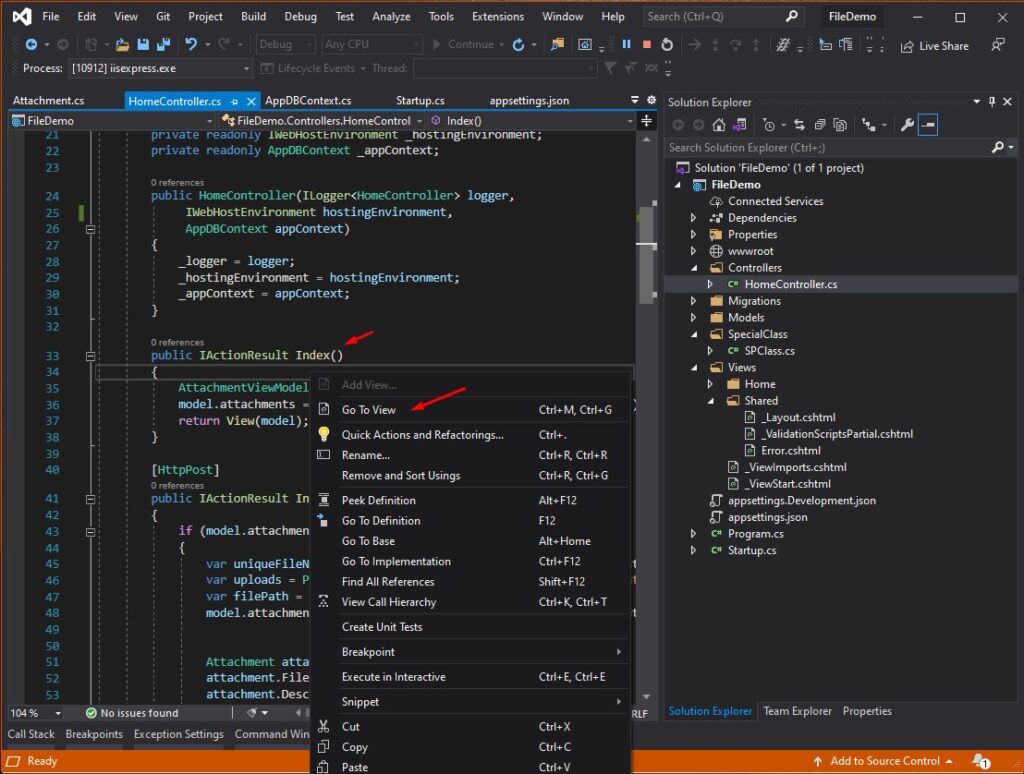
If you remember, from the first step of this tutorial, we created a project using the ASP.NET Core Web App with the MVC template. This will generate a default controller name HomeController instead of creating a new controller. We will use the Home Controller.
- Open HomeController under Controllers folder. Navigate to index method then right-click and choose go to view.
2. Once you are in the View file which is index.cshtml under Views » Home » Index.cshtml. Copy the code snippet below.
@model AttachmentViewModel
@{
ViewData["Title"] = "Home Page";
}
<form method="post" enctype="multipart/form-data">
<div class="form-row">
<div class="form-group col-md-3">
<label>File Name</label>
<input class="form-control form-control-lg" placeholder="File Name"
asp-for="FileName" required />
</div>
<div class="form-group col-md-3">
<label>Description</label>
<input class="form-control form-control-lg" placeholder="Description"
asp-for="Description" required />
</div>
<div class="form-group col-md-3">
<label>Attachment</label>
<input class="form-control form-control-lg" placeholder="Middle Name"
asp-for="attachment" type="file" required />
</div>
<div class="form-group">
<label>``</label>
<button class="btn btn-primary btn-lg btn-block" type="submit">Submit</button>
</div>
</div>
</form>
<div class="row">
<table class="table">
<thead>
<tr>
<th>ID</th>
<th>File Name</th>
<th>Description</th>
<th></th>
<th></th>
</tr>
</thead>
<tbody>
@if (Model != null)
{
@foreach (var row in Model.attachments)
{
<tr>
<td> @row.id</td>
<td> @row.FileName</td>
<td> @row.Description</td>
<td><a class="btn btn-primary" asp-action="GetAttachment" asp-controller="Home" asp-route-ID="@row.id">View</a></td>
<td><a class="btn btn-primary" asp-action="GetFileStreamResultDemo" asp-controller="Home" asp-route-filename="@row.FileName">Download</a></td>
</tr>
}
}
</tbody>
</table>
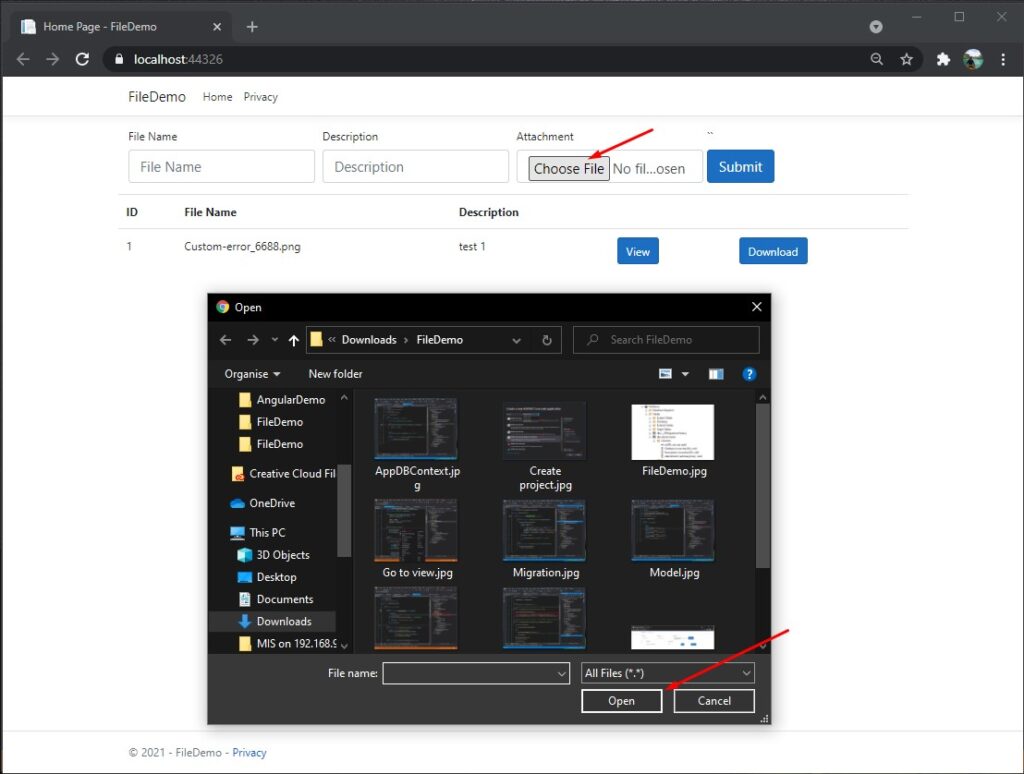
</div>This view is bind with the model property AttachmentViewModel. Below is the final UI design for this tutorial.

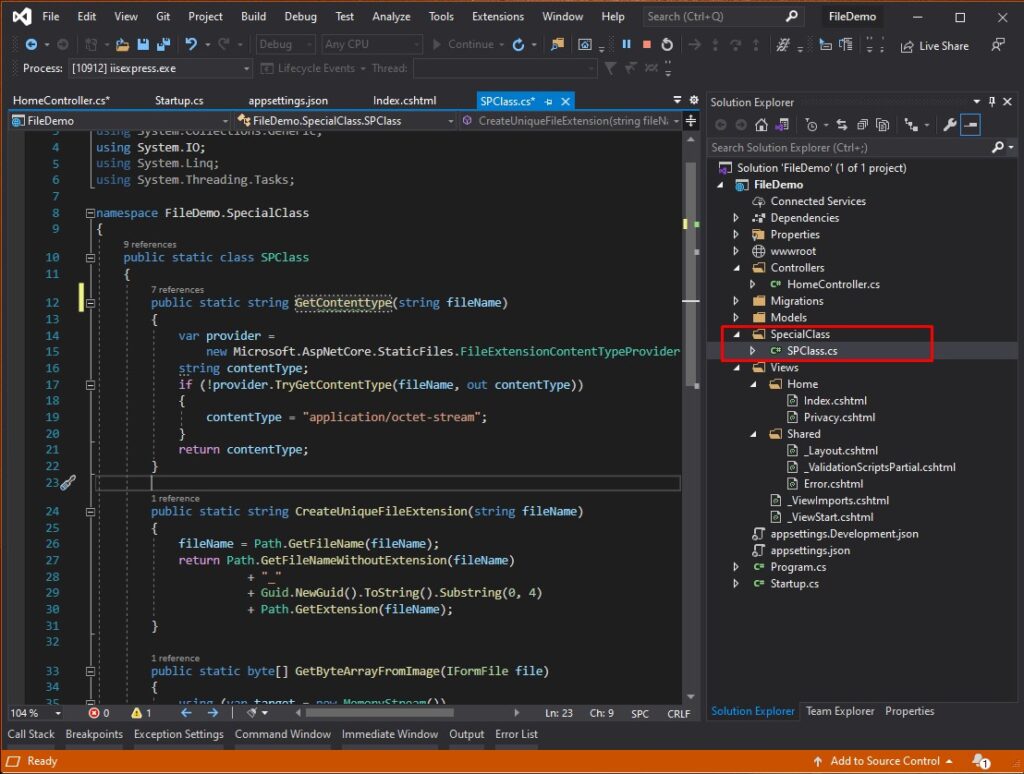
VII. Create Special Class
These class methods can also be added inside HomeController, but I decided on a class for this method since this will not interact with the View or UI. Please see the code snippet below with a description of its function.
GetContenttype
This method return a content type of a file
public static string GetContenttype(string fileName)
         {
             var provider =
                 new Microsoft.AspNetCore.StaticFiles.FileExtensionContentTypeProvider();
             string contentType;
             if (!provider.TryGetContentType(fileName, out contentType))
             {
                 contentType = "application/octet-stream";
             }
             return contentType;
         }
CreateUniqueFileExtension
This method will generate a unique filename
public static string CreateUniqueFileExtension(string fileName)
         {
             fileName = Path.GetFileName(fileName);
             return Path.GetFileNameWithoutExtension(fileName)
                       + "_"
                       + Guid.NewGuid().ToString().Substring(0, 4)
                       + Path.GetExtension(fileName);
         }
GetByteArrayFromImage
Convert IFormFile to byte array
public static byte[] GetByteArrayFromImage(IFormFile file)
         {
             using (var target = new MemoryStream())
             {
                 file.CopyTo(target);
                 return target.ToArray();
             }
         }
VIII. Upload a File » HomeController
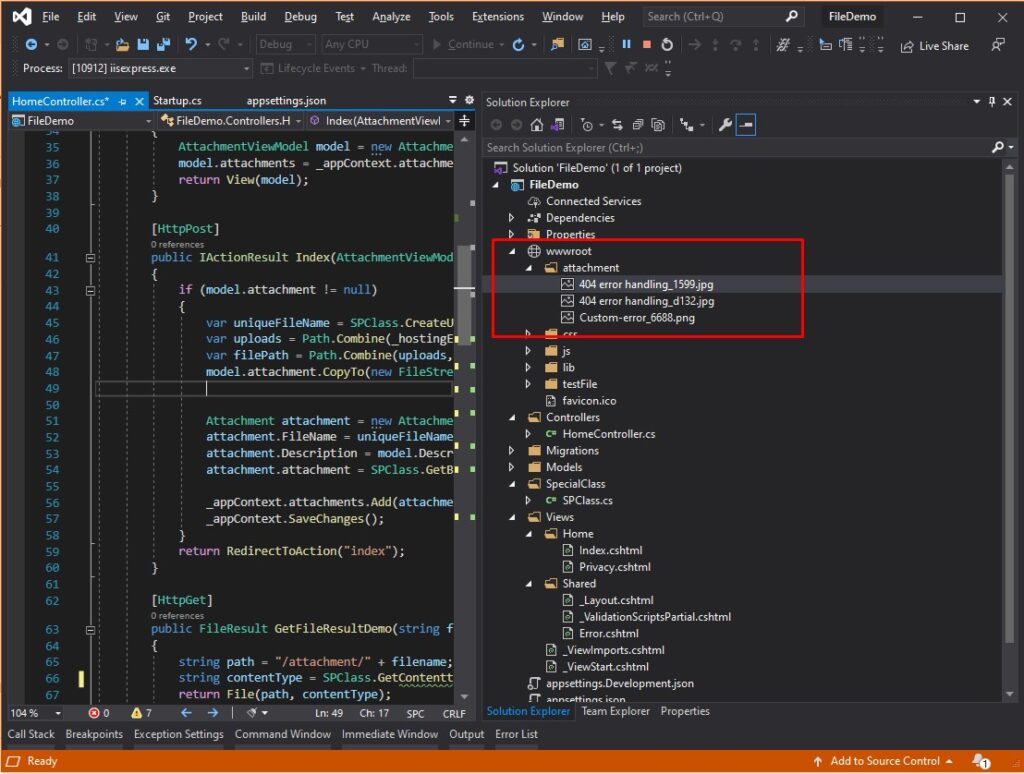
Since we are using the index method to render the view, we also need to create an index method using POST requests. This method will handle the submitted attachment record from the user. We will write the uploaded file under wwwroot » attachment, and after that, we will also save it to the database.
- Create a folder name attachment inside wwwroot.
4. Create a constructor in your HomeController then declare the following.
 private readonly ILogger<HomeController> _logger;
 private readonly IWebHostEnvironment _hostingEnvironment;
 private readonly AppDBContext _appContext;

 public HomeController(ILogger<HomeController> logger,
              IWebHostEnvironment hostingEnvironment,
              AppDBContext appContext)
    {
      _logger = logger;
      _hostingEnvironment = hostingEnvironment;
      _appContext = appContext;
    }
3. Now, create index POST method inside HomeController. See the code snippet below.
 [HttpPost]
 public IActionResult Index(AttachmentViewModel model)
    {
        if (model.attachment != null)
           {
              //write file to a physical path
              var uniqueFileName = SPClass.CreateUniqueFileExtension(model.attachment.FileName);
                 var uploads = Path.Combine(_hostingEnvironment.WebRootPath, "attachment");
                 var filePath = Path.Combine(uploads, uniqueFileName);
                 model.attachment.CopyTo(new FileStream(filePath, FileMode.Create));

                     //save the attachment to the database
                 Attachment attachment = new Attachment();
                 attachment.FileName = uniqueFileName;
                 attachment.Description = model.Description;
                 attachment.attachment = SPClass.GetByteArrayFromImage(model.attachment);

                 _appContext.attachments.Add(attachment);
                 _appContext.SaveChanges();
        }
       return RedirectToAction("index");
     }
4. Now, let’s modify the index GET method. We will return all the data saved in the database. See the code snippet below.
public IActionResult Index()
         {
             AttachmentViewModel model = new AttachmentViewModel();
             model.attachments = _appContext.attachments.Select(m => m).ToList();
             return View(model);
         }
And our uploading is done. Run your application and test if it is working. Below is the expected final output.
IX. Return Uploaded Files from a Physical Directory
Now, let’s try to return the uploaded file using the return type we mention in the tutorial’s introduction. Below are methods that you can use to return uploaded files to the user.
- FileResult
- FileContentResult
- FileStreamResult
- VirtualFileResult
- PhysicalFileResult
FileResult
[HttpGet]
public FileResult GetFileResultDemo(string filename)
  {
             string path = "/attachment/" + filename;
             string contentType = SPClass.GetContenttype(filename);
             return File(path, contentType);
 }
FileContentResult
[HttpGet]
public FileContentResult GetFileContentResultDemo(string filename)
    {
             string path = "wwwroot/attachment/" + filename;
             byte[] fileContent = System.IO.File.ReadAllBytes(path);
             string contentType = SPClass.GetContenttype(filename);
             return new FileContentResult(fileContent, contentType);
   }
FileStreamResult
[HttpGet]
public FileStreamResult GetFileStreamResultDemo(string filename) //download file
   {
             string path = "wwwroot/attachment/" + filename;
             var stream = new MemoryStream(System.IO.File.ReadAllBytes(path));
             string contentType = SPClass.GetContenttype(filename);
             return new FileStreamResult(stream, new MediaTypeHeaderValue(contentType))
             {
                 FileDownloadName = filename
             };
   }
VirtualFileResult
[HttpGet]
public VirtualFileResult GetVirtualFileResultDemo(string filename)
   {
             string path = "attachment/" + filename;
             string contentType = SPClass.GetContenttype(filename);
             return new VirtualFileResult(path, contentType);
   }
PhysicalFileResult
[HttpGet]
public PhysicalFileResult GetPhysicalFileResultDemo(string filename)
{
             string path = "/wwwroot/attachment/" + filename;
             string contentType = SPClass.GetContenttype(filename);
             return new PhysicalFileResult(_hostingEnvironment.ContentRootPath
                 + path, contentType);
}
X. Return Uploaded files from the database
If you remember, we also save the attachment in the database using a varbinary type. To return this file, use the code snippet below.
 [HttpGet]
 public ActionResult GetAttachment(int ID)
 {
    byte[] fileContent;
    string fileName = string.Empty;
    Attachment attachment = new Attachment();
    attachment = _appContext.attachments.Select(m=>m).Where(m=>m.id == ID).FirstOrDefault();

    string contentType = SPClass.GetContenttype(attachment.FileName);
    fileContent = (byte[])attachment.attachment;
   return new FileContentResult(fileContent, contentType);
 }
We are done!. This is how to upload files in ASP NET CORE. You can start experimenting on your own using the ideas shown above. You may also download the source code from my GitHub Account @coderbugzz.
Summary
This tutorial created a simple ASP.NET Core Web App that uploaded files like PDF and image. We also added a list of return types that you can use with a sample code. This tutorial will guide you in case your struggling with how to upload files in ASP NET CORE. Hopefully, this helps you to on your future project, and don’t forget to share if this helps.
KEEP CODING!