
In this article, we will Implement nested WebGrid with Expand and Collapse in ASP NET Core. In my previous topic, I use Jquery Datatable to display data in a WebGrid. You can check it out since we will use the actual project that we created from that tutorial.
Using a nested WebGrid will allow us to show additional information for the primary data of a table. This tutorial will add a reason why we need to use JQuery Datatable. This tutorial will see how easy it is to implement a nested WebGrid using JQuery Datatable plugins.
To proceed with these steps. Create an ASP.NET Core Web API or download the source code from this article.
I. How to use downloaded source code
If you will use the source code from my article. Do the steps below.
Once you have downloaded the file from my previous article, open appsettings.json and configure Connection String value, this is how it looks like.
"ConnectionStrings": {
     "default": "Data Source=DESKTOP-4DU98BI\SQLEXPRESS01;Initial Catalog=UserDB;Integrated Security=True"
}- Data Source » Server Name
- Catalog » Database Name
You can also use this link to view SQL Connection string formats. After that, you can perform the command below.
- Package Manager Console > Update-Database
- Visual Studio Code Terminal > dotnet ef database update
This command will execute the existing Migration file found in the source code. The migration will create the necessary table for this project.

II. Implement Nested WebGrid with Expand and Collapse in ASP NET
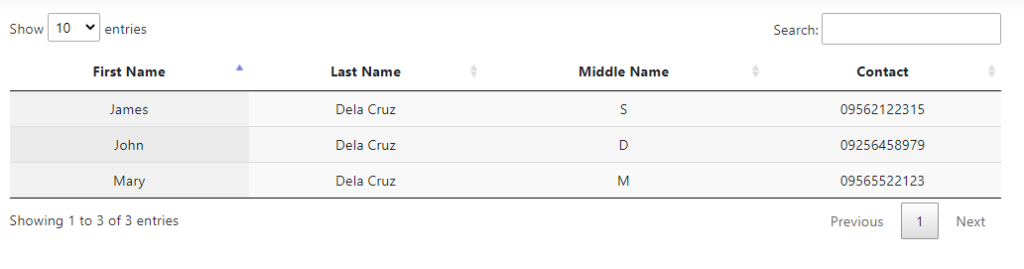
Now, we are all set. We can run the project to see the default UI. This is how it should look like.
Open the index.html and let’s start adding the child table on our JQuery Datatable.
- Download an icon for the Expand and collapse button. Place it under wwwroot » images. The image below is what I used. See the image below.
2. Add the code snippet below for the style. This style will toggle the icon once the collapse and expand function will be triggered.
     td.details-control {
                        background: url('../images/arrow side.png') no-repeat center center;
                        cursor: pointer;
    }
    tr.shown td.details-control {
       background: url('../images/arrow down.png') no-repeat center center;
     }
3. From the script, let’s add a column from the table’s first index. This column is where we will place the icon. To do that, use the code snippet below.
Add columns with details-control class:
               {
                     "className": 'details-control',
                     "orderable": false,
                     "data": null,
                     "defaultContent": ''
                 },
This now how the full script will look like.
var table = $('#userTable').DataTable({
"processing": true, // for show progress bar
//"serverSide": true, // for process server side
"filter": true, // this is for disable filter (search box)
"orderMulti": false, // for disable multiple column at once
"ajax": {
'url': '@Url.Action("getAllUsers", "Home")',
"type": "GET",
"datatype": "json"
},
"columns": [
{
"className": 'details-control',
"orderable": false,
"data": null,
"defaultContent": ''
},
{ "sTitle": "First Name", "data": "firstName"},
{ "sTitle": "Last Name", "data": "lastName" },
{ "sTitle": "Middle Name", "data": "middleName" }
]
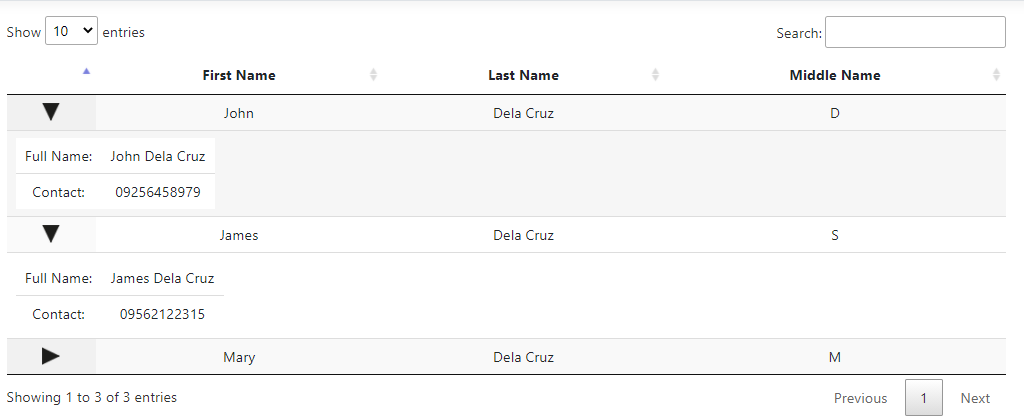
});Below is the image of the changes from the UI. I remove the contact column from the primary table. We will add it later to the child table.
4. Add an Event listener for the click event of the details-control class. This class will handle the closing and opening of the nested web grid.
$('#userTable tbody').on('click', 'td.details-control', function () {
             var tr = $(this).closest('tr');
             var row = table.row(tr);
         if (row.child.isShown()) {
             // Check if child is already open
             row.child.hide();
             tr.removeClass('shown');
         } else {
             // Open the child row
            row.child(child_Table(row.data())).show();
             tr.addClass('shown');
         }
});- child_Table » this is the format of our nested webgrid.
- row.data() » data from the main grid
5. Create the child_table format. Use the code snippet below.
function child_Table(data) {
         return '<table cellpadding="5" cellspacing="0" border="0" style="padding-left:50px;">' +
             '<tr>' +
             '<td>Full Name:</td>' +
             '<td>' + data.firstName + ' ' + data.lastName + '</td>' +
             '</tr>' +
             '<tr>' +
             '<td>Contact:</td>' +
            '<td>' + data.contact + '</td>' +
            '</tr>' +
            '</table>';
    }
At this point, we already Implement Nested WebGrid with Expand and Collapse in ASP.NET. To test, Run your project.
You can download Source code here: coderbugzz
III. Nested WebGrid with existing HTML Table
This method is an alternative way of using a Jquery Datatable. If you have an existing table and you wanted to convert it to a JQuery Datatable. You will encounter this scenario if you are working with an existing web application. If that is your case, you may proceed with these steps.
Scripts:
<script src="https://ajax.googleapis.com/ajax/libs/jquery/3.2.1/jquery.min.js"></script>
<link rel="Stylesheet" href="https://cdn.datatables.net/1.10.16/css/jquery.dataTables.min.css" />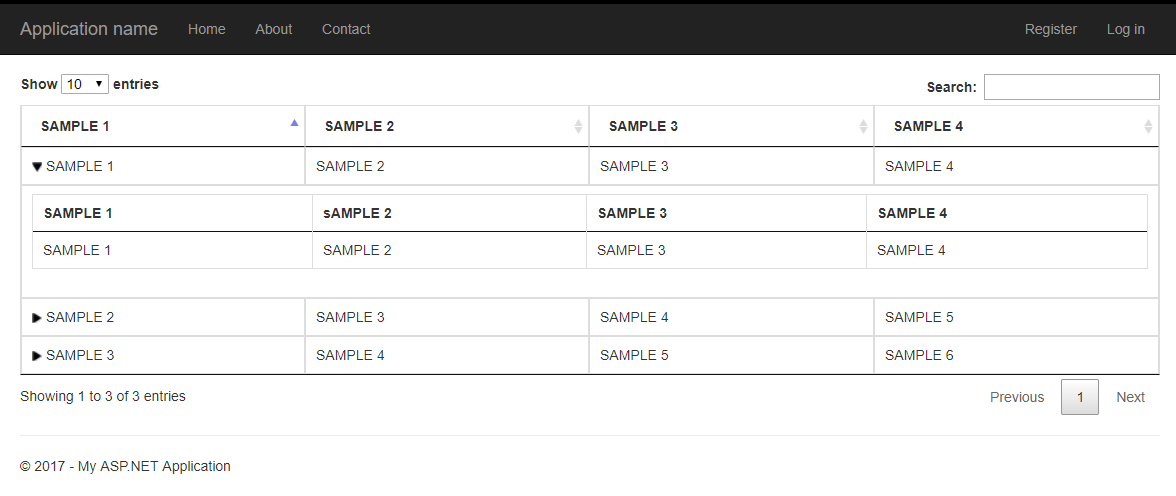
<script type="text/javascript" src="https://cdn.datatables.net/1.10.16/js/jquery.dataTables.min.js"></script>- If you have an existing table, you can use it, but I will construct mine using the code below for the sake of this tutorial.
<table class="table table-bordered" id="sampleTable">
       <thead>
           <tr>
               <th>SAMPLE 1</th>
               <th>SAMPLE 2</th>
               <th>SAMPLE 3</th>
               <th>SAMPLE 4</th>
           </tr>
       </thead>
       <tbody>
           <tr>
               <td class="main_table1"><a onclick="load_child_table(1)"><img id='main_table1' src='../images/arrowupfinal.png' width='10' height='10' /></a> SAMPLE 1</td>
               <td>SAMPLE 2</td>
               <td>SAMPLE 3</td>
               <td>SAMPLE 4</td>
           </tr>
           <tr>
               <td class="main_table2"><a onclick="load_child_table(2)"><img id='main_table2' src='../images/arrowupfinal.png' width='10' height='10' /></a> SAMPLE 2</td>
               <td>SAMPLE 3</td>
               <td>SAMPLE 4</td>
               <td>SAMPLE 5</td>
           </tr>
           <tr>
               <td class="main_table3"><a onclick="load_child_table(3)"><img id='main_table3' src='../images/arrowupfinal.png' width='10' height='10' /></a> SAMPLE 3</td>
               <td>SAMPLE 4</td>
               <td>SAMPLE 5</td>
               <td>SAMPLE 6</td>
           </tr>
       </tbody>
   </table>
2. To convert this table to JQuery Datatable you just need to call the Datatable() method.
$("#sampleTable" ).DataTable();3. Using this method will give you an error if you convert the same table multiple times. That means we need to check if the Jquery Datatable is already created. To check if JQuery Datatable already exists, use the snippet below.
//check if Datatable already exist for dynamic table and remove if it exist
  function check_table(table) {

      var currTable = $(table);
      if (currTable) {
          $(".dataTables_filter").remove();
          $(".dataTables_length").remove();
          $(".dataTables_info").remove();
          $(".dataTables_paginate").remove();
          $(".paging_simple_numbers").remove();
          // contains the dataTables master records
          var s = $(document).dataTableSettings;
          if (s != 'undefined') {
              var len = s.length;

              for (var i = 0; i < len; i++) {
                  // if already exists, remove from the array
                  if (s[i].sInstance = $(table)) {
                      s.splice(i, 1);
                  }
              }

          }
      }
  }
4. Now, this is how our conversion to Datatable will look like.
function jq_Datatable(table_ID) {
      var table = "#" + table_ID;

      check_table(table); //check if datable exist if not destroy

      var table = $("#" + table_ID).DataTable();

  }
5. Create a format for our Child Table.
//child table design
         function child_Table() {
         var result =  "<div class='slider'>";
                                          + "  <table class='table table-bordered'>  "
                        + "  <thead>"
                        + "    <tr>"
                                                 + "        <th>SAMPLE 1</th>"
                        + "        <th>sAMPLE 2</th>"
                        + "        <th>SAMPLE 3</th>"
                        + "        <th>SAMPLE 4</th>"
                        + "    </tr>"
                        + "  </thead>"
                        + " <tbody>"
                        + "    <tr>"
                        + "        <td>SAMPLE 1</td>"
                        + "        <td>SAMPLE 2</td>"
                        + "        <td>SAMPLE 3</td>"
                        + "        <td>SAMPLE 4</td>"
                        + "    </tr>"
                        + "</tbody>"
                        + "</table>"
                        + "</div>";
         return result;
}
6. Load the child table. If you observe, I used the onclick event to trigger the load_child_table method. This process will require you to generate a unique value to identify which columns call the child design. In my case, I use id to call load_child_table design. Used the snippet below.
- main_table -> unique class use to determine the closest tr from the selected <td>
 function load_child_table(No) {
      ////Set img for toogle add and minus
      var src = $("#main_table" + No).attr('src');
      var src_add = '../images/arrowdown.png';
      var src_minus = '../images/arrowupfinal.png';


      if (src == src_add) {
          $("#main_table" + No).attr('src', src_minus);

      } else if (src == src_minus) {
          $("#main_table" + No).attr('src', src_add);
      }
      //end of toggle


      var tr = $(".main_table" + No).closest('tr');
      var table = $('#sampleTable').DataTable();
      var row = table.row(tr);

      if (row.child.isShown()) {
          // This row is already open - close it
          row.child.hide();
          tr.removeClass('shown');
      }
      else {
          row.child(child_Table).show();
          tr.addClass('shown');
          $('div.slider', row.child()).slideDown(20000);
      }
  }
Now, you can run your project. This should be the final output.
Full Code
@{
    ViewBag.Title = "Home Page";
}
<br />
<div>
    <table class="table table-bordered" id="sampleTable">
        <thead>
            <tr>
                <th>SAMPLE 1</th>
                <th>SAMPLE 2</th>
                <th>SAMPLE 3</th>
                <th>SAMPLE 4</th>
            </tr>
        </thead>
        <tbody>
            <tr>
                <td class="main_table1"><a onclick="load_child_table(1)"><img id='main_table1' src='../images/arrowupfinal.png' width='10' height='10' /></a> SAMPLE 1</td>
                <td>SAMPLE 2</td>
                <td>SAMPLE 3</td>
                <td>SAMPLE 4</td>
            </tr>
            <tr>
                <td class="main_table2"><a onclick="load_child_table(2)"><img id='main_table2' src='../images/arrowupfinal.png' width='10' height='10' /></a> SAMPLE 2</td>
                <td>SAMPLE 3</td>
                <td>SAMPLE 4</td>
                <td>SAMPLE 5</td>
            </tr>
            <tr>
                <td class="main_table3"><a onclick="load_child_table(3)"><img id='main_table3' src='../images/arrowupfinal.png' width='10' height='10' /></a> SAMPLE 3</td>
                <td>SAMPLE 4</td>
                <td>SAMPLE 5</td>
                <td>SAMPLE 6</td>
            </tr>
        </tbody>
    </table>
</div>

<script src="https://ajaxx.googleapis.com/ajax/libs/jquery/3.2.1/jquery.min.js"></script>
<link rel="Stylesheet" href="https://cdn.datatables.net/1.10.16/css/jquery.dataTables.min.css" />
<script type="text/javascript" src="https://cdn.datatables.net/1.10.16/js/jquery.dataTables.min.js"></script>


<script>
    $(document).ready(function () {
        $.noConflict();

        //call function for conversion of table when document is ready
        jq_Datatable("sampleTable");
    });


    //function to convert simple table to Datatable
    function jq_Datatable(table_ID) {
        var table = "#" + table_ID;

        check_table(table);

        var table = $("#" + table_ID).DataTable();

    }

    //check if Datatable already exist for dynamic table and remove if it exist
    function check_table(table) {

        var currTable = $(table);
        if (currTable) {
            $(".dataTables_filter").remove();
            $(".dataTables_length").remove();
            $(".dataTables_info").remove();
            $(".dataTables_paginate").remove();
            $(".paging_simple_numbers").remove();
            // contains the dataTables master records
            var s = $(document).dataTableSettings;
            if (s != 'undefined') {
                var len = s.length;

                for (var i = 0; i < len; i++) {
                    // if already exists, remove from the array
                    if (s[i].sInstance = $(table)) {
                        s.splice(i, 1);
                    }
                }

            }
        }
    }

    //load child table
    function load_child_table(No) {
        ////Set img for toogle add and minus
        var src = $("#main_table" + No).attr('src');
        var src_add = '../images/arrowdown.png';
        var src_minus = '../images/arrowupfinal.png';


        if (src == src_add) {
            $("#main_table" + No).attr('src', src_minus);

        } else if (src == src_minus) {
            $("#main_table" + No).attr('src', src_add);
        }
        //end of toggle


        var tr = $(".main_table" + No).closest('tr');
        var table = $('#sampleTable').DataTable();
        var row = table.row(tr);

        if (row.child.isShown()) {
            // This row is already open - close it
            row.child.hide();
            tr.removeClass('shown');
        }
        else {
            row.child(child_Table).show();
            tr.addClass('shown');
            $('div.slider', row.child()).slideDown(20000);
        }
    }

   //child table design
         function child_Table() {
         var result =  "<div class='slider'>";
                                          + "  <table class='table table-bordered'>  "
                        + "  <thead>"
                        + "    <tr>"
                                                 + "        <th>SAMPLE 1</th>"
                        + "        <th>sAMPLE 2</th>"
                        + "        <th>SAMPLE 3</th>"
                        + "        <th>SAMPLE 4</th>"
                        + "    </tr>"
                        + "  </thead>"
                        + " <tbody>"
                        + "    <tr>"
                        + "        <td>SAMPLE 1</td>"
                        + "        <td>SAMPLE 2</td>"
                        + "        <td>SAMPLE 3</td>"
                        + "        <td>SAMPLE 4</td>"
                        + "    </tr>"
                        + "</tbody>"
                        + "</table>"
                        + "</div>";
         return result;
}
</script>
Summary
In this tutorial, we have created a sample project on ASP.NET Core. We use the Jquery Datatable plugin to create a table. We also discuss how to convert an existing HTML table. This tutorial shows the flexibility of this project. I hope this can be a reference and guide for your future projects. Happy coding.