This article will show you an actual ASP.Net SignalR Real-Time Chat Application. This project’s main goal is to have an idea of how we can use SignalR in a real-time web application.
As stated on this site https://www.asp.net/signalr:
“ASP.NET SignalR is a library for ASP.NET developers that makes developing real-time web functionality easy. SignalR allows bi-directional communication between server and client. Servers can now push content to connected clients instantly as it becomes available. ”
Project Overview:
SignalR allows us to create a real-time application over HTTP. HTTP is a standard protocol used to communicate between a client and a server. Below is a sample diagram of an HTTP request from a client and a server.
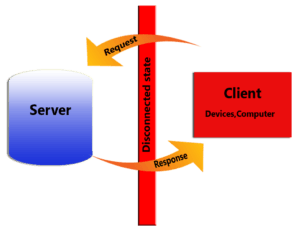
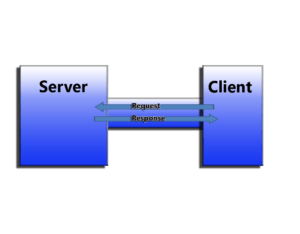
As you can see from the diagram above, there is a disconnected state between the client and a server. At the same time, SignalR is like a tunnel that has bi-directional connectivity. Please see the image below.
To see how SignalR works in real-time. Let’s create a Web Chat Application. This application will show a real-time and stateless manner of SignalR.
SignalR Chat App With ASP.NET
Note: I’m using the default MVC template of ASP.NET
I assume you have already created a project or if not you can refer to this blog post How to start with asp.net MVC.
Let’s start:
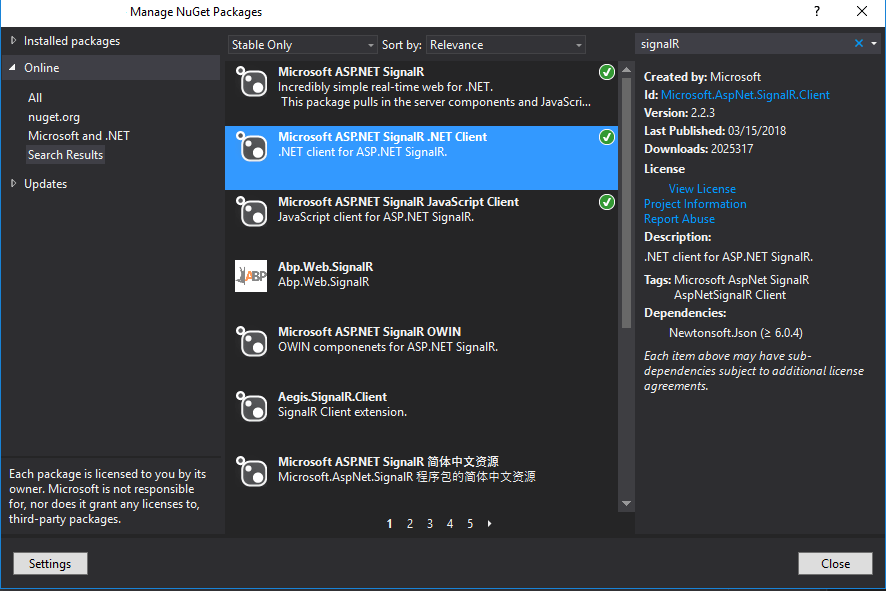
First, open Nuget Package Manager. To open, go to your solution explorer and right-click on your project name. Once the NuGet package manager is opened, search for SignalR and install.
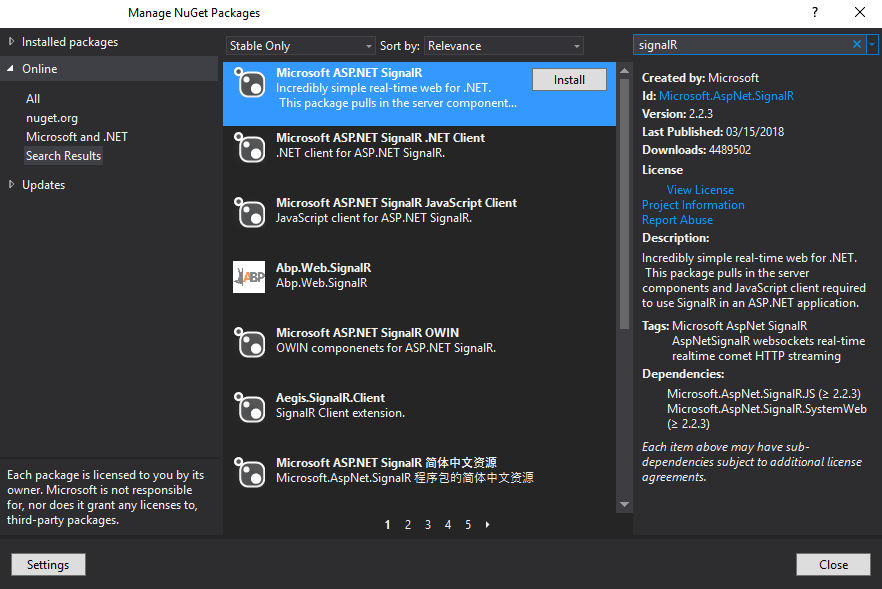
To verify if the assembly reference is installed. It should look like the image below.
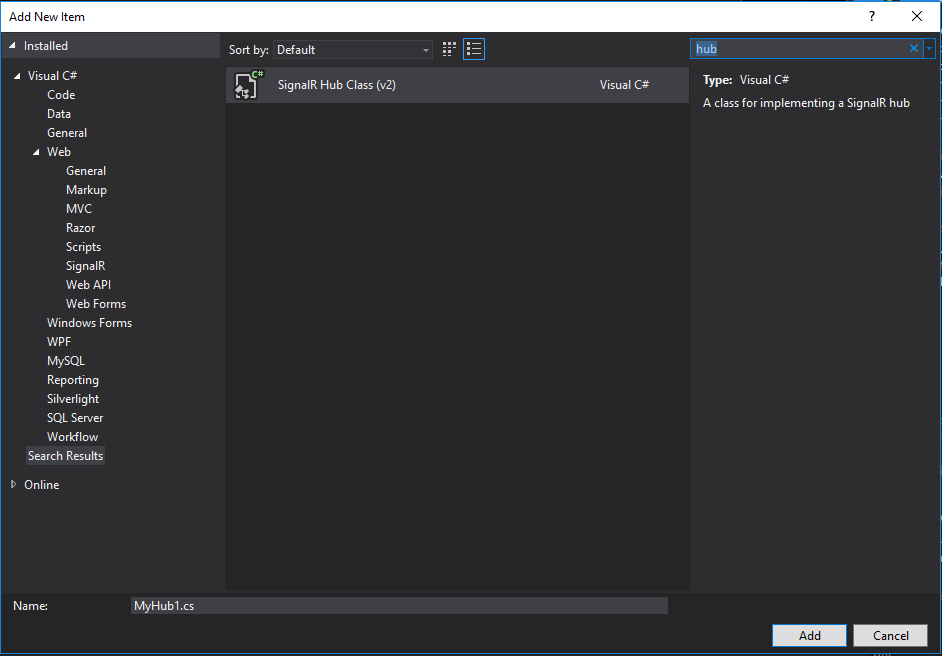
Second, add the SignalR Hub Class. To add, right-click on your project name and select add > add new item, then search for the hub. Then rename your hub. In my case, I name it ChatHub.
Open your hub class and copy the code below.
Code:
using System;
using System.Collections.Generic;
using System.Linq;
using System.Web;
using Microsoft.AspNet.SignalR;

namespace signalR_Chat
{
    public class ChatHub : Hub
    {
        public override System.Threading.Tasks.Task OnConnected()
        {
            Clients.All.user(Context.User.Identity.Name);
            return base.OnConnected();
        }

        public void send(string message)
        {
            Clients.Caller.message("You~You: " + message);
            Clients.Others.message("others~"+ Context.User.Identity.Name + ": " + message);
        }
    }
}
Third, open your default controller, which is HomeController, and create a new action result. This will return the ChatView design that we are about to create in our next steps.
Code:
      public ActionResult Chat()
        {
            return View("ChatView");
        }
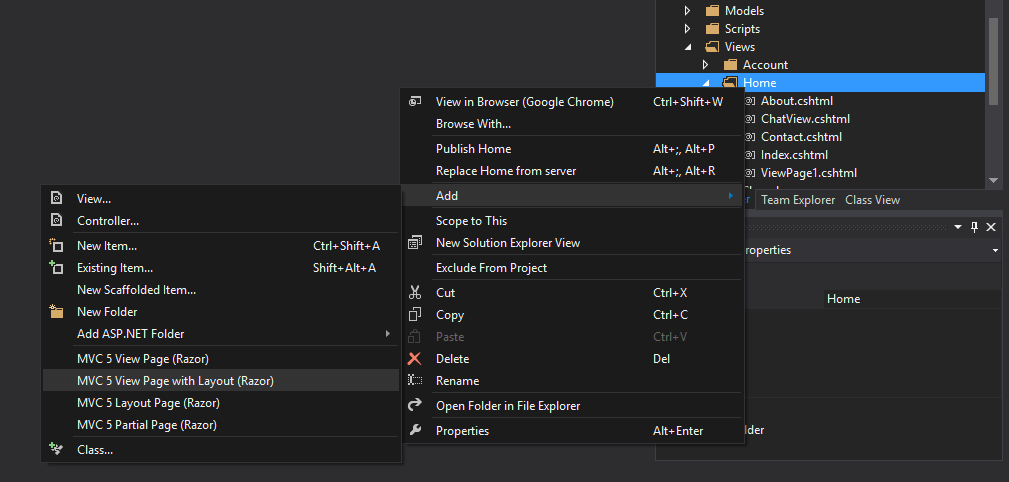
Fourth,create ChatView.cshtml. Go to your solution explorer and navigate to Views >Home folder, then create a new view. Right-click on Home Folder and then select add > MVC 5 View Page with Razor. Choose Layout.cshml as your layout page for your view.
Copy code below to your ChatView.cshtml
Code:
@{
    ViewBag.Title = "ChatView";
}

<meta name="viewport" content="width=device-width, initial-scale=1">
<style>
    body1 {
        margin: 0 auto;
        max-width: 800px;
        padding: 0 20px;
    }

    .container1 {
        border: 2px solid #dedede;
        background-color: #f1f1f1;
        border-radius: 5px;
        padding: 10px;
        margin: 10px 0;
    }

    .darker {
        border-color: #ccc;
        background-color: #ddd;
    }

    .container1::after {
        content: "";
        clear: both;
        display: table;
    }

    .container1 img {
        float: left;
        max-width: 60px;
        width: 100%;
        margin-right: 20px;
        border-radius: 50%;
    }

        .container1 img.right {
            float: right;
            margin-left: 20px;
            margin-right: 0;
        }

    .time-right {
        float: right;
        color: #aaa;
    }

    .time-left {
        float: left;
        color: #999;
    }
</style>

<div class="container">
<h3>Chat Box</h3>
<div class="panel panel-default">
<div class="panel-heading">
<h5>Users</h5>
<ul id="user"></ul>
</div>
<div class="panel-body">
<h5>Chat Message</h5>
<div class="" id="message">

</div>

</div>
<div class="panel-footer">
<div class="form-inline my-2 my-lg-0">
<input class="form-control mr-sm-2" type="text" id="txt" placeholder="Search">
<button class="btn btn-secondary my-2 my-sm-0" id="send">Send</button>
</div>

</div>
</div>
</div>
Fifth, establish a connection with your SignalR library using Jquery. Copy code below to your ChatView.cshtml.
@section scripts{
<script src="~/Scripts/jquery.signalR-2.2.3.js"></script>
<script src="~/signalr/hubs"></script>
<script>
    var hub = $.connection.chatHub;
    debugger;
    hub.client.message = function (msg) {
        $("#message").append(chatTemplate(msg));
    }

    hub.client.user = function (msg) {
        $("#user").append("<li>" + msg + "</li>")
    }

    $.connection.hub.start(function () {
        $("#send").click(function () {
            hub.server.send($("#txt").val());
            $("#txt").val(" ");
        })
    })

    function chatTemplate(msg)
    {
        var result = "";
        var dt = new Date();
        var time = dt.getHours() + ":" + dt.getMinutes() + ":" + dt.getSeconds();
        if (msg.split("~")[0] == "You") {
            result += "<div class='container1'>" +
              "<img src='/w3images/bandmember.jpg' alt='Avatar' style='width:100%;'>" +
              "<p>" + msg.split("~")[1] + "</p>" +
              "<span class='time-right'>" + time + "</span> " +
              "</div>";
        } else {
            result += "<div class='container1 darker'>" +
             "<img src='/w3images/bandmember.jpg' alt='Avatar' style='width:100%;'>" +
             "<p>" + msg.split("~")[1] + "</p>" +
             "<span class='time-right'>" + time + "</span> " +
             "</div>";
        }


        return result;
    }
</script>

    }
Lastly, redesign your default view, which is the index.cshtml inside your Views>Home Folder. Open the file and replace the content with the code below.
Code:
@{
    ViewBag.Title = "Home Page";
}

<link href="~/Content/style.css" rel="stylesheet" />

<div class="w3l">
<div class="text">
<h1>Welcome!</h1>

<p>Simple Chat Application</p>
</div>
<div class="image">
<img src="~/images/smile.png" />
</div>
<div class="clear"></div>
</div>
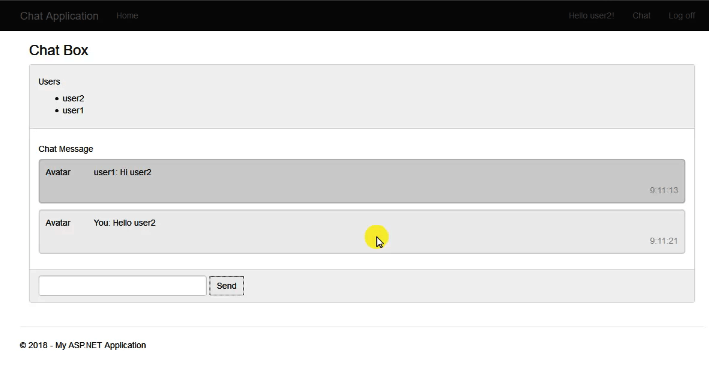
And we are good to go. We now have our ASP.Net SignalR Real-Time Chat Application. To see the final output of this project. Run your project by pressing F5. Then register two new users for testing purposes. Then open this project in Mozilla and google chrome to see a real-time chat application. See the image below.
Thank you for reading!!
Happy coding!!
Code Summary:
ChatHub.cs > Hub Class
Code:
using System;
using System.Collections.Generic;
using System.Linq;
using System.Web;
using Microsoft.AspNet.SignalR;

namespace signalR_Chat
{
    public class ChatHub : Hub
    {
        public override System.Threading.Tasks.Task OnConnected()
        {
            Clients.All.user(Context.User.Identity.Name);
            return base.OnConnected();
        }

        public void send(string message)
        {
            Clients.Caller.message("You~You: " + message);
            Clients.Others.message("others~"+ Context.User.Identity.Name + ": " + message);
        }
    }
}
HomeController.cs > Controller
Code:
using System;
using System.Collections.Generic;
using System.Linq;
using System.Web;
using System.Web.Mvc;

namespace SignalR_Chat.Controllers
{
    public class HomeController : Controller
    {
        public ActionResult Index()
        {
            return View();
        }

        public ActionResult Chat()
        {
            return View("ChatView");
        }

    }
}
ChatView.cshtml > View
Code:
@{
    ViewBag.Title = "ChatView";
}

<meta name="viewport" content="width=device-width, initial-scale=1">
<style>
    body1 {
        margin: 0 auto;
        max-width: 800px;
        padding: 0 20px;
    }

    .container1 {
        border: 2px solid #dedede;
        background-color: #f1f1f1;
        border-radius: 5px;
        padding: 10px;
        margin: 10px 0;
    }

    .darker {
        border-color: #ccc;
        background-color: #ddd;
    }

    .container1::after {
        content: "";
        clear: both;
        display: table;
    }

    .container1 img {
        float: left;
        max-width: 60px;
        width: 100%;
        margin-right: 20px;
        border-radius: 50%;
    }

        .container1 img.right {
            float: right;
            margin-left: 20px;
            margin-right: 0;
        }

    .time-right {
        float: right;
        color: #aaa;
    }

    .time-left {
        float: left;
        color: #999;
    }
</style>

<div class="container">
<h3>Chat Box</h3>
<div class="panel panel-default">
<div class="panel-heading">
<h5>Users</h5>
<ul id="user"></ul>
</div>
<div class="panel-body">
<h5>Chat Message</h5>
<div class="" id="message">

</div>

</div>
<div class="panel-footer">
<div class="form-inline my-2 my-lg-0">
<input class="form-control mr-sm-2" type="text" id="txt" placeholder="Search">
<button class="btn btn-secondary my-2 my-sm-0" id="send">Send</button>
</div>

</div>
</div>
</div>


@section scripts{
<script src="~/Scripts/jquery.signalR-2.2.3.js"></script>
<script src="~/signalr/hubs"></script>
<script>
    var hub = $.connection.chatHub;
    debugger;
    hub.client.message = function (msg) {
        // $("#message").append("<li>" + msg + "</li>")

        $("#message").append(chatTemplate(msg));
    }

    hub.client.user = function (msg) {
        $("#user").append("<li>" + msg + "</li>")
    }

    $.connection.hub.start(function () {
        $("#send").click(function () {
            hub.server.send($("#txt").val());
            $("#txt").val(" ");
        })
    })

    function chatTemplate(msg)
    {
        var result = "";
        var dt = new Date();
        var time = dt.getHours() + ":" + dt.getMinutes() + ":" + dt.getSeconds();
        if (msg.split("~")[0] == "You") {
            result += "<div class='container1'>" +
              "<img src='/w3images/bandmember.jpg' alt='Avatar' style='width:100%;'>" +
              "<p>" + msg.split("~")[1] + "</p>" +
              "<span class='time-right'>" + time + "</span> " +
              "</div>";
        } else {
            result += "<div class='container1 darker'>" +
             "<img src='/w3images/bandmember.jpg' alt='Avatar' style='width:100%;'>" +
             "<p>" + msg.split("~")[1] + "</p>" +
             "<span class='time-right'>" + time + "</span> " +
             "</div>";
        }


        return result;
    }
</script>

    }
Index.cshtml > Home Page View
Code:
@{
    ViewBag.Title = "Home Page";
}

<link href="~/Content/style.css" rel="stylesheet" />

<div class="w3l">
<div class="text">
<h1>Welcome!</h1>

<p>Simple Chat Application</p>
</div>
<div class="image">
<img src="~/images/smile.png" />
</div>
<div class="clear"></div>
</div>