In this tutorial, we will learn how to use attribute routing in ASP NET MVC 5. We will create an actual project and then enable and apply attribute routing. This way, we can understand how attribute routing can help us control our website’s structure.
- What is Routing in MVC?
- I. Setup ASP.NET Web Application Project
- II. Enabling Attribute Routing
- III. Add Framework Controller
- IV. Add methods and View in the Framework Controller
- V. Default MVC URL
- VI. Add Route attribute
- VI. Add Route Prefix attribute
- VII. Add Route Areas attribute
- VIII. Add Route Constraints
- Summary
What is Routing in MVC?
Routing maps the URL to an Action in a controller class. Routing contains URL patterns and handler information. We can configure the route in the ASP.NET MVC application in the RouteConfig class.
Attribute-based routing is a feature where you can apply attributes to a controller level or directly from an action result method. By default, convention-based routing is enabled on your project during creation. If you open your RouteConfig class inside the App_Start folder, this is what you will find. Below are the route config used on all of your controllers in your project.
http://localhost:xxxx/Controller Name/Action/{parameter:id}
– Default URL format
 using System;
 using System.Collections.Generic;
 using System.Linq;
 using System.Web;
 using System.Web.Mvc;
 using System.Web.Routing;

 namespace MVCAttributeDemo
 {
     public class RouteConfig
     {
         public static void RegisterRoutes(RouteCollection routes)
         {
             routes.IgnoreRoute("{resource}.axd/{*pathInfo}");

             routes.MapRoute(
                 name: "Default",
                 url: "{controller}/{action}/{id}",
                 defaults: new { controller = "Home", action = "Index", id = UrlParameter.Optional }
             );
         }
     }
 }
We can define multiple routes using this route config class, but this can create a conflict if not configured correctly. So, in this case, we will use attribute-based routing instead.
Now, Before we proceed please make sure to install the Visual Studio from this link.
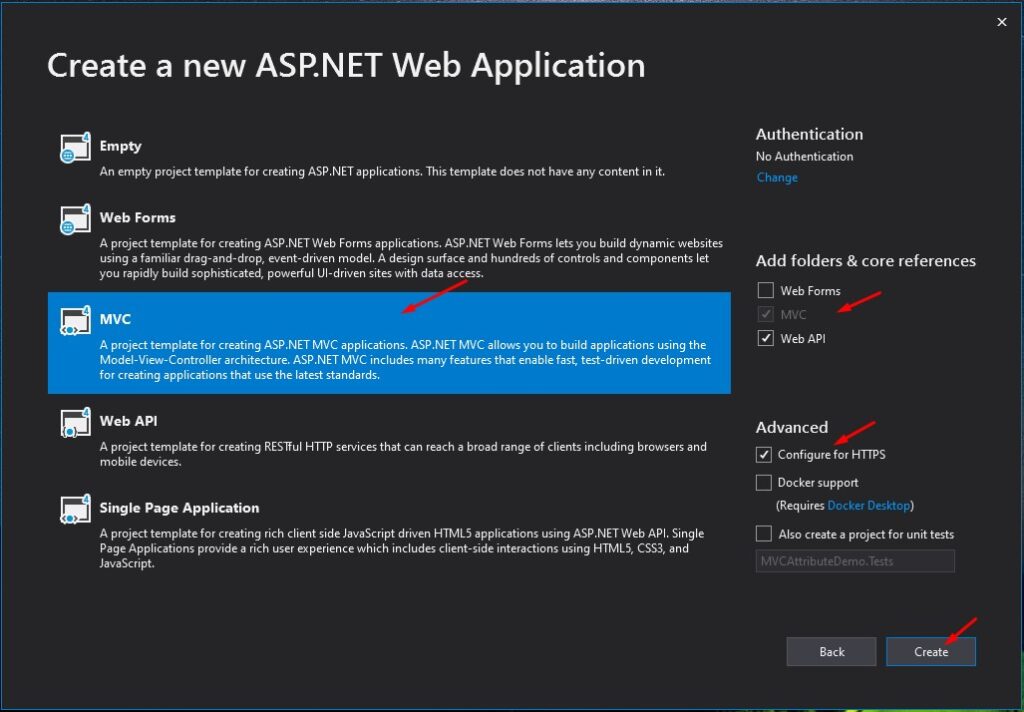
I. Setup ASP.NET Web Application Project
Let’s start by creating a new ASP.NET Web Application. Open your Visual Studio IDE and proceed with the steps below.
- Select File » New » Project.
- Choose ASP.NET Web Application(.NET Framework). Name the project MVCAttributeDemo to have the same namespace as my project. Click OK.
- Select the MVC template and then check Configure for HTTPS.
- Lastly, Click on Create.
II. Enabling Attribute Routing
The first thing that we need to do is enable attribute routing. We will enable attribute routing along with convention-based routing. To do that, we need to declare the following code on the route config class.
routes.MapMvcAttributeRoutes();Adding the code right above the MapRoute config. See the code snippet below.
using System;
 using System.Collections.Generic;
 using System.Linq;
 using System.Web;
 using System.Web.Mvc;
 using System.Web.Routing;

 namespace MVCAttributeDemo
 {
     public class RouteConfig
     {
         public static void RegisterRoutes(RouteCollection routes)
         {
             routes.IgnoreRoute("{resource}.axd/{*pathInfo}");

             routes.MapMvcAttributeRoutes();

             routes.MapRoute(
                 name: "Default",
                 url: "{controller}/{action}/{id}",
                 defaults: new { controller = "Home", action = "Index", id = UrlParameter.Optional }
             );
         }
     }
 }
III. Add Framework Controller
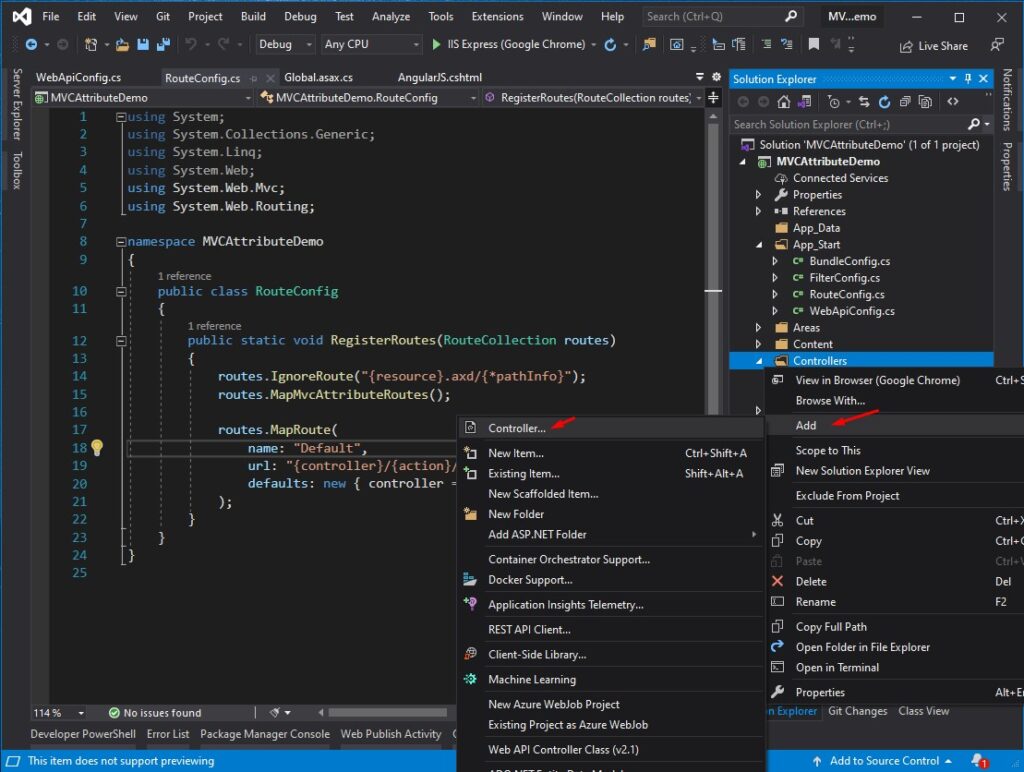
We will apply the attribute route on this controller. To create the controller follow the steps below.
- Right-click on the Controllers folder.
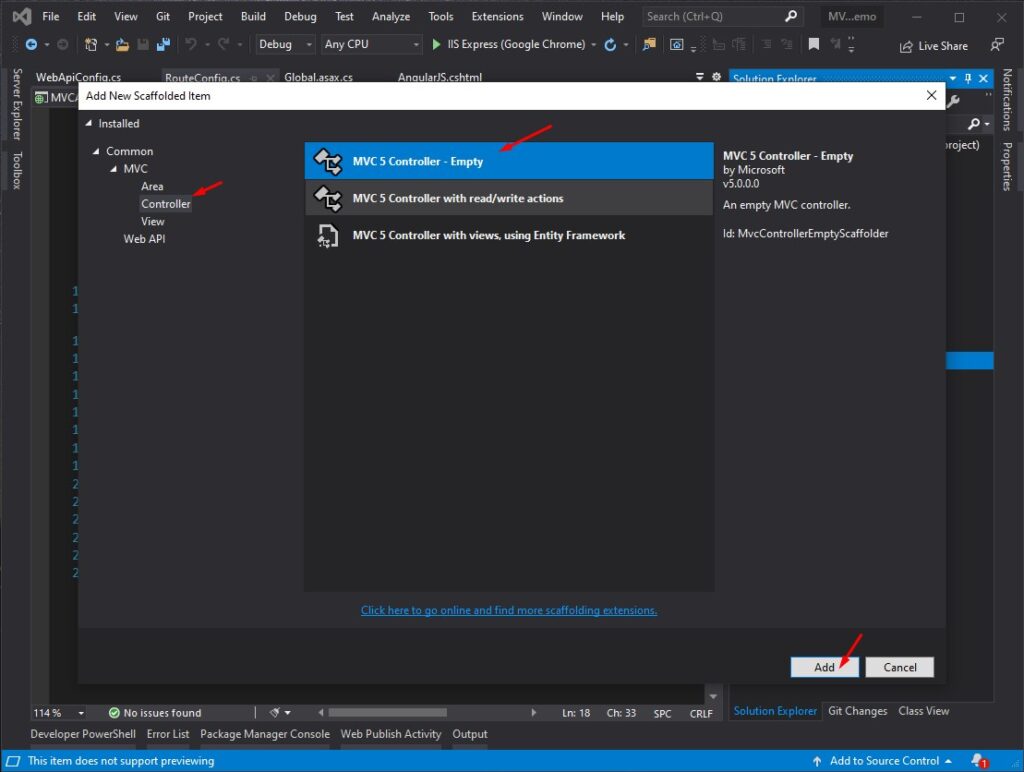
- Select Add then choose Controller.
- Choose MVC 5 Controller – Empty then click the Add button
- Name the controller FrameworkController then press the add button.

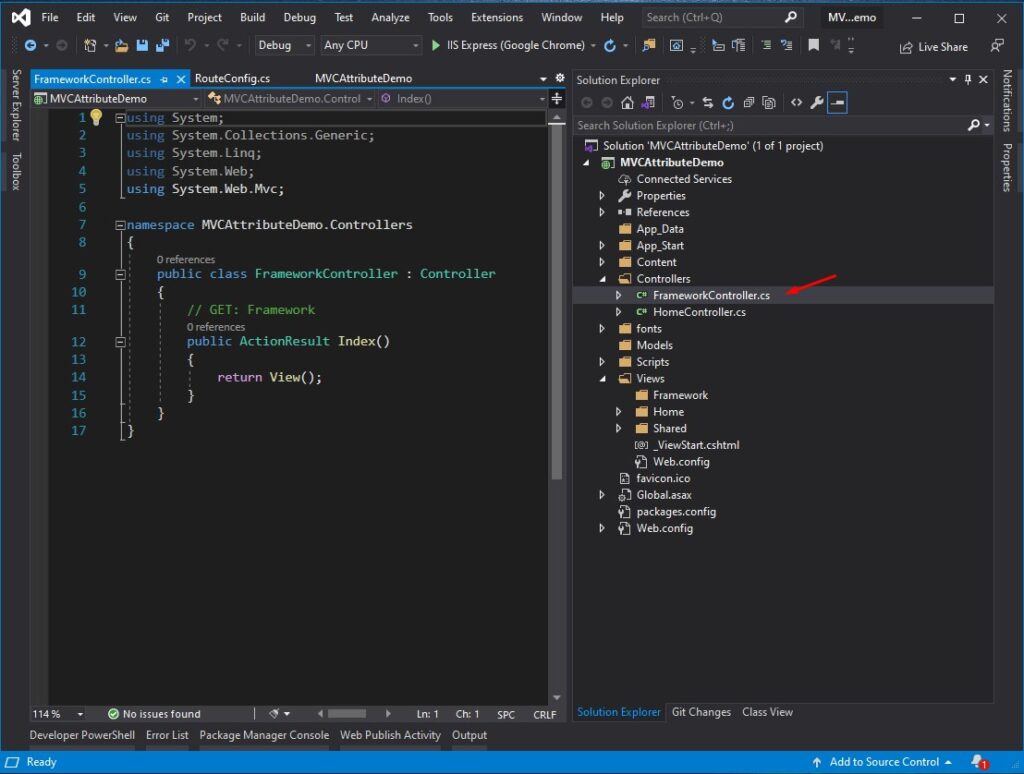
After successfully adding the controller, this is how the new controller looks like from the solution explorer.
IV. Add methods and View in the Framework Controller
Once we have our controller. Open the Framework controller and add the following method.
 public class FrameworkController : Controller
  {
         // GET: Framework
         public ActionResult Angular()
         {
             return View();
         }
         public ActionResult React()
         {
             return View();
         }
         public ActionResult Blazor()
         {
             return View();
         }
 }
In this part, we have added 3 New Action Methods Angular, React, and Blazor in Framework Controller.

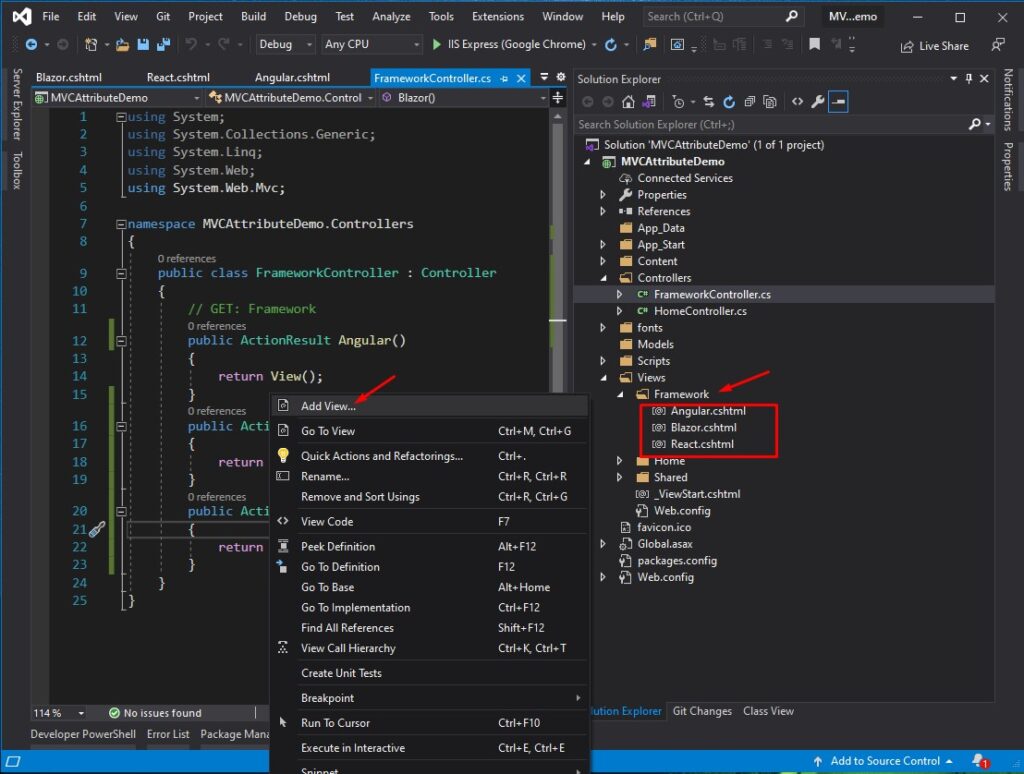
After that, create views for each action method. See the image shown below.
V. Default MVC URL
As define route on the route config class. A controller can be accessed using this format. http://{root URL}/{controller}/{action}/{parameter}. So in this project, the methods in the framework controller can be accessed using the following URL.
| Action Result | ROUTE URL |
|---|---|
| Angular() | https://localhost:44398/Framework/Angular |
| React() | https://localhost:44398/Framework/React |
| Blazor() | https://localhost:44398/Framework/Blazor |
VI. Add Route attribute
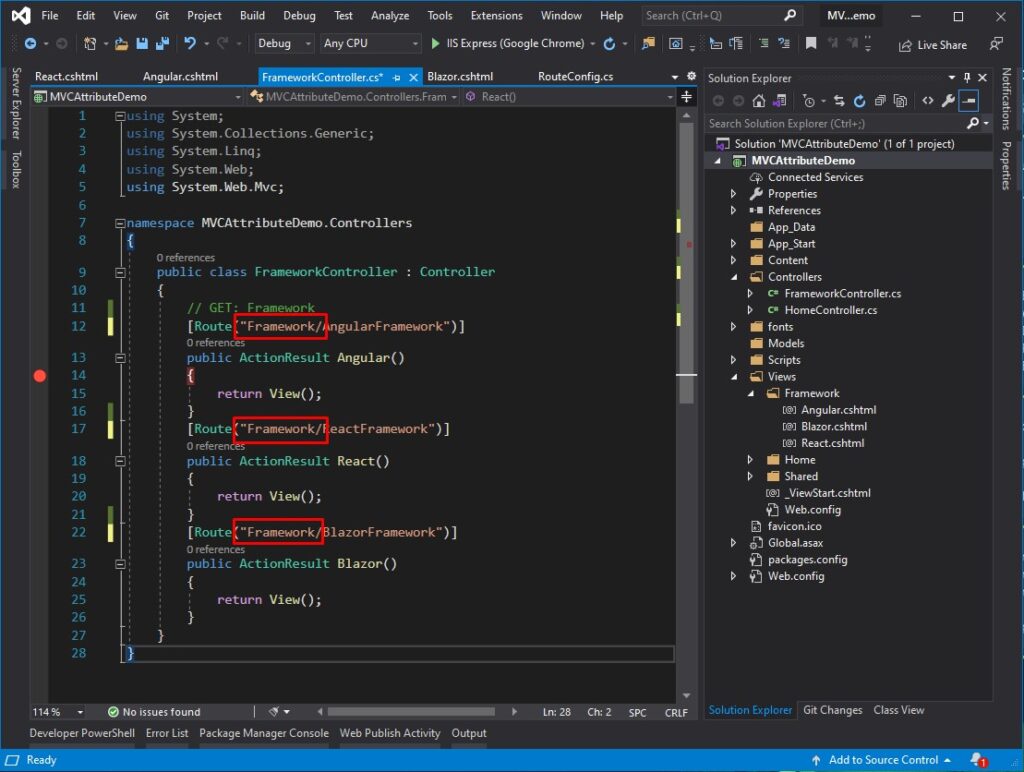
Let’s add the route attribute to the Framework controller methods. Using this technique, we can define whatever route we want for every method on this controller. To do that, apply this attribute to the Action method.
| Action Result | Attribute Route | Route URL |
| Angular() | [Route(“AngularFramework”)] | https://localhost:44398/BlazorFramework |
| React() | [Route(“ReactFramework”)] | https://localhost:44398/ReactFramework |
| Blazor() | [Route(“BlazorFramework”)] | https://localhost:44398/BlazorFramework |
using System;
 using System.Collections.Generic;
 using System.Linq;
 using System.Web;
 using System.Web.Mvc;
 namespace MVCAttributeDemo.Controllers
 {
     public class FrameworkController : Controller
     {
         // GET: Framework
         [Route("AngularFramework")]
         public ActionResult Angular()
         {
             return View();
         }
         [Route("ReactFramework")]
         public ActionResult React()
         {
             return View();
         }
         [Route("BlazorFramework")]
         public ActionResult Blazor()
         {
             return View();
         }
     }
 }
VI. Add Route Prefix attribute
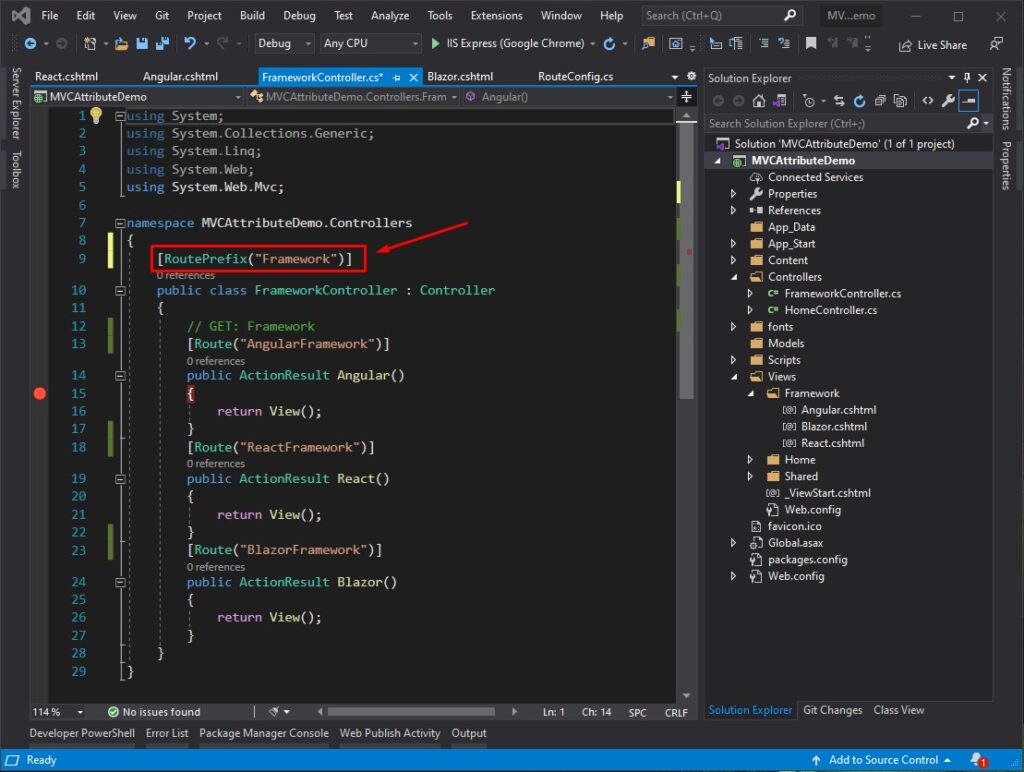
We can use Route prefixes if you have a common name on your route attribute methods. For example, if you have the same route attribute assigned, just like the attribute on the image below.
If you observed Framework word is repeated multiple times in an attribute. This scenario is where the route prefix attribute comes in handy. We can use the Route prefix to define the Framework on the controller level, and this prefix can be applied to all the methods inside the framework controller. To specify the Route prefix, use this attribute.
RoutePrefix("Framework")Once, applied this is how your Framework controller will look like.
Now, you can access the methods using the URL below.
https://localhost:44398/RoutePrefix/BlazorFramework
– RoutePrefix(“Framework”)
| Action Result | Attribute Route | Route URL |
| Angular() | [Route(“AngularFramework”)] | https://localhost:44398/Framework/BlazorFramework |
| React() | [Route(“ReactFramework”)] | https://localhost:44398/Framework/ReactFramework |
| Blazor() | [Route(“BlazorFramework”)] | https://localhost:44398/Framework/BlazorFramework |
VII. Add Route Areas attribute
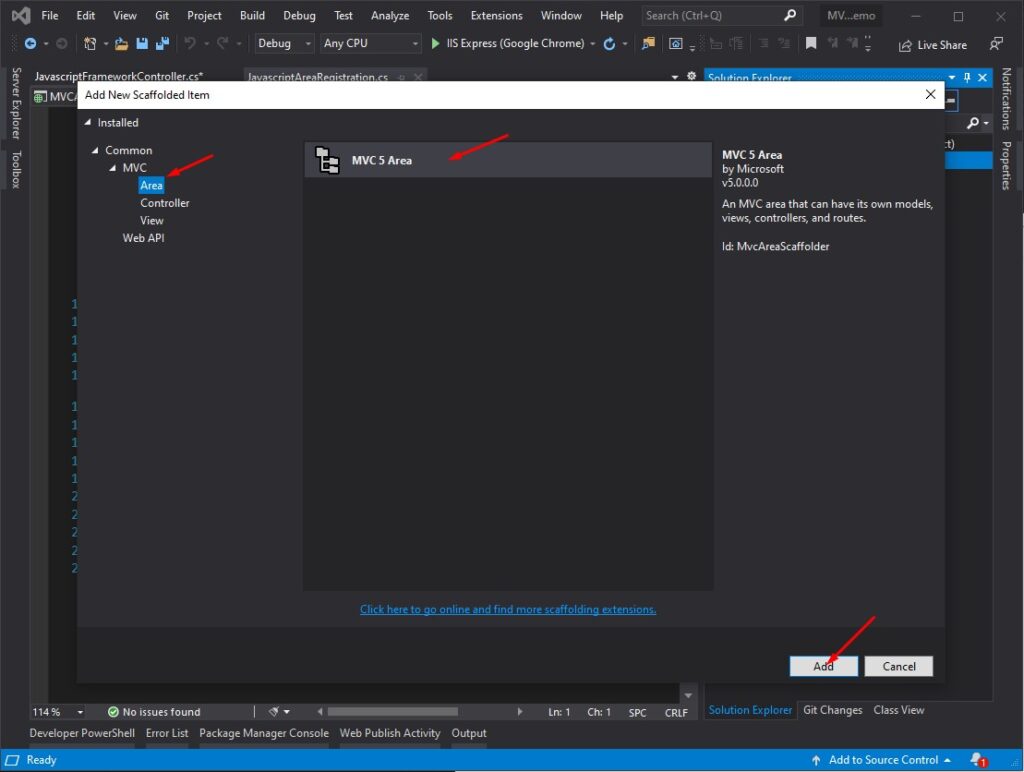
Suppose you are using Area in your project. This step is how you can define route attributes in an Area. To be able to do a demo on using attribute route from an Area. Let’s add an Area to our project.
Create an Area
- Right-click on your Project Solution
- Choose Add » New Scaffolded Item
- Select MVC 5 Area and click the Add button.
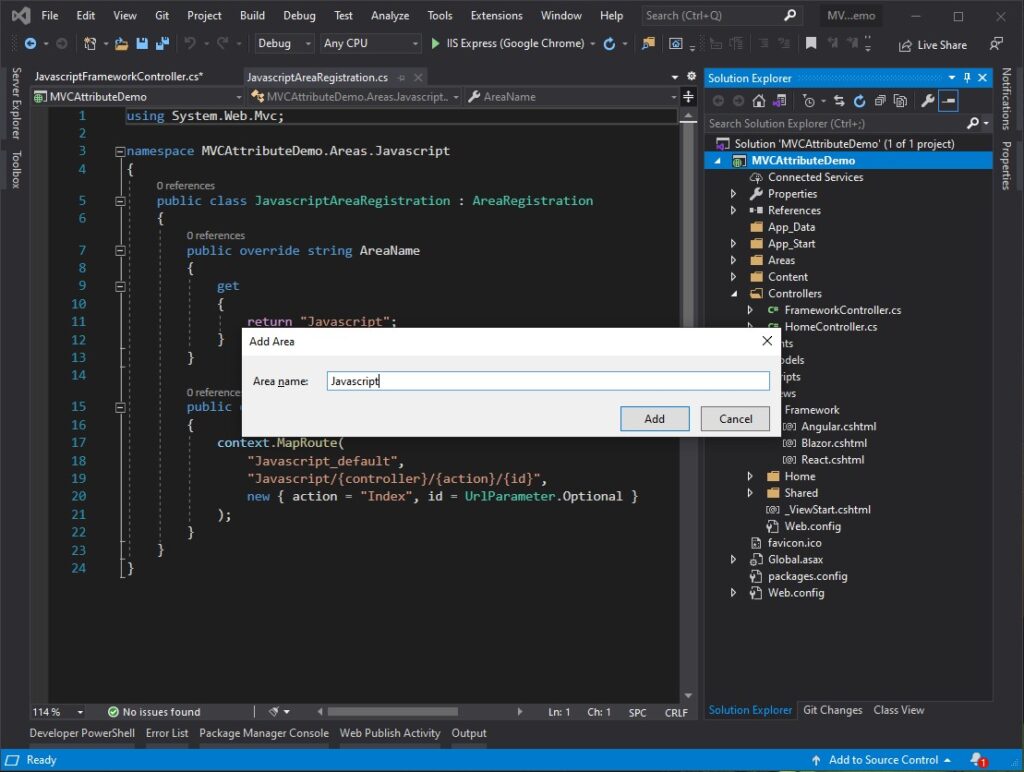
- Name it JavaScript and press the Add button.

Now, create a sample controller inside the Javascript Area. To do that, follow the steps below.
Create a Controller inside Javascript Area
- Create a Controller, name it JavascriptFramework
- Add a new action result method Vue and Angular, in your controller. See the image below.
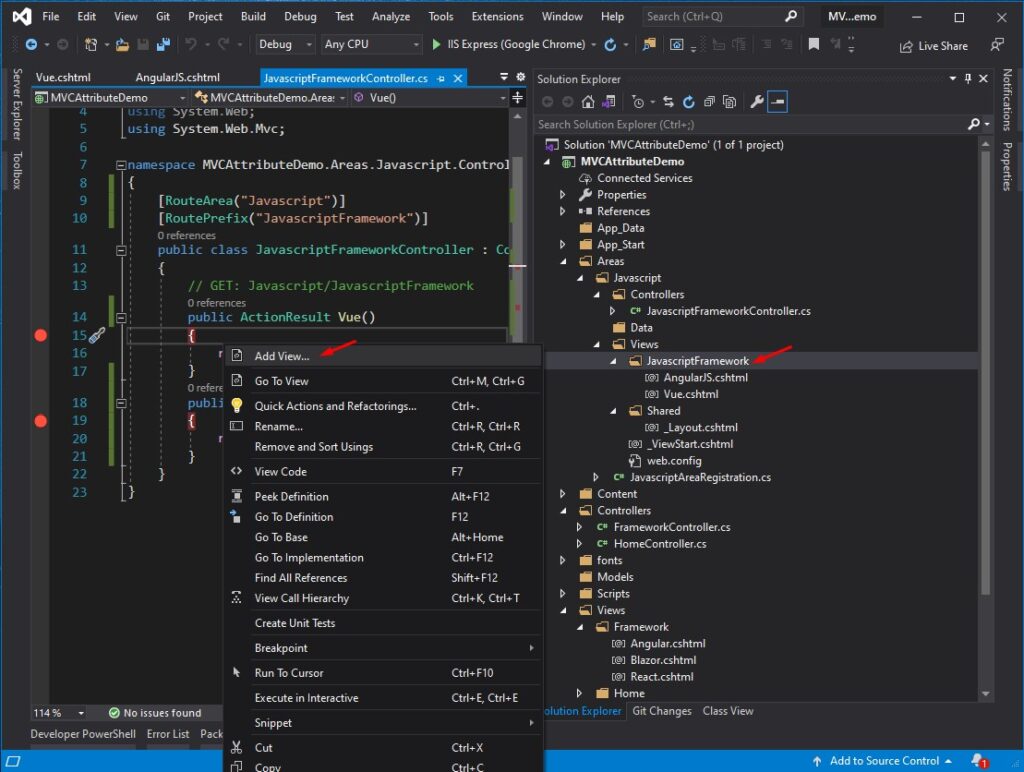
- Create a view of each method.
- Then apply the route attribute.

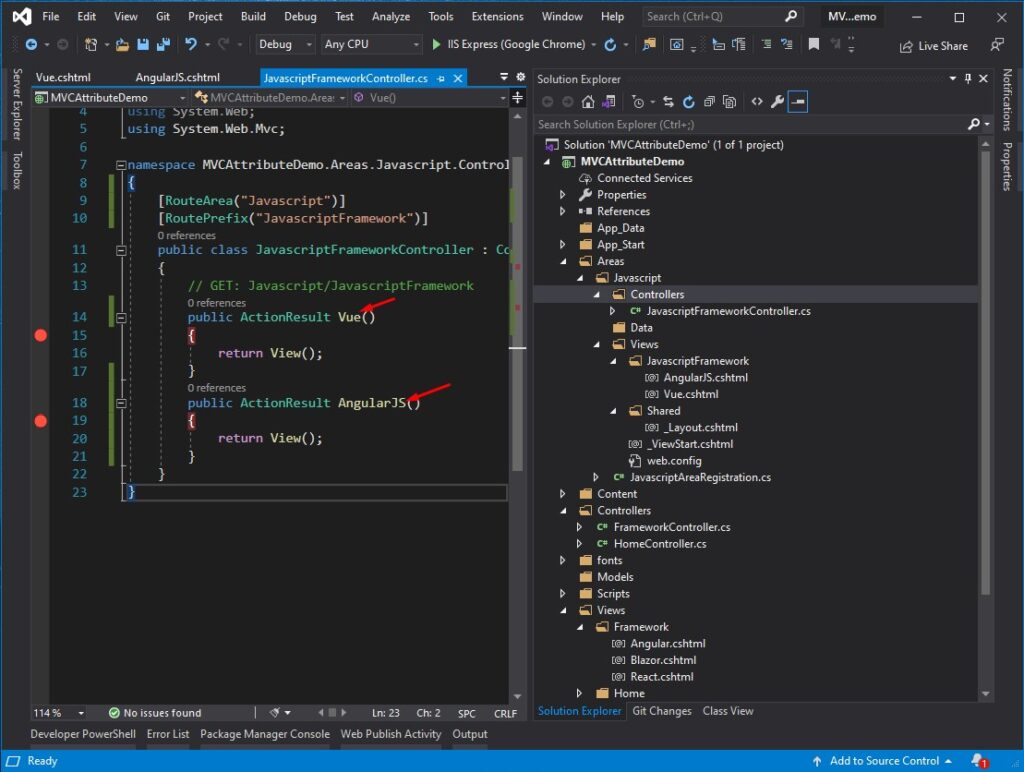
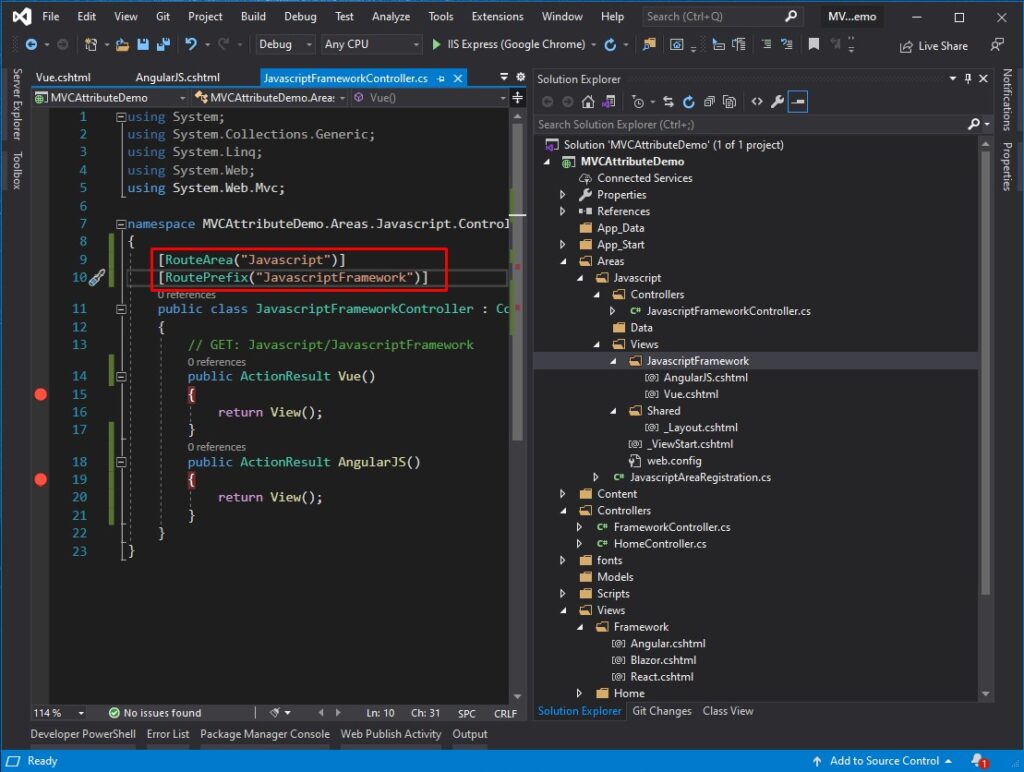
Since we define route attributes like this.
[RouteArea("Javascript")]
[RoutePrefix("JavascriptFramework")]
We can access the Area Controller method using this URL format:
https://localhost:xxxx/Route Area/Route Prefix/Action Result method
URL format
| Action Result | ROUTE URL |
|---|---|
| Vue() | https://localhost:44398/Javascript/JavascriptFramework/Vue |
| AngularJS() | https://localhost:44398/Javascript/JavascriptFramework/AngularJS |
VIII. Add Route Constraints
This part will add route constraints. The Route Constraint in ASP.NET MVC Routing allows us to apply a regular expression to a URL segment to restrict whether the route will match the request.
Below is a sample of what route constraints will look like.
- Integer parameter:
[Route("AngularFramework/{id:int}")]2. string parameter:
[Route("ReactFramework/{type:regex(^[a-zA-Z]*$)}")]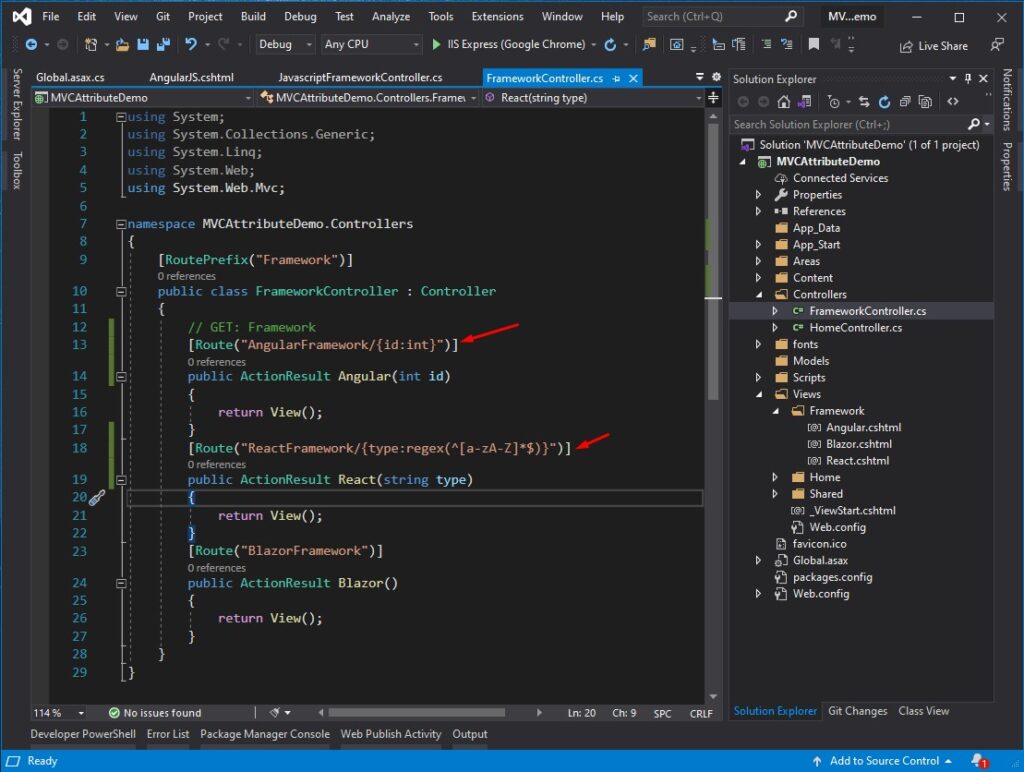
Below is the Table of Constraints. You can refer below for available constraints.
| Constraint | Description | Example |
|---|---|---|
| alpha | Matches uppercase or lowercase Latin alphabet characters (a-z. A-Z) | {x:alpha} |
| bool | Matches a Boolean value. | {x:bool} |
| DateTime | Matches a DateTime value. | {x:datetime} |
| decimal | Matches a decimal value. | {x:decimal} |
| double | Matches a 64-bit floating-point value. | {x:double} |
| float | Matches a 32-bit floating-point value. | {x:float} |
| guid | Matches a GUID value. | {x:guid} |
| int | Matches a 32-bit integer value. | {x:int} |
| length | Matches a string with the specified length or within a specified range of length | {x:length(6)} {x:length(1,20)} |
| long | Matches a 64-bit integer value. | {x:long} |
| max | Matches an integer with a maximum value. | {x:max(10) |
| maxlength | Matches a string with a maximum length. | {x:maxlength(10)} |
| min | Matches an integer with a minimum value. | {x:min(10)} |
| minlength | Matches a string with a minimum length. | {x:minlength(10)} |
| range | Matches an integer within a range of values. | {x:range(10.50)} |
| regex | Matches a regular expression. | {x:regex(^ \d(3}-\d(3)-\d(4}S)} |
This is how to use attribute routing in ASP NET MVC 5. You may also download the source code for this tutorial on my GitHub Account @coderbugzz.
Summary
We learned from this tutorial how to use attribute routing in ASP NET MVC 5. We also tried to route in Areas. Hopefully, this tutorial will help you if you are having trouble creating a custom route on your ASP.NET Application.
KEEP CODING!!
Read More : Secure ASP.NET Web Application
– freecodespot