Widgets in Flutter are the building blocks of user interfaces in Flutter. In Flutter, everything is a widget. According to the documentation, Flutter widgets are built using a modern framework that takes inspiration from React. If you’re familiar with React, you would know that React user interfaces are built using components.
The view of widgets relies on their current configuration and state. When the changes, the widget rebuilds its description and renders the updated view.
There are currently fourteen (14) major categories of widgets in Flutter. You can view the widget catalog in Flutter’s documentation (https://docs.flutter.dev/ui/widgets).
In this tutorial, we will learn how to build custom widgets and use them in our application.
About the project
In this small project, we will create a stopwatch app similar to the iPhone’s. The app will have a timer, a lap/reset and start/stop buttons, and a list of laps. The app will run on both Android and iOS devices. To demonstrate the power of custom widgets in Flutter, we will build our app entirely using existing widgets before refactoring to custom widgets.
Watch the video on creating a custom Flutter widget here.
Getting Started
Before we get started in building our app, make sure you have the following:
- A device with Flutter installed and configured;
- An integrated development environment (VSCode or Android Studio) was installed; and
- A working knowledge of Flutter.
Without further ado, let’s get started.
I. Create the Flutter starter app
To create a Flutter app, run the following code in your command prompt or terminal.
This will create a new folder in your current directory based on the app name you inputted, in this case, the folder will be named countdown_timer. Next, open the folder in VS Code (or the IDE of your choice).
Open lib/main.dart and remove all the contents. Replace it with the following code:
 import 'package:custom_widget/countdown_timer.dart';

  import 'package:flutter/material.dart';

// entry point of the app

  void main() {

    runApp(const MyApp());

  }

// root widget of the app

  class MyApp extends StatelessWidget {

    const MyApp({super.key});

    @override

    Widget build(BuildContext context) {

      return MaterialApp(

        debugShowCheckedModeBanner: false,

        title: 'Countdown Timer',

        theme: ThemeData(

          colorScheme: ColorScheme.fromSeed(seedColor: Colors.black),

          useMaterial3: true,

        ),

        home: const CountdownTimer(),

      );

    }

   }
The above code creates a simple Flutter app with a single widget called CountdownTimer() assigned to the body. The CountdownTimer widget is a widget that leaves inside the lib/countdown_timer.dart file. We will create this file when we build the user interface.
CountdownTimer is a custom widget in that it does not come from the library of widgets of Flutter. It is a widget that we will create ourselves. In the next part, we will populate this widget.
II. Build the user interface
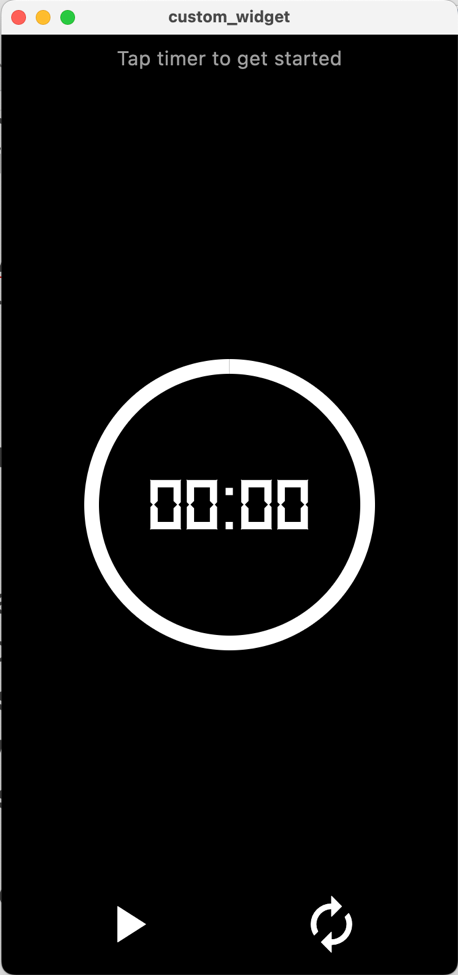
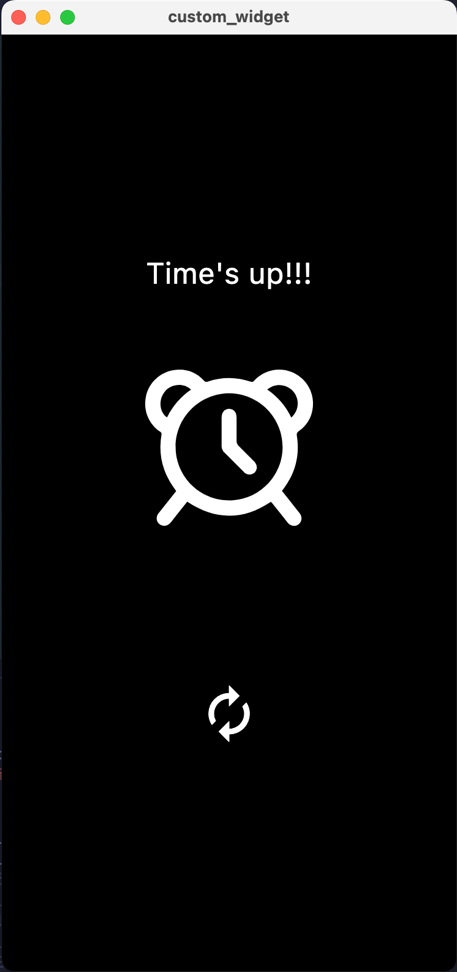
The user interface we will be building is simple. It has a countdown timer showing minutes and seconds, has a circular progress indicator that indicates how much time is left compared to how much time we started, and below it are some control buttons: play/pause button and reset button. When the user taps on the minute, a bottom sheet will show up to allow the user to select how many minutes they want to set the timer to. The same is true for the seconds. Once the timer runs out, the screen will be replaced with an animation of an alarm clock with a reset button below so the user can start the countdown again. This app is minimalist with black and white colors.
The app looks like this:
Now, let’s build this.
First, create the file countdown_timer.dart inside the lib folder. Copy the code below:
   import 'package:flutter/material.dart';

  class CountdownTimer extends StatefulWidget {

    const CountdownTimer({super.key});

    @override

    State<CountdownTimer> createState() => _CountdownTimerState();

  }

  class _CountdownTimerState extends State<CountdownTimer> {

    @override

    Widget build(BuildContext context) {

      return const Scaffold(

        backgroundColor: Colors.black,

        // this will be populated with the widgets to build the user interface

        body: Placeholder(),

      );

    }

  }

  Inside the _CountdownTimerState, let’s declare the necessary states:

// the timer that will be used to control the countdown timer

    late Timer _timer;

    // bool value to check if the countdown timer is counting down or not

    bool _isPlaying = false;

    // keep track of how much time has elapsed while the widget is counting down (i.e. timer is running)

    int _timeElapsed = 0;

    // variable to store the time to countdown based on user selection

    Duration _totalTime = const Duration(milliseconds: 0);

    // some constant that will be used by the timer to determine how often the state gets updated

    final Duration _periodicMovement = const Duration(milliseconds: 1000);

    // controllers for bottom sheet

    final FixedExtentScrollController _minutesController =

        FixedExtentScrollController();

    final FixedExtentScrollController _secondsController =

         FixedExtentScrollController();
To explain the code above, we will be using Flutter’s Timer class from dart:async library to update the _timeElapsed variable. Normally, one would expect that the countdown timer would be decrementing the value of a given time and that would be possible. Now, in our case, we want to store the _totalTime and the _timeElapsed separately so we can use it to compute the progress indicator. The _periodicMovement defines how often the timer is updated, in this case, it is set to one second.
Let’s define the functions:
     // function to handle countdown

    void _countdown(Timer timer) {

      // while time elapsed has not exceeded total time, increment it

    // else stop the timer

      setState(() {

        if (_timeElapsed <= _totalTime.inMilliseconds) {

          _timeElapsed += _periodicMovement.inMilliseconds;

        } else {

          _timer.cancel();

        }

      });

    }

    // function to start timer

    void _startTimer() {

      setState(() {

        _isPlaying = true;

      });

      _timer = Timer.periodic(

        _periodicMovement,

        _countdown,

      );

     }
The _countdown function is a callback passed on to Timer.periodic inside _startTimer. When the function is called, the _countdown callback handles updating the state.
// function to stop timer

    void _stopTimer() {

      setState(() {

        _isPlaying = false;

      });

      _timer.cancel();

     }
The _stopTimer, on the other hand, stops the timer by canceling it. This function only pauses the countdown. Now, there is no way to restore the current _timer variable. Instead, when the user resumes the countdown, a new _timer is created.
Lastly, the _resetTimer handles the case when the user wants to create a new countdown timer and discard the existing one. This function sets the _isPlaying variable to false, the _timeElapsed to zero, and _totalTime to zero seconds.
   // function to reset timer

    void _resetTimer() {

      setState(() {

        _isPlaying = false;

        _timeElapsed = 0;

        _totalTime = const Duration(seconds: 0);

      });

     }
We will also define the dispose override function to get rid of the timer and the controllers when they are no longer needed:
     // dispose of timer and controllers to prevent memory leak

    @override

    void dispose() {

      _timer.cancel();

      _minutesController.dispose();

      _secondsController.dispose();

      super.dispose();

     }
For the body of the widget, we have the following code:
// if the timeElapsed exceeds the total time, show the alarm animation
// else show the countdown
body: _timeElapsed > _totalTime.inMilliseconds
? Center(
child: Column(
mainAxisAlignment: MainAxisAlignment.center,
children: [
SizedBox(
width: 200,
height: 200,
child: Lottie.asset('assets/alarm.json'),
),
const SizedBox(
height: 20,
),
const Text(
'Time\'s up!!!',
style: TextStyle(
fontSize: 24,
color: Colors.white,
),
),
const SizedBox(
height: 100,
),
IconButton(
onPressed: _resetTimer,
icon: const Icon(
Icons.autorenew,
size: 50,
),
color: Colors.white,
),
],
),
)
: Stack(
alignment: Alignment.center,
children: [
const Positioned(
top: 0,
child: Padding(
padding: EdgeInsets.all(8.0),
child: Text(
'Tap timer to get started',
style: TextStyle(
color: Colors.grey,
fontSize: 16,
),
),
),
),
Center(
child: Stack(
alignment: Alignment.center,
children: [
// starts at 1 so right hand should be zero
// remaining time
SizedBox(
width: 225,
height: 225,
child: CircularProgressIndicator(
valueColor:
const AlwaysStoppedAnimation(Colors.white),
color: Colors.white,
value: progress,
strokeWidth: 12,
),
),
Row(
mainAxisAlignment: MainAxisAlignment.center,
children: [
GestureDetector(
onTap: () {
showModalBottomSheet(
context: context,
builder: (context) {
return SizedBox(
height: 200,
child: ListWheelScrollView(
controller: _minutesController,
itemExtent: 50,
diameterRatio: 1.5,
physics:
const FixedExtentScrollPhysics(),
onSelectedItemChanged: (int value) {
//
setState(() {
_totalTime = Duration(
minutes: value,
seconds:
_totalTime.inSeconds % 60);
});
},
children: List.generate(60, (index) {
return Text(
"${index.toString().padLeft(2, '0')} minutes",
style: const TextStyle(
fontSize: 24,
),
);
}),
),
);
});
},
child: Text(
minutes.toString().padLeft(2, '0'),
style: const TextStyle(
fontFamily: 'Digi',
color: Colors.white,
fontWeight: FontWeight.bold,
fontSize: 60,
),
),
),
const Text(
':',
style: TextStyle(
fontFamily: 'Digi',
color: Colors.white,
fontWeight: FontWeight.bold,
fontSize: 60,
),
),
GestureDetector(
onTap: () {
showModalBottomSheet(
context: context,
builder: (context) {
return SizedBox(
height: 200,
child: ListWheelScrollView(
controller: _minutesController,
itemExtent: 50,
diameterRatio: 1.5,
physics:
const FixedExtentScrollPhysics(),
onSelectedItemChanged: (int value) {
//
setState(() {
_totalTime = Duration(
minutes: _totalTime.inMinutes,
seconds: value,
);
});
},
children: List.generate(60, (index) {
return Text(
"${index.toString().padLeft(2, '0')} seconds",
style: const TextStyle(
fontSize: 24,
),
);
}),
),
);
});
},
child: Text(
remainingSeconds.toString().padLeft(2, '0'),
style: const TextStyle(
fontFamily: 'Digi',
color: Colors.white,
fontWeight: FontWeight.bold,
fontSize: 60,
),
),
),
],
),
],
),
),
Positioned(
bottom: 0,
child: Padding(
padding: const EdgeInsets.all(8.0),
child: Row(
mainAxisAlignment: MainAxisAlignment.spaceAround,
children: [
IconButton(
onPressed: noTimeLeft
? null
: (_isPlaying ? _stopTimer : _startTimer),
icon: _isPlaying
? const Icon(
Icons.pause,
size: 50,
color: Colors.white,
)
: const Icon(
Icons.play_arrow,
size: 50,
color: Colors.white,
),
),
const SizedBox(
width: 100,
),
IconButton(
onPressed: _isPlaying ? null : _resetTimer,
icon: Icon(
Icons.autorenew,
size: 50,
color: _isPlaying ? Colors.grey : Colors.white,
),
),
]),
),
),
],
),Whoa! That’s a long line of code but these are all we need for the countdown timer widget. All of these are just user interface building codes that use the functions and states we defined earlier. In addition, we will also add the following codes on top of the return statement to do some calculations for the user interface to be rendered.
     double progress = _totalTime.inMilliseconds == 0

          ? 1

          : 1 - (_timeElapsed / _totalTime.inMilliseconds);

      int timeLeft = _totalTime.inMilliseconds - _timeElapsed;

      int seconds = (timeLeft / 1000).floor();

      int minutes = (seconds / 60).floor();

      int remainingSeconds = seconds % 60;

       bool noTimeLeft = timeLeft <= 0;
Now, there are two things that you need to do here before you can get this to work. First, get the DS-DIGI.ttf file linked in this article create an assets/fonts folder in the root of your app, and put that file inside. Next, add the following code inside pubspec.yaml in the fonts section:
 fonts:

      # download from https://www.dafont.com/theme.php?cat=302

      - family: Digi

        fonts:

           - asset: assets/fonts/DS-DIGI.ttf
This will load the font we are using in this app available. You can add other fonts in your app this way and you can reference the fontFamily by referring to them in the TextStyle widget.
Next, for the alarm clock animation, download the alarm.json file linked in this article and copy it inside the assets folder. Add the following lines of code inside pubspec.yaml:
     assets:

       - assets/alarm.json
Now, let’s get Lottie into our application by running the following code inside your terminal (or command prompt):
Lottie is a cross-platform library that parses Adobe After Effects animations exported as JSON with Bodymovin and renders them natively. You can read more about it on its pub.dev page: https://pub.dev/packages/lottie. You can find more animations on the Lottie website (https://lottiefiles.com).
For our assets loading to take effect, let’s finally run:
Whenever we make changes like add/remove files inside the assets folder or any other assets linked to pubspec.yaml, we have to run the above code to ensure that they are loaded into the project.
All in all, our CountdownWidget has 316 lines of code! If you run this, you should be able to see the user interface we showed you earlier.
Well, still long so let’s refactor this in the next step.
III. Refactor to custom widgets
Now we’re done with our project. Or are we? For small apps, this approach is generally acceptable. The simpler the better. However, if we are to maintain this application, this is a nightmare because everything is everywhere. It’s hard to follow all those conditional renders. It’s hard to keep track which user interface elements should be the same as well. So, what do we do? Let’s refactor.
First, let’s extract the alarm clock animation:
// lib/alarm_clock.dart

  class AlarmClock extends StatelessWidget {

    const AlarmClock({

      super.key,

      required this.onReset,

    });

    final VoidCallback onReset;

    @override

    Widget build(BuildContext context) {

      return Center(

        child: Column(

          mainAxisAlignment: MainAxisAlignment.center,

          children: [

            SizedBox(

              width: 200,

              height: 200,

              child: Lottie.asset('assets/alarm.json'),

            ),

            const SizedBox(

              height: 20,

            ),

            const Text(

              'Time\'s up!!!',

              style: TextStyle(

                fontSize: 24,

                color: Colors.white,

              ),

            ),

            const SizedBox(

              height: 100,

            ),

            IconButton(

              onPressed: onReset,

              icon: const Icon(

                Icons.autorenew,

                size: 50,

              ),

              color: Colors.white,

            ),

          ],

        ),

      );

    }

   }
For better manageability, it is suggested that new files be created for new widgets although there is nothing wrong with just creating the new widget below your existing widgets. It’s just cleaner if your widgets live in their own file.
Probably the most important thing to know about custom widgets is how to use parameters. You can either pass a positional parameter or a named parameter. It is recommended to use named parameters for better documentation of widgets versus positional parameters. For example, in the code above, we declared a named parameter called onReset that will need to be passed down when the widget is created.
_timeElapsed > _totalTime.inMilliseconds

     ? AlarmClock(

        onReset: _resetTimer,

       )

      : // rest of the code
Now, another thing that is of interest when making custom widgets is: where should the state live? Now, like in React, the state should live in the parent widget where the children have read access to it and can use callbacks to update the state. Now, this is useful when you only have a few nested widgets but once the children go deeper, you would want to use dedicated state management solutions like Bloc, Provider or Riverpod to help you manage your state. That is outside the scope of this tutorial but you’ll find a lot of dedicated resources on state management on the internet.
Let’s create another widget for control buttons:
// lib/control_buttons.dart

  import 'package:flutter/material.dart';

  class ControlButtons extends StatelessWidget {

    const ControlButtons({

      super.key,

      required this.noTimeLeft,

      required this.isPlaying,

      required this.stopTimer,

      required this.startTimer,

      required this.resetTimer,

    });

    final bool noTimeLeft;

    final bool isPlaying;

    final VoidCallback stopTimer;

    final VoidCallback startTimer;

    final VoidCallback resetTimer;

    @override

    Widget build(BuildContext context) {

      return Positioned(

        bottom: 0,

        child: Padding(

          padding: const EdgeInsets.all(8.0),

          child: Row(mainAxisAlignment: MainAxisAlignment.spaceAround, children: [

            IconButton(

              onPressed: noTimeLeft ? null : (isPlaying ? stopTimer : startTimer),

              icon: isPlaying

                  ? const Icon(

                      Icons.pause,

                      size: 50,

                      color: Colors.white,

                    )

                  : const Icon(

                      Icons.play_arrow,

                      size: 50,

                      color: Colors.white,

                    ),

            ),

            const SizedBox(

              width: 100,

            ),

            IconButton(

              onPressed: isPlaying ? null : resetTimer,

              icon: Icon(

                Icons.autorenew,

                size: 50,

                color: isPlaying ? Colors.grey : Colors.white,

              ),

            ),

          ]),

        ),

      );

    }

   }
Again, what is important here is what is being passed down to this widget, i.e. the relevant states and callback functions. Next, let’s break down the clock user interface by creating the following files:
// lib/circular_clock.dart

  import 'package:flutter/material.dart';

  class CircularClock extends StatelessWidget {

    const CircularClock({

      super.key,

      required this.progress,

    });

    final double progress;

    @override

    Widget build(BuildContext context) {

      return SizedBox(

        width: 225,

        height: 225,

        child: CircularProgressIndicator(

          valueColor: const AlwaysStoppedAnimation(Colors.white),

          color: Colors.white,

          value: progress,

          strokeWidth: 12,

        ),

      );

    }

   }
The circular clock shows the surrounding progress indicator for the digital clock.
// lib/digital_clock.dart

  import 'package:flutter/material.dart';

  class DigitalClock extends StatefulWidget {

    const DigitalClock({

      super.key,

      required this.timeLeft,

      required this.totalTime,

      required this.onUpdateMinutes,

      required this.onUpdateSeconds,

    });

    final int timeLeft;

    final Duration totalTime;

    final Function(int value) onUpdateMinutes;

    final Function(int value) onUpdateSeconds;

    @override

    State<DigitalClock> createState() => _DigitalClockState();

  }

  class _DigitalClockState extends State<DigitalClock> {

    // controllers for bottom sheet

    final FixedExtentScrollController _minutesController =

        FixedExtentScrollController();

    final FixedExtentScrollController _secondsController =

        FixedExtentScrollController();

    @override

    void dispose() {

      _minutesController.dispose();

      _secondsController.dispose();

      super.dispose();

    }

    @override

    Widget build(BuildContext context) {

      int seconds = (widget.timeLeft / 1000).floor();

      int minutes = (seconds / 60).floor();

      int remainingSeconds = seconds % 60;

      return Row(

        mainAxisAlignment: MainAxisAlignment.center,

        children: [

          GestureDetector(

            onTap: () {

              showModalBottomSheet(

                  context: context,

                  builder: (context) {

                    return SizedBox(

                      height: 200,

                      child: ListWheelScrollView(

                        controller: _minutesController,

                        itemExtent: 50,

                        diameterRatio: 1.5,

                        physics: const FixedExtentScrollPhysics(),

                        onSelectedItemChanged: widget.onUpdateMinutes,

                        children: List.generate(60, (index) {

                          return Text(

                            "${index.toString().padLeft(2, '0')} minutes",

                            style: const TextStyle(

                              fontSize: 24,

                            ),

                          );

                        }),

                      ),

                    );

                  });

            },

            child: Text(

              minutes.toString().padLeft(2, '0'),

              style: const TextStyle(

                fontFamily: 'Digi',

                color: Colors.white,

                fontWeight: FontWeight.bold,

                fontSize: 60,

              ),

            ),

          ),

          const Text(

            ':',

            style: TextStyle(

              fontFamily: 'Digi',

              color: Colors.white,

              fontWeight: FontWeight.bold,

              fontSize: 60,

            ),

          ),

          GestureDetector(

            onTap: () {

              showModalBottomSheet(

                  context: context,

                  builder: (context) {

                    return SizedBox(

                      height: 200,

                      child: ListWheelScrollView(

                        controller: _minutesController,

                        itemExtent: 50,

                        diameterRatio: 1.5,

                        physics: const FixedExtentScrollPhysics(),

                        onSelectedItemChanged: widget.onUpdateSeconds,

                        children: List.generate(60, (index) {

                          return Text(

                            "${index.toString().padLeft(2, '0')} seconds",

                            style: const TextStyle(

                              fontSize: 24,

                            ),

                          );

                        }),

                      ),

                    );

                  });

            },

            child: Text(

              remainingSeconds.toString().padLeft(2, '0'),

              style: const TextStyle(

                fontFamily: 'Digi',

                color: Colors.white,

                fontWeight: FontWeight.bold,

                fontSize: 60,

              ),

            ),

          ),

        ],

      );

    }

   }
The digital clock, on the other hand, shows the time in numerical form. The user can tap on this digital clock to select the minutes/seconds they want to countdown for.
Putting them all together, our final countdown_timer.dart file looks like this with less than half the original code:
// lib/countdown_timer.dart

  import 'dart:async';

  import 'package:custom_widget/alarm_clock.dart';

  import 'package:custom_widget/circular_clock.dart';

  import 'package:custom_widget/digital_clock.dart';

  import 'package:custom_widget/control_buttons.dart';

  import 'package:flutter/material.dart';

  class CountdownTimer extends StatefulWidget {

    const CountdownTimer({super.key});

    @override

    State<CountdownTimer> createState() => _CountdownTimerState();

  }

  class _CountdownTimerState extends State<CountdownTimer> {

    // the timer that will be used to control the countdown timer

    late Timer _timer;

    // bool value to check if the countdown timer is counting down or not

    bool _isPlaying = false;

    // keep track of how much time has elapsed while the widget is counting down (i.e. timer is running)

    int _timeElapsed = 0;

    // variable to store the time to countdown based on user selection

    Duration _totalTime = const Duration(milliseconds: 0);

    // some constant that will be used by the timer to determine how often the state gets updated

    final Duration _periodicMovement = const Duration(milliseconds: 1000);

    // function to handle countdown

    void _countdown(Timer timer) {

      //

      setState(() {

        if (_timeElapsed <= _totalTime.inMilliseconds) {

          _timeElapsed += _periodicMovement.inMilliseconds;

        } else {

          _timer.cancel();

        }

      });

    }

    // function to start timer

    void _startTimer() {

      setState(() {

        _isPlaying = true;

      });

      _timer = Timer.periodic(

        _periodicMovement,

        _countdown,

      );

    }

    // function to stop timer

    void _stopTimer() {

      setState(() {

        _isPlaying = false;

      });

      _timer.cancel();

    }

    // function to reset timer

    void _resetTimer() {

      setState(() {

        _isPlaying = false;

        _timeElapsed = 0;

        _totalTime = const Duration(seconds: 0);

      });

    }

    // dispose of timer and controllers to prevent memory leak

    @override

    void dispose() {

      _timer.cancel();

      super.dispose();

    }

    @override

    Widget build(BuildContext context) {

      double progress = _totalTime.inMilliseconds == 0

          ? 1

          : 1 - (_timeElapsed / _totalTime.inMilliseconds);

      int timeLeft = _totalTime.inMilliseconds - _timeElapsed;

      bool noTimeLeft = timeLeft <= 0;

      return Scaffold(

        backgroundColor: Colors.black,

        // if the timeElapsed exceeds the total time, show the alarm animation

        // else show the countdown

        body: _timeElapsed > _totalTime.inMilliseconds

            ? AlarmClock(

                onReset: _resetTimer,

              )

            : Stack(

                alignment: Alignment.center,

                children: [

                  const Positioned(

                    top: 0,

                    child: Padding(

                      padding: EdgeInsets.all(8.0),

                      child: Text(

                        'Tap timer to get started',

                        style: TextStyle(

                          color: Colors.grey,

                          fontSize: 16,

                        ),

                      ),

                    ),

                  ),

                  Center(

                    child: Stack(

                      alignment: Alignment.center,

                      children: [

                        // starts at 1 so right hand should be zero

                        // remaining time

                        CircularClock(progress: progress),

                        DigitalClock(

                          timeLeft: timeLeft,

                          totalTime: _totalTime,

                          onUpdateMinutes: (int value) {

                            setState(() {

                              _totalTime = Duration(

                                minutes: value,

                                seconds: _totalTime.inSeconds % 60,

                              );

                            });

                          },

                          onUpdateSeconds: (int value) {

                            setState(() {

                              _totalTime = Duration(

                                minutes: _totalTime.inMinutes,

                                seconds: value,

                              );

                            });

                          },

                        ),

                      ],

                    ),

                  ),

                  ControlButtons(

                    noTimeLeft: noTimeLeft,

                    isPlaying: _isPlaying,

                    stopTimer: _stopTimer,

                    startTimer: _startTimer,

                    resetTimer: _resetTimer,

                  ),

                ],

              ),

      );

    }

   }
While it is possible to still refactor this code into smaller components, the above should be enough to demonstrate the creation and use of custom widgets. We’ll leave further refactoring as your assignment.
IV. Build the app
Now, you are ready to build the app. This app will run on any platform as there are no platform-specific limitations. For demo purposes, we will build the app for Android.
To build the app, all you need to do is run:
Choose APK if you wish to distribute outside Play Store and appbundle if you wish to distribute your app through the Play Store.
Now, our app compiles but uses the default Flutter icon. Let’s customize this using the flutter_launcher_icons package. To do so, run:
Add the following code to pubspec.yaml:
   flutter_launcher_icons:

    android: "launcher_icon"

    ios: true

    image_path: "hourglass.png"

    min_sdk_android: 21 # android min sdk min:16, default 21

    web:

      generate: true

      image_path: "hourglass.png"

      background_color: "#hexcode"

      theme_color: "#hexcode"

    windows:

      generate: true

      image_path: "hourglass.png"

      icon_size: 48 # min:48, max:256, default: 48

    macos:

      generate: true

       image_path: "hourglass.png"
Now, since flutter_launcher_icons is a cross-platform package, we can also define how the icons for the other platforms are generated. In this configuration, the icon we are setting is in the root folder and is named “hourglass.png”. You can choose whichever file you want but just make sure you update the reference. Finally, run the following commands:
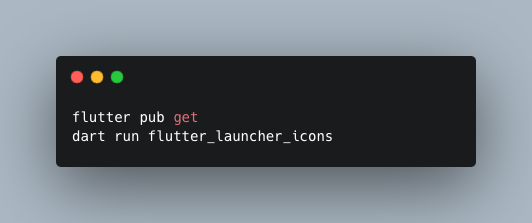
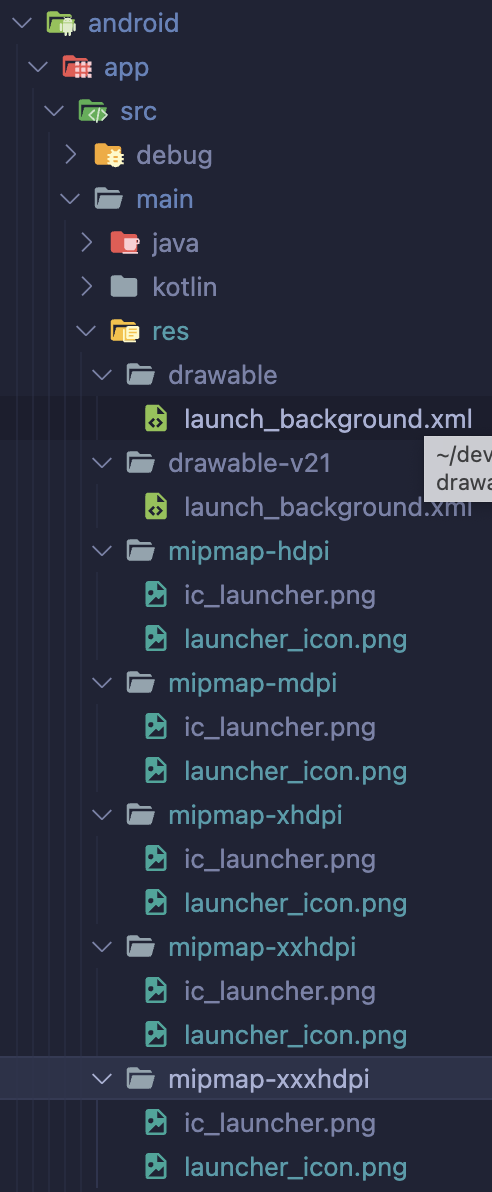
After the command runs successfully, you can verify that the launcher_icons have been generated successfully by opening android/app/src/res and looking inside the folders.
Now, just run the build command again and the new build will show your new icon.
Source Code
You may download the source code used for this tutorial from GitHube:
Conclusion
In this tutorial, we took a look at using custom widgets to make our application code more readable and manageable. From a single widget, we broke it down into smaller parts/components and passed down state and callback parameters to update the parent widget. We also learned how to build an APK file and change the default Flutter icon.
KeepCoding!
Subscribe to freecode spot to get more tutorials like this.