
In this tutorial, you will learn how to build and prepare your Flutter app for the Android platform and Deploy a Flutter App through the Google Play Store. We will also touch on other strategies you may employ in case you wish to explore other means to distribute it.
You have created a Flutter application and would like to share it with your users and the public. Since Flutter is primarily a framework for creating cross-platform applications, its final products are developed and compiled in a format suitable for being released on the relevant platforms.
Requirements :
To follow this tutorial, you must have the following:
- A working Flutter app » You may download the starting application from here.
- A paid Google Play Store account.
You may enroll in the Google Play Developer through the Play Developer console accessible at https://play.google.com/console.
Let’s get this started.
I. Prepare the Flutter Android app for release
1. Set up Flutter Demo App Project
After downloading the zip file, unzip it in any folder you want to work on. Open the terminal, navigate to the root directory of the Flutter project, and run the following commands:
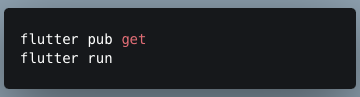
The first command will install the dependencies of the project while the second will run the project on an Android device (typically your Android emulator). Once successful, you may proceed to the next step.
2. Sign the app
To publish an app to the Play Store, you must sign it with a digital certificate. You need to generate an upload key and configure your app to use that key. To do that:
Linux/MacOS
  keytool -genkey -v -keystore ~/upload-keystore.jks -keyalg RSA \
           -keysize 2048 -validity 10000 -alias upload
Windows
   keytool -genkey -v -keystore %userprofile%\upload-keystore.jks ^
          -storetype JKS -keyalg RSA -keysize 2048 -validity 10000 ^
           -alias upload
Follow the prompt in the succeeding screens which will ask you for the following information:
- The key password with at least six characters
- Your first name and last name
- Name of your organizational unit
- Name of your organization
- Name of your city/locality
- Name of your state/province
- Two-letter code of your country
This will generate the upload key in the directory you specified.
Make sure you don’t commit this to your public source control.
The next step is to create a file named key.properties inside the Android folder of your app and input the following:
storePassword=<password-from-previous-step>
keyPassword=<password-from-previous-step>
keyAlias=upload
storeFile=<keystore-file-location>
Next, update your build gradle in [project]/android/app/build.gradle to reference your new upload key:
 // create a reference to the created file
     def keystoreProperties = new Properties()
     def keystorePropertiesFile = rootProject.file('key.properties')
     if (keystorePropertiesFile.exists()) {
         keystoreProperties.load(new FileInputStream(keystorePropertiesFile))
     }
     android {
           ...
      }
Replace the buildTypes block with the following:
   signingConfigs {
         release {
             keyAlias keystoreProperties['keyAlias']
             keyPassword keystoreProperties['keyPassword']
             storeFile keystoreProperties['storeFile'] ? file(keystoreProperties['storeFile']) : null
             storePassword keystoreProperties['storePassword']
         }
     }
     buildTypes {
         release {
             signingConfig signingConfigs.release
         }
      }
All release builds will now be signed automatically with your upload key. You may need to run Flutter Clean to prevent cached builds (which typically use a debug key) from affecting the updated signing process.
3. Update the app manifest
This step is to make sure your app has the necessary permissions to work on the devices of your users. Typically, the AndroidManifest.xml file inside [project]/android/app/src/main folder will not contain any permissions at all. The label of your application also defaults to the Flutter project name.
Now, open the AndroidManifest.xml inside [project]/android/app/src/main folder and add the following inside the <manifest /> tag just before the <application /> tag:
   <uses-permission android:name="android.permission.INTERNET" />
   <uses-permission android:name="android.permission.ACCESS_NETWORK_STATE" />
And to change the application label:
   <application
      android:label="My Flutter App" 🡨 change to your desired app name
      android:name="${applicationName}"
       android:icon="@mipmap/ic_launcher">
4. (Optional) Review the build gradle configuration
Normally, the existing build gradle [project]/android/app/build.gradle configuration of the Flutter android project would work. However, if there are features that your app requires to function, you may need to change some of the Gradle configurations. You may also review this file if you want to make sure the details are correct.
In particular, you may want to review this block:
 defaultConfig {
          // TODO: Specify your own unique Application ID (https://developer.android.com/studio/build/application-id.html).
          applicationId "com.example.demo_app" 🡨 change to your desired application ID
          // You can update the following values to match your application needs.
          // For more information, see: https://docs.flutter.dev/deployment/android#reviewing-the-gradle-build-configuration.
          minSdkVersion flutter.minSdkVersion 🡨 Minimum SDK version
          targetSdkVersion flutter.targetSdkVersion 🡨 Target SDK version
          versionCode flutterVersionCode.toInteger() 🡨 Flutter version code
          versionName flutterVersionName
       }
The versionCode is important as Google Play Store uses this as an identifier of the latest version of the code. You will not be able to upload a version of your build file if there is an existing build with the same version code. This is used internally and won’t be visible to users. You need to set this manually.
The versionName, on the other hand, is the version visible to users. This setting can be specified as a raw string or as a reference to a string resource.
Note: The versionCode and versionName can be controlled by the pubspec.yaml in your file. Specifically, the version line:
# The following defines the version and build number for your application.
# A version number is three numbers separated by dots, like 1.2.43
# followed by an optional build number separated by a +.
# Both the version and the builder number may be overridden in flutter
# build by specifying --build-name and --build-number, respectively.
# In Android, build-name is used as versionName while build-number used as versionCode.
# Read more about Android versioning at https://developer.android.com/studio/publish/versioning
# In iOS, build-name is used as CFBundleShortVersionString while build-number is used as CFBundleVersion.
# Read more about iOS versioning at
# https://developer.apple.com/library/archive/documentation/General/Reference/InfoPlistKeyReference/Articles/CoreFoundationKeys.html
# In Windows, build-name is used as the major, minor, and patch parts
# of the product and file versions while build-number is used as the build suffix.
   version: 1.0.0+1
In this version configuration, the versionName will be 1.0.0 while the versionNumber is 1. Make sure you update this before running your build command.
5. Build the app for release
There are two possible release formats when publishing or Deploy a Flutter App to the Play Store:
- App bundle (the preferred format)
- APK » (Android Package Kit file format)
An Android App Bundle (files with .aab extension) is a publishing format that includes all your app’s compiled code and resources and defers APK generation and signing to Google Play. Google Play uses your app bundle to generate and serve optimized APKs for each device configuration, so only the code and resources that are needed for a specific device are downloaded to run your app. You no longer have to build, sign, and manage multiple APKs to optimize support for different devices, and users get smaller, more optimized downloads. Further, publishing with Android App Bundles helps your users install your app with the smallest downloads possible and increases the compressed download size limit to 150 MB. (Source: https://developer.android.com/guide/app-bundle)
To build your Android project as an app bundle, run the following command from your project’s root directory:
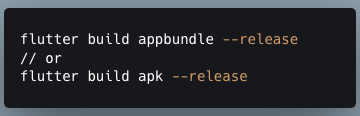
The app will start to run the gradle task “bundleRelease”. Once complete, you will find the built app bundle in build/app/outputs/bundle/release/app-release.aab.
If you wish to build an APK file, just run the following command instead which will run the gradle task “assembleRelease”. You will find the APK file in build/app/outputs/flutter-apk/app-release.apk.
Now, you are ready to deploy your Flutter Android app.
II. Deploy to the Google Play Store
1. Create an app in your Play developer console
2. Input the following app details in the next screen
- Type App Name
- Select Default Language
- Select whether the app is an app or a game
- Select whether the app is free or paid (can be changed before being published but can not be changed after publishing)
- Tick the checkbox on the Developer Program Policies and US Export Laws
- Click Create app
Upon successful creation of your app, you will be taken to the new app’s page. The next step is to set up and Deploy a Flutter App.
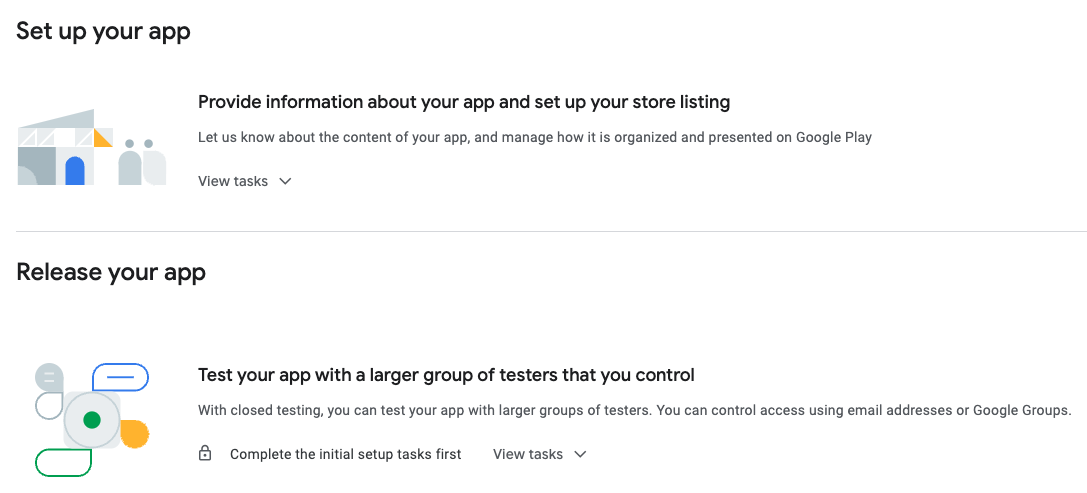
3. Set up your app by providing information about the app and set up a store listing
The figure below shows the tasks related to this step.
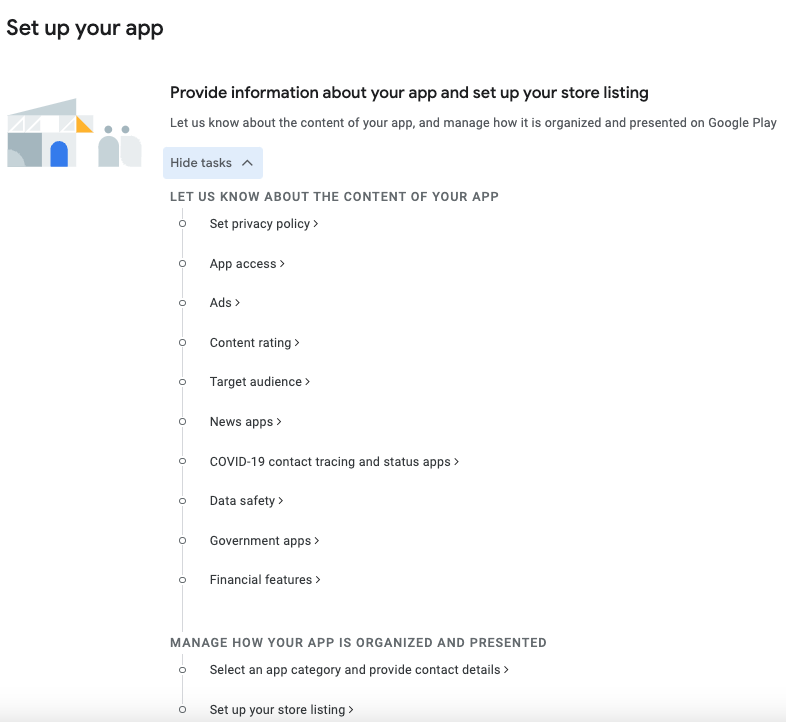
- Set up privacy policy. Provide a link to the privacy policy of your app. Example: https://<your-company-domain>/privacy-policy
- App access. You need to provide access to all parts of your app to Google Play to review it. In this step, you will provide instructions on how Google Play can log in to your app and use it. For simplicity, just select “All functionality in my app is available without any access restrictions” for now. If you choose restricted access, you will need to provide instructions such as username or password and if there are other special instructions like OTP for login. If your app has multi-role, you also need to provide different credentials for that. This step is critical and if not complied with, Google Play may disapprove your publishing request.
- Ads. You must select whether your app contains ads or not. Google Play will check if your app is compliant with the Ads Policy or not.
- Content Rating. The content rating questionnaire will allow you to receive official content ratings for your app. Ratings are displayed on Google Play to help users identify whether your app is suitable for them. For this step, just answer all the questions in the questionnaire. After completing the questionnaire, you will receive a rating for your app which will show the IARC rating.
- Target Audience. For this step, you will need to provide the target audience of your app such as age. Google Play will check if your app is appropriate for children’s audience or not and will hide it from the appropriate group.
- News App. If your app is a news app, you may need to provide more information about it. Google Play will check if your app is compliant with its Google Play News Policy. Just select No if your app is not a news app.
- Covid-19 contact tracing and status apps. This is another app-specific question about whether your app is a contact tracing and status app for COVID-19 or not.
- Data Safety. User privacy is given high importance by Google Play. You need to declare the data you collect from your users here as well as how they are used and managed.
- Government Apps. If your app is an app for government agencies, you need to declare it and submit additional requirements to prove you are authorized to act on the government’s behalf. In some cases where your app may be related to a government agency’s services but not officially affiliated, you may put a disclaimer in the description of your Store listing.
- Financial features. If your app is providing financial services to users (e.g., e-wallet or banking app), you will need to provide more information in this section.
- Select the app category and provide contact details. This information is now more specific to your app. You can select the category and the tags for your app. The tags can help you describe the content and functionality of your app. For the contact details, you will need to provide your email address, phone number, and website. Lastly, you may select if you want your app advertised outside Google Play.
- Main Store Listing. This will help users find your app. You’ll need to provide a short and complete description of your app. You must also provide an app icon (512×512 resolution) and a feature graphic (or screenshots). You must also attach screenshots in various formats (phone, tablet, and Chromebook).
After completing this setup process, you are now ready to deploy a Flutter App.
4. Release your app
From the dashboard, click the option “Release your app”. You can choose from various options like open testing, closed testing, and internal testing. Now, since you want to release your app, you need to select Production.
- Select countries/regions. The first step you need to do is select which countries and regions you want your app to be available.
- Create a new release. Once you’ve selected the target countries and regions, click on Create New Release.
- App Integrity. Choose a signing key. You can either use a Google-generated key or a different key generated by you or some other tools you are familiar with. The Google-generated key is the most common signing key. Note: This is different from the upload key that you used to sign your app. This is the key used to sign the app that your users download.
- Upload the app bundle. Upload the app bundle from the steps you did above.
- Fill in the release details. This includes the release name and the release details.
5. Confirm release
After completing the requirements for the release step, you can now release your app. Click Next and Save.
The next step is to go to Publishing overview in the sidebar and click on “Send <number of changes> for review”.
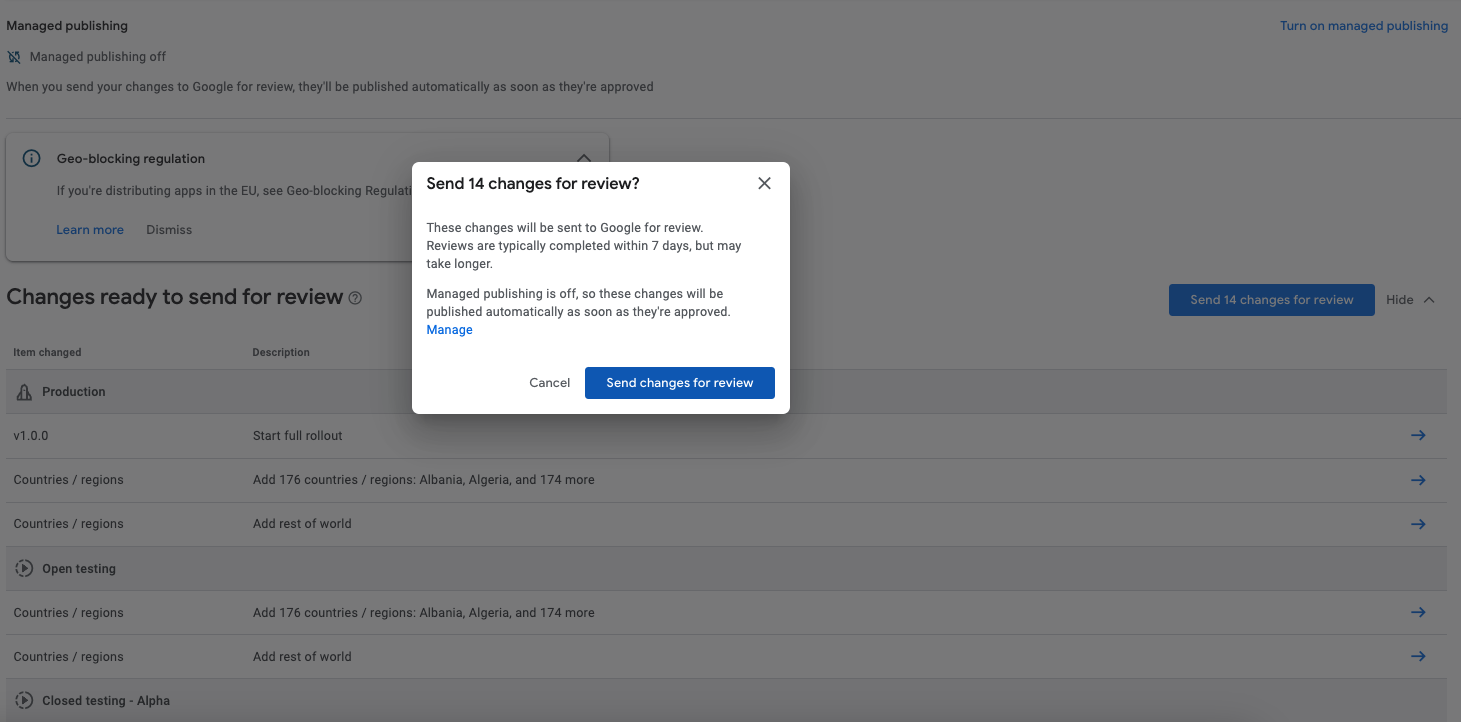
Your app release is now complete. Now, the last step is to wait for the Google Play store to review and approve your app release before your app will appear in the store.
This completes the release process in the Google Play Store.
III. Other modes of distribution
Since Google Play Store is not free to use, you may also for alternative modes to distribute and Deploy a Flutter App. Also, you may wish to control the distribution of your app especially if it’s targeted to specific users (e.g., internal company app). This includes the following:
- Distributing through an app marketplace such as Amazon Appstore or Huawei’s app gallery.
- Distributing your app through email. You may also send the latest version of your app using the APK build. Note that the users need to opt in to install unknown apps to install it.
- Distributing your app through the website. You may also upload the APK file to your website which the users can download.
Conclusion
In this tutorial, you have learned how to prepare your Flutter Android app for release and how to Deploy a Flutter App to the Play Store. You have also seen how you can use other methods to distribute it. We hope that we will soon see your apps distributed.
Keep Coding!
Visit this link for more Flutter tutorials like this. Flutter FreeCodes