
In this tutorial, we’ll look at React Hooks, Routing, and Styling, three fundamental components that shape modern web development. We overcome the complexity of routing to offer an intuitive user experience by leveraging Hooks for efficient state management. Beyond functionality, we’ll look at how to style React using CSS-in-JS tools and new methods. If you’re an experienced developer or just starting, join us to master these crucial technologies and expand your skills in modern web development. Master React Hooks, Routing, and Styling to bring your online apps to their full potential!
- Introduction to React Hooks
- I. Understanding the motivation behind React Hooks
- II. Exploring useState, useEffect, and other commonly used hooks
- III. Converting class components to functional components with hooks
- IV. Client-Side Routing with React Router
- V. Styling Strategies in React
- VI. Optimizing Performance with Hooks and Routing
- VII. Practical Implementation and Advanced Techniques
- Source Code
Introduction to React Hooks
I. Understanding the motivation behind React Hooks
Hooks allow function components to access state and other React features. As a result, class components have become outdated. Hooks are functions that let you use React features. There are various reasons to prefer React Hooks, some of which include
- Simplicity and readability: One of the primary benefits of using React Hooks is that it simplifies the codebase. Hooks eliminate the need for class components which often require more boilerplate code and can be harder to read and understand. With Hooks developers can write cleaner, more intuitive code.
- Code Reusability: React Hooks make it easier to reuse stateful logic across components. With custom hooks developers can extract component logic into reusable functions. This promotes cleaner, more modular code, and reduces duplication.
- Improved Performance: React Hooks, especially the useEffect Hook, empowers developers with added flexibility in determining when components should re-render and how to handle side effects. This can lead to performance optimizations by avoiding unnecessary re-renders and ensuring efficient resource allocation.
- Better Debugging: Hooks track their state and side effects explicitly, making them easier to reason about and debug compared to complex class methods with intertwined logic.
- Future-proof for React Development: The React team actively supports and recommends using hooks for modern React development.
II. Exploring useState, useEffect, and other commonly used hooks
Hooks allow function components to have access to state and other React features. For now, remember that hooks have rules that we need to abide by:
- Call hooks only from the top level of a functional component.
- Calling hooks from within loops or conditions is not permissible.
- Call hooks exclusively inside React function components
Although Hooks generally replace class components, there are no plans to remove classes from React. Hooks do not work in React class component.
1. React useState hook
The useState hook is a built-in hook in React that allows you to define state in a functional component. Generally, state refers to data or properties that an application needs to track. To use the useState Hook, we first need to import it into our component by adding it at the top of our component. We are destructuring useState from react as it is a named export.
import { useState } from “react”;The usestate hook takes an initial value as a parameter and returns an array with two elements that we can destructure to get:
- The current state value
- A function to update the state value
State definition with useState commonly follows this pattern:
const [stateValue, setStateValue] = useState(initialValue);

const [backgroundColor, setBackgroundColor] = useState(initialColor);
The backgroundColor state is established using the hook. Then on every button, we set up a click event handler that calls the setBackgroundColor function with the corresponding value.
<button
  type=”button” onClick={() => setBackgroundColor(“blue”)}
   >Blue</button>
The background then applies the new color. Notice that, we are destructuring the returned values from useState. Adding more state variables should be as easy as adding more useState calls. Note that updating state directly, for example, setting backgroundColour = "red", is not allowed.
The useState Hook is versatile and can be utilized to track strings, numbers, booleans, arrays, objects, or any combination of these. We could create multiple state Hooks to track individual values for example:
import { useState } from "react";
import ReactDOM from "react-dom/client";

function Car() {
  const [brand, setBrand] = useState("Ford");
  const [model, setModel] = useState("Mustang");
  const [year, setYear] = useState("1964");
  const [color, setColor] = useState("red");

  return (
	<>
  	<h1>My {brand}</h1>
  	<p>
    	It is a {color} {model} from {year}.
  	</p>
	</>
  )
}
const root = ReactDOM.createRoot(document.getElementById('root'));
root.render(<Car />);
When the state is updated, the entire state gets overwritten. This could be a problem if there is a need to change only one of the state values and others have to remain the same. For example, in order to update the colour of car, If we only called setCar({colour: “blue”}), this would remove the brand, model, and year from our state. We can use the JavaScript spread operator to update the color of car for example.
import { useState } from "react";
import ReactDOM from "react-dom/client";

function Car() {
  const [car, setCar] = useState({
	brand: "Ford",
	model: "Mustang",
	year: "1964",
	color: "red"
  });

  const updateColor = () => {
	setCar(previousState => {
  	return { ...previousState, color: "blue" }
	});
  }

  return (
	<>
  	<h1>My {car.brand}</h1>
  	<p>
    	It is a {car.color} {car.model} from {car.year}.
  	</p>
  	<button
    	type="button"
    	onClick={updateColor}
  	>Blue</button>
	</>
  )
}

const root = ReactDOM.createRoot(document.getElementById('root'));
root.render(<Car />);
Since we require the state’s current value, we pass a function to the setCar method. The previous value is passed to this function. The previous State is then spread out and just the color is overwritten when we return an object.
2. React useEffect Hooks
The useEffect Hook allows you to perform side effects in your components. Some examples of side effects are: fetching data, directly updating the DOM, and timers. useEffect accepts two arguments. The second argument is optional.
useEffect(<function>, <dependency>)To demonstrate this, let’s use setTimeout() to count 1 second after initial render
import { useState, useEffect } from "react";
import ReactDOM from "react-dom/client";

function Timer() {
  const [count, setCount] = useState(0);

  useEffect(() => {
	setTimeout(() => {
  	setCount((count) => count + 1);
	}, 1000);
  }, []); // <- add empty brackets here

  return <h1>I've rendered {count} times!</h1>;
}

const root = ReactDOM.createRoot(document.getElementById('root'));
root.render(<Timer />);
The timing of side effects can be managed in a few different ways. Include the second parameter (which takes an array) at all times. Dependencies are optionally sent to useEffect in this array. Here are ways in which side effects can be managed:
2.1 No dependency passed:
useEffect(() => {
  //Runs on every render
});
2.2 An empty array:
useEffect(() => {
  //Runs only on the first render
}, []);
2.3 Props or state values
useEffect(() => {
  //Runs on the first render
  //And any time any dependency value changes
}, [prop, state]);
Here is an example of a useEffect Hook that is dependent on a variable. If the count variable updates, the effect will run again:
import { useState, useEffect } from "react";
import ReactDOM from "react-dom/client";

function Counter() {
  const [count, setCount] = useState(0);
  const [calculation, setCalculation] = useState(0);

  useEffect(() => {
	setCalculation(() => count * 2);
  }, [count]); // <- add the count variable here

  return (
	<>
  	<p>Count: {count}</p>
  	<button onClick={() => setCount((c) => c + 1)}>+</button>
  	<p>Calculation: {calculation}</p>
	</>
  );
}

const root = ReactDOM.createRoot(document.getElementById('root'));
root.render(<Counter />);
If there are multiple dependencies, they should be included in the useEffect dependency array.
3. Custom Hooks
If you ever find yourself wanting to reuse specific set of functionalities that manage state across various components you have the freedom to craft your own personalized (unique) Hooks. React introduces a handy feature known as custom hooks enabling you to extract and reuse stateful behaviors across different components. These are essentially regular JavaScript functions with the ability to call other hooks as required. You just need to prefix the term “use” to create them. Here’s a simple example of how to create and use a custom hook:
import { useState, useEffect } from 'react';

const useFetchData = (url) => {
  const [data, setData] = useState(null);
  const [loading, setLoading] = useState(true);
  const [error, setError] = useState(null);

  useEffect(() => {
	const fetchData = async () => {
  	try {
    	const response = await fetch(url);
    	if (!response.ok) {
      	throw new Error('Failed to fetch data');
    	}
    	const fetchedData = await response.json();
    	setData(fetchedData);
    	setLoading(false);
  	} catch (error) {
    	setError(error);
    	setLoading(false);
  	}
	};

	fetchData();

	// Cleanup function
	return () => {
  	// Cancel fetch or clean up any resources if needed
	};
  }, [url]);

  return { data, loading, error };
};

export default useFetchData;
Now you can use this custom hook in your components:
// ExampleComponent.js
import React from 'react';
import useFetchData from './useFetchData';

const ExampleComponent = () => {
  const { data, loading, error } = useFetchData('https://api.example.com/data');

  if (loading) {
	return <div>Loading...</div>;
  }

  if (error) {
	return <div>Error: {error.message}</div>;
  }

  return (
	<div>
  	{data && (
    	<ul>
          {data.map((item) => (
        	<li key={item.id}>{item.name}</li>
      	))}
    	</ul>
  	)}
	</div>
  );
};

export default ExampleComponent;
In this example, useFetchData is a custom hook that encapsulates the logic for fetching data from an API. The hook returns an object containing data, loading and error states. ExampleComponent uses the useFetchData hook to fetch and display data from the specified URL.Custom hooks are a great way to organize and reuse complex logic in your React applications. They promote code reusability and make components more readable and maintainable.
III. Converting class components to functional components with hooks
Here is an example of the conversion of class component to functional component
Class Component :
import React, { Component } from 'react';

class Counter extends Component {
  constructor(props) {
	super(props);
	this.state = {
  	count: 0
	};
  }

  increment = () => {
	this.setState({ count: this.state.count + 1 });
  }

  render() {
	return (
  	<div>
    	<p>Count: {this.state.count}</p>
    	<button onClick={this.increment}>Increment</button>
      </div>
	);
  }
}

export default Counter;
Functional Component with Hooks (After Conversion):
import React, { useState } from 'react';

function Counter() {
  const [count, setCount] = useState(0);

  const increment = () => {
	setCount(count + 1);
  }

  return (
	<div>
  	<p>Count: {count}</p>
  	<button onClick={increment}>Increment</button>
	</div>
  );
}

export default Counter;
The function declaration has been used in place of the class component syntax in the transformed functional component, the state for the count has been managed using the useState hook, constructor and this.state declaration has been removed. A standard function increment in place of the class method increase has been added. this.state.count was changed to count, and this.increment to increment.
With the ease of use and advantages of functional components and hooks, this converted functional component accomplishes the same behavior as the original class component. The only difference between these two code snippets is the number of lines of code when react hooks are used
IV. Client-Side Routing with React Router
Client-side routing is a web development technique where navigation occurs within the browser without full page reloads, creating a seamless and fluid user experience. This is especially useful for single-page applications (SPAs), because the client side handles further content modifications dynamically after the initial HTML page loads.
A popular library for client-side routing in React apps is called React Router. It provides a wide range of tools for route configuration, navigation, and dynamic URL management. Using React Router for client-side routing is essential for developing contemporary single-page applications (SPAs). With the help of the robust library React Router, developers can easily construct client-side navigation, control application state, and provide a seamless user experience. Below is a summary of the main ideas:
1. Implementing client-side navigation in single-page applications
When switching between views or pages in a single-page application (SPA), the complete page is not reloaded. Rather, only dynamically updated content is available. In client-side navigation, the URL is modified and various components are rendered according to the modified URL, all without requiring a complete page refresh.
React Router gives developers the ability to specify routes and the components that go with them in a declarative manner for handling routing in React applications.
2. Setting up routes and navigation using React Router
To set up routes and navigation using React Router, you need to install it in your project first. You can do this using npm or yarn:
npm install react-router-domor
yarn add react-router-domNext, you define routes in your application using <Route> components from React Router. Each <Route> component maps a URL path to a specific component that should be rendered when the path matches. You typically wrap your application with a <BrowserRouter> or <HashRouter> component provided by React Router. This component manages the application’s history and listens for changes in the URL. Here’s a basic example of setting up routes with React Router:
import { BrowserRouter, Routes, Route } from 'react-router-dom';
import Home from './components/Home';
import About from './components/About';
import NotFound from './components/NotFound';

function App() {
  return (
    <BrowserRouter>
      <Routes>
        <Route path="/" element={<Home />} />
        <Route path="/about" element={<About />} />
        <Route path="*" element={<NotFound />} />
      </Routes>
    </BrowserRouter>
  );
}

export default App;
3. Creating a Seamless User Experience with Route Transitions
Route transitions enhance the user experience by providing smooth transitions between different views or pages. React Router does not provide built-in support for route transitions out of the box. However, you can achieve route transitions using CSS transitions, CSS animations, or third-party libraries like React Transition Group.
1. Choose the Right Approach:
- Static Transitions: Ideal for simple fades, slides, or zooms using CSS or animation libraries (e.g., react-transition-group, Framer Motion). Easy to implement, but limited in complexity.
- Code Splitting with Suspense: Breaks down your app into smaller bundles, improving initial load time. Shows loading states while components fetch asynchronously. Offers a good balance between performance and flexibility.
- Server-Side Rendering (SSR): Pre-renders pages on the server, enhancing perceived performance. Requires a complex setup and specific frameworks/server components.
2. Implement Animation Techniques:
- Page-Level Transitions: Hide the old page before revealing the new one (fades, wipes, zooms). Creates context change and visual continuity.
- Component-Level Transitions: Animate individual elements within the page (smooth scrolling, element animation). Adds subtle and engaging details.
3. Optimize Performance:
- Minimize Animation Complexity: Avoid overly complex animations that impact render performance. Prioritize smooth and efficient transitions.
- Use Animation Libraries: Leverage tools like Framer Motion or animate.css for pre-built animations and performance optimizations.
- Conditional Transitions: Avoid unnecessary transitions using memoization or transition components that consider route changes.
Recommended Libraries and Tools:
- Framer Motion: Powerful animation library with built-in components and advanced features.
- react-spring: Performant animation library with spring physics-based animations.
- react-transition-group: Classic library for basic CSS-based transitions.
- animate.css: Collection of pre-built CSS animations for quick implementation.
Example Implementation with Framer Motion:
import { motion } from 'framer-motion';
import { BrowserRouter as Router, Routes, Route } from 'react-router-dom';

const Home = () => <h1>Home</h1>;
const About = () => <h1>About</h1>;

function App() {
  return (
	<Router>
  	<Routes>
    	<Route
      	path="/"
      	element={(
        	<motion.div
          	key={location.key}
          	initial="out"
          	animate="in"
          	exit="out"
          	variants={{
          	  out: { opacity: 0 },
            	in: { opacity: 1 },
          	}}
        	>
          	<Home />
        	</motion.div>
      	)}
    	/>
    	<Route
      	path="/about"
      	element={(
        	<motion.div
    	      key={location.key}
          	initial="out"
          	animate="in"
          	exit="out"
          	variants={{
            	out: { opacity: 0 },
            	in: { opacity: 1 },
          	}}
        	>
          	<About />
        	</motion.div>
      	)}
    	/>
  	</Routes>
	</Router>
  );
}
export default App;
V. Styling Strategies in React
Styling React components is an essential part of building user interfaces. There are various strategies for styling React components, each with its advantages and use cases. Here’s a comprehensive overview of various styling strategies in React, incorporating insights from feedback and addressing potential shortcomings:
- Styling React Components using Traditional CSS
Traditional CSS involves writing styles in separate CSS files and then linking them to your React components using className or class attributes. This approach allows for a clear separation of concerns between HTML structure and styling. You can use CSS preprocessors like Sass or Less to enhance your styling workflow with features like variables, mixins, and nested selectors. Here’s an example of styling a React component using traditional CSS
// Button.js
import React from 'react';
import './Button.css';

function Button(props) {
  return <button className="button">{props.children}</button>;
}

export default Button;


/* Button.css */
.button {
  background-color: blue;
  color: white;
  padding: 10px 20px;
  border: none;
  border-radius: 5px;
  cursor: pointer;
}
Everything in Button.css file is applied on className “button” in Button.js file.
1. Exploring CSS-in-JS Libraries for Dynamic Styling
CSS-in-JS libraries allow you to write CSS directly within your JavaScript code using JavaScript objects or template literals. These libraries offer benefits like scoped styles, dynamic styling based on props or state, and better integration with component-based architectures. Some popular CSS-in-JS libraries include styled-components, Emotion, and CSS Modules. Here’s an example of using styled-components to style a React component:
// Button.js
import React from 'react';
import styled from 'styled-components';

const StyledButton = styled.button`
  background-color: blue;
  color: white;
  padding: 10px 20px;
  border: none;
  border-radius: 5px;
  cursor: pointer;
`;

function Button(props) {
  return <StyledButton>{props.children}</StyledButton>;
}

export default Button;
2. Best Practices for Organizing and Maintaining Styles in a React Application
Organizing and maintaining styles is crucial for keeping your React application clean, readable, and scalable.By following these best practices, you can build React applications with well-organized, maintainable, and visually appealing styles.
- Use a consistent naming convention for CSS classes or styled components to maintain clarity and consistency in your codebase.
- Organize styles based on components or features to make it easier to find and maintain them.
- Consider using CSS preprocessors or postprocessors to enhance your styling workflow with features like variables, mixins, and auto prefixing.
- Optimize your styles for performance by reducing unnecessary specificity and removing unused styles.
- Consider using a CSS reset or normalize.css to ensure consistent rendering across different browsers.
- Use media queries and responsive design techniques to create styles that adapt to different screen sizes and devices.
- Regularly review and refactor your styles to keep them organized and maintainable as your application grows.
- By understanding and applying these styling strategies and best practices, you can effectively style your React components and create maintainable and scalable user interfaces.
VI. Optimizing Performance with Hooks and Routing
React apps can be made to perform better by using a variety of ways, such as improving routing algorithms and making use of React Hooks for effective state management. The following summarizes how to use hooks and routing to optimize performance:
1. Leveraging React Hooks for Optimized State Management:
React Hooks, introduced in React 16.8, provide a more concise and readable way to manage state and side effects in functional components. Hooks like useState, useEffect, and useContext allow you to encapsulate logic and stateful behavior within functional components. By using hooks effectively, you can reduce the amount of boilerplate code and improve the performance of your components. For example, you can use the useState hook to manage local component state:
import React, { useState } from 'react';

function Counter() {
  const [count, setCount] = useState(0);

  const increment = () => {
	setCount(count + 1);
  };

  return (
	<div>
  	<p>Count: {count}</p>
  	<button onClick={increment}>Increment</button>
	</div>
  );
}

export default Counter;
2. Enhancing Application Performance Through Efficient Routing Strategies
Optimizing the way your application manages routing and switching between views or pages is a key component of effective routing techniques. React Router optimizes route and component loading using features like code separation and lazy loading.
It is possible to decrease the initial bundle size and enhance the speed of your application by dividing your routes into distinct bundles and loading them asynchronously.
React.lazy and Suspense components from React Router can be used to load components slowly and only when necessary:
import React, { Suspense } from 'react';
import { BrowserRouter as Router, Routes, Route } from 'react-router-dom';

const Home = React.lazy(() => import('./Home'));
const About = React.lazy(() => import('./About'));

function App() {
  return (
    <Router>
      <Suspense fallback={<div>Loading...</div>}>
        <Routes>
          <Route path="/" element={<Home />} />
          <Route path="/about" element={<About />} />
        </Routes>
      </Suspense>
    </Router>
  );
}

export default App;
3. Combining Hooks and Routing for a Responsive and Interactive User Interface:
By combining hooks and routing, you can create a responsive and interactive user interface that efficiently manages state and handles navigation. For example, you can use hooks like useEffect to fetch data when a route is loaded and update the component’s state accordingly:
import React, { useState, useEffect } from 'react';
import { useParams } from 'react-router-dom';

function UserDetails() {
  const { userId } = useParams();
  const [user, setUser] = useState(null);

  useEffect(() => {
    fetch(`https://api.example.com/users/${userId}`)
  	.then(response => response.json())
  	.then(data => setUser(data));
  }, [userId]);

  return (
	<div>
  	{user ? (
    	<div>
      	<h2>{user.name}</h2>
      	<p>Email: {user.email}</p>
    	</div>
  	) : (
    	<div>Loading...</div>
  	)}
	</div>
  );
}

export default UserDetails;
By efficiently managing state with hooks and optimizing routing strategies, you can create high-performance React applications that provide a seamless user experience.
VII. Practical Implementation and Advanced Techniques
1. Building real-world examples that showcase the integration of hooks, routing, and styling
Let’s create a simple task management application where users can add, delete, and mark tasks as completed. We’ll integrate React hooks for state management, React Router for routing, and CSS for styling. Create a skeleton react app and install necessary dependencies using:
npx create-react-app task-appnpm install react-router-domnpm install react-scriptsThen replace the content of App.js with:
import React from 'react';
import { BrowserRouter as Router, Routes, Route } from 'react-router-dom';

import Tasks from './component/Tasks';
import AddTask from './component/Tasks';

function App() {
  return (
	<Router>
  	<div className="app">
        <Routes>
      	<Route path="/" element={<Tasks />} />
      	<Route path="/add" element={<AddTask />} />
        </Routes>
  	</div>
	</Router>
  );
}

export default App;
Create a component folder and create files Tasks.js, AddTask.js and styles.css inside the folder.
Inside Tasks.js, paste the following line of code:
import React, { useState } from 'react';
import { Link } from 'react-router-dom';
import './styles.css';

const Tasks = () => {
  const [tasks, setTasks] = useState([]);
  const [newTask, setNewTask] = useState('');

  const handleAddTask = () => {
    setTasks([...tasks, { name: newTask, completed: false }]); // Updated to use object for task
    setNewTask('');
  };

  const handleDeleteTask = (index) => {
    const updatedTasks = [...tasks];
    updatedTasks.splice(index, 1);
    setTasks(updatedTasks);
  };

  const handleToggleTask = (index) => {
    const updatedTasks = [...tasks];
    updatedTasks[index] = { ...updatedTasks[index], completed: !updatedTasks[index].completed };
    setTasks(updatedTasks);
  };

  const handleKeyDown = (e) => {
    if (e.key === 'Enter') {
      handleAddTask();
    }
  }


  return (
    <div>
      <h1>Tasks</h1>
      <ul className="task-list">
        {tasks.map((task, index) => (
          <li key={index} className={`task ${task.completed ? 'completed' : ''}`}>
            <span onClick={() => handleToggleTask(index)}>{task.name}</span>
            <button onClick={() => handleDeleteTask(index)}>Delete</button>
          </li>
        ))}
      </ul>
      <input type="text" onKeyDown={handleKeyDown} value={newTask} onChange={(e) => setNewTask(e.target.value)} />
      <button className='btn' onClick={handleAddTask}>Add Task</button>
      {/* <Link to="/add">Add Task (Alternative)</Link> */}
    </div>
  );
};

export default Tasks;
Inside AddTask.js file, paste:
import React, { useState } from 'react';
import { useNavigate } from 'react-router-dom';
import './styles.css';

const AddTask = () => {
  const [newTask, setNewTask] = useState('');
  const navigate = useNavigate();

  const handleAddTask = () => {
	// Here you can add the task to your data source
	navigate('/'); // Navigate to the root route using useNavigate
  };

  return (
	<div>
  	<h1>Add Task</h1>
  	<div className="add-task-form">
    	<input type="text" value={newTask} onChange={(e) => setNewTask(e.target.value)} />
    	<button onClick={handleAddTask}>Home</button>
  	</div>
	</div>
  );
};

export default AddTask;
Navigate to style.css and paste this in it:
div {
  border-radius: 5px;
  padding: 20px;
}


input[type=text] {
  width: 15%;
  padding: 12px 20px;
  margin: 8px 0;
  display: inline-block;
  border: 1px solid #ccc;
  border-radius: 4px;
  box-sizing: border-box;
}

.btn {
  width: 10%;
  background-color: #054e73;
  color: white;
  padding: 14px 20px;
  margin: 8px 0;
  border: none;
  border-radius: 4px;
  cursor: pointer;
}

.task-list {
    list-style-type: none;
    padding: 0;
  }

  .task {
    display: flex;
    align-items: center;
    margin-bottom: 10px;
    padding: 10px;
    border: 1px solid #ccc;
    border-radius: 5px;
  }

  .task.completed {
    text-decoration: line-through;
  }

  .task span {
    flex-grow: 1;
    cursor: pointer;
  }

  .task button {
    margin-left: 10px;
    background-color: #ff6347;
    color: #fff;
    border: none;
    border-radius: 5px;
    padding: 5px 10px;
    cursor: pointer;
  }

  .task button:hover {
    background-color: #ff473d;
  }

  .add-task-form {
    margin-top: 20px;
  }

  .add-task-form input[type="text"] {
    padding: 8px;
    border: 1px solid #ccc;
    border-radius: 5px;
  }

  .add-task-form button {
    margin-left: 10px;
    background-color: #5cb85c;
    color: #fff;
    border: none;
    border-radius: 5px;
    padding: 8px 15px;
    cursor: pointer;
  }

  .add-task-form button:hover {
    background-color: #4cae4c;
  }
Now, to run your app execute npm start command
npm start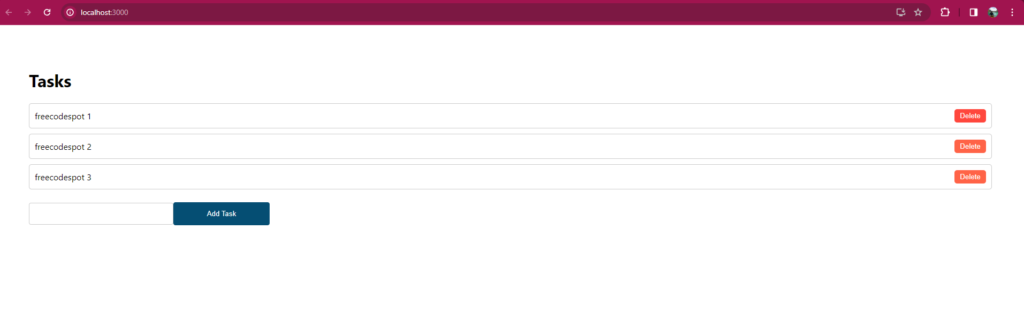
2. Exploring advanced techniques for stateful components, dynamic routes, and complex styling scenarios
For stateful components, we’ve used React hooks (useState) for managing state. For dynamic routes, we’ve used React Router’s Route component. And in complex styling scenarios, you can add CSS classes and stylesheets as needed. You can further enhance this example by adding features like editing tasks, persisting data using localStorage or a backend server, authentication, etc.
Source Code
You may download the source code from GitHub. Don’t forget to follow us!
This topic provides a comprehensive guide to using React Hooks for state management, implementing client-side routing with React Router, and adopting effective styling strategies in modern React applications. The focus on practical implementation ensures that readers can apply these concepts to real-world projects.

To get more familiar with React you can revisit this article. This guide will help you set up react development and create your first web app.