Here is a sample source code on how you can run MSBuild programmatically in C# using Powershell. In this tutorial, we will not just run the MSBuild command. We will automate a deployment process of an ASP.NET CORE Web Application from a clone repository up to building an output file for deployment.
- I. Configure Nuget on Windows
- II. Configure MSBuild on Windows
- III. Create a new Windows Form Application
- IV. Install PowerShell Package
- V. Clone a Sample Remote Repository
- VI. Create A Builder Form
- VII. Settings Button and Create Settings Form
- VIII. Builder Form Load Button
- IX. Builder Form Nuget Restore
- X. Builder Form Build button
- XI. Builder Form Pull Remote button
- XII. Builder Form View Changes Button
- Application Preview
- Source Code
- Summary
These are the process that we will execute in this tutorial.
- Nuget Restore » restore project nuget packages
- MsBuild » build our project solution
- Release Output » generate release build output
- git log -5 » get last 5 commits from your repository
- git fetch » Fetch changes from the remote repository
- git pull » Apply changes to your local repository
Before we start, you need the following files.
I. Configure Nuget on Windows
After you download Nuget, you need to install it on your Windows Environmental Variable. This process will allow us to execute a Nuget command using the command line or Windows Powershell. You may check out my previous article on how you can add Nuget to your local machine.
II. Configure MSBuild on Windows
To run MSBuild programmatically in C# using PowerShell, we need to have the msbuild.exe. If you are using Visual Studio on your local machine, you need to locate it inside the program file. If not, you can download it here.
C:\Program Files (x86)\Microsoft Visual Studio\2019\Community\MSBuild\Current\Bin\amd64
This is my MSBuild.exe location
III. Create a new Windows Form Application
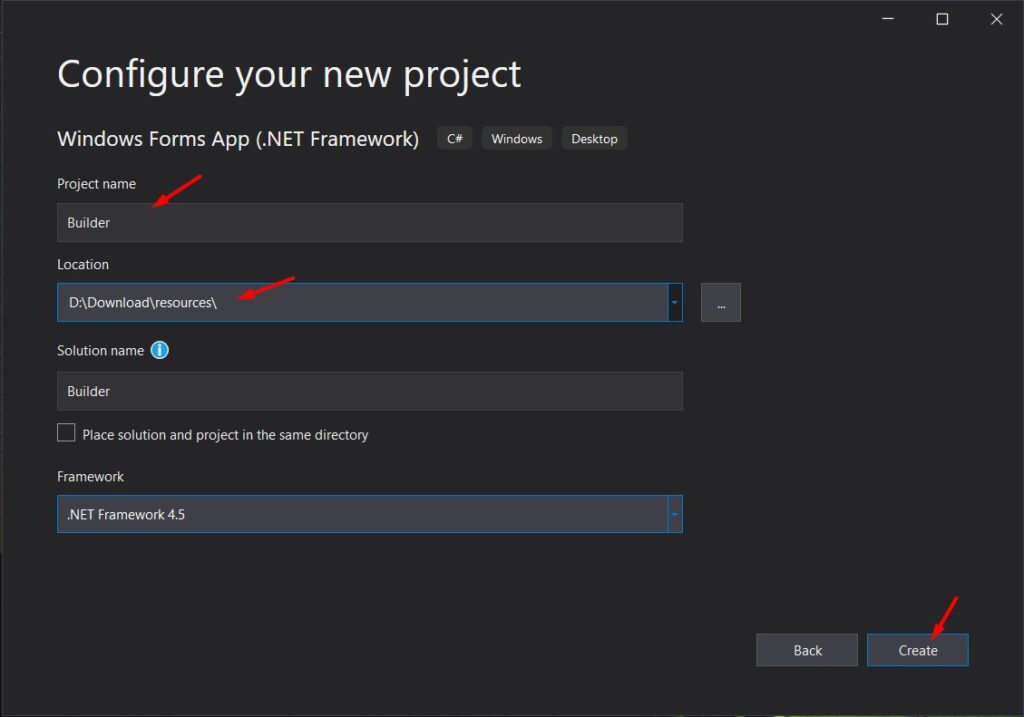
Now, let’s create a new Windows form application. To do that, follow the steps below.
- Open Visual Studio and search for Windows Form App(.Net Framework)

2. Name your Windows application. In my case, I named it Builder
3. Choose the location where you want to put the project, then click the Create button.
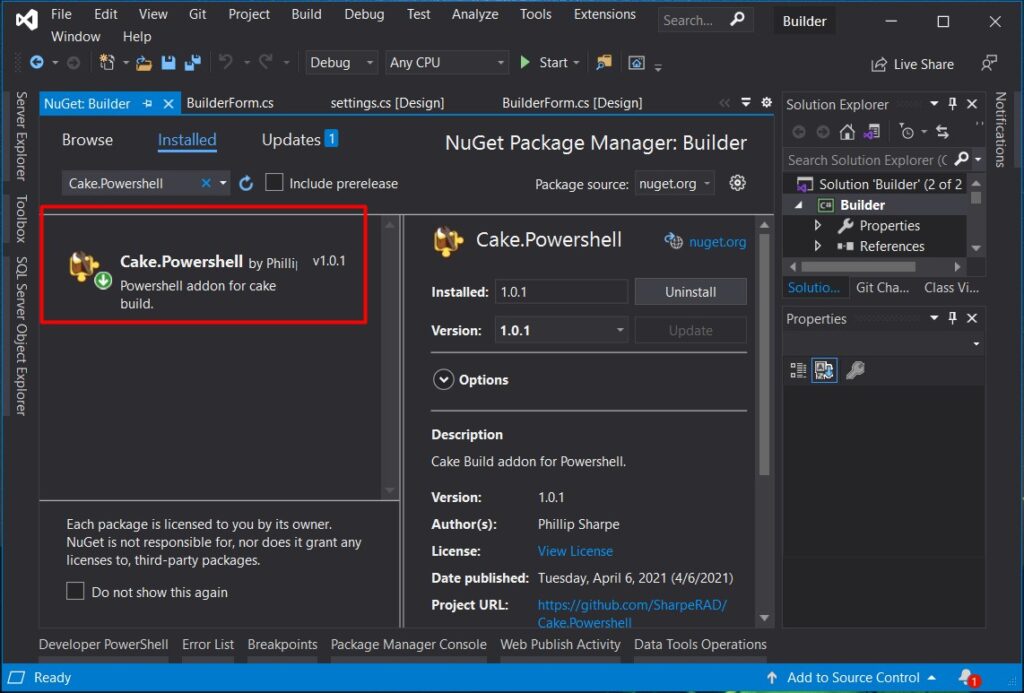
IV. Install PowerShell Package
Since we will use PowerShell to execute the build automation, let’s add the Package we need to install from the Nuget Package Manager. Search for Cake Powershell, then install the Package.
V. Clone a Sample Remote Repository
This step is just optional if you have an existing clone repository. You may use it. In my case, I clone a repository from my previous article. If you want to use it, you may visit this article JQuery Datatable server-side processing in ASP.NET Core.
Now, choose where you want to put your local repository, then perform a git clone command.
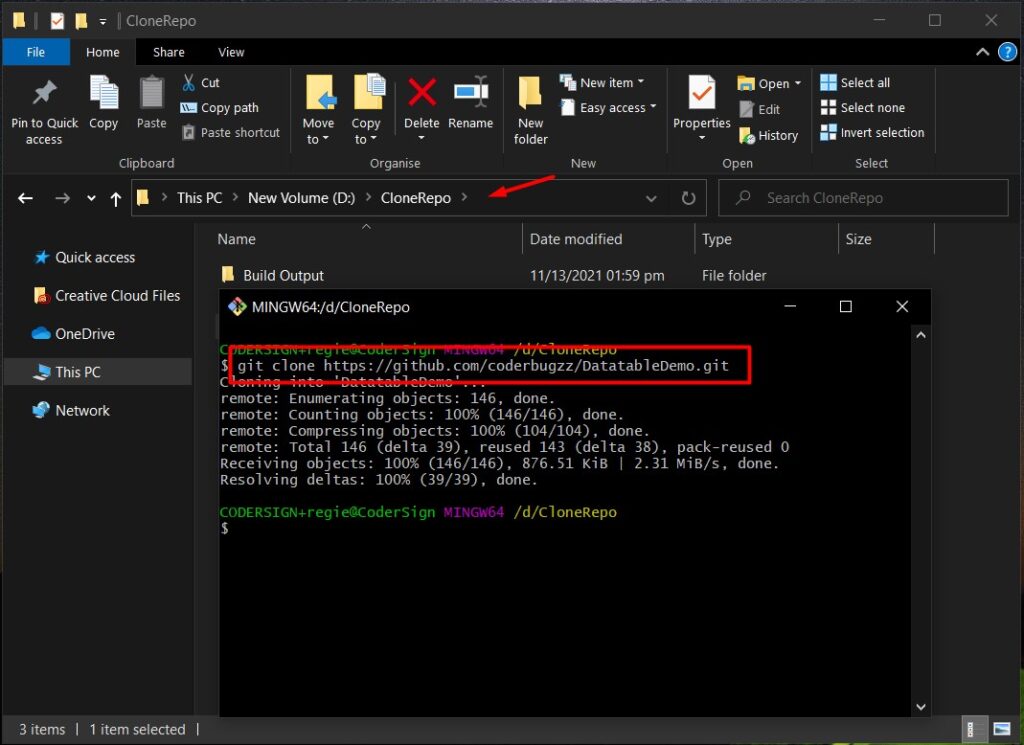
As you can see above, the project that we will use is named DatatableDemo. Just take note of the name since I will use this demo project in the next step.
We are ready to start executing the command we need to perform a build operation for an ASP.NET CORE web application.
VI. Create A Builder Form
This Form will handle the following command.
- Nuget Restore DatatableDemo.sln » restore all the missing package for the project
- MSBuild DatatableDemo.csproj » Build the ASP.NET Core web application to generate a release build file
Before we can execute the command above, we need to add the inputs on our windows Form. Navigate back the Windows form application that we created a while ago and then add the following. See the image below.
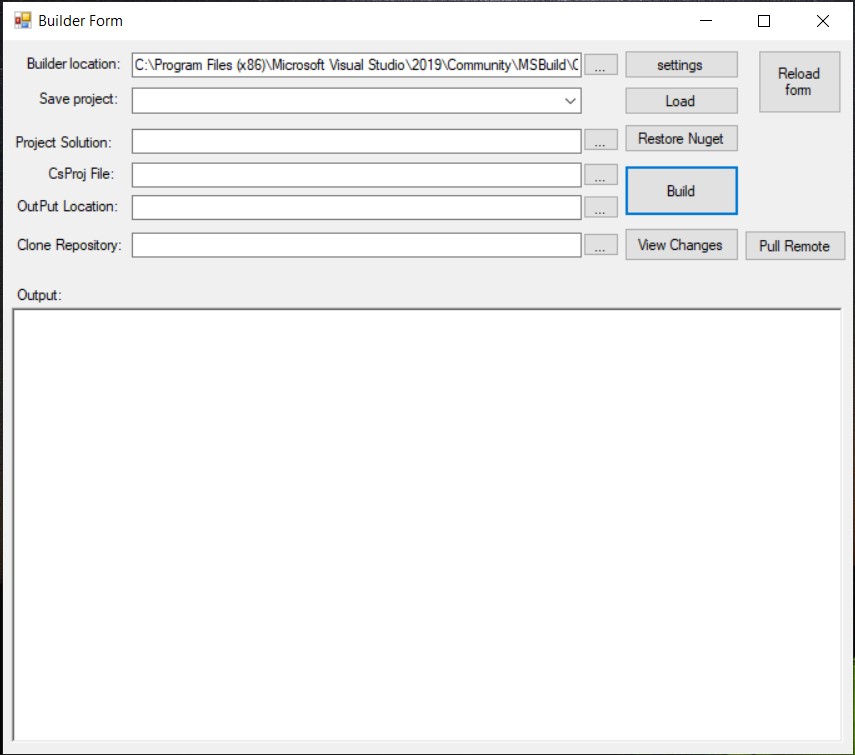
To understand why I added this field on the Form. These are the details.
Textboxes:
- Builder Location » This is the settings for the msbuild.exe file
- Save Project » Just a dropdown list of the save settings that we will create later.
- Project solution » A solution file which in my case it’s DatatableDemo.sln
- CsProj » A c# Project file that will be use during building process
- Output Location » A folder location where you want to place the build output for release
- Clone Repository » The local repository you want to build. In my case it’s the location of my DatatableDemo project.
Button :
- Settings » A form to save a settings on a JSON file for later use.
- Load » Load the selected save Settings from a JSON file
- Restore Nuget » execute nuget restore command using powershell
- Build » Build ASP.NET Core Project
- View Changes » Perform git log command to view recent commits to the DatatableDemo Remote Repository
- Pull Remote » perform git fetch and git pull command to git the latest changes from the Remote Repository
Now, let’s start adding the functionality.
VII. Settings Button and Create Settings Form
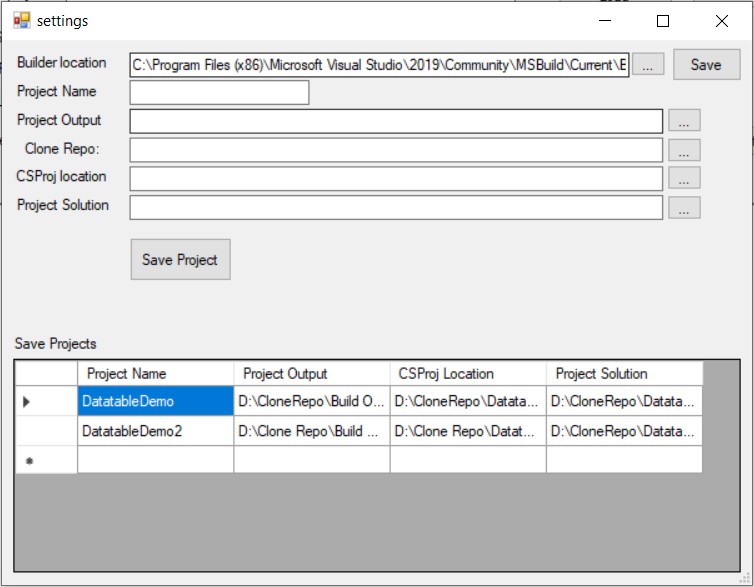
The settings button will display the Settings Form. This Form will also contain the input that we had on the Builder form, but the functionality would be to save the settings to a JSON file used on the Builder form.
- Create a settings.json file on the application root directory. This is where we save the settings for our deployment.
- Create a builder.json file on the application root directory. This is where the msbuild location wil be saved.

3. Create the Form inputs that we need. Below is the screenshot of the settings Form with the same input as the Builder form input that we created a while ago.
4. Add functionality on the Save button. Below is the source code that will save the text from the builder location to the builder.json file. Copy the code below.
private void button1_Click(object sender, EventArgs e)
         {
             if (txtMSbuilLocation.Text.Trim() != "")
             {
                 File.WriteAllText(AppDomain.CurrentDomain.BaseDirectory + @"\builder.json", txtMSbuilLocation.Text);
             }
             else
             {
                 MessageBox.Show("oooopsss"); //dummy error message
             }
         }
AppDomain.CurrentDomain.BaseDirectory » get the base directory of your application.
5. Add functionality for the Save Project button. Below is the code snippet that will save the settings to the settings.json file.
         private void button2_Click(object sender, EventArgs e)
         {

             if (txtProjectName.Text.Trim() != "" && txtBuildOutput.Text.Trim() != "" && txtCProjLocation.Text.Trim() != "" && txtLocalRepoLoc.Text.Trim() != "")
             {
                 List<projectModel> models = new List<projectModel>();

                 var current_settings = Builder.Class.settings.getSettings();

                 if (current_settings != null)
                 {
                     models = current_settings;
                 }

                 ProjectDetails details = new ProjectDetails {
                  ProjectOutput = txtBuildOutput.Text,
                  CsprojLocation = txtCProjLocation.Text,
                  CloneRepository = txtLocalRepoLoc.Text,
                  ProjectSolution = txtProjSolution.Text
                 };
                 models.Add(new projectModel{ ProjectName = txtProjectName.Text, details = details});

                 string json = JsonConvert.SerializeObject(models);
                 File.WriteAllText(AppDomain.CurrentDomain.BaseDirectory + @"\settings.json", json);
                 models = Builder.Class.settings.getSettings();

                 for (int i = 0; i < models.Count; i++)
                 {
                     if (models[i].ProjectName != null)
                     {
                         dataGridView1.Rows.Add(models[i].ProjectName, models[i].details.ProjectOutput, models[i].details.CsprojLocation);
                     }
                 }
             }
             else
             {
                 MessageBox.Show("Oopsss empty!");
             }
         }
6. Create a separate class file with a method getSettings() and getBuilder(). See the code snippet below.
- getSettings() » Retrieved the data from settings.json file
- getBuilder() » Retrieved the data from builder.json file
  using Builder.Models;
 using Newtonsoft.Json;
 using System;
 using System.Collections.Generic;
 using System.IO;
 using System.Linq;
 using System.Text;
 using System.Threading.Tasks;

 namespace Builder.Class
 {
     public static class settings
     {
         public static List<projectModel> getSettings()
         {
             using (StreamReader r = new StreamReader("settings.json"))
             {
                 string json = r.ReadToEnd();
                 List<projectModel> items = JsonConvert.DeserializeObject<List<projectModel>>(json);
                 return items;
             }
         }

         public static string getBuilder()
         {
             try
             {
                 using (StreamReader r = new StreamReader("builder.json"))
                 {
                     string settings = r.ReadToEnd();
                     return settings;
                 }
             }
             catch (Exception)
             {

                 return "";
             }
         }
     }
 }
6. Lastly, display the save file on the form load event. See the code snippet below.
          private void settings_Load(object sender, EventArgs e)
         {
             List<projectModel> models = new List<projectModel>();
             models = Builder.Class.settings.getSettings();

             if (models != null)
             {
             for (int i = 0; i < models.Count; i++)
             {
                 if (models[i].ProjectName != null)
                 {
                     dataGridView1.Rows.Add(models[i].ProjectName, models[i].details.ProjectOutput, models[i].details.CsprojLocation,models[i].details.ProjectSolution);
                 }
             }
             }
             txtMSbuilLocation.Text = Builder.Class.settings.getBuilder();
         }
VIII. Builder Form Load Button
The load button will load the selected settings from the Save Project dropdown list from the settings.json file. Below is the code from the Load button event.
         private void btnReload_Click(object sender, EventArgs e)
         {
             List<projectModel> models = new List<projectModel>();
             models = Builder.Class.settings.getSettings();

             for (int i = 0; i < models.Count; i++)
             {
                 if (models[i].ProjectName == txtSaveProject.Text)
                 {
                     txtCProjLoc.Text = models[i].details.CsprojLocation;
                     txtOutputLoc.Text = models[i].details.ProjectOutput;
                     txtLocalCloneRepo.Text = models[i].details.CloneRepository;
                     txtProjSolution.Text = models[i].details.ProjectSolution;
                 }
             }
         }
IX. Builder Form Nuget Restore
NuGet restore button will execute NuGet restore command. The command below will fix the Package missing from my DatatableDemo project. Take note that the Nuget restore command needs the project solution file to work. Below is a sample Powershell command to restore the Nuget package.
Nuget Restore D:\CloneRepo\DatatableDemo\DatatableDemo.slnBelow is the complete code on the Restore Nuget button.
         private void button11_Click(object sender, EventArgs e)
         {
             using (PowerShell powerShell = PowerShell.Create())
             {
                 string commnd_text = "nuget restore " + txtProjSolution.Text;
                 powerShell.AddScript(commnd_text);
                 powerShell.AddCommand("Out-String");
                 Collection<PSObject> PSOutput = powerShell.Invoke();
                 StringBuilder stringBuilder = new StringBuilder();
                 foreach (PSObject pSObject in PSOutput)
                     stringBuilder.AppendLine(pSObject.ToString());
                 txtOutput_rich.Text = stringBuilder.ToString();
             }

         }
X. Builder Form Build button
After restoring the NuGet package, it’s time to run MSBuild programmatically in C#. This command will build the project and create the output build file for deployment. See the code below. Below is the code snippet on my Build button event.
     private void btnBuild_Click(object sender, EventArgs e)
         {
             try
             {
                 txtOutput_rich.Clear();
                 using (PowerShell powerShell = PowerShell.Create())
                 {
                     string commnd_text = "cd " + txtMSBuildLoc.Text + "\n";
                     commnd_text += @"msbuild.exe '" + txtCProjLoc.Text + "' /p:Configuration=Release /p:DeployOnBuild=True /p:DeployDefaultTarget=WebPublish /p:WebPublishMethod=FileSystem /p:DeleteExistingFiles=True /p:publishUrl='" + txtOutputLoc.Text + "'";
                     powerShell.AddScript(commnd_text);
                     powerShell.AddCommand("Out-String");
                     Collection<PSObject> PSOutput = powerShell.Invoke();

                     StringBuilder stringBuilder = new StringBuilder();
                     foreach (PSObject pSObject in PSOutput)
                         stringBuilder.AppendLine(pSObject.ToString());
                     txtOutput_rich.Text = stringBuilder.ToString();
                 }
             }
             catch (Exception ex)
             {
                 MessageBox.Show(ex.Message);
             }
         }
This event will execute the following command.
Change location to msbuild.exe.
cd C:\Program Files (x86)\Microsoft Visual Studio\2019\Community\MSBuild\Current\Bin\amd64\The command below will execute MSBuild and publish the file to the location declared on publishUrl.
msbuild.exe 'D:\CloneRepo\DatatableDemo\DatatableDemo\DatatableDemo.csproj' /p:Configuration=Release /p:DeployOnBuild=True /p:DeployDefaultTarget=WebPublish /p:WebPublishMethod=FileSystem /p:DeleteExistingFiles=True /p:publishUrl='D:\CloneRepo\Build Output'The command-line argument » this will output the release output file of our ASP.NET Core Web application. To change the Output location of the file after publishing, you can change the publisher argument.
 /p:Configuration=Release
 /p:DeployOnBuild=True
 /p:DeployDefaultTarget=WebPublish
 /p:WebPublishMethod=FileSystem
 /p:DeleteExistingFiles=True
 /p:publishUrl="D:\Build Location"
XI. Builder Form Pull Remote button
If you are working as a team on this project, one of your members pushes his changes on the remote repository. To get the changes from the remote repository, you can perform a git fetch and git pull.
GIT FETCH
 using (PowerShell powerShell = PowerShell.Create())
             {
                 string commnd_text = "cd " + txtLocalCloneRepo.Text + "\n";
                 commnd_text += "git fetch";
                 powerShell.AddScript(commnd_text);
                 powerShell.AddCommand("Out-String");
                 Collection<PSObject> PSOutput = powerShell.Invoke();

                 StringBuilder stringBuilder = new StringBuilder();
                 foreach (PSObject pSObject in PSOutput)
                     stringBuilder.AppendLine(pSObject.ToString());
                 txtOutput_rich.Text = stringBuilder.ToString();
             }
GIT PULL :
 using (PowerShell powerShell = PowerShell.Create())
             {

                 string commnd_text = "cd " + txtLocalCloneRepo.Text + "\n";
                 commnd_text += "git pull";
                 powerShell.AddScript(commnd_text);
                 powerShell.AddCommand("Out-String");
                 Collection<PSObject> PSOutput = powerShell.Invoke();

                 StringBuilder stringBuilder = new StringBuilder();
                 foreach (PSObject pSObject in PSOutput)
                     stringBuilder.AppendLine(pSObject.ToString());
                 txtOutput_rich.Text = stringBuilder.ToString();
             }
XII. Builder Form View Changes Button
If you want to see the last changes made on the repository, you can perform a git log command or git log -5 to limit the result to the top 5 recent changes.
using (PowerShell powerShell = PowerShell.Create())
             {

                 string commnd_text = "cd " + txtLocalCloneRepo.Text + "\n";
                 commnd_text += "git log -5";
                 powerShell.AddScript(commnd_text);
                 powerShell.AddCommand("Out-String");
                 Collection<PSObject> PSOutput = powerShell.Invoke();

                 StringBuilder stringBuilder = new StringBuilder();
                 foreach (PSObject pSObject in PSOutput)
                     stringBuilder.AppendLine(pSObject.ToString());
                 txtOutput_rich.Text = stringBuilder.ToString();
             }
Application Preview
Source Code
You can download the source code on my GitHub Account @coderbugzz.
Summary
In this tutorial, we have learned how to Run MSBuild programmatically in C# using the Powershell package. This process can be used to execute a deployment process on a machine with no Visual Studio installed. However, you can get free tools to implement this kind of automation. Just like Jenkins, that has a lot of useful automation functionality. This tutorial can give you insight if you prefer inHouse custom tools that you can manage.
This example might not be perfect, but hopefully, this gives you an idea of how to run commands on PowerShell using C# programming.
KEEP CODING!!