In this tutorial, we will learn how to consume an ASP.NET Core Web API using RestSharp. We are going to take advantage of this simple library and later on, we will see how simple and easy it is to implement. A restful API can be consumed in many ways and the simplest way is to use a library that is available via NuGet manager.
- What is RestSharp?
- I. Download example ASP.NET Core WEB API Source Code
- II. Setup ASP.NET Web Application Project
- RestSharpDemo Project Folder Structure
- III. Create Model
- IV. RestSharp Caller Interface and Implementation
- V. Register IRestClientCaller and RestClientCaller in Unity Config
- VI. Create View and Action Result inside HomeController
- VII. Home Controller Index View
- VIII. Home Controller Register View
- IX. Home Controller Edit View
- Source Code
- Summary
What is RestSharp?
RestSharp is a comprehensive, open-source HTTP client library that works with all kinds of DotNet technologies. It can be used to build robust applications by making it easy to interface with public APIs and quickly access data without the complexity of dealing with raw HTTP requests.
Now, before you proceed with the steps below, please ensure that you have the latest version of the following installer.
- Visual Studio
- SQL Server
I. Download example ASP.NET Core WEB API Source Code
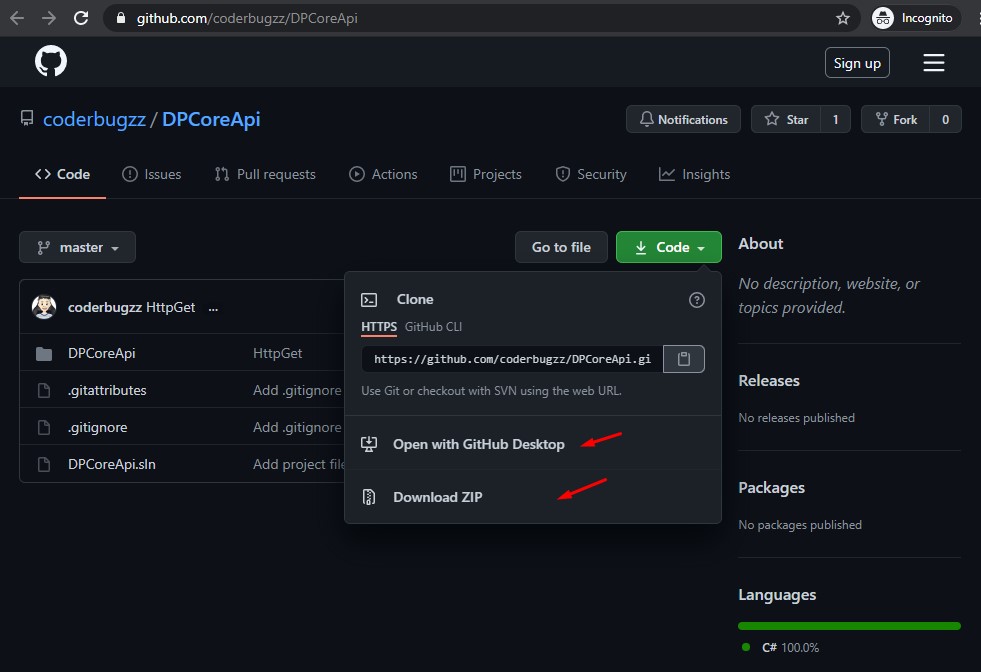
We will use an existing ASP.NET Core Web API for this tutorial, so the first thing we need to do is to download the source code from my previous article. Link below.
- Download source from this article will redirect you to my GitHub Repository. See the image below.
2. Now, Create the database structure we need. You may also refer to the previous article or you may execute the code below.
USE [DBTest]
 GO
 / Object:  Table [dbo].[members]    Script Date: 04/18/2021 11:33:08 am /
 SET ANSI_NULLS ON
 GO
 SET QUOTED_IDENTIFIER ON
 GO
 CREATE TABLE [dbo].[members](
     [Id] [int] IDENTITY(1,1) NOT NULL,
     [Name] nvarchar NULL,
     [Contact] nvarchar NULL,
     [Address] nvarchar NULL,
     [RegDate] [datetime] NULL
 ) ON [PRIMARY]
 GO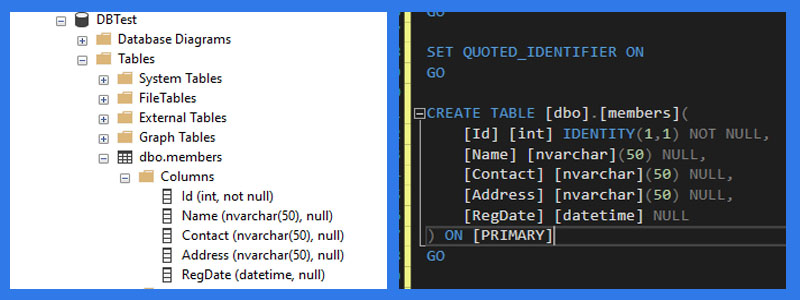
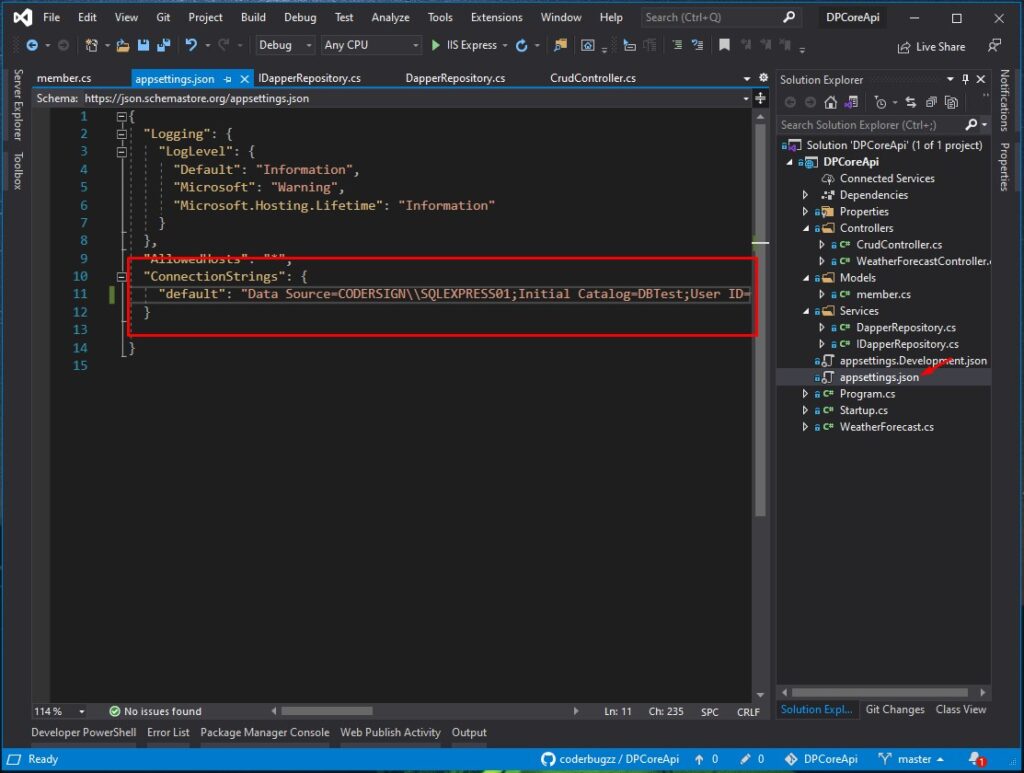
3. Once you download the source code change the connection string from appsettings.json. Make sure to change it to the right SQL Database connection from your local machine.
This are the URL that we can consume from this WEB API. See the list below.
| URL | METHOD |
|---|---|
| https://localhost:44302/api/CRUD/GetMembers | GET |
| https://localhost:44302/api/CRUD/Create | POST |
| https://localhost:44302/api/CRUD/Delete?id=3 | DELETE |
| https://localhost:44302/api/CRUD/Update | POST |
| https://localhost:44302/api/CRUD/GetMembersById?id=3 | GET |
II. Setup ASP.NET Web Application Project
- Let’s start by creating a new ASP.NET Web Application. Open your Visual Studio IDE and proceed with the steps below.
- Select File » New » Project.
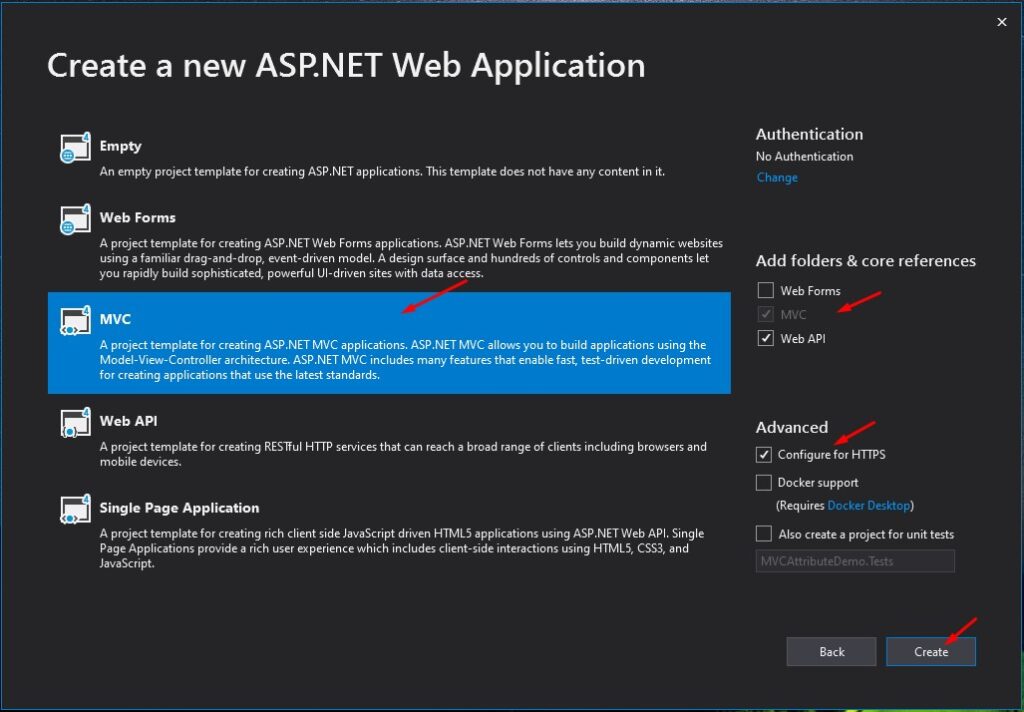
- Choose ASP.NET Web Application(.NET Framework). Name the project RestSharpDemo to have the same namespace as my project. Click OK.
- Select MVC template and then check Configure for HTTPS.
- Lastly, Click on Create.
2. Now we need to install required packages for this project. I have listed it all below.
- RestSharp v106.11.7
- Unity.Mvc5 v1.4.0
RestSharpDemo Project Folder Structure
III. Create Model
Let’s create a model that will handle the response from the ASP.NET Core Web API. Use the code snippet below for your reference.
using System;
 using System.Collections.Generic;
 using System.Linq;
 using System.Web;
 namespace RestSharpDemo.Models
 {
     public class member
     {
         public int Id { get; set; }
         public string Name { get; set; }
         public string Contact { get; set; }
         public string Address { get; set; }
     }
 }
IV. RestSharp Caller Interface and Implementation
Create a folder Name Caller and under caller create an interface and an implementation class. See the image below.
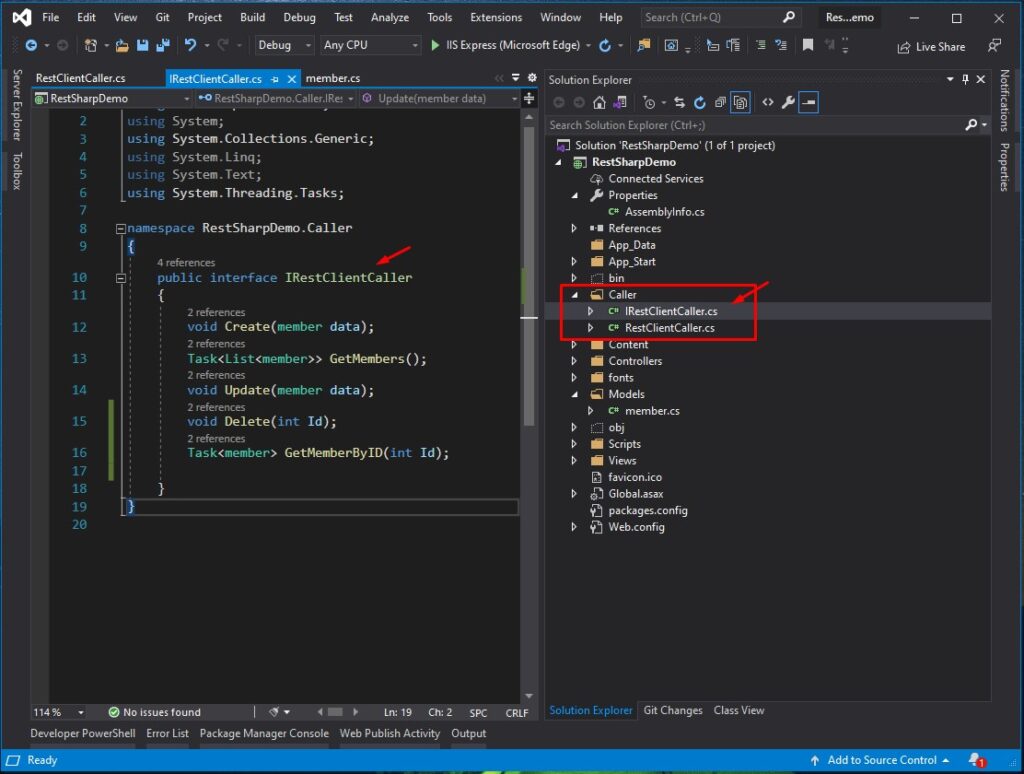
- I named my interface as IRestClientCaller. This will contain the method properties that I want to implement. See the code below.
using RestSharpDemo.Models;
using System;
using System.Collections.Generic;
using System.Linq;
using System.Text;
using System.Threading.Tasks;

namespace RestSharpDemo.Caller
{
    public interface IRestClientCaller
    {
        void Create(member data);
        Task<List<member>> GetMembers();
        void Update(member data);
        void Delete(int Id);
        Task<member> GetMemberByID(int Id);

    }
}
2. Then the implementation class is RestClientCaller. This will contain the actual RestSharp call to the ASP.NET Core Web API. To use the RestSharp Library I call and initiate a RestClient using the code snippet below.
 private readonly RestClient _client;
 private readonly string _url = "https://localhost:44302/";

 public RestClientCaller()
 {
     _client = new RestClient(_url);
 }
3. Create the method that will consume the URL from the WEB API. See the list of URL below.
| WEB API URL | METHOD | RestClientCaller Method |
|---|---|---|
| https://localhost:44302/api/CRUD/GetMembers | GET | GetMembers() |
| https://localhost:44302/api/CRUD/Create | POST | Create(member data) |
| https://localhost:44302/api/CRUD/Delete?id=3 | DELETE | Delete(int Id) |
| https://localhost:44302/api/CRUD/Update | POST | Update(member data) |
| https://localhost:44302/api/CRUD/GetMembersById?id=3 | GET | GetMemberByID(int Id) |
Below is the full code from my RestClientCaller class. See the code snippet below.
 using RestSharp;
 using RestSharpDemo.Models;
 using System;
 using System.Collections.Generic;
 using System.Linq;
 using System.Threading.Tasks;
 using System.Web;

 namespace RestSharpDemo.Caller
 {
     public class RestClientCaller : IRestClientCaller
     {
         private readonly RestClient _client;
         private readonly string _url = "https://localhost:44302/";

         public RestClientCaller()
         {
             _client = new RestClient(_url);
         }
         public void Create(member data)
         {
             var request = new RestRequest("api/CRUD/Create", Method.POST);
             request.AddJsonBody(data);
             _client.Execute(request);
         }

         public void Delete(int Id)
         {
             var request = new RestRequest("api/CRUD/Delete?id=" + Id, Method.DELETE);
             _client.Execute(request);
         }

         public async Task<member> GetMemberByID(int Id)
         {
             var request = new RestRequest("api/CRUD/GetMembersById?Id=" + Id, Method.GET)
             { RequestFormat = DataFormat.Json };

             var response = await _client.ExecuteAsync<member>(request);

             return response.Data;
         }

         public async Task<List<member>> GetMembers()
         {
             var request = new RestRequest("api/CRUD/GetMembers", Method.GET)
             { RequestFormat = DataFormat.Json };

             var response = await _client.ExecuteAsync<List<member>>(request);
             return response.Data;
         }

         public void Update(member data)
         {
             var request = new RestRequest("api/CRUD/Update", Method.PUT);
             request.AddJsonBody(data);
             _client.Execute(request);
         }
     }
 }
V. Register IRestClientCaller and RestClientCaller in Unity Config
This step will handle the mapping from our interface to the actual class implementation. To do that open UnityConfig.cs inside the App_Start folder then register the component. See the code below.
container.RegisterType<IRestClientCaller, RestClientCaller>(); The full code from Unity Config will look like this.
using RestSharpDemo.Caller;
 using System.Web.Mvc;
 using Unity;
 using Unity.Mvc5;

 namespace RestSharpDemo
 {
     public static class UnityConfig
     {
         public static void RegisterComponents()
         {
                      var container = new UnityContainer();

             // register all your components with the container here
             // it is NOT necessary to register your controllers

             // e.g. container.RegisterType<ITestService, TestService>();

             container.RegisterType<IRestClientCaller, RestClientCaller>();

             DependencyResolver.SetResolver(new UnityDependencyResolver(container));
         }
     }
 }
VI. Create View and Action Result inside HomeController
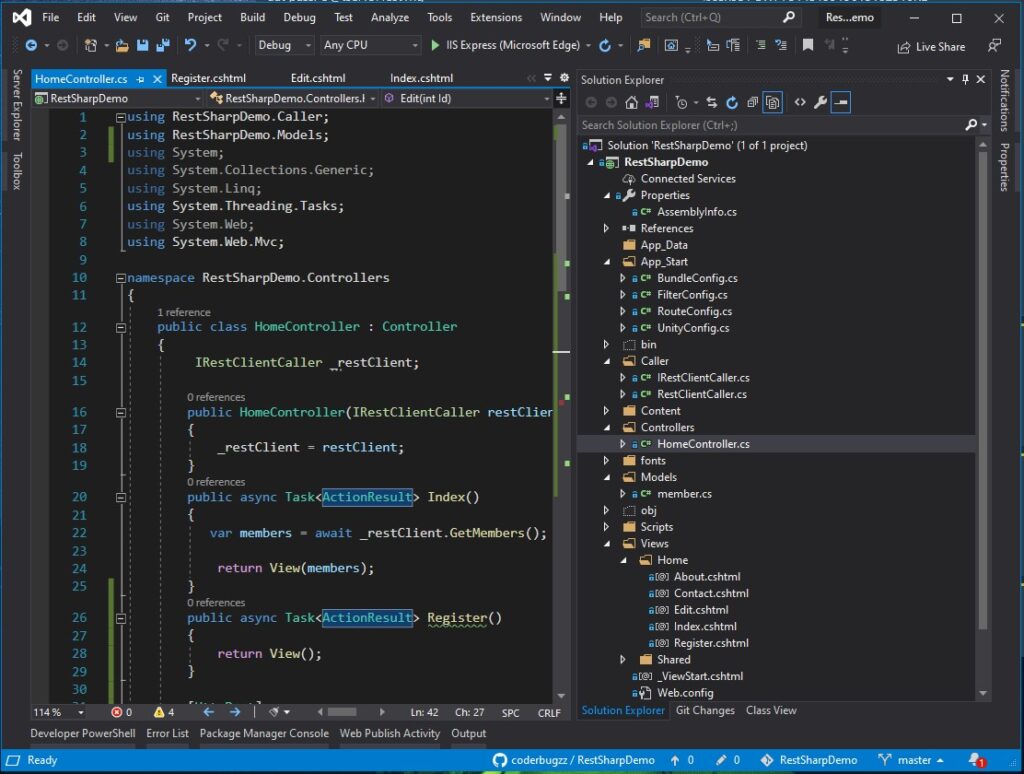
Now, all we need to do is to display the data to a view. Instead of creating a new Controller, we will use the default Home Controller. Open Home Controller and then add the action method below.
 using RestSharpDemo.Caller;
 using RestSharpDemo.Models;
 using System;
 using System.Collections.Generic;
 using System.Linq;
 using System.Threading.Tasks;
 using System.Web;
 using System.Web.Mvc;

 namespace RestSharpDemo.Controllers
 {
     public class HomeController : Controller
     {
          IRestClientCaller _restClient;

         public HomeController(IRestClientCaller restClient)
         {
             _restClient = restClient;
         }
         public async Task<ActionResult> Index()
         {
            var members = await _restClient.GetMembers();

             return View(members);
         }
         public async Task<ActionResult> Register()
         {
             return View();
         }

         [HttpPost]
         public async Task<ActionResult> Register(member model)
         {
             if (!ModelState.IsValid)
             {
                 return View(model);
             }
              _restClient.Create(model);
             return RedirectToAction("index");
         }

         public async Task<ActionResult> Edit(int Id)
         {
             member result = await _restClient.GetMemberByID(Id);

             return View(result);
         }

         [HttpPost]
         public async Task<ActionResult> Edit(member model)
         {
             if (!ModelState.IsValid)
             {
                 return View(model);
             }
             _restClient.Update(model);

             return RedirectToAction("index");
         }

         [HttpGet]
         public async Task<ActionResult> Delete(int Id)
         {
             _restClient.Delete(Id);
             return RedirectToAction("index");
         }

     }
 }
VII. Home Controller Index View
This will is the view for the index action result. This view will display the list of members inside a table. See the code below.
 @model List<RestSharpDemo.Models.member>
 @{
     ViewBag.Title = "Home Page";
 }

 <h2>List of Members</h2>

 <div class="row container">
     @Html.ActionLink("Register New Member","Register",null,new { @class = "btn btn-primary" })

     <table class="table table-bordered ta">
         <thead>
             <tr>
                 <th>ID</th>
                 <th>Name</th>
                 <th>Contact</th>
                 <th>Address</th>
                 <th></th>
             </tr>
         </thead>
         <tbody>
             @foreach (var row in Model)
             {
                 <tr>
                     <td>@row.Id</td>
                     <td>@row.Name</td>
                     <td>@row.Contact</td>
                     <td>@row.Address</td>
                     <td>
                         @Html.ActionLink("Edit", "Edit", new { Id = row.Id }, new { @class = "btn btn-primary" })
                         @Html.ActionLink("Delete", "Delete", new { Id = row.Id }, new { @class = "btn btn-danger" })
                     </td>
                 </tr>
             }

         </tbody>
     </table>
 </div>
VIII. Home Controller Register View
This view is a form that will gather and submit a new member registration. See the code below.
 @model RestSharpDemo.Models.member
 @{
     ViewBag.Title = "Register";
 }

 <h2>Registration Form</h2>

 @using (Html.BeginForm("Register", "Home", FormMethod.Post, new { @class = "form-horizontal", role = "form" }))
 {
     <fieldset>

         @Html.ValidationSummary(true, "", new { @class = "text-danger" })
         <div class="form-group">
             @Html.LabelFor(model => model.Name, new { @class = "col-lg-2 control-label" })
             <div class="col-lg-10">
                 @Html.TextBoxFor(model => model.Name, new { @class = "form-control" })
                 @Html.ValidationMessageFor(model => model.Name, "", new { @class = "text-danger" })
             </div>
         </div>
         <div class="form-group">
             @Html.LabelFor(model => model.Contact, new { @class = "col-lg-2 control-label" })
             <div class="col-lg-10">
                 @Html.TextBoxFor(model => model.Contact, new { @class = "form-control" })
                 @Html.ValidationMessageFor(model => model.Contact, "", new { @class = "text-danger" })
             </div>
         </div>

         <div class="form-group">
             @Html.LabelFor(model => model.Address, new { @class = "col-lg-2 control-label" })
             <div class="col-lg-10">
                 @Html.TextBoxFor(model => model.Address, new { @class = "form-control" })
                 @Html.ValidationMessageFor(model => model.Address, "", new { @class = "text-danger" })
             </div>
         </div>

         <div class="form-group">
             <div class="col-lg-10 col-lg-offset-2">
                 <button type="submit" class="btn btn-primary">Submit</button>
             </div>

          </div>


 </fieldset>
 }
IX. Home Controller Edit View
This view contains form to update the details of an existing member. See the code below.
 @model RestSharpDemo.Models.member
 @{
     ViewBag.Title = "Edit";
 }

 <h2>Edit Member Form</h2>

 @using (Html.BeginForm("Edit", "Home", FormMethod.Post, new { @class = "form-horizontal", role = "form" }))
 {
     <fieldset>

         @Html.ValidationSummary(true, "", new { @class = "text-danger" })
         @Html.HiddenFor(model => model.Id, new { @class = "form-control", })
         <div class="form-group">
             @Html.LabelFor(model => model.Name, new { @class = "col-lg-2 control-label" })
             <div class="col-lg-10">
                 @Html.TextBoxFor(model => model.Name, new { @class = "form-control" })
                 @Html.ValidationMessageFor(model => model.Name, "", new { @class = "text-danger" })
             </div>
         </div>
         <div class="form-group">
             @Html.LabelFor(model => model.Contact, new { @class = "col-lg-2 control-label" })
             <div class="col-lg-10">
                 @Html.TextBoxFor(model => model.Contact, new { @class = "form-control" })
                 @Html.ValidationMessageFor(model => model.Contact, "", new { @class = "text-danger" })
             </div>
         </div>

         <div class="form-group">
             @Html.LabelFor(model => model.Address, new { @class = "col-lg-2 control-label" })
             <div class="col-lg-10">
                 @Html.TextBoxFor(model => model.Address, new { @class = "form-control" })
                 @Html.ValidationMessageFor(model => model.Address, "", new { @class = "text-danger" })
             </div>
         </div>

         <div class="form-group">
             <div class="col-lg-10 col-lg-offset-2">
                 <button type="submit" class="btn btn-primary">Submit</button>
             </div>

         </div>


     </fieldset>
 }
Now, that we have placed all the code in place let’s run both DBCoreAPI and RestSharpDemo project. Then you can try it yourself if it works. If not, I will also attach the source code here for your reference.
You may publish your WEB API to the IIS to make it more of a real-life scenario. Visit this blog How to publish ASP.NET MVC in IIS.
Source Code
You may visit my GitHub Account for more FreeCode. Use this link @coderbugzz to download the source code I use for this tutorial.
Summary
This tutorial shows you how to consume an ASP.NET Core Web API using RestSharp. RestSharp makes the job easier for a developer to consume cloud restful services. As you observe from the implementation we had for RestSharp, we almost used it with a single line of code. Hopefully, this tutorial will help you make your development faster and easier.
KEEP CODING!